How much irritation, headache, and inconvenience causes water that appears on the floor near the toilet! We wonder: what could be leaking in the simplest form of plumbing? We think: is this a serious breakdown or a minor violation? And when we find that the gasket between the tank and the toilet is damaged, we call the plumbers. It is so?
With our help, you can easily deal with the problem yourself. We will introduce you to the specifics of using gaskets of different configurations. Independent home craftsmen who are not afraid of any work will find here a detailed description of the procedure for laying and fixing the seals located between the toilet and the cistern.
The valuable tips we offer will help novice plumbers. The article outlines the principle of replacing the gasket, touches on technical nuances, and gives recommendations to ensure a successful result. Photos and videos are a good help to facilitate the perception of information.
Prevention
It is customary to install polymer studs on modern plumbing kits. In terms of fastening, they are, of course, inferior to metal ones, but they also have their advantages. The main advantage is the material’s resistance to corrosion, because metal bolts are guaranteed to rust over time, and the tank leaks because of this.
Preventive measures also include regular inspection of the toilet and all its mounting elements. If you notice faults and wear of parts in time, you can avoid a number of unpleasant moments, such as leaks.
To learn how to fix a leak in a toilet, watch the following video.
Installation of an electric heated towel rail
The main advantage of an electric heated towel rail is ease of installation. Like any wall-mounted electrical appliance, it needs to be hung on the wall and connected to the power supply. All that remains is to turn on the device itself and use it for its intended purpose.
An important requirement is compliance with electrical safety rules
Such a device should be connected only through a so-called “automatic machine” or RCD - residual current device. If the socket for connecting the device will be installed directly in the bathroom, be sure to use a special device protected from moisture.
This socket is mounted in the thickness of the wall and has a special cover. In addition, the electrical appliance must be grounded.
It is believed that the option with an electric heated towel rail is not economically profitable compared to water models, as it increases heat bills. However, the power of such devices is not so great, as is the electricity consumption.
This is quite enough to dry wet terry cloth, but it does not cope very well with the role of a bathroom heater.
The choice is yours!
Types of sealing products
Known types of sealing products differ both in their configuration and in the size and material from which they are made. Each of these signs has its own characteristics.
Seal shape
In accordance with this feature, toilet cuffs are divided into the following groups:
- oval, resembling a regular ring;
- trapezoidal seals;
- cone products;
- gaskets of complex multi-circuit configuration.
Toilet O-rings are the most common type of seal used to connect the bowl and cistern.
They are used in most classic old-style designs. In modern models, gaskets of a more complex shape, resembling a truncated cone, are usually installed.
Recently, trapezoidal seals, which look like a triangle with cut off corners, have become increasingly common in foreign-made products.
In addition to the shape of the cuffs, all of them are characterized by another important property that determines the performance characteristics of the product. It involves classification according to the type of material used in the manufacturing process. https://www.youtube.com/embed/WoI7fB1HCqo
Material
Based on this feature, all known samples of seals are divided into the following types:
- elastic cuffs, which are among the most popular and cheapest products;
- silicone blanks, characterized by increased elasticity and higher cost;
- polyurethane seals, which are the most expensive in their class.
Rubber cuffs are easy to produce and have a relatively low price. This comes at the cost of poor wear resistance and the need for frequent replacement. In contrast, expensive polyurethane products are very elastic, retain their shape well and have a long service life.
Selection by issue
In addition to the cuff parameters, you need to take into account the specific dimensions of the device and the release form. It comes in three types:
- Oblique;
- Vertical;
- Horizontal.
The vertical solution is rarely used in bathrooms in the Russian Federation, due to the fact that the presence of coalition lines above the floor interferes with such a device. A vertical outlet assumes that the drain is equipped in the same plane as the floor tiles, and the pipes themselves are located in the ceiling or under the floor.
If the installation of a model with a vertical inlet is realistic, then it makes sense to use a straight short cuff made of plastic (in the shape of a cylinder). Complex additions or eccentrics will not be needed due to the location of the toilet with a vertical outlet - it is located above the sewer drain.
The cuff is needed to seal the joints and disguise them. If the connection is located in plain sight, then it is better to choose a model that matches the color of the toilet; if it is inside the plumbing, the exterior appearance does not play a special role.
An alternative type of release is horizontal. It is used more often and is considered an integral element of the toilet, directed perpendicular to the wall. It is better when it is located directly opposite the drain inlet. Then a smooth plastic cuff of short length or a model with 2 cylinders at the ends and a corrugated middle will do.
In old buildings where the pipes have not been replaced for a long time, a rubber part for a small toilet is useful (it connects cast iron pipes). When the input-output axes do not coincide, an eccentric (smooth or with a corrugated pipe) is used.
If there is a significant distance left to the pipe, sometimes a corrugation is installed, stretching it to the required size, and an eccentric (to protect the joints).
The device can fit as needed - opposite the sewer inlet, but the inlet does not fit around the circumference. Here you need to buy a short plastic corrugation of a cone shape. It does not have the same diameters on both sides. For example, it is attached to the plumbing inlet with D80 mm, and to the drain - with D110 mm. In general, when connecting a toilet with a horizontal outlet, different types of cuffs are required.
The last type of release is oblique. It is also cut in different ways (depending on the location relative to the drain cutout for the sewer). The outlet is directed at an angle of 45 degrees and, therefore, the plumbing is installed next to the pipe so that it is slightly lower in level.
If the outlet and inlet are on the same line, you will need a toilet with a horizontal outlet. When connecting an oblique outlet, short cylindrical models made of plastic are suitable if the plumbing fixtures are installed next to the pipe. Long options with corrugation are needed when the object is located at a distance from the sewer drain. The rubber part is used only for connecting cast iron pipes.
How to properly fix a leak between the tank and the toilet
If a leak appears between the tank and the toilet, then the reason is the depressurization of the device. Most likely, the problem is in the deformation of the seal, a special rubber gasket. To fix the problem, you will need to replace the gasket.
Gasket replacement steps:
- First, turn off the water supply;
- The liquid from the tank will need to be drained, possible residues will also be removed;
- There is a drain nut under the descent hatch that should be loosened;
- Then you should remove the tank by unscrewing the corresponding nuts at the fastening point;
- You will also need to unscrew the drain;
- Next you need to replace the gasket;
- Then reinstall all parts back into place.
But the cause of the problem may also be an old rusty bolt that holds the container to the bowl. Next you will need to replace the damaged part. Also, first the water is shut off and the water is drained. The bolts will need to be removed and replaced with new ones. Sealing washers are required.
Sometimes you can only tighten loose bolts. To do this, just fix the element with a key and turn it with a screwdriver. But you need to be careful not to damage the ceramic bowl. That is why it is better to replace parts rather than constantly tighten them.
Replacement procedure
The operation of updating the gasket is not so complicated that a person completely unfamiliar with plumbing could not cope with it. In order to correctly change the sealing element under the toilet tank, first of all you should consider how to attach it to the base of the bowl.
Note! Based on this feature, all systems are divided into two types: the first involves fixing the tank for drainage on a special shelf, and the second is characterized by an independent position of the fastening zone.
On the shelf
The cuff is mounted on the shelf of the bowl base. The advantage of this arrangement is the compactness and ease of maintenance of the compaction area.
Note! This method is not without some disadvantages, manifested in the low pressure of the drained liquid.
Before you remove the old one and start installing the new gasket, you should first turn off the water supply valve and disconnect the supply hose from the tank.
Then the water is completely drained from it (you can use a special valve for this), and then the mounting bolts are removed. When disassembling the bolted joint, you need to act very carefully, trying not to damage the fragile porcelain (otherwise it may simply crack).
Causes of leaks
First, it’s worth considering the signs of a leak, which should alert owners. These include the following points:
Constantly running water in the toilet.
- Monthly water consumption has increased significantly.
- When draining, the flow of water is not intense enough, since it is constantly drained and does not have time to accumulate in the tank.
- You can hear the constant, never-ending sound of flowing water.
- The appearance of rusty streaks or salt deposits in the toilet bowl at the water drainage point.
- The surface of the toilet in the area where the tank is installed is constantly wet, even if the toilet has not been used for a long time.
- There are permanent traces of condensation on the outer surface of the tank and on the pipes.
If at least one of the above symptoms appears, you should inspect the tank and the connection points of the water supply and drain pipes. These steps will help determine the area and cause of the leak. To make it easier to understand this issue, a list of possible reasons that can lead to a leak will be presented below.
The most common phenomenon is a constant leak of water into the toilet. In this case, water, of course, will not flood the room, but its consumption will increase significantly. There are several reasons that can lead to this phenomenon.
Most often, a leak occurs due to a loss of tightness in the outlet valve.
- The rubber gasket on the outlet valve that seals the drain hole has lost its elasticity due to prolonged use. The bulb, plug or membrane does not fit tightly, even under the pressure of water, and a constant, sometimes not even visually noticeable, leak occurs.
- Due to shifting or improper installation, the rubber gasket does not fit tightly to the drain hole, so water constantly flows into the toilet.
- The bulb or cork itself has lost its elasticity or has suffered mechanical damage, ruptured or become deformed.
- At the edges of the drain hole, to which the plug should be located, irregularities have appeared due to silt, small solid fragments, or salt build-up.
- Damage to the water drainage mechanism that prevents the valve from returning freely to its place - this can become a real cause of leakage, since parts are almost always made of plastic.
Another common problem is that the tank constantly overflows, and water continuously flows out through the safety overflow hole (tube). It is clear that this phenomenon is caused by a malfunction or misadjustment of the float valve.
The rod (lever) connecting the valve to the float has become unusable. During operation, a metal part may rust, become deformed, or be damaged by mechanical stress. There can also be problems with plastic levers - cracks, fractures, deformations,
Float valve with brass body
- Damage to the float valve body can also cause continuous water leakage. If the valve is made of brass, then the risk of such a problem is significantly reduced, since such products are distinguished by their durability. The same cannot be said about plastic ones.
- Wear of the valve assembly itself - even with full pressure, the water flow is not completely blocked.
- Loss of tightness of the float - water gets inside it, and it naturally becomes heavier and incorrectly controls the water level in the tank. And sometimes it doesn’t change its lowest position at all, that is, it simply drowns.
These were all leaks, as they say, internal. Water runs uncontrollably into the toilet, but there is still no risk of flooding the room. It's worse if water starts leaking outside. The reason for this may be the following malfunctions.
Damage to the connection between the flush cistern and the toilet bowl. Most often associated with deformation and loss of elasticity of the sealing parts installed between them.
The junction between the cistern and the toilet - leaks can occur here too.
- Damage to the hose supplying water to the tank, or depressurization of its connection to the float valve nozzle.
- For hanging-type tanks - depressurization of the joints of the pipe connecting the tank and the toilet.
- The appearance of a crack in the tank body.
Any of the specified causes of leakage requires a quick response. You don’t have to call a plumber to fix it; most problems can be dealt with on your own.
Temporary troubleshooting
Sometimes a problem is discovered at the most inopportune moment. Delay may result in a serious accident or create inconvenience due to the cessation of normal operation of the bathroom. In this case, the only option is to temporarily repair the damage. There are several ways:
- Cut a miniature strip of fabric and soak it with oil paint. With the help of an assistant, lift the cistern while he wraps a strip of fabric around the damaged part. To improve the result, you should tie a rag with twine, then lower the tank and install all the internal elements. You can turn on the water only after the paint has dried;
- Use a rubber band. It can be purchased at 24-hour pharmacies. Its length, width and thickness should be 1 meter 5 and 1-2 millimeters, respectively. Having stretched the tape, you need to use it to wrap the damaged gasket. Fixation is carried out using rust-resistant copper wire.
Causes of leakage
To establish the causes of the leak and eliminate it, you must first clearly identify the place where the leak is. Such leaks can be internal or external. Let's look at it in order.
Leak inside
Such a leak manifests itself in the constant flow (of greater or less intensity) of water through the drain valve or overflow pipe of the tank directly into the toilet. This leak is harmless but wastes water. Such a low-intensity leak can be visually identified by a thin stream of water that constantly flows through the toilet.
Options for troubleshooting this problem:
- Change the gaskets between the shut-off valve and the seat.
- clean the area where it adjoins the seat.
- raise the level of the overflow tube.
- adjust the float and filling valve system.
- Replace the fill valve and float.
Advice! In most of these cases, water flows through the overflow tube, so you need to start repairs by adjusting the water level in the tank.
A properly adjusted system closes the fill valve when the water level in the tank is below the top edge of the overflow tube. As a rule, this is enough to eliminate such a leak.
Wet outside
If you have water on the floor under the toilet, you should take a very responsible approach to finding out where it is leaking and for what reasons. With some faults of this type there is a significant risk of a major flood. According to the law of meanness, this usually happens at night or in your absence, so it causes maximum harm.
There may be nothing wrong with your tank at all. Simply due to the temperature difference between the water entering the tank and the room, quite powerful condensation can form, which flows onto the floor and forms puddles.
This effect is observed in cold weather with intensive drainage - the water is constantly renewed and does not have time to warm up.
To eliminate this phenomenon, you can install a partial drainage system - half the volume of the tank is poured out at a time. The incoming cold water is mixed with warm water and much less condensation is formed.
Another reason is a severe internal leak. Remedies are described in the previous chapter.
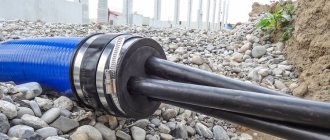
Leak in flexible hose.
Probably the most dangerous defect that can lead to catastrophic consequences.
If, upon inspection, you find that water is flowing from the water supply connection, then you need to tighten it or replace the gaskets in it.
Flexible rubber hoses with external reinforcement are usually of rather low quality. Over time, in addition to cracks on the hose itself, the bushings into which this hose is pressed also become subject to corrosion, so there is a possibility that when the gasket is pressed, the fitting will be torn off and a fountain will occur. And this is not the worst option; the fitting may burst even in your absence.
Advice! Don’t take risks - replace such hoses with special plastic, metal-plastic connections or stainless steel tubes.
Leaking from under the tank.
Another type of external leak. It occurs when the seal between the tank and the toilet is broken. The intensity of such a leak depends on the degree of damage and can be quite dangerous.
There are two main types of connection between the cistern and the toilet - a hanging cistern connected by a pipe to the toilet drain hole and a cistern installed directly on its bowl. Let's consider options for eliminating leaks in the second, modern type of installation.
Loosening of fastening threaded connections. When installing a tank on steel threaded rods, corrosion occurs over time, even to the point of destruction. In this case, distortions and, accordingly, the appearance of cracks and leaks are possible.
If you find such a defect, you need to replace the fasteners and, if necessary, the seal between the tank and the toilet.
Damage or physical wear of the rubber sealing gasket.
Rubber is a material that is not particularly resistant to changes and temperature fluctuations, so over time it loses its plasticity and becomes covered with cracks and potholes. Such a gasket can no longer reliably perform its functions and must be replaced with a new one.
Crack, cracks on the body of the tank and or toilet.
Quite rarely, but still there are cases when, during unprofessional installation, usually due to excessive tightening of the fasteners, cracks appear on the earthenware. This situation is very unpleasant and its solution is to replace the cracked device with a new one.
Advice! The drainage system is a low-pressure system, and therefore does not require increased strength of connections.
If the cracks are small and do not significantly affect the strength of the structure, you should try to seal them with silicone sealant. To do this, you need to thoroughly clean, degrease the area being treated and apply a layer of sealant to it from the inside. A strip of small mesh plaster mesh additionally reinforces such a seam.
First aid
Since gaskets are most often made from rubber, there are many concerns about their durability.
It is no secret that with constant contact with moisture, rubber products gradually lose their elasticity, harden, and begin to crack. And even small cracks can see water, which is the first cause of gasket damage. You can understand that the seal has become unusable based on several signs.
- The appearance of liquid on the floor covering of the restroom. If the liquid has nothing to do with the formation of condensation on the toilet tank in the winter, as well as with valve leakage, then this is a leak associated with the unsuitability of the gasket.
- A visual inspection of the seal showed obvious damage. To carry out this operation, you must completely remove the tank from the toilet. If the inspection does not reveal any visible damage, it is necessary to feel the gasket. If the part is too rigid, it is better to replace the seal.
Types of sealing products
Known types of sealing products differ both in their configuration and in the size and material from which they are made. Each of these signs has its own characteristics.
Seal shape
In accordance with this feature, toilet cuffs are divided into the following groups:
- oval, resembling a regular ring;
- trapezoidal seals;
- cone products;
- gaskets of complex multi-circuit configuration.
Toilet O-rings are the most common type of seal used to connect the bowl and cistern.
They are used in most classic old-style designs. In modern models, gaskets of a more complex shape, resembling a truncated cone, are usually installed.
Recently, trapezoidal seals, which look like a triangle with cut off corners, have become increasingly common in foreign-made products.
In addition to the shape of the cuffs, all of them are characterized by another important property that determines the performance characteristics of the product. It involves classification according to the type of material used in the manufacturing process
Material
Based on this feature, all known samples of seals are divided into the following types:
- elastic cuffs, which are among the most popular and cheapest products;
- silicone blanks, characterized by increased elasticity and higher cost;
- polyurethane seals, which are the most expensive in their class.
Rubber cuffs are easy to produce and have a relatively low price. This comes at the cost of poor wear resistance and the need for frequent replacement. In contrast, expensive polyurethane products are very elastic, retain their shape well and have a long service life.
Overview of species
The stores offer a large selection of toilets. They not only differ in manufacturer, shape, and material of manufacture, but also have different components. Therefore, if you need to replace the sealing gasket when visiting a store, it is better to have a sample removed from the toilet. Its presence will help you accurately select a new spare part and save you from going to the store again.
If it is not possible to remove the old rubber band intact, then it is necessary to visually determine its parameters. The main indicator that distinguishes these parts from each other is their shape. They are round, oval, trapezoidal. Less common are cone gaskets for intake and exhaust valves.
Round
This form is the most common. Round seals are installed on most older toilet models.
Oval gaskets are also used in many models of domestically produced plumbing fixtures.
Trapezoidal
This type of sealing rubber is installed on new models of imported toilets. The shape of such gaskets resembles a triangle with truncated corners.
Other
This type includes rare conical gaskets and products made in the form of a multi-contour figure.
Structure of the cistern
Components that make up a drain tank.
Over several decades, the design of the drain tank has undergone minimal changes. Just like half a century ago, parallel to filling, the float rises, ultimately leading to blocking of the water flow.
The operation of modern drainage systems is ensured by three components, which include:
- Float.
- Leverage.
- Pad.
The mechanism works as follows: when water is drawn into the tank, when it reaches a certain level, it is shut off by means of a shut-off valve. When you press the drain lever, the water drains.
The main malfunctions that occur in the drain tank
The toilet tank gasket is not always to blame for a leak. Therefore, before starting work, you need to determine the nature of the leak. The table below will help you with this.
A toilet leak is not always the fault of the gaskets. The photo shows setting the float level.
| Type of malfunction | Cause | Remedy |
| Water flows into the tank continuously. | There may be several reasons for this phenomenon:
| The problem is solved by installing the float horizontally (if we are talking about skew) or by replacing it. If there is no possibility of replacement, then for a while you can tightly wrap the float in a plastic bag in order to protect it from water ingress. |
| The water in the toilet does not stop flowing. | Most likely, your drain valve diaphragm is damaged. | The problem is solved by replacing the membrane. To do this, it is necessary to disconnect the drain pipe from the product, after which the membrane is replaced. A new gasket under the toilet tank is also needed here. |
| The tank is leaking. | This could also be caused by:
| In the first case, the leak is eliminated by replacing the bulb. In the second, you need to disconnect the bulb by cleaning its seat with sandpaper. Your goal in this case is to eliminate corrosion and deposits. |
| Leak between the cistern and the toilet. | This problem can also be caused by the gasket between the tank and the toilet being cracked or not installed correctly. Technicians call this phenomenon “stuck gasket.” | First of all, you should check the rubber lining under the toilet. If it is installed incorrectly, give it the correct position and connect the structure again. If the reason is that it is cracked, then it needs to be replaced. The price of the gaskets is low, and therefore such a replacement will not hit your wallet. |
| Water flows out. | There may be several reasons for this problem:
| In the first case, you just need to tighten the nut. This is a fairly common problem with such leaks. A cracked nut must be replaced. If you find a crack in the tank itself, then it needs to be replaced. |
| Water is leaking from the cistern. | Perhaps the reason for this is the incorrectly set height of the button, in which the valve is located above the drain hole. Due to the gap formed, leakage occurs. | The problem is resolved by adjusting the height of the button. |
| Water leaks in the toilet when the tank is filled. | Most often this occurs due to the fact that the shut-off valve simply does not shut off the water. | The first step is to determine the valve defect. To detect it, press the valve with your hand - the water flow should stop. If this is the case, change the gasket for the wall-hung toilet yourself. If this does not help, change the valve. |
Toilet replacement
Assembly of sanitary ware. The pad is installed correctly.
If you have an old toilet, sooner or later you will have to replace it.
And the following instructions will help you do everything correctly:
- First you need to determine the shape of the outlet, which can be horizontal, floor-mounted or inclined. You need to purchase the same type of product as you had before.
- The simpler the design of the tank, the more durable the plumbing will be.
The simpler the reinforcement, the less likely it is to fail.
- Do not forget to purchase an additional set of gaskets, in this case, if a leak is detected, you will not need to go to the store, and you will be able to quickly fix the problem.
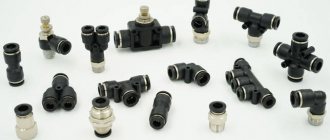
Various types of plumbing gaskets that should always be on hand.
- If you do not have experience in changing a toilet, then it is better to trust a specialist.
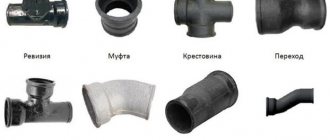
Type of connecting part
Toilet design.
Sometimes the breakdown is caused by external faults. This is especially true for those in which the flush cistern is connected to the neck of the toilet using a rubber cuff, which dries out and cracks after a certain period of use. This part cannot be repaired, only replaced.
The toilet cuff is a sealed connecting piece. The main task of this part is to connect the toilet with a pipe that drains domestic and household wastewater into the sewer system. This part is produced in various sizes and can be either straight or eccentric.
The cuff consists of two cylindrical surfaces that are joined together. Their longitudinal axes can be shifted relative to each other. This eccentricity is needed when its outlet and the inlet pipe of the sewer pipe do not coincide with each other. For various installation options for the toilet, a long connecting part and a short one are produced.
Stages of toilet installation.
Another type of connecting part is a corrugated cuff. The versatility of this part manufacturing option lies in the possibility of using it in particularly complex toilet installation options. The corrugation allows you to perform the necessary maneuver on the area of the bathroom, installing it at any angle, and also allows you to move the toilet to a place convenient for you. The main thing to remember when using corrugation is that the required slope must be made.
It is very easy to detect water leakage from under the cuff or directly through it. To do this, you need to place one palm under the connecting piece, and with the other hand simply press the tank release mechanism. If water spills into your palm, it means the cuff has become unusable. It would be good if it was simply pulled off the neck of the toilet by a lopsided one. Fixing such a leak is quite easy. To do this, you need to position and support the tank with some kind of stand and then tighten the nuts of the screws that connect the toilet and the shelf. After this, we pull the cuff back into place. For a more reliable fixation, you can secure it with wire.
Installation nuances
Pay attention to the following details:
- what kind of drain - oblique or straight;
- symmetry of the body;
- there should be no distortions on the seating surfaces of the tank and toilet body;
- When purchasing, check all fittings, seals, rubber bands;
- fastening bolts must be equipped with conical washers and rubber bands;
- during installation of the connection between the drain and the sewer pipe, it is advisable to treat it with liquid silicone;
- the place where the toilet is attached to the floor is treated with white or transparent silicone.
The toilet body must be installed horizontally without distortion. The tank mounting bolts are tightened gradually by half a turn one at a time.
The visor bowl is an intermediate option in the design of the toilet between the plate and funnel-shaped ones. Features 100% protection against water splashing on the body. But men need to remember that the angle of incidence of the liquid on the bowl is equal to the angle of reflection.
Gasket for drain mechanism
The gasket for the drain mechanism is a quickly worn part.
The time for replacement comes when water begins to seep into the bowl in a continuous stream, and with it your money.
Silicone and polyurethane gaskets last longer than rubber ones.
Testing
Before putting the toilet into operation, check the tightness of all connections. Flush testing can be done at home. To do this, apply drops of ink along the edges of the bowl around the perimeter and try to wash them off. If the ink comes off the first time, the result is excellent. Toilets with circular flush cope best with this task. To prevent water from getting on the body, it is better to buy models with an inclined visor bowl.
The Basics of Total Sealing
By complete tightness of the toilet we mean the tightness of all connections:
- between the bowl and the tank;
- sewer pipe and housing;
- tightness of the side water supply;
- tightness of the trigger mechanism.
Lack of airtightness leads not only to problems with neighbors on the floor below. But also financial losses. Worn shut-off valve gasket increases water consumption and charges.
Purpose
When assembling a “bowl plus cistern” toilet pair, it is impossible to do without a reliable cuff that connects them into a single whole. It is necessary not only to form a high-quality joint between the two parts of the toilet structure, but also to ensure its tightness.
The reliability of the functioning of the entire system as a whole depends on the condition of the connecting gasket between the tank and the toilet. In this case, there should not be any leaks in the connection area. The operating water pressure in the drain channel must be maintained at an optimal level.
When the gaskets are in perfect condition, the bowl and tank become one, guaranteeing the maintenance of cleanliness and order in the sanitary area. To achieve this state, you should learn how to choose the right element, on which the service life of the toilet pair depends.
The toilet cuff between the cistern and the toilet should perform the following functions:
- creation of a single monolithic structure “toilet plus cistern”,
- use as an elastic insert that cushions the joint area between two fragile ceramic surfaces,
- preventing leakage in the joint between parts of the product.
Note! The two-component system installed in the toilet should be easy to disassemble if necessary, which is very important in case of repairs.
During restoration work, even with a well-preserved seal, experts advise replacing it with a new elastic product of the same shape (this will not make things worse). In this case, one should highlight the situation when, due to a slight displacement relative to the bowl, it does not stand quite level.
Features of the screed
It would seem that the process of tightening the parts could be simpler when all the manipulations with the gaskets are behind us. However, the procedure for fastening toilet parts has certain features.
Screwing the nuts onto the threads of the bolted studs must be carried out evenly, alternating with the bolted connections. The pressure force should be moderate, the tightening intensity should be correctly calculated. You should not overtighten the connections; it is enough to stop at the stage when the gasket is visually and by touch tightened to the required level.
Retightening is especially not recommended in places where polypropylene screws are used. Experts recommend replacing plastic fasteners with metal ones: this way you can achieve manufacturer-guaranteed reliability.