To carry out renovations in a bathroom or during construction, it is necessary to move an old faucet or install a new one. There is a need to install a device such as a water socket for a mixer. These are types of fittings that allow apartment and house owners to install various plumbing fixtures and change them quite easily. The advantages that are available when using modern designs:
- installation of plumbing is carried out when the final finishing of the room is completed;
- quick change of plumbing fixtures is available without complex work related to the pipeline;
- The installation and replacement of mixers and taps is greatly simplified.
Modern water sockets for a bathroom faucet can be in the form of a pair of sockets for hot and cold water on a common strip.
The mixer distance for most manufactured models is standard and equal to 150 mm. Water sockets for the mixer should be installed strictly at this distance.
What is a water socket?
This is a type of fitting, a device for connecting a plumbing fixture to a water supply.
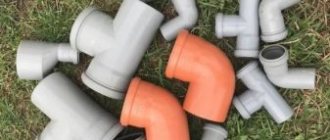
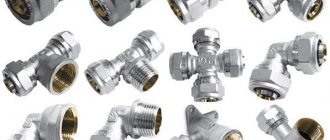
Most often this is a threaded fitting with bosses with holes for attaching the fitting to the surface. There are from two to four mounting holes. A large number of fittings are produced, which differ in design and materials of manufacture. These devices are: 1. Single - designed for use with a single water supply line. 2. Double solid - two in one block for connecting two connected lines. 3. Double on a common bar - two, located at a certain interval on one bracket. They are made from ferrous and non-ferrous metals, alloys, and synthetic materials.
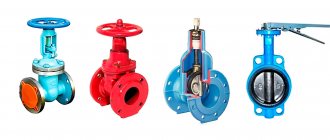
Wall options are:
- threaded;
- crimping;
- on pressure testing;
- self-fixing.
Each type has its own characteristics, advantages or disadvantages.
Threaded water sockets
It is clear from the name that the joining of pipes is carried out using a threaded connection. It must guarantee tightness and not depend on the temperatures used, that is, maintain quality under any conditions. The most important thing in this case is high-quality carving. Of course, the material also plays an important role.
It might be interesting: How best to cover the space under the bathroom with a screen
Threaded types differ:
- long service life;
- simple installation, repair and maintenance without specialized equipment and destruction;
- reliability during operation due to excellent tightness;
- impact resistance.
Crimping types
In this type, the means of fastening is a collet. This is a bushing used to fasten cylindrical parts. The collet is installed between the inner and outer parts, ensuring tightness.
Advantages of crimp options:
- low price;
- long service life;
- ease of installation;
- a large selection of various design parts on the market;
- reliable tightness;
- Possibility of disassembly and reuse.
Water inlets with crimping
Devices of this type are connected to the main line by soldering using a special device. Advantages:
- minimum details;
- versatility;
- small sizes;
- high durability;
- long period of use;
- reliability;
- convenient height of water sockets;
- low price.
The disadvantages of this design include the need to use special tools and the impossibility of reuse.
Self-fixing species
Appeared on the market recently. Main advantages:
- disassembly of the device;
- possibility of reuse;
- reliability;
- versatility;
- ease of installation.
Connection types
The classification of water sockets by connection type is the most extensive
It is directly related to the options of materials used to create the fitting, but these are only details of the range of manufacturing companies, so it is worth paying attention to the types of connection with the main pipe
They can be self-locking, crimp, threaded or even pressed. Each type of connection has many features that make them more attractive from the point of view of operation and installation. They are most obvious in the example of crimp water sockets.
At the heart of their connection is a special bushing, the so-called collet. It has a cylindrical shape and is clamped between the outer and inner parts, due to which it provides the necessary tightness. The undoubted advantages of this connection:
• Modernity of the method.
• Relatively low cost.
• Easy to install.
• Widespread.
• Tightness.
• Recyclable.
An older connection option is threaded. Its main disadvantage is the need to comply with operating conditions, since an alternate increase and decrease in the temperature of the water passing through the water supply can significantly reduce the tightness of the connection.
On the other hand, there are many advantages:
• High impact strength.
• Easy to dismantle and reuse.
• Durability.
As for press water inlets, they have a more serious drawback.
They cannot be installed without special equipment, and in addition, such a connection is non-separable, so it will not be possible to dismantle and re-install such a fitting. They are connected to the supply water supply by soldering, which is the main difficulty in using them
At the same time, they are quite inexpensive, versatile, compact, and most importantly, durable.
Important: polypropylene and PVC elements are incompatible with each other, and when soldering they will not provide a tight connection. The last, but sooner to appear option is self-locking fittings
The last option, but sooner appeared, is self-locking fittings.
This version of water sockets is a complex design with a connection based on internal rings, including toothed ones, which are responsible for connecting the elements.
Their main advantage is the trouble-free repeated installation and dismantling of the product, as well as its reuse.
Classification
Parts for connecting household appliances and showers are divided according to several criteria. Classification by purpose:
- for heating systems;
- for cold water supply;
- for hot water supply.
Separation by number of connection holes:
- Single - only one line can be connected to them.
- Double solid water inlet.
- Double parts, the holes of which are located on one strip at a distance from each other.
- With three or four holes.
Separation by fitting material:
- Made from stainless steel. Withstand pressure of no more than 20 atmospheres.
- Made from PVC. Suitable for installation on cold water supply systems. The coolant temperature should not exceed 40 degrees.
- Made from polypropylene. Water sockets for metal-plastic and plastic pipes are used to connect cold and hot water supply pipes.
- Made from galvanized cast iron. Cheaper than products made from pure stainless steel, however, if the protective layer is damaged, rust will begin to appear at the site of the damage.
- Brass, bronze. Practical, inexpensive. Suitable for hot and cold water.
When installing water sockets, the material from which they are made plays an important role. For example, you cannot combine parts made of PVC and polypropylene. This is due to the fact that they are incompatible for soldering.
Varieties
The classification of water sockets is based on a number of criteria. Let's look at them in a little more detail.
1. Scope of application. According to this criterion, water sockets are:
- for cold water supply;
- for supplying hot water;
- for heating.
The last two types of water sockets are similar in many ways.
The situation is different with cold water supply systems. They are created using fittings for metal-plastic pipes made from a plastic mass that does not lose its strength properties at a temperature not exceeding +30۫С.
2. Material of manufacture. Water inlets are made from:
- galvanized cast iron;
- brass and bronze;
- of stainless steel.
Water inlets are made from steel, brass, bronze, PVC, polypropylene, and can also be combined
In addition, advances in the field of polymer technology have created the prerequisites for the production of similar elements from PVC or polypropylene. This was mentioned above.
3. Configuration and shape of connectors. According to this criterion, water sockets are of the following types:
- with a short or long strap for fastening;
- with three and two holes for fastening;
- single and double.
Selection of water sockets
Before you begin to consider the rules for installing water sockets for connecting various plumbing equipment, you need to find out what devices are produced and what they are intended for.
Water sockets for kitchens and bathrooms can be classified according to three criteria:
- type or number of bends;
- material of manufacture;
- method of attachment to pipes.
Types of water sockets
Depending on the number of outlets, water sockets can be:
- single (picture above). Such devices are used to connect one pipeline, for example, for a washing machine, dishwasher, hose, and so on;
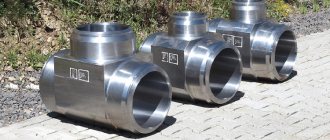
- double solid. Used for simultaneous connection of two different highways;
Double solid water socket
- double, mounted on a relief strip. The devices are also used to connect equipment, such as a faucet, to two lines for a bathroom sink.
Double water socket on a relief strip
The main advantage of a double water socket on a raised strip compared to a double solid water socket is the ability to adjust the interaxial distance, which allows you to connect, for example, different types of faucets without replacing transition elements.
What materials are they made from?
To make water sockets for a bath or kitchen, the following are used:
- stainless steel. The fittings are distinguished by a high safety margin (withstand pressure up to 20 atmospheres) and high cost (on average 800 rubles). Can be used to connect pipes made of various materials;
- galvanized cast iron. Fittings are cheaper (approximately 200 rubles), but no less durable. A significant drawback is the susceptibility to rust formation when the protective coating is damaged;
- brass, bronze and other alloys. The average cost of fittings is 100 rubles. The devices are no less durable than previous versions, can be installed on pipes made of various materials, are not subject to rust, and are durable. Brass and bronze are the most popular materials;
- PVC and/or polypropylene. Plastic water sockets are characterized by minimal cost (about 40 rubles), durability, and inertness to corrosion. Recommended for use only on pipes made from similar materials.
We recommend reading: The principle of operation of an air conditioner: technical diagram of the device
Double water socket made of polypropylene
Methods for attaching water sockets
Another parameter taken into account when choosing is the method of installation of plumbing equipment. Attaching water sockets to pipes can be done:
- on the thread. The advantages of a threaded connection are a detachable connection, which allows repair work without replacing the device, durability, ease of installation without the use of special equipment;
Threaded fitting
To achieve tightness of the threaded connection, special sealing materials are used, for example, sanitary flax or FUM tape.
- using a crimping collet. The device is easy to install and can be removed for repairs. The connection is sealed without the use of additional materials;
Fitting fixed with a collet
- by soldering method. Press water inlets are distinguished by the maximum level of tightness, reliability and versatility. Special equipment is required for installation.
Soldered fitting
Wiring diagram for the bathroom and toilet
When performing plumbing work in these rooms, 3 methods of laying metal-plastic pipe products can be used.
Serial connection system. This option involves connecting each plumbing fixture to the main pipe using a separate tee. It is relevant for bathtubs that contain a minimum number of objects (faucet, washing machine). It is possible to implement a sequential scheme after finishing the finishing work in the room by means of open laying. The assembly process looks quite simple: the pipe is laid from object to object, and the supply element is simultaneously removed from the tee.
Wiring with pass-through sockets. Here the technique is similar, only sockets are used, not tees. This scheme is most widespread in private homes, since it involves laying long pipes. Here you need to know that to provide the necessary pressure you will need to install an additional pump.
With a sequential wiring scheme, the water supply can be laid openly, without cutting walls for pipes and water sockets
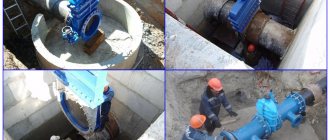
Efficient collector system. This practical and reliable option involves connecting to the central pipe of each object through a supply pair. A manifold for metal-plastic pipes allows you to turn off or regulate the water supply to a separate plumbing fixture. The collector is placed together with the control devices in a special cabinet. This technical solution has the following advantage: if one of the objects (mixer, washing machine) fails, there is no need to completely disconnect the bathtub from the water supply - just turn off the corresponding shut-off valve.
How to choose a water socket
To choose the right water socket for a mixer, tap, washing machine or other equipment, you need to consider the following factors:
- fitting material;
- device type;
- method of connection to equipment;
- manufacturer.
What materials are water sockets made from?
Water outlets intended for installation both in the bathroom and in any other place can be made:
- made of brass. The most popular material, characterized by strength, inertness to chemical impurities, resistance to temperature and pressure changes, as well as low cost;
- made of stainless steel. A more expensive material with similar properties compared to brass water sockets;
Water inlets made of stainless steel are not recommended for installation on systems with an internal pressure of more than 20 bar.
- made of cast iron. The material has a high safety margin, which allows the use of fittings on pipelines with high levels of pressure and fragility. We install water sockets made of cast iron exclusively in a hidden way, this will prevent any mechanical impact;
Cast iron fitting for plumbing systems
- made of plastic. Plastic sockets are absolutely inert to chemical attack, can withstand high temperatures and pressure, and are characterized by minimal cost. Recommended for use on polypropylene pipes, PVC pipes or metal-plastic pipes;
Plastic fitting for connecting plumbing fixtures
- from copper, bronze and other similar metals. Expensive fittings, characterized by a maximum margin of safety under any circumstances. It is recommended to install on pipes made of similar material.
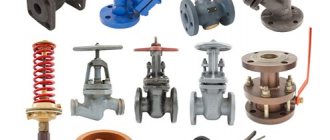
Types of fittings
After determining the material for making the fitting, you can begin to select a model.
Water outlets can be:
- single (pictures above). Used to connect one source of water intake or heating tap;
- double.
A double water socket can be designed:
- for connecting two water intake points to one pipe, for example, for connecting a tap and for a washing machine;
Water socket with one connection and two outlets
- for connecting one equipment to two pipes, for example, a faucet in a kitchen or bathroom. Such equipment is supplied on a support bar. The strip for water sockets can be cast or composite.
Double water socket on a composite strip
Connection methods
Water outlets can be equipped with the following systems for attaching to pipes and plumbing equipment:
- threaded (pictures above). Threaded fittings are easy to install, low cost and reusable, which is especially important for repair work;
To achieve a tight connection when using a threaded fitting, it is recommended to use special sealing materials, which include FUM tape, flax thread, and so on.
- crimping The fittings are distinguished by a high level of tightness, which is achieved due to the presence of an additional element in the device - a crimp collet, fixed with a nut;
Crimp fitting
- press. The pipes are fastened to the press water socket using special equipment. Among the advantages are a high level of tightness and resistance to high pressure, which allows the fittings to be used in specialized plumbing or heating systems.
Fitting with press fastening equipment
Manufacturers
An important aspect when choosing a water socket is to identify a manufacturer that produces reliable and durable fittings.
Such manufacturers are:
- Valtec (joint Russian-Italian production). Advantages: low cost, adaptability to Russian systems, high quality.
- UNI-FITT (Italy). Fittings are made from high quality raw materials. Product quality control is carried out at all stages of production, which allows us to obtain reliable components for plumbing and heating systems.
- Rehau (Germany). Rehau is a popular brand on the Russian market, characterized by a high degree of reliability and a long service life.
- Uponor (Finland). The company specializes in the manufacture of high-strength fittings for sinks, bathtubs or other plastic equipment.
Design Features
For the installation of modern water supply systems, metal-plastic pipes and fittings are often used. This material is non-corrosive, durable and easy to install and maintain. For such systems, connecting elements appropriate for their intended purpose are selected: tees, press connections, etc. Polypropylene, polyvinyl chloride and other pipes are no less popular; fittings for them are also available in a wide range.
Different types of pipes are used for water supply; fittings for them are plastic or metal
As for the water socket, it acts as a fastening of the outlets of the water supply system to the wall and connecting them to the taps. A special feature of this element is that its design includes a fastening strip and an adapter fitting (socket). The fastening bar is usually made of steel due to its higher strength compared to similar samples made of metal-plastic or plastic. On this part itself there is a connector in the form of a coupling. On one side there is a thread for connecting a water supply hose or mixer, and on the other side it is connected to the water supply system.
Standard rules for installing water sockets
What are the rules for installing water sockets for a shower, for a sink or bath faucet, for a toilet, for a washing machine or dishwasher? What is the optimal installation height for equipment?
Bath
In accordance with SNiP 3.05.01-85 the following standard applies:
- the tap should be located above the bathtub at a distance of at least 20 cm;
- mixer installation height from the floor – from 80 cm;
- if the mixer is used exclusively for drawing water into the bathtub, then it is recommended to install water sockets at a height of 20 cm - 25 cm from the side of the plumbing;
- if you plan to install one mixer for a bathtub and a sink, then the installation location is chosen so that the device is located 25 cm above the side of the bath and 30 cm above the washbasin;
- The installation depth depends on the size of the mixer.
We recommend reading: Water pressure reducer: how to adjust and configure an apartment’s water supply system
Recommended bathtub faucet installation parameters
For installation of equipment in medical institutions, other standards are used. The faucet for the sink or bathtub is installed at a height of 110 cm from the floor level. The tap in the shower stall is mounted at a height of 120 cm - 150 cm from the tray.
Sink
Water outlets for a standard sink (85 cm from the floor and 20 cm height) are installed:
- under a sink with a cabinet, unless other requirements are established by the equipment manufacturer, at a height of 62 cm from the floor. The distance between water outlets in this situation is 8 cm;
- for a large cabinet: height – 62 cm, center distance – 10 cm.
Standard parameters for placing water sockets
Other equipment
Water outlets intended for other equipment are located at the following heights:
- 55 cm - 60 cm from the floor for a kitchen sink. The standard center-to-center size of the water socket is 7.5 cm;
- 70 cm – 75 cm for a hygienic shower;
- 18 cm for a floor-standing toilet;
- 23 cm for a wall-hung toilet;
- 110 cm for heated towel rail;
- 50 cm – 85 cm for washing machine.
How to determine the depth of placement of water sockets yourself, watch the video.
Preparation for installation and selection of tools
Installation of a water outlet should begin with preparation. First, the material from which the parts will be made is selected. The choice is influenced by what coolant the line will work with. Next you need to select the type of fitting:
- Combined angle PP D20x1/2 VR, which is attached to the wall. Used for mounting on a wall surface. If desired, it can be fixed inside the walls.
- A 90 degree elbow that has ½ inch internal threads. Used for installation inside walls.
- Two combination squares, complete with a bar for fastening the PP D20x1/2 VR. The angles are located at a certain distance from each other. This fitting is used for installing faucets in shower stalls or bathtubs.
The tools you will need are a hammer drill, mounting bolts, a drill, a measuring tool, and a set of keys.
Tools for installing a water socket
Installation
In the design process, to determine the location for sockets, first of all, you need to decide on the material from which they will be made and the type of products, since this will determine the further procedure.
Depending on the plumbing fixtures planned for connection and the location of their attachment, various types of fittings are used:
- A combination-type elbow with a 1⁄2-inch internal thread and a special outlet for a standard polypropylene pipe with a cross-section of 20 mm.
- Combined square with marking PP D20x1/2 BP. It has additional fastening, which makes its installation justified both when installed in grooves and when placed openly.
- Set of two corner elbows on a bar. The water socket is perfect for securing a standard faucet in the bathroom. It consists of two identical squares, separated by a certain distance and securely fastened to a bar, which, in turn, is attached to the wall. Professionals do not really like this method of installation, since they have to weld two pipes at once.
The installation of a water socket itself can be:
- Hidden (secret) with fixation using cement mortar.
- Concealed with fastening with anchor dowels.
- Hidden using polyurethane foam.
- Surface with fastening the mounting strip, or using anchor dowels.
The hidden installation method involves installing pipes and the water socket itself in grooves. In this case, only the outer part of the threaded fitting protrudes from the wall. Metal water sockets are not suitable for this installation method, since stray currents will arise at the points of their contact with concrete or cement, causing oxidation of the metal.
After selecting water sockets and purchasing all the necessary materials, you can begin the installation process, which will consist of several mandatory steps.
Marking
Polypropylene pipes in grooves are always laid with a certain margin. Subsequently, they will be trimmed to the level of the horizontal markings.
After completing the welding work, the pipes are removed into niches, after which, in accordance with the developed project, vertical and planar markings are made on the wall:
- For a standard wall-mounted faucet, the distance between the centers of the water outlets should be exactly 150 mm.
- For other consumers this value may well be different.
Preparing the pipeline for soldering
Upon completion of a set of preliminary measures, marking and cutting of polypropylene pipes, the final fitting of all elements is carried out. Once again, it is necessary to check that all threaded elements are in place, with a permissible deviation not exceeding 5 mm.
Note! If one of the pipes turns out to be shorter than the other, it can be extended. To do this you will need: a piece of pipe of the same diameter with a length margin of about 5 cm, a polypropylene coupling of the required cross-section and proper welding experience. The strength characteristics of such a connection will be practically not inferior to a solid pipeline.
Spike
Any elements made of polypropylene are connected using a special welding machine. For one-time soldering work, it is not necessary to buy a tool; it is not cheap, so a good solution would be to rent the device, or invite a specialist who will not only perform this part of the work efficiently, but also provide a guarantee for his services.
The operating principle of the welding machine is to strongly heat the ends of the polypropylene elements. For this purpose, the pipe is placed on a Teflon nozzle, preheated to 200-250 degrees. At the same time, the coupling is inserted into another nozzle. The elements are held in this position for 3-4 seconds.
We recommend that you read: Which heating is better and how to install it in a private house
It is not recommended to overexpose polypropylene, since when overheated, it can form voids during jointing, which negatively affect the strength of the contact point.
The heated elements are removed from the device and tightly connected to each other. In the first 5-10 seconds, minor calibration of the structure is allowed. During this time, the water socket must be aligned in height and along the axis of rotation.
We recommend reading: Electric boiler Galan: technical specifications and installation
Having placed the structure in the proper position, it needs to be fixed for a while (usually a few minutes are enough), after which you can safely release it.
Cooled polypropylene forms a strong and durable joint. It is not recommended to use the water supply until all elements have cooled completely. This can lead to the formation of microcracks and reduce the service life of the structure.
Calibration
After completing the welding work, the finished pipeline must be securely fixed in the thickness of the wall. The final position of the water socket will depend on the finishing material:
- Plastered or painted wall. The water outlet is fixed in the plane of the wall.
- Wall tiles are expected. The water outlet protrudes above the wall plane by the thickness of the tile plus 3-5 mm adjustments for the adhesive layer.
The position of the water socket is considered normal when its plane exactly coincides with the plane of the wall finish, or is recessed a short distance (5 mm or less). Protrusion of the structure outward will make it impossible to accurately install the mixer, since there will be a gap between the reflectors and the wall.
Final check and sealing of seams
At the end of all stages of work, the system must be checked. To do this, all loose threaded connections are closed with plugs and water is supplied to the system at the operating pressure level. After 10-20 minutes, the pipeline must be carefully inspected for leaks, paying special attention to the joints.
If the structure has passed all tests with honor, you can begin sealing the grooves and final wall cladding.
Distance between pipes when connecting a mixer
Before installing the mixer, pipes with cold and hot water are installed, and the outlets are supplied to the place where the mixer is attached. At this stage, you should know the distance between the pipes when connecting the mixer; this parameter should be selected based on SNIP standards and usually it is 15 cm, with a deviation of 1.5 cm in both directions.
Pipes under the sink
The size of the pipe connected to the mixer is half an inch, and based on this parameter, if necessary, you should take care of additional adapters. Installing a faucet in a bathroom, shower or kitchen has its own characteristics and nuances that should be paid attention to even at the initial stages of pipe installation.
Installing a faucet in the kitchen
When installing a faucet in the kitchen, as a rule, the pipes are laid open and are not walled up in the wall, so it is not so important what the distance between the pipes is on the faucet; it can be easily adjusted if necessary. If the pipes are mounted into the wall, in order to avoid the use of additional elements and adapters, it is worth taking care of the distance between the pipes in advance so that the installation of the mixer goes without unnecessary problems. It is worth buying the mixer in advance and installing the pipeline based on the given dimensions.
Installing a faucet in the kitchen
Installing a faucet in the shower
The most suitable for these purposes are faucets designed specifically for showers. Until recently, in this role they used one mixer for both the sink (pictured) and the shower, which did not require large expenses.
Installing a faucet in the shower
A distinctive feature of this type of faucet is the absence of a bath-shower switch, which gives a more modest size of the product. Recently, there has been a tendency to use special mixers that allow you to reveal the functions of the shower at 100%. Installation of such a mixer can be done openly or some parts can be hidden during the installation process for a more aesthetic appearance; it is worth noting that with hidden installation, when repairing the mixer, problems arise with access to failed parts. Shower faucets designed to connect special shower heads or hydromassage elements are becoming increasingly popular.
Pipe distance
The distance between the pipes of the mixer in the shower during hidden installation is selected especially carefully, since the complexity of installing the mixer itself will depend on this. When installing the mixer, you should take into account the height to which the mixer should be raised. Also, you should not ignore the height at which the shower head is located, which affects the quality of the mixer. Before purchasing a mixer, check all the necessary indicators with a sales consultant.
Installing a faucet in the bathroom
Often, when installing a water supply system to connect a faucet in a bathroom, the pipes are walled into the wall, this saves space in the bathroom. With this type of installation, the distance between the pipes for the faucet in the bathroom plays a big role.
A small error when installing the mixer can be eliminated with the help of eccentrics that come with most mixer models. After setting the required distance between the pipes for the mixer using eccentrics, all the necessary elements are connected.
When choosing a faucet, pay attention to the weight of the product; as a rule, faucets made of silumin are cheaper and lighter in weight than brass ones, but they are usually inferior in quality. When installing the mixer, it is necessary to wrap tow or full tape on the threads of the products, this will prevent leaks during operation of the product.
Advice when installing the mixer: tools for work, if possible, should be wrapped with electrical tape or other materials to prevent damage to the surface of the mixer. When dismantling an old mixer, you should be careful not to damage the threads on the fitting connected to the water supply, which can lead to unnecessary costs.