Heat exchangers are the general name for devices united by the principle of operation.
They are used in chemical, oil, gas, and other industrial sectors.
In everyday life, they are used to increase the efficiency of home-made stoves, in indirect heating boilers, for the joint operation of different coolants when one of them is more expensive (to save money), in general, wherever it is necessary to cool, heat or transfer the temperature to a liquid or gas.
How it works, why and how you can make a heat exchanger with your own hands.
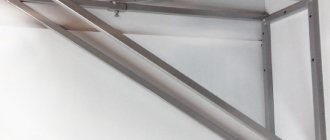
System design
So, the purpose of the device is to transfer temperature from one environment to another. Heat sources and coolants can be various liquids, gases and steam. Unstable media are separated by a material that has a suitable thermal conductivity for this purpose. The simplest example of a heat exchanger is an ordinary room radiator. The heat source is heating water. The heated medium is the air in the room. And the separating material is the metal from which the radiator is made.
A big role in which intermediate material to use is its degree of thermal conductivity. The leaders in this indicator are silver and copper. But for obvious reasons, copper is most often used.
Copper is 7.5 times better at transferring heat than steel, and plastic is 200 times worse than steel. It turns out that, other things being equal, 1.7 meters of copper, 12 meters of steel and 2000 meters of plastic pipe will transfer the same amount of heat.
According to their purpose, heat exchangers are divided into:
The former contain cold gas or liquid. Contacting it, the heated coolant cools down.
Heaters, on the contrary, contain a heated gas (liquid), which shares heat with a circulating cold liquid (gas).
Surface heat exchanger design
Both “heaters” and “coolers” can differ in design:
- Surface (the case when the media come into contact through an intermediate surface).
- Regenerative (alternate supply of cold and hot media to a special nozzle, which, by heating and cooling, regulates the temperature of the media).
- Mixing (supplying one medium directly into another and mixing them).
It must be said that surface heat exchangers are used most often. They differ significantly in shape. There are three types here:
- Lamellar (many plates assembled into cassettes through the labyrinths of which liquid passes).
- Coils (thin tube twisted into a spiral).
- Pipe in pipe.
Dual fuel heating can be very convenient, especially when one heating source fails. Combination heating boilers have two combustion chambers and are produced in different designs: gas - electricity, gas - coal and so on. We will consider the design of the system and installation methods below.
We will consider the features of choosing a thermostat for a heating radiator here.
Conventional heating methods may prove inconvenient in some situations. Heating without gas and wood can be a good alternative. Here https://microklimat.pro/sistemy-otopleniya/bez-gaza-i-drov.html we will look at ways to organize heating of a room without the use of firewood and gas.
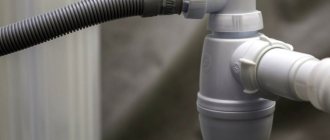
Pipeline installation
We have already mentioned that for pipelines it is better to use pipes with a diameter of 3/4″; this diameter is most often used in all heating systems and is suitable in all respects for a bathhouse heat exchanger.
Pipes can be metal or plastic. You can also use flexible corrugated hoses, but you need to keep in mind that they have a significantly smaller nominal diameter, and this negatively affects the speed of water flow.
Let's give some tips on installing pipelines.
Try to reduce the length of the pipelines as much as possible; do not make many turns or bends in the pipe. Your task is to create the most favorable conditions for water circulation.
When using plastic pipes, do not allow them to overheat at the junction with the heat exchangers. The presence of water inside will prevent their complete breakthrough due to loss of strength caused by heating, but deformation is possible.
Don't forget to place the drain valve in the lowest place. If the bathhouse is not used for a long time, then in winter you need to drain all the water from the system.
- When connecting pipelines, provide for the possibility of dismantling them to perform repair or routine maintenance work.
- Try to keep the length of horizontal sections of the pipeline to a minimum. Install all such sections at an angle of at least 10°. Such measures have a positive effect on the speed of water flow.
Making a pipe-in-pipe heat exchanger with your own hands
Operating principle, pros and cons
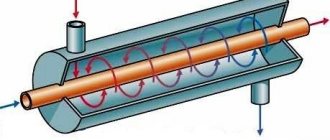
As the name suggests, the heat exchanger is a large pipe with a smaller one inside. The cooling or heating medium moves through the inner pipe, and the liquid to be cooled is supplied to the outer one.
A pipe heat exchanger can consist of several units connected in series.
This simple design has the following advantages:
- suitable for any coolant;
- easy to make yourself;
- easy to clean;
- lasts a long time;
- suitable for work under pressure (unlike plate type);
- You can select the speed of movement of liquids by changing the size of the pipes.
However, everything needs to be carefully calculated, and pipes can be quite expensive.
Manufacturing
- Tubes of different diameters (preferably copper) – 2 pcs.
- T-shaped tees (diameter is the same as the larger tube) – 2 pcs.
- Short tubes of equal length, diameter = tee outlet. - 2 pcs.
- Welding and electrodes, or a powerful soldering iron and copper solder.
- Bulgarian.
- Roulette.
We will use thin-walled copper tubes. We select segments of suitable length so that the diameter of one is at least 4 mm larger than the other (the gap will be 2 mm on each side).
- We weld tees onto the outer tube on both sides (sideways).
- We insert a tube of smaller diameter inside and, by boiling the ends of the larger tube, fix the inner tube in it.
- We weld short tubes through which the liquid will flow to the outlets of the T-shaped tees.
- If a steel billet, rather than a copper one, was used, its efficiency will be significantly lower. It makes sense to increase the working surface area by making a battery of separate heat exchangers. They are connected in series by small sections of pipes welded to one or the other tee. The result should be a snake.
Marking
There must be inscriptions on the outside of the pipes. To make the right choice, you need to understand what they mean. Not all types of pipes are suitable for a particular task. The marking is applied by the manufacturer. In metal-plastic products, the materials of the outer and inner layers may differ.
What designations are found:
- PE - R . Indicates that polyethylene was used to make the inner and outer layers.
- PP - R . Material of manufacture: polypropylene.
- PE - X . The composition contains cross-linked polyethylene. There are also other markings indicating the method of stitching the material.
- PE - RT . Made from heat-resistant polyethylene.
After these designations the diameter and thickness of the tube are indicated. Another marking that can be found is PN, which indicates the nominal pressure that the product can withstand. The unit of measurement is usually bars. Additionally, the maximum temperature and type of permissible coolant are indicated.
Do-it-yourself air plate heat exchanger assembly with a fan
Let's make a household heater from a plate heat exchanger. It can, for example, be connected to a boiler with a water jacket.
- ready plate heat exchanger, small size;
- air duct connections;
- fan;
- plywood for assembling the frame (its dimensions must match the dimensions of the side walls of the heat exchanger) – 4 pcs;
- plywood for the front part of the frame – 1 piece;
- Metal sheet;
- a block (of such length as to be enough for a frame and 4 short bars);
- self-tapping screws;
- roulette;
- jigsaw;
- screwdriver
- A box is made from pieces of plywood. The internal corners are fixed using bars on self-tapping screws. The heat exchanger must be tightly inserted into the frame.
- We attach a sheet of metal to one side of the frame and cut a hole in the middle into which the fan will be inserted.
- We make a frame from a block. We attach it to the opposite side of the frame.
- Air vent pipes are attached to the frame.
Spark extinguishing
Any tent has a hole for a hot smoke pipe (chimney). In addition, the area around the stove is always protected with a fireproof mat in case of hot coals flying out. Some tent manufacturers recommend rolling back the tent base and placing the product directly on the ground.
Not only hot carbon dioxide, but also sparks rise from the stove through the chimney pipe. If the pipe is short, they can get onto the roof of the tent and cause a fire. To prevent this from happening, the chimney pipe is made long so that it is at least 2–2.5 m long. While the spark flies along this path, it will have time to go out. Consequently, the chimney acts as a spark arrestor.
Safety precautions also mean that all objects that can catch fire should be kept away from the operating stove. Another danger is carbon monoxide. It must go strictly into the chimney. And the tent itself should be designed so that clean air regularly enters it.
Do-it-yourself water heat exchanger for a furnace
To increase the efficiency of a boiler with a water circuit. A metal structure made of large diameter pipes will be built into the furnace and connected to the heating pipeline.
A few general recommendations:
- The diameter of the pipes should not be less than 2.5 cm. Otherwise, the heat exchanger will slow down the movement of the liquid.
- Approximate calculation of the heat exchanger area: 1 m 2 per 3-5 kW of furnace power.
- But if the stove not only heats the house, but also heats water, the heat exchanger must “take” more than 1/10 of the heat.
The design of the heat exchanger is two horizontal pipes, between which a battery of 6-9 pipes of the same diameter is welded.
- The heat exchanger outlet is in the upper part, the inlet (through which the return flow will be supplied) is in the lower part.
- Threads are cut on the inlet and outlet pipes for connection to heating pipes.
- Installation in the furnace cavity begins at the stage of laying the foundation of the furnace.
- As the rows of the furnace are built, the tubular structure is constantly attached and its position is monitored (towards the coolant outlet slightly higher from the level).
- When the furnace is finished, the heat exchanger is connected to the heating. This is done using a coupling. A long thread is cut at one end, a narrow nut is screwed on, then the coupling is screwed in until it stops. The threads on the second pipe are wrapped with FUM tape, tow, etc., then the coupling is twisted in the opposite direction. To prevent the joint on the first pipe from leaking, the thread is also wrapped with FUM tape and pressed with a nut.
- The system with the heat exchanger is filled with water and a test fire is performed.
Metal-plastic pipes for heating: features of use, review of manufacturers and prices
During repairs, improvement of a house or cottage, the owner may have difficulty choosing suitable pipes. Emergency situations occur when an old pipeline leaks and there is a risk of flooding. To get rid of such problems, new high-quality communications should be established. In the modern market, metal-plastic pipes for heating are in great demand.
What to do with the power regulator?
A small, inexpensive device will significantly save money and help set the heat exchanger to the desired temperature.
To install it on the heat exchanger tube, you need to connect the thermostat with terminals, and then the power wires.
You can avoid unnecessary work by purchasing a regulator with a built-in heating device. There will be no noticeable difference in price.
A heat exchanger can be a great addition to your furnace and will improve its efficiency. It can be installed on ventilation openings and heat the air passing into the house, provide the house with hot water, make a conventional furnace give off more heat, and much more.
A stove in a dacha is not a superfluous design, since in the off-season the weather can be unpredictable. Do-it-yourself brick stove for a summer residence: types of stoves, correct choice of location, recommendations for work.
To learn how to correctly calculate the power of a heating boiler, read this article.
Tips and tricks
- It is important to design a heat exchanger correctly , calculate economic efficiency, the percentage of hydraulics, indicate heat losses, calculate the design according to the geometric parameters of the unit and its components, and calculate the thermal insulation of the device.
- simpler design for making it yourself
- You can connect the heat exchanger to the system using fittings , place one at the bottom for cold water inlet, the second at the top for hot water inlet.
- When installing the exchanger, install the pipes at a slope according to the diagram.
- When installing the unit to a furnace and using coal for combustion as a material for the exchanger, it is better to choose cast iron; it is durable and fireproof.
- To make an exchanger with your own hands, take any model as an example and follow its parameters.
- When using the stove for heating and water supply purposes, the exchanger should absorb no more than a tenth of the heat generated.
- Pellets are good fuel and cheap in price, they do not emit soot, which is very important for cleanliness.
- Check the seams at the exchanger , you must not allow them to leak; under pressure or high temperatures, the entire structure can become unusable.
- Make the calculations correctly , otherwise your work will cost you dearly.
- A heat exchanger of the pipe-in-pipe type is easy to clean , lasts a long time, is simple to manufacture, and can operate under pressure. It is considered the most acceptable option for making it yourself.
As you can see, making a heat exchanger yourself is not difficult. For a simple design, a tank, two copper tubes of different diameters, a coil and a fan are enough. Thanks to the device, you can not only heat the room, but also cool it.
A thing like an exchanger in one form or another is found in almost every home. Approach the work constructively and thoroughly, prepare drawings, decide on the choice of material, follow the instructions described above for the manufacture, assembly and connection of the device.
If you wish and follow consistent steps, you will assemble a design no worse than a store-bought one, the house will be warm and cozy, and the device will work flawlessly for a long time.
Video on the topic
Such a process can be carried out several times in one system, because a special case of a heat exchanger is a heating radiator and a gas or electric boiler.
The most common model of heat exchanger used in a heating system consists of 2 metal containers, which, like a nesting doll, are located one inside the other, and transfer heat through the metal wall.
The advantages of this mechanism are that, due to the hermetic design, mutual mixing of homogeneous media does not occur, and when using coolants with different physical properties, mixing does not occur.
"Winter" scheme
To equip a solar collector that operates all year round, you need to use a different coolant. Antifreeze is used instead of water. We'll have to use a completely different scheme. To do this, you need to use a boiler that operates on the basis of indirect heating. The bottom line is that the coolant heated by solar energy passes through a serpentine heat exchanger into the boiler and heats the water inside the container.
To ensure normal operation of the circuit in question, it is necessary to use a safety valve, an automatic air vent and a pressure gauge.
Do it yourself
Before starting to manufacture a heat exchanger, it is necessary to decide what principle of heat transfer will be implemented in such a device.
Manufacturing of plate heat exchanger
To make such a device, you need to prepare the following materials and tools:
- welding machine;
- Bulgarian;
- 2 sheets of stainless corrugated steel 4 mm thick;
- flat sheet of stainless steel 4 mm thick;
- electrodes;
Build process:
- from stainless, corrugated steel , in the amount of 31 pieces.
- Then , a tape with a width of 10 mm and a total length of 18 meters is cut from a flat stainless steel. This tape is cut into pieces 300 mm long.
- The corrugated squares are welded to each other , with a 10 mm strip on two opposite sides, so that each subsequent section is perpendicular to the previous one.
- As a result , you get 15 sections facing one way and 15 facing the other in one cubic body. The corrugated surface of such sections allows you to effectively transfer heat from one coolant to another, while there is no mutual movement of different or homogeneous media.
- In the case when not an air mass, but a liquid is used to transfer heat, a stainless steel manifold is welded to those sections in which water will circulate. The collector is made of flat stainless steel. For this purpose, rectangles are cut out with a grinder: 300 * 300 mm – 2 pcs; 300 *30 mm – 8 pcs. Thus, you get a kit from which 2 collectors are welded, which resemble in shape a square box lid.
- A hole is made in each of the collectors , to which a pipe is welded for subsequent connection to the pipes of the heating system or to provide hot water supply.
- Holes on the collectors are made at one of the corners a, and when installing them on a heat exchanger, the inlet pipe should be located in the lower part of such a structure, and the outlet pipe in the upper part.
The heat exchanger discussed above is installed with the open side into the hot gas circulation system.
Thus, the hot gaseous coolant will transfer heat to the corrugated walls of the stainless steel plates, which, in turn, will heat the liquid.
Drawing:
Production of a water heat exchanger for a furnace
A conventional wood stove can not only heat a room in the traditional way, but can also be used to heat water for heating rooms in which this heating device is not installed.
To make such a device you will need the following materials and tools:
- steel pipe with a diameter of 325 mm, a length of 1 meter;
- steel pipe with a diameter of 57 mm, a length of 6 meters;
- steel sheet 4 mm thick;
- welding machine;
- electrodes;
- cutting torch;
- white marker;
Manufacturing process:
- A cylinder made of a pipe with a diameter of 325 mm is installed vertically on a steel sheet and outlined with a marker or chalk.
- The outlined circle is cut out with a gas cutter. Then, using the resulting metal pancake, another circle of the same diameter is made.
- In each of these pancakes, 5 holes with a diameter of 57 mm are cut. Such holes should be equidistant from each other, as well as from the middle of the pancake and its edge. The pancakes are welded to the cylinder so that their holes are located opposite each other.
- A 57 mm pipe is cut with a grinder into sections 101 cm long. It is necessary to prepare 5 such sections.
- Each piece of pipe is installed in the holes so that the edges of this pipe protrude 1 mm from the holes of the upper and lower “pancakes”. Pipe sections are welded using electric welding. The result is a metal cylinder, inside of which there are pipes of smaller diameter. Hot air and flue gases will pass through these pipes, as a result of which the pipe will heat up and transfer heat through its walls to the liquid that will be located inside the cylinder.
- To circulate liquid inside the metal cylinder, pipes are welded in its lower and upper parts. Cold water will be supplied from the bottom of this design, and the liquid heated in this way will be taken from the top.
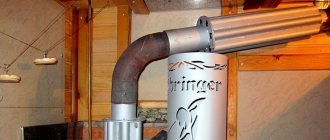
Air heat exchanger
An air heat exchanger is a plate device that is manufactured according to the same principle as the plate heat exchanger described above in this article, the only difference being that the collector is not installed on such a device.
Both in the vertical and horizontal planes, gas is used as a coolant through the device. Only for heating are hot gases formed as a result of fuel combustion used, and the heated gas is air, which, for greater efficiency, can be forced through the heat exchanger using a fan.
Pipe in pipe
Heat exchangers of this design are very simple to manufacture and operate.
In order to make such a device yourself, you will need the following materials and tools:
- electric welding;
- electrodes;
- Bulgarian;
- pipe with a diameter of 102 mm, a length of 2 meters;
- pipe with a diameter of 57 mm. 2 meters long;
- steel sheet 4 mm thick;
Gas equipment
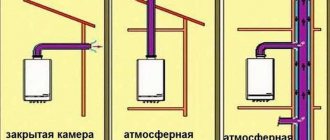
A good alternative would be gas heating. Main gas is used here. Such boilers are efficient and reliable. The efficiency is 87% for the simplest modification. For expensive condensing modifications, this figure is close to 97%.
The heating device is compact, safe and automated. It requires maintenance no more than once a year. In this case, you have to go to the boiler room solely to change the settings and monitor their normal functioning. Compared to solid fuel, this is a fairly budget unit.
Gas equipment has its own nuances
Flushing the heat exchanger
Timely washing and cleaning of such devices allows such devices to serve for many years without failure. Heat exchangers that use heated gases from burning solid fuels as a coolant are especially in need of timely cleaning.
As a rule, in such systems, the plate channels become clogged with soot, which sharply reduces the efficiency of such a device, and if the working holes are excessively clogged with combustion products, the device can completely fail.
For high-quality cleaning of such heat exchangers, the device is completely dismantled and the channels are thoroughly cleaned of soot, followed by washing the plates.
The circuit in which high-hardness water circulates must be washed with a special descaling agent or citric acid solution. If there is a significant layer of lime deposits, the plates are cleaned mechanically. For this purpose, the collector is cut along the seam with a grinder. The plates are cleaned of scale, then the collector is welded in its original place.
The “pipe-in-pipe” heat exchange system is cleaned in a similar way. If it is not possible to effectively remove scale by chemical means, the pipe is cut and the scale is removed mechanically. Then the device is assembled.
There are 2 types of heat exchangers:
Surface
The most common type of heat exchanger, which has become widespread not only in building heating systems, but also in many production processes. Not only water, but also water vapor, various mineral oils and chemicals are used as a coolant that can be used to transfer heat in such devices.
Surface models are divided into recuperative and regenerative:
- Recuperative - transfer heat through the wall of the coolant.
- Regenerative - such heat exchangers operate in periodic mode. First, the hot coolant heats the surface of the heat exchanger, then the cold coolant is supplied to the walls that accumulated the heat.
Mixing
When using this type of device, hot coolant penetrates into cold coolant. As a result of this mixing, direct heat transfer occurs. This type of heat transfer is rarely used in a heating system.
Typically, the mixing method is used for solar heating of water, when the coolant from the heat generator enters a storage tank in which hot and cold liquids are mixed.
The efficiency of a sauna or heating stove can be increased by equipping it with a water or air heat exchanger . Installing a heat exchanger on a chimney will solve two problems at once: heat water for the heating system or hot water circuit and perform thermal insulation of the chimney.
Types of maintenance
Diagram and operating principle of a recuperative heat exchanger
Based on the operating principle, the equipment is divided into recuperative and regenerative. In the first, moving coolants are separated by a wall. This is the most common type and can come in various shapes and designs. In the second case, hot and cold coolants alternately contact the same surface. High temperature heats the wall of the equipment during contact with a hot medium, then the temperature is transferred to the cold liquid upon contact with it.
According to their purpose, heat exchangers are divided into two types: cooling - they work with cold liquid or gas, while cooling the hot coolant; and heating ones - interact with the heated environment, giving energy to cold flows.
There are several types of heat exchangers by design.
Collapsible
They consist of a frame, two end chambers, separate plates separated by heat-resistant gaskets and mounting bolts. Such equipment is easy to clean and can increase efficiency by adding plates. But collapsible maintenance units are sensitive to water quality. To extend their service life, additional filters must be installed, which increases the cost of the project.
Lamellar
A plate heat exchanger requires the installation of additional filters on the coolant.
They differ in the method of connecting the internal plates:
- In brazed TOs, corrugated stainless steel plates 0.5 mm thick are made by cold stamping. A gasket made of special heat-resistant rubber is installed between them.
- In welded plates, plates are welded together to form cassettes, which are then arranged inside steel plates.
- In semi-welded maintenance, cassettes are fastened together using paronite joints in a structure consisting of a small number of welded modules. These modules are sealed with rubber gaskets and connected by laser welding. Then they are assembled between two plates using bolts.
Plate heat exchangers are used in high pressure and extreme temperature environments. Such devices require minimal maintenance, are economical and are highly efficient. In addition, the efficiency of the equipment can be increased or decreased as needed by increasing or decreasing the number of steel plates.
The only drawback of a corrugated stainless steel heat exchanger is its sensitivity to the quality of the coolant; it requires the installation of additional filters.
Shell and tube
They consist of a cylindrical body in which bundles of tubes arranged in grids are placed. The ends of the pipes are secured by flaring, welding or soldering. The advantage of such equipment is that it is undemanding to the quality of the coolant and can be used in technical processes where aggressive environments and high pressure are present (in the oil, gas, chemical industries). The disadvantages of shell-and-tube maintenance are relatively low heat transfer, large dimensions, high cost and difficulty in repair.
Principle of operation
The chimney of a metal stove installed in a bathhouse, house or garage becomes very hot when fired. Depending on the design of the stove, its temperature can be from 200 to 500 degrees, which makes it dangerous in terms of fire safety, and accidental touching it can cause a severe burn.
The heat from the chimney can be used for good by placing a heat exchanger on it: tank or coil . The coolant in this case is usually water, and in some cases air. When the coolant comes into contact with the heated walls of the chimney, their temperature is equalized: the chimney is cooled, and the water or air in the heat exchanger, on the contrary, is heated.
When heated, warm water rises to the upper part of the heat exchanger, and from there through the outlet fitting and pipe into the system or storage water tank. Instead of heated water, cold water flows through the inlet fitting. As it heats up, circulation continues, as a result of which the water in the storage tank can heat up to a high temperature.
Air heat exchangers operate on a similar principle: cold air is taken from below, and after heating it is supplied through a pipeline to the heated rooms. This way you can heat an attic in a country house or a relaxation room in a bathhouse, which are heated periodically. It is impossible to install water heating in them, since you will have to regularly drain and fill the system with coolant.
Features of operation
There are a number of requirements that must be adhered to when operating this device so that it lasts as long as possible without causing absolutely any harm.
- It is undesirable to fix heat exchanger pipes (if any) on the walls of the room with fixed fasteners due to the high temperature and, as a result, expansion of the metal.
- If it is necessary to seal the connection of the pipeline with the heat exchanger, then only material that can withstand high temperatures can be used.
- Do not pour water into an already heated brick oven with a heat exchanger.
- If the productivity of the furnace is low, then it is undesirable to install a large heat exchanger on it, since it will take too much energy from it.
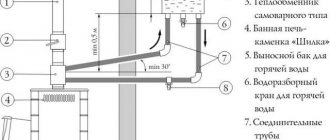
Tank with water circuit connection
The heat exchanger in the form of a tank located around the chimney is made of stainless steel or galvanized sheet . In this case, the design of the furnace should be taken into account. If it has a combustion mode for flue gases, and the smoke temperature at the furnace outlet does not exceed 200 degrees, you can use any material to make the heat exchanger.
In simple stoves without smoke circulation, the smoke temperature at the outlet can reach 500 degrees Celsius. In this case, it is necessary to use stainless steel, since the zinc coating releases harmful substances when heated strongly.
Most often, heat exchangers of this type are installed on a sauna stove and used as a water heater for domestic hot water. The tank is equipped with fittings in its upper and lower parts, and pipes leading into the system are connected to them. The hot water tank is installed in the shower or steam room. It is possible to use such a system for heating a utility room or garage.
Making a tank: step-by-step instructions and video
Heat exchangers for industrial furnaces are sold complete with some modifications; when installing a new furnace, you can choose a suitable model with a ready-made water circuit. You can also make a heat exchanger for the chimney with your own hands. To make it you need the following materials:
- pieces of stainless steel pipe of different diameters with a wall thickness of 1.5-2 mm, sheet steel;
- 2 1-inch or ¾-inch fittings for connecting to the system;
- storage tank made of stainless steel or galvanized steel with a volume of 50 to 100 liters;
- copper or steel pipes or flexible connections for hot water supply;
- ball valve for draining coolant.
Manufacturing sequence for a sauna stove or potbelly stove:
- Work begins with preparing a drawing. The dimensions of the tank installed on the chimney depend on the diameter of the pipe and the type of stove. Furnaces of a simple design with a direct chimney are characterized by a high temperature of the flue gases at the outlet, so the dimensions of the heat exchanger can be quite large: up to 0.5 m in height.
- The diameter of the inner walls of the tank must ensure a tight fit of the heat exchanger on the smoke pipe. The diameter of the external walls of the tank can exceed the diameter of the internal ones by 1.5-2.5 times. These sizes will ensure quick heating and good coolant circulation. It is better to equip furnaces with low flue gas temperatures with a small tank to speed up its heating and avoid the formation of condensation and deterioration of draft.
- Using a welding inverter, the parts of the workpiece are connected, ensuring the tightness of the seams. Fittings for supplying and withdrawing water are welded into the lower and upper parts of the tank.
- The tank is installed tightly onto the smoke fitting of the furnace, coating the connecting seam with heat-resistant silicate sealant. An adapter from a non-insulated pipe to an insulated one is placed on top of the heat exchanger tank in the same way and the chimney is removed from the room through the ceiling or wall.
- Connect the heat exchanger to the system and storage tank. At the same time, the required degree of inclination is maintained: the cold water supply pipe connected to the lower fitting must have an angle of at least 1-2 degrees relative to the horizontal plane, the heated water supply pipe is connected to the upper fitting and, with a slope of at least 30 degrees, is led to the storage tank. The storage tank must be located above the heat exchanger level.
- A drain valve is installed at the lowest point of the system. In the bathhouse it can be combined with a tap for drawing warm water for the steam room.
- Before starting operation, the system must be filled with water, otherwise the metal will overheat and leak, which can lead to poor sealing of welds and leaks.
- The water supply to the storage tank can be done either manually or automatically using a float valve. When filling manually, it is recommended to place a transparent tube on its outer wall to monitor the water level in the tank, so as not to run the system dry.
How to identify a fake
When installing pipelines, it is very important to use high-quality pipes, which will allow the system to last for decades. Counterfeits are simply not able to withstand the existing loads; after 2-3 years they can leak. In addition, in low-quality products, the aluminum layer deteriorates over time, which can also become a problem.
A few tips to help you spot a fake:
- The pipes must be accompanied by a certificate. Of course, if there are documents, this does not mean that the product is 100% high quality, but if they are not there, this is a reason to think about it. If the supplier is conscientious, he must attach to each batch a corresponding document indicating the originality of the products.
- Visual characteristics. The marking and appearance of the pipe must be the same as indicated on the manufacturer’s website. You need to be vigilant when purchasing products.
- Pipe cut quality. If the aluminum is butt welded, everything is fine, but if the seam is made “overlapping,” the product is of low quality. You also need to pay attention to the thickness of the aluminum - it should be identical throughout the entire diameter. The same applies to the outer and inner layers.
By adhering to these rules, the likelihood of buying counterfeit goods can be minimized. The key to the efficiency of a heating system is properly installed high-quality pipes.
Simple design: coil
Installing a heat exchanger tank on a chimney involves welding work, which not everyone can do. A simpler design is a coil wrapped in a spiral around the chimney. The coil can be made from a copper or aluminum tube - these metals are easy to bend, have high thermal conductivity and are not subject to corrosion.
The diameter of the tube is chosen so that it is convenient to connect it to the fittings of the water storage tank. For bending, pipes with a diameter of no more than 28 mm are more convenient. In any case, the length should not exceed 3 meters - this is a prerequisite for natural coolant circulation . To connect the heating coil to the tank, use a flexible hot water line.
This heat exchanger design can be used to produce hot water, or less often for heating small rooms. Maximum heating efficiency is achieved if the coil is installed on the chimney of a simple stove such as a potbelly stove with a high temperature of the flue gases.
DIY chimney coil
A pipe heat exchanger is usually installed on the chimney of a metal stove installed in a garage or workshop to produce warm water or heating. It is also possible to install a coil on a sauna stove.
Necessary materials:
- pipe made of copper, aluminum or steel - about 3 meters;
- flexible hose for hot water supply with a diameter of ¾ inches - 2 pieces of the required length;
- a storage tank equipped with a float valve for water supply and a drain valve for its consumption;
- ball valve for draining the system.
Sequence of work:
- The most difficult thing when making such a heat exchanger is to bend the pipe into a spiral without reducing its cross-section. Copper pipes with a diameter less than 28 mm can be bent using a pipe bender without heating. Steel and aluminum, as well as larger diameter pipes, must be heated with a blowtorch before forming.
- You can also use this method: fill the pipe with dry sand and tightly plug its ends with wooden plugs. The pipe is bent according to the template - a pipe having the diameter of the chimney, after which the plugs are removed and sand is poured out, the pipe is washed under high pressure of water.
- Threads are cut at the ends of the pipe and adapters are installed for connection to the system.
- The pipe is installed on the chimney. To improve heat transfer, you can solder the coil onto the chimney with tin, having previously degreased the soldering areas and removed oxides with phosphoric acid.
- The tank is hung on the wall or placed on a support above the level of the coil. Connect the heater to the tank using flexible hoses. A drain valve is installed at the lowest point of the system.
When using a coil heat exchanger in closed heating systems, it is necessary to install a circulation pump! The coolant may boil, and if circulation is poor, water hammer can occur, destroying the system elements!
Video: receiving hot water from a coil heat exchanger installed on the chimney
"Summer" scheme
This option is convenient for a summer shower. If it is located outdoors, then the hot water storage tank should be mounted there.
If we are talking about wiring inside a building, then a container with liquid must be installed in the house.
The scheme under consideration operates on the basis of natural circulation. The collector must be mounted below the tank, where warm water will accumulate, about one meter. This is due to the different densities of cold and hot liquids. To connect the collector to the tank, it is necessary to use pipes with a cross-section of 0.75 inches or higher.
To effectively keep water warm, the walls of the container must be insulated. For this purpose it is necessary to use mineral wool. Its thickness should be at least ten centimeters. If there is a roof above the boiler, you need to additionally use polyethylene for insulation.
Note that natural circulation is not the best way to arrange a system based on a solar collector. Because it creates a weak level of fluid movement in the pipeline. If the collector is too far away, the water will cool down as it enters the tank. To increase the efficiency of the system, you need to use a special circulation pump.
It’s not for nothing that this scheme is called “summer”. It is capable of heating water exclusively in the warm season. During cold periods, the liquid must be drained from the system. Otherwise, freezing may damage the pipeline being used.
Air tank
You can improve an ordinary potbelly stove or sauna stove with a direct chimney by installing it on an air heat exchanger on the chimney . It is a cylindrical body through which several hollow pipes pass. Air is sucked in from below, heated in the pipe, it leaves the heat exchanger, increasing the efficiency of the furnace by 15-20%. The air ducts can be routed to an adjacent room, thus heating several rooms or sections of the garage from one furnace.
Video: how to make an air heat exchanger for a chimney
Another original design of a stove with an air heat exchanger on a chimney for heating a garage is shown in the video. With the help of such a stove you can heat not only a garage, but also any utility room, including agricultural buildings and greenhouses.
From corrugated pipe
A cheap and simple way to install an air heat exchanger is to use corrugated ventilation pipes for this purpose . They are wrapped around the uninsulated part of the chimney, as a result the air in the corrugation warms up and, due to thermal convection, enters the neighboring rooms. To make the corrugated pipe heat up more efficiently, you can wrap it together with the chimney in several layers of foil.
A system with a corrugated pipe is convenient for heating a garage in which a simple potbelly stove made of rough metal is installed. Such a stove quickly heats the air, but it rises to the ceiling, which is why the temperature at floor level remains low. If you move the air ducts closer to the floor, you can create natural circulation of heated air, and the temperature throughout the garage will become approximately the same.
Bell-type heat exchanger
Heat exchangers in the form of a bell are usually used for heating the attic or second floor . The principle of its operation is that the air heated from the chimney rises to the ceiling, where it is retained by the hood and, gradually cooling, falls down into the room.
The cap can be made of either galvanized metal or fire-resistant plasterboard and lead the air ducts to the desired location. Sometimes the cap is decorated with stones, which, when heated, serve as an additional heat accumulator.
Battery Installation
After all the calculations have been made, the main work begins. The first thing to do is treat all structural components consisting of wood with an antiseptic. If parts of the modules are made of metal, they are treated with an anti-corrosion substance. For this purpose, the easiest way is to use mastic used to protect the bottoms of vehicles.
After drying the treated components, they need to be assembled into a single structure. Next, metal-plastic pipes are laid, secured using special holders.
To ensure that pipe structures pass freely through the sides of the boxes, holes are drilled into them. They need to be done at the top and bottom of the module. In the first case, the hole is used for the entry of heated liquid, and in the second, for cool liquid.
To mount several sections vertically or one large one, where several spirals will be laid, you need to connect the lower entrance of each of them to the upper entrance of the one lying below. It is necessary to adhere to this principle when switching the compartment. The lower end is connected to a common manifold used to supply cool liquid.
The upper ends of the pipes of the upper horizontal row of sections are connected to the collector pipe used to supply heated liquid.
Remember that the spiral collector circuit can be installed on a metal sheet mounted next to the building. The main thing is that it is mounted on the south side of the building. A metal base will accelerate the heating of the liquid and will help maintain the temperature in the pipeline, since it has excellent thermal conductivity and heat capacity.
The solar collector can also be installed in boxes on the roof. It is important that they lie in parallel rows over the entire roof area.
Homemade heat storage device - watch the video:
- Heat exchangers, coils - for most of us these terms are incomprehensible. Radiators, dryers and batteries are another matter, because we come across them every day. By the way, these are also heat exchangers, or rather, some of the types.
This article will talk about how to make a heat exchanger yourself.
Coil for oven
Contents of step-by-step instructions:
Video - How to make a heat exchanger yourself
Flaws
Despite many advantages, the installation of a heating element on a chimney pipe also has disadvantages . One of them, the most important, is a sharp decrease in the smoke temperature at the installation site of the heat exchanger. This can lead to deterioration of traction and the formation of condensation, increased soot deposition inside the pipe.
In addition, when connecting a heating system, for example, a garage, you need to calculate the volume of coolant to avoid boiling water and bursting pipes . Welds must be completely sealed.
Any heat exchanger design significantly increases the efficiency of the furnace . For trouble-free operation of the system, it is necessary to carry out a visual inspection of all its elements at least twice a year , and, if necessary, timely repairs, descaling, replacement of gaskets and other necessary maintenance work. In this case, water heating and heating systems will operate flawlessly for a long time.
>
Advantages and disadvantages
The obvious advantages of the heat exchanger include:
- simplicity of its manufacture and installation;
- heating can be combined; in addition to heating, a water heating system can be installed;
- fuel for the device can be varied: solid, gas - liquid;
- The devices are beautiful in appearance; you can give the interior a national style.
The heat exchanger has two disadvantages:
- there is no automatic control over media heating;
- The efficiency is not too high.
Heat exchanger using tube sheet
Choosing material
The coil is traditionally made from a pipe, the length and diameter of which are determined by the desired level of heat transfer. The efficiency of the structure will depend on the thermal conductivity of the material used. The most commonly used pipes are:
- copper with a thermal conductivity coefficient of 380;
- steel with a thermal conductivity coefficient of 50;
- metal-plastic with a thermal conductivity coefficient of 0.3.
Copper or metal-plastic?
With the same level of heat transfer and equal transverse dimensions, the length of metal-plastic pipes will be 11, and steel pipes will be 7 times longer than copper ones.
That is why it is best to use annealed copper pipe to make the coil.
We are looking for improvised means
Considering the high cost of materials, it would be appropriate to consider the possibility of using products that have already served their purpose, but have not yet fully exhausted their service life. This will not only reduce the cost of manufacturing the heat exchanger, but will reduce the time for installation work. As a rule, preference is given to:
- any heating radiators that do not leak;
- heated towel rails;
- radiators from cars and other products of similar design;
- instantaneous water heaters.