One of the key stages in creating a heating system in a country house or country house is the installation and installation of a chimney. The chimney is responsible for the safe and high-quality removal of combustion products from heating equipment operating on combustible fuel - boilers, stoves, fireplaces and stoves. The fire safety of the entire house, as well as the efficiency of heating units, directly depends on the quality of both the chimney itself and the method of its installation. This article will discuss the advantages and disadvantages of constructing a smoke exhaust route in one way or another.
Differences in the designs of external and internal smoke exhaust ducts
The differences between the two installation methods lie in the location of the smoke exhaust pipe. Thus, a chimney installed inside the building is located inside the house and passes directly from the heating device upward - along the walls of the room and above: through the ceiling to the second or third floor and further through the attic floors and the roof of the building. Thus, the chimney originates at point A - on the heating equipment pipe, and ends at point B - on the roof of the house. The internal chimney, as a rule, has a strictly vertical design. But, due to the peculiarities of the layout and technical plan of the structure, the smoke exhaust route may have various displacements, turns, bends, and bypasses of supporting structures.
The external chimney also originates from the heating device, but its main part is laid along the external facade of the house. A small section of the beginning of the pipe from the stove or fireplace is led to a hole in the wall, which leads directly to the street. Next, the pipe runs strictly vertically along the facade wall of the building and ends at the required elevation above the roof. In the case of installing an external chimney, various displacements, turns and detours are also possible, if required by the configuration and structure of the building facade, roof and the building as a whole.
Both options for installing a channel for removing combustion products - inside and outside the building - are actively practiced in suburban housing construction, and have their own advantages, features and disadvantages. It is worth adding that these two options for installing a chimney are used both for private residential buildings and for bathhouses and saunas.
Point two - condensate collector
This is another element that also does not affect chimneys and chimneys, but serves exclusively to collect and discharge condensate in systems with modern boilers. This element is required if you have a high-efficiency boiler (gas, diesel, liquefied gas or pellets). The temperature of the exhaust gases from it will be low, and the dew point will certainly form somewhere in the middle of the chimney for a long-burning stove or boiler. The resulting condensate will flow down, and if we do not ensure its removal, then over time it will accumulate so much that it will leak through the leaks of the smoke exhauster for the stove, or will simply pour into the boiler. And this absolutely cannot be allowed. Condensate must be drained.
Designing a chimney at the initial stages of construction or installing it in an already finished house?
Important! In order to avoid additional costs of money and time, as well as to achieve the highest quality of the smoke route, it is recommended to include the hearth and smoke channel in the engineering design of the house at the initial stages of construction.
The diagram of the smoke duct, developed before the construction of the main frame and structures of the house, allows you to comply with all the required fire and operational safety standards, select the most suitable location for the stove or fireplace, and also immediately calculate all the costs and actions along the smoke exhaust route. Unfortunately, most often the fireplace, stove, boiler and chimney begin to be installed after the house or bathhouse is built. This entails significant risks and completely unnecessary expenses.
We list the main disadvantages of this approach:
- the need to remodel many structures in the house
- the need to dismantle newly constructed rafters and floors
- the need to cut membranes, vapor barrier at home
- the need to create the necessary openings in the walls, floor and ceiling, on the roof
- often: the need to develop a smoke route design based on an existing layout, which entails frequent turns of the chimney, which increases its cost and reduces efficiency
- the need to dismantle some structures
- the need for new repair work in places where structures have been dismantled and the integrity of walls and ceilings has been damaged
- often: the inability to fully implement compliance with all fire safety standards due to the features of the finished layout and load-bearing structures, which entails the risk of a fire in the future
Drawing up a plan for the passage of the pipe from the heating device to the roof ridge at the initial stages of construction allows you to install a smoke exhaust route during the construction of load-bearing and related engineering structures of the building. This approach significantly reduces the cost of funds, and also allows you to install heating equipment and a chimney in compliance with all fire safety standards and requirements.
Trust but check!
Rarely does anyone calculate chimneys and chimneys in a design organization; most often we rely on the experience of our builders. But this cannot be done, because builders are people too. And the chimney pipe for a wood-burning stove also seems to them to be a simple device, so they often build it without taking into account various technical details that do not lie on the surface, or they simply forget about them, building the same chimney for a sauna stove and a boiler. Which causes the furnace or boiler to subsequently work poorly, or not work at all, or be difficult to maintain, or a nuisance. Therefore, we will talk about these technical features that are not visible, but their observance is very important when stove pipes and chimneys are designed and built. We can highlight 8 key positions that will require our attention when discussing the design of a stove or boiler chimney. And now we will analyze them, from simple to complex.
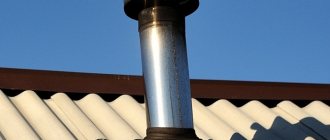
External chimney along the facade of the building: advantages
An external chimney is a chimney whose main area is located on the street. Only a small horizontal section of pipe remains in the house, connected to the heating device. In the vast majority of cases, this method of organizing a smoke route is resorted to when the smoke channel was not provided at the beginning of the construction of the house. In order to avoid labor-intensive and costly processes of reconstruction and adaptation of internal structures to the smoke route, the pipe is simply brought outside.
Advantages of an external chimney:
- easy installation
- simple design
- higher fire safety
- no possibility of smoke and carbon monoxide entering the room
- good traction with the ability to adjust it
- saving useful living space
- the possibility of installing a smoke exhaust route at any stage of building a house, or after its completion
Disadvantages of an external chimney:
- hypothermia of the chimney in winter and difficulty in lighting the fireplace
- low draft in the cold season
- supercooling of flue gases, which provokes the formation of condensation on the internal walls of the pipe
- constant risks of damage to the chimney structure by snow and wind
- violation of the appearance of the building facade
- heat losses
- the need to use expensive fasteners due to the large loads placed on the smoke duct in bad weather
Calculation methods
Exact method + formula
Calculating a chimney for a stove is not a task for beginners. It is better to entrust such work to professionals. But if you decide to calculate this parameter yourself, you will need knowledge of basic data and several formulas:
- To determine the volume of exhaust gases, it is important to know the power of the heating unit. For calculations we use the formula:, where:
- B is the combustion rate coefficient of solid fuel. This value is determined based on the data in table No. 10 of GOST 2127;
- V – level of volume of fuel burned. This value is indicated on the tag of the industrial device;
- T – heating level of exhaust gases at the exit point from the chimney. For wood stoves – 1500.
- The total area of the chimney. It is calculated based on the ratio of gas volumes, this value is designated “Vr”, and the speed of their movement in the pipeline. For a household wood-burning stove, this number is 2 m/sec.
- The diameter of a round pipe is calculated using the formula – d² = (4 * Vr) / (π * W), where W is the speed of gas movement. It is better to perform all calculations on a calculator and carefully enter all values.
Calculating the optimal amount of thrust
This operation is performed to control the calculations of the optimal height and cross-section of the chimney. This calculation can be carried out using 2 formulas. We will present the basic, but complex formula in this chapter, and we will present the basic, simple formula when performing a trial data calculation:
, Where:
- C is a constant coefficient equal to 0.034 for wood-burning stoves;
- The letter “a” is the value of atmospheric pressure. The value of natural pressure in the chimney is 4 Pa;
- The height of the chimney is indicated by the letter “h”.
- Т0 – average level of atmospheric temperatures;
- Ti is the amount of heating of the exhaust gases as they exit the pipe.
Example of calculating the cross-section of a chimney
We take as a basis:
- the potbelly stove runs on solid fuel;
- within 60 minutes, up to 10 kg of hardwood firewood burns in the stove;
- fuel moisture level – up to 25%.
Let's look at the basic formula again:
The calculation is carried out in several stages:
- We perform the action in brackets – 1+150/273. After calculations we get the number 1.55.
- We determine the cubic capacity of the exhaust gases - Vr = (10*10*1.55)/3600. After calculations, we obtain a volume equal to 0.043 m3/sec.
- The area of the chimney pipe is (4*0.043)/3.14*2. The calculation gives a value of 0.027 m2.
- We take the square root of the chimney area and calculate its diameter. It is equal to 165 mm.
Now we determine the amount of thrust using a simple formula:
- Using the formula for calculating power, we calculate this value - 10 * 3300 * 1.16. this value is equal to 32.28 kW.
- We calculate the level of heat loss for each meter of pipe. 0.34*0.196=1.730.
- The level of gas heating at the exit from the pipe. 150-(1.73*3)=144.80.
- Atmospheric gas pressure in the chimney. 3*(1.2932-0.8452)=1.34 m/sec.
Important! Using the data from your furnace, you can perform the calculation yourself, but to be on the safe side, it is better to consult with specialists. The safety of your home and the economical operation of heating devices depend on the correctness of the calculation.
Swedish calculation method
The size of a chimney for a stove can be done using this method, but the main purpose of the Swedish method is to calculate the chimneys of fireplaces with an open firebox.
In this calculation method, the size of the combustion compartment and the volume of air in it are not used. To determine the correctness of the calculation, use the following graph:
What is important here is the correspondence between the area of the combustion chamber (“F”) and the opening of the chimney (“f”). For example:
- firebox dimensions 770/350 mm. We calculate the area of the compartment - 7.7 * 3.5 = 26.95 cm2;
- chimney size 260/130 mm, pipe area – 2.6*1.3=3.38 m2;
- We calculate the ratio. (338/2695)*100=12.5%.
- We look at the value 12.5 at the bottom of the table and see that the calculation of length and diameter was made correctly. For our stove it is necessary to build a chimney 5 m high.
Let's look at another example of calculation:
- firebox 800/500 mm, its area is 40 cm2;
- chimney cross-section 200/200 mm, area 4 cm2;
- We calculate the ratio (400/4000)*100=10%.
- Using the table, we determine the length of the chimney. In our case, for a round sandwich pipe it should be 7 m.
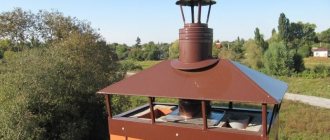
Internal chimney through the roof: advantages
A chimney installed indoors from a heating device upward through the floors and roof is called internal and is most widespread. The main thing in this matter is to plan such a smoke removal route in advance, at the very initial stages of building construction.
Advantages of an internal chimney:
- the most stable and good traction
- absence of external factors that can damage the structure
- insulation of the chimney and, accordingly, eliminating the possibility of overcooling of smoke and gases with subsequent formation of condensate
- independence from climatic and weather conditions
- no wind load
- no heat loss
- no violations of the integrity and insulation of the external walls of the building
- longer service life
- the possibility of saving on fasteners, since they can be used to fasten the structure of the house itself, and also use inexpensive fasteners due to the absence of load on them by external factors
- easier installation and maintenance
Disadvantages of an internal chimney:
- violation of the tightness of the roof and the need to dismantle some load-bearing structures in cases where the chimney route was not included in the original house construction plan
- higher level of fire hazard due to the location of the pipe inside the house
- the need to insulate all areas where the pipe adjoins the walls and where the pipe passes through the ceiling, ceiling and roof
- use of useful living space
- risk of smoke in the room if the pipe is damaged
Attention! When organizing a smoke exhaust system inside a house, it is important to pay special attention to insulating all surfaces and pipe passages.
When pipes are heated, the surrounding areas, especially those made of flammable materials, may begin to smolder or catch fire. It is strongly recommended not to skimp on the quality of insulating materials and to install them in accordance with all established rules. You should also maintain safe distances between the chimney and surrounding areas of walls, ceilings or roofs.
Point 5 - horizontal section of the boiler connection
The rule here is simple - from the boiler or furnace to the smoke exhaust pipe, the horizontal section of the transition should not exceed one meter. Horizontal sections of greater length help reduce chimney draft, so for every horizontal meter of pipe, you need to increase the height of the chimney by the same amount. If possible, it is better to avoid horizontal areas altogether. If this cannot be done, then be sure to provide for the possibility of cleaning this section of pipe. This can be done using special tees with revision elements. Installing the pipe at an angle to the stove reduces the draft less than a horizontal arrangement; it is worth taking this into account when designing.
Important! As already noted, each horizontal section of the chimney must be compensated by a vertical section, and the total length of the horizontal sections should not exceed one and a half meters.
External and internal chimney: do it yourself or with the help of professionals?
On the Internet you can find numerous diagrams for connecting external and internal pipes, their designs and fastening methods. But installing a chimney with your own hands is always a big risk. Since it concerns fire safety, property safety, life and health of the residents of the house, it is recommended to use the services of trusted specialists.
Carrying out installation work by professionals has the following advantages:
- preparation of a work plan taking into account all technical features of the structure
- guarantee for work performed
- guarantee of high quality assembly and installation
- guarantee of compliance with all required standards, including those established by law
- taking into account all the nuances and features of the smoke exhaust system
- high efficiency of work
- fire safety guarantee
Point one - audit
This is a window that can be opened, and it serves so that we can inspect the condition of the stove chimney, dry it and clean it. Most often, the inspection is located on the trunk, where the chimneys for stoves begin, i.e. where the boiler (furnace) is connected to the bottom of the pipe, and where the condensate collector is located, if provided. There is an option to connect an inspection in the area between the barrel and the boiler. This can be done here so that a furnace with a horizontal pipe can be cleared of soot. The inspection is placed in such a way that you can fully clean the inner surface of the chimney with your own hands; it does not have any effect on its operation. The valve for the stove chimney is an equally essential element, but, as a rule, no one forgets about it. And if two stoves go into the same chimney, then there should be at least two valves and revisions.
An inspection of the pipe allows you to assess the condition of its internal surface
Full range of design and installation services
carries out a full range of work on the design, installation and commissioning of smoke removal routes of any level of complexity, length and design. The company’s installation department specialists will prepare a detailed technical work plan, taking into account all the nuances of the structure, its design and layout, as well as taking into account the personal needs and wishes of the customer. Drawing up a plan is possible both at the initial stages of construction and in finished buildings.
The project plan is drawn up with an accurate calculation of the cost of both all work and the required chimney elements, which is undoubtedly convenient for the customer. After approval of the project, a team of specialists arrives at the client’s site and promptly carries out high-quality installation of the smoke exhaust system, followed by commissioning. A big advantage is testing and a full check of the functionality of the heating and smoke exhaust system upon completion of the work. The client receives long-term guarantees of the quality of the constructed smoke removal system, installed in accordance with all fire and operational safety rules and regulations.
Point 6 - pipe section
The basic rule is that the cross-section of the chimney at the outlet should not be less than the cross-section at the inlet. There are no problems when performing this step. Problems arise if a pipe is inserted into a brick shaft. Most often this is a stainless steel pipe. What should you pay attention to when designing a brick chimney? Very often the cross-section of this brick shaft is made smaller than required. Usually it is 150 by 150 millimeters; it is generally impossible to insert anything into such a shaft. Another common option is 27 by 27 centimeters, this section gives a 25 cm brick length and 2 centimeters of seams between the bricks. What could go wrong with such a wide passage?
Let's say we plan to insert a sandwich pipe into this shaft. Let's say we have a 60-kilowatt boiler and the chimney diameter for a 60-kilowatt boiler should be 180 millimeters. If we add to this section the thickness of the sandwich layer and the thickness of the outer pipe, we get a total cross-section of the insert equal to 280 millimeters. It is clear that a sandwich pipe will no longer fit into a brick shaft with a cross-section of 27 by 27 centimeters. Even if the metal pipe on the outside is 26 centimeters in diameter, taking into account the brackets that are necessarily provided for fastening, it will not fit either. Thus, before building a brick shaft, pay attention to which specific pipe will need to be inserted into it in accordance with the standards.
Choosing a fireplace stove for a wooden house
In a wooden house, you can install any ready-made, factory-assembled stove-fireplace - there are no strict restrictions. However, some models are suitable unconditionally, while the installation of others requires serious preparatory work.
Recommended models:
- steel fireplace stoves weighing up to 150 kg, if the house has wooden floors;
- convection stoves-fireplaces, models with a body lined with ceramics or tiles (the surface heats up less);
- with a combustion chamber raised above the floor (fireplace stoves on legs, models with a wood burner below).
Stoves and fireplaces that may cause difficulties:
- massive products with a cast iron body or stone cladding - the floors may have to be strengthened;
- high heating devices (surface temperature >90 °C).
Otherwise, when choosing a fireplace stove, you need to focus on the volume of the room and the power of the device (1 kW of power is needed to heat 20-25 m3), the necessary functionality (the presence of a water circuit, hob, oven), design and budget.
Protecting joints
In order to create a seal between the roofing material and the chimney, you need to make an internal apron.
Gaps in floors and pipes
The lower adjacent strips are suitable for this. You need to attach the strip to the walls of the pipe and mark the point of the top edge. You need to walk along the resulting line with a grinder and punch a groove.
The apron should start from the bottom wall, the edges should be inserted into the groove, and then mounted along the remaining walls with an overlap of 15 cm. The edges of the strip inserted into the groove must be sealed and secured with self-tapping screws.
After installing the apron, install a tie, which is designed to drain water.
The tie sheet should be directed into the valley or eaves of the roof. If desired, you can make a border on the edges of the sheet using pliers.
Now you can install the roofing material. After the roofing material is installed around the pipe, a decorative apron should be made. It is made in the same way as the internal one, only it is attached without a groove.
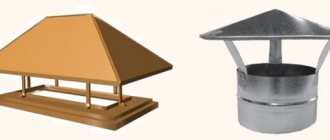
Otherwise, you can simply purchase a finished product designed for chimneys of hipped pitched roofs with your own hands. They are generally round in shape and made from a steel base connected to an apron. The chimney is located inside the valve.
If you don’t know how to remove a metal pipe through the roof, then don’t despair. Just remember that such a pipe is laid out in the same way as all the others, so just read everything again and you can start making a chimney.
To avoid fires
The fire safety requirements for chimneys are regulated by Sanitary Norms and Rules 41-01-2003, clause 6.6.22 - it specifies the distance that should be maintained between the surface of the pipes and the combustible parts of the roof, depending on the parameters of the pipe. For an individual bathhouse builder at this point, SanPiN should be most interested in Appendix “K”, since few people privately use brick or concrete pipes, preferring, as a rule, a single-walled metal version without thermal protection.
This means that when preparing to install the chimney outlet through the ceilings, you should count on a distance of up to 500 mm. to wood without thermal protection or 380 mm. from the heated pipe to the flammable materials behind the insulation layer.
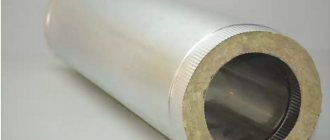
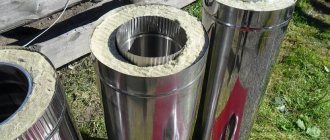
Item 7 material
If you buy an expensive modular chimney made of stainless steel or ceramic, then there is nothing to worry about, the material you will have is excellent. But if you buy a stainless steel pipe yourself at the nearest market, go there with a piece of magnet, and do not hesitate to apply it to the product on offer. Stainless steel should not be attracted to a magnet. If you feel that your magnet is sticking to metal, there is no need to buy such a chimney, it is made of iron.
Another important rule is that brick should absolutely not be used for chimneys that are connected to high-efficiency boilers. Brick can last a long time only in combination with stoves and solid fuel boilers. When connecting a gas, diesel or pellet boiler to a brick chimney, low temperature gases will enter the chimney. There will be a dew point somewhere in the middle of the boiler and condensation will form there. Brick, as a porous material, will actively absorb this condensate. During periods when the boiler stops, the condensate will freeze in the cold, gradually destroying the brick. Literally after 2 years, at the bottom of the chimney you will see a pile of peeled bricks - sludge.
Then the condensate saturates the chimney right through, and peeling of the brick will begin to occur even outside the chimney. It will also become covered with terrible black-brown streaks and lose all aesthetics. And no amount of plastering or painting can save the brick from this process of destruction. In a few years you will have to do major repairs or reconstruction, with all the ensuing complications. If no metal, asbestos or ceramic pipes fit into your brick chimney, then a flexible chimney in the form of a polymer stocking can help you. But this technology is still too expensive for most people.
Tools
You only need cutting tools: grinder, jigsaw, knife. All work is carried out manually and does not require special equipment.
Installation diagram
There are several types of chimneys; the most suitable type of design is selected individually.
Installation methods
It is important to take into account the collection of condensate in the system, so it is necessary to have a plug, a condensate drain and a container for collecting condensate.
If the potbelly stove is installed through a wall from a pipeline located on the street, then it would be advisable to lead the chimney through a window so that you do not have to prepare a hole for the pipeline in the ceiling.
The outer part of the chimney is insulated using thermal insulation and covered with protective material. A fungus is installed at the end of the pipe, which will protect the chimney from debris, rain, various small animals and foreign objects.
Floor preparation
The chimney pipe for a potbelly stove is most often installed in such a way that it passes through the ceiling, therefore, before installing and fixing the pipeline structure, it is necessary to make a hole for it in the ceiling: using a jigsaw or other cutting tool, having a diameter suitable for the passage of a glass for elbows of the internal chimney.
Example of a hole for a chimney pipe
Pass-through glass
The passage glass is installed in the hole before the chimney for the potbelly stove is assembled. The diameter of the glass should be selected according to the diameter of the inner pipe, although sometimes the joint is made before the chimney passes through the ceiling. It should be understood that it is important to secure the glass tightly - it serves as a retainer. But in addition to this, the pipeline must also be attached to the surface of the wall.
If installed incorrectly, the following consequences may occur:
If there are easily flammable materials, insulation or wooden parts in the ceiling, then they must be removed so that they do not come into contact with the passage glass.
Once the pipe has been inserted, the whole thing needs to be sealed with a fire-resistant material, such as heat-resistant sealant or special fire-resistant wool.
The following stages of work are shown in the photo:
Sealing
Pipe outlet to the roof
Roof work
At the last stage you need to put a deflector on the pipe
Tips for working
- The pipes used in the structure are located exclusively in a vertical position; to fix them, it is best to use special brackets with dimensions corresponding to the elbows of the system. To save money, you can make the brackets yourself using a metal corner.
- All connections must be treated with sealant so that there are no holes through which smoke can escape into the room air. There is a large selection of sealants on the market that are suitable for sealing pipeline seams for smoke exit:
- High temperature sealants;
- Heat-resistant sealants;
- Heat-resistant sealants;
- Heat-resistant sealants;
High temperature and heat resistant sealants are used to seal areas that reach temperatures of 350 degrees Celsius. Since the chimney for a potbelly stove heats up to higher temperatures, these types of sealants are only suitable for parts outside the piping system.
Heat-resistant and heat-resistant polymers can withstand enormous temperatures, up to 1500 degrees Celsius - they are the most suitable choice for a potbelly stove chimney.
Connecting the chimney to the stove
The chimney coming out of the potbelly stove, called internal, is connected to the street, external pipeline, in the attic or in the under-roof part of the roof. The beginning of the internal chimney is the segment coming out of the stove pipe, which is joined at the elbow to the ceiling.
When installing an internal chimney, it is important to correctly connect the pipe to the stove pipe - since if this is done incorrectly, smoke may escape into the air in the room, which will make it impossible for the heating system to function properly.
Expert opinion
Pavel Kruglov
Stove maker with 25 years of experience
The chimney is connected to the potbelly stove using a heat-resistant seal and a special clamp. It is important to make a completely sealed structure, since any breakthrough of gases can lead to poisoning of those inside the room.
Chimney connected to potbelly stove