We cannot imagine a home without heating. Our concept of comfort unconditionally includes a suitable temperature regime. There is no central heating in a private house, and each owner solves the heating problem in his own way.
We welcome our regular reader and bring to his attention an article about chimneys for stoves - an absolutely necessary component of any heating system, be it a stove, a modern fireplace or a boiler with automatic fuel supply.
How the chimney works
The main part of any chimney is a vertical pipe structure. Structurally, the familiar brick stationary box differs from modern prefabricated counterparts made from ready-made factory-made modules.
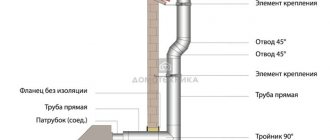
A traditional brick pipe includes the following elements: a neck for connecting to the furnace, a riser with valves, a slope, an otter, a neck (at the point of passage through the roof), a headband, and sometimes a metal cap.
Homemade chimneys made of metal or asbestos cement include pipes, caps, adapters for connecting to the stove, and insulation.
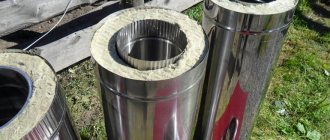
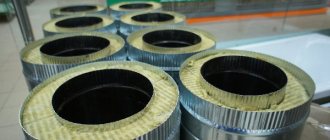
The most modern types of chimneys are ceramic and three-layer sandwich pipes. The ceramic structure consists of an external expanded clay concrete frame, an internal prefabricated ceramic pipe, and a layer of insulation between them. The ceramic and sandwich structure itself includes the following blocks: straight blocks for collecting condensate, tees, modules for cleaning, transition elements for connecting heating units. An integral part of a modern chimney is the deflector.
Chimney installation
The most popular types of chimneys are brick chimneys and sandwich pipes. It is with these examples that we will analyze the main stages of installation of the structure.
Installation and assembly of a brick chimney
Installing and assembling a brick chimney with your own hands is considered a rather complex process. Therefore, it is advisable to involve professionals to install the structure. If, however, the work is carried out independently, the installer will need:
Do-it-yourself brick chimney is laid in the following order:
- since the installation of the chimney is carried out from the point of connection with the heating device, when installing the latter, a solid foundation is created that can withstand the load;
- the masonry mortar is mixed: 1 part cement is mixed with 2.5 parts sand and 1.5 parts lime;
- the base under the chimney is cleaned of dirt and dust and moistened with plain water;
- all rows of bricks must be placed in a checkerboard pattern, preventing the joints in adjacent parts from matching;
- the first stage of bricklaying ends 6-7 rows to the ceiling;
- Next, the so-called cutting is laid out, preserving the stability of the mounted structure and preventing precipitation from entering the mounted area. The cutting is folded in the form of a pyramid, while the outer diameter of the chimney increases, but the inner one remains unchanged;
For strong and stable draft, the internal diameter of a brick chimney must be the same throughout the entire length of the structure.
- when brickwork passes through the roof, it is necessary to make additional insulation on the latter from appropriate materials, for example, roofing felt;
- the chimney at the point of passage through the roof, as well as through the ceiling, increases in outer diameter. To strengthen the roof structure, additional beams are laid in the place where the pipe passes;
- after exiting, at least 9 more rows of bricks are laid on the roof;
- the junction of the pipe to the roof is covered with a steel apron of a suitable color;
- A cap is installed at the top of the chimney, protecting the system from moisture and foreign objects.
When laying a chimney, do not forget about arranging cleaning holes.
Not all people like the look of brickwork. How to make a chimney beautiful? For this you can use, for example, tiles or plaster.
Installation and assembly of a chimney from sandwich pipes
Installation of a chimney made of sandwich pipes, unlike a brick one, does not require special skills and can be done independently. To do this you will need:
- required number of sandwich pipes and adapters;
- beams for strengthening the wall and roof where the structure passes;
- sealant for additional insulation of connections;
- materials insulating the chimney passages;
- tools: screwdriver, jigsaw, level, tape measure and so on.
The chimney is installed according to the following scheme:
- the lower part of the chimney is attached to the heating equipment;
- the structure is assembled up to the ceiling;
The junction of the pipes should not be located out of sight of a person, since in the event of a violation of the tightness of the structure, it will be difficult to find out the location of its violation.
- the chimney through a wall or ceiling should only pass through a reinforced place. Beams are used for this;
- the junction of the pipe and the wall of the house is insulated using high-temperature resistant materials. This will prevent a fire;
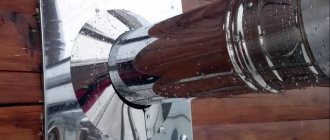
- when arranging a passage through a wall, a special elbow is used, which is subsequently connected to adjacent parts of the chimney. The knee is attached to the wall or ceiling using brackets;
- the passage of the chimney through the roof is arranged using an additional element of the system called cutting;
- a metal apron is attached to the roof section, protecting the system from moisture;
- the final elements of the chimney are installed: a pipe of the required length and a head;
- All pipe joints are sealed.
When assembling a chimney from sandwich pipes, due attention must be paid to sealing the structure.
From all of the above, it is clear that assembling and installing a chimney on your own is possible. The main thing is to correctly calculate the structure, install it according to all standards and constantly monitor its performance.
Types and designs
The design features of the chimney primarily depend on the material from which they are made.
According to the material, chimneys are:
- brick;
- reinforced concrete (usually industrial);
- asbestos-cement;
- of steel;
- ceramic;
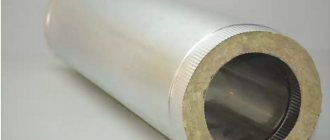
- three-layer metal - two layers of steel with mineral wool insulation between them.
By design, chimneys are:
- indigenous - the structure has its own foundation;
- wall, built into the load-bearing walls of the building;
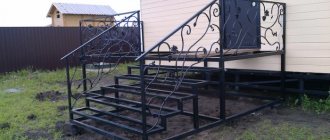
- mounted - light pipes are mounted on a vertically located outlet pipe of a boiler or fireplace (and potbelly stove);
- Often lightweight structures are simply suspended from the supporting structures of the building;
- coaxial - arranged on the “pipe-in-pipe” principle. The most common example is horizontal gas vents of gas heating boilers. It is used in devices with a closed combustion chamber and ensures maximum safety for residents. Save fuel consumption. Recently, vertical structures of the Shidel system have appeared, taking combustion air from the roof of the house (just below the top).
Chimneys of various types of stoves
How to make a chimney for a stove largely depends on its type. Normal operation of an all-metal slow-burning stove (for example, → Prof. Butakov’s stove) requires the presence of a metal chimney in the form of an insulated pipe, six meters or higher in height.
I recommend: Laying linoleum with your own hands, how to lay and lay linoleum
The chimney of brick heating stoves, in addition to a straight channel, may have a so-called heating shield (“rough”), with several vertical channels - wells.
Rude
This chimney arrangement allows for maximum heat transfer, since hot gases escape into the atmosphere only after passing through a long, winding path of wells and channels.
The downside of this useful device is the significant resistance to the flow of gases leaving the furnace, as well as the complexity of maintenance and repair.
Which one is better to choose?
The choice of chimney largely depends on the parameters of the installed heating unit (design, temperature, type of fuel used), the degree of readiness of the house (we are modernizing an old house with a stove and a wall pipe, the house is only “in design”, or the load-bearing structures have already been installed, or there is already finishing) ; heated volumes.
Features of various types of chimneys are given in the table:
Table 1
| Name | Advantages | Flaws |
| Brick | Durable and high temperature resistant masonry construction, durability depending on the liner material. | Complex installation requiring highly qualified masons; heavy weight, need for a foundation; long installation time, the need to replace the liner approximately every 10 years. When working with modern boilers and fireplaces, a brick without a liner can collapse in literally 10 years. Wall structures can only be installed during the construction of a house. |
| Ceramic | Service life up to 50 years, smooth internal surface, high installation speed; high acid resistance, good thermal insulation; withstands temperatures up to 550° | Expensive option; installation requires some qualifications; there is a need for a foundation; fragility |
| Single-layer steel (and asbestos-cement) | Smooth inner surface, lightweight, inexpensive, high speed of installation, easy to repair; resistance to corrosion and condensation | Insulation required; When passing through structures made of flammable materials, large offsets are required; They burn out in 10-15 years, there are no components - during installation you will have to make all the elements yourself. Galvanization will last five years (or less) |
| Steel sandwich type | Long service life, smooth inner surface, light weight, quick easy installation, easy repairs, high resistance to corrosion and condensation; can be installed/suspended outside the building; good thermal insulation | Quite expensive elements |
You should not use flexible steel corrugation - they burn out very quickly.
Despite the price, it is worth choosing modern ceramic chimneys or “sandwich”. If necessary, they can be installed both in a finished house and outside the house, they are durable, fairly easy to assemble, resistant to high temperatures, well insulated, and have a large assortment of ready-made factory elements.
If you want to use an old wall box from a conventional heating stove, you need to insert a stainless steel liner and insulate it. But perhaps you should choose a sandwich - there will be less hassle.
Make it yourself or order it
You can make some elements yourself for installing single-layer pipes or lay out a brick structure (if you have the skills of a qualified mason).
But the installation of prefabricated structures can be done with your own hands - this will help save a considerable amount from the family budget. You will have to pay a lot for the services of a qualified team - the amount is comparable to the cost of materials. There is a risk of running into unskilled workers.
When deciding whether to do the work yourself, you need to carefully analyze your capabilities:
- How accessible is the roof;
- do you have friends or relatives who can help;
- Do you have a fear of heights?
- What are your qualifications in performing repair work?
Building regulations
The installation of chimneys is determined by the provisions of SNiP 41-01-2003.
The chimney design must meet the following regulatory requirements:
- the minimum height must be at least 5,000 mm or grate;
- when located on the roof slope at a distance of less than 1.5 m to the ridge, the pipe should be 500 mm higher than the ridge;
- when located on the roof slope at a distance of 1.5-3 m to the ridge, the pipe must be no lower than the ridge;
- when located on the roof slope at a distance of more than 3 m to the ridge, the angle between the horizontal and the line passing through the ridge and the top of the pipe should be no more than 10°;
- the head must rise above the flat roof to a height of at least 1,000 mm;
- the maximum length of each horizontal and inclined section should not exceed 1000 mm, the total length of their projections onto the horizontal should not exceed 2000 mm. If there are oblique and horizontal sections, it is necessary to extend the pipe by the length of the horizontal projections. For ceramics, horizontal sections are not allowed.
How to lay a brick pipe correctly
Good draft, neutrality to acids, strength and durability of the structure are the main conditions that apply to chimneys.
First of all, a concrete foundation or brick with a height of at least 30 cm is built. The width of the base is designed to be 15 cm greater than the width of the chimney. The ideal thickness of the channel walls is 10 cm.
Mortars for masonry can be lime, gypsum, cement or mixed. In most cases, a cement solution is used (mixed with cement, sand and water).
The smallest height of the chimney above the roof ridge is 50 cm. The part rising above the roof is insulated and decorated with roofing materials.
The gas exhaust pipe of the heating boiler needs a sleeve (install a steel pipe in the middle of a brick one). This technique improves traction, strengthens the structure, and reduces the process of soot formation. Stainless steel has anti-corrosion characteristics, which extends the service life of the brick barrel. A round pipe has low resistance to the movement of combustion products (when compared with the square cross-section of a brick chimney).
Chimneys with a rectangular or round cross-section are suitable for liners. The thickness of the sleeve is selected as follows:
- 0.5-0.6 mm if a column is installed;
- 0.6-0.8 mm, if a boiler operating on pellets or liquid fuel is installed;
- 0.8-1 mm if a boiler is installed that runs on coal or wood.
The advantages of the liner are clear; after it is carried out, soot does not accumulate on the walls and condensation does not appear.
For a metal stove
If it is planned to build a brick gas exhaust channel for a metal stove, a foundation with an increased strength margin should be calculated and installed. Sometimes an individual base for such a chimney is made. A metal stove and a brick pipe have different heating times, which can reduce draft. The height of the chimney should be 5 m or more, otherwise the draft will be even less. In order for the chimney design to be durable, the seams must be thin, no more than 15 mm.
The fittings in the cutting and otter area should not cross the smoke channel.
A heat-resistant platform is laid at the junction of the chimney with the roof. The joint between the pipe and the roof is sealed with silicone-based sealant.
Fire retardant silicate furnace sealant fills cracks and crevices.
Fire safety requirements for chimneys
The distance from the surface of ceramic, insulated steel and asbestos-cement chimneys to combustible house structures must be at least 250 mm; for brick chimneys and sandwich pipe structures - at least 130 mm.
It is necessary to protect building structures made of combustible materials using cement or gypsum plaster on a mesh with a thickness of at least 25 mm.
If the roof covering can burn (roofing felt, bituminous tiles, ondulin), or leaves or fluff can accumulate on it, a mesh spark arrester must be installed on the roof cap.
Remember that the life and health of your loved ones depends on the quality of smoke removal.
Traction force
Factors influencing traction force:
- pipe height;
- condition of the surface of the internal channel - regularity of soot removal, wall roughness;
- the presence of inclined or horizontal sections. The presence of horizontal and inclined sections is undesirable, since lengthening the chimney is undesirable - the gases will cool, the draft will decrease until it tips over;
- installation of a deflector;
- quality of insulation;
- air supply to the firebox.
Your safety depends on the force of traction, so it is necessary to regularly check the presence of traction and take measures to clean the channel from soot and the pipe head from ice.
Making and installing a chimney with your own hands
What materials are best to make it from?
The easiest to install are steel structures. Single-layer steel products require insulation and the manufacture of components - in general, work for pathological workaholics, and here we will not consider their installation.
Installing a chimney made from a sandwich pipe is quite simple; the availability of a large number of various elements and components in stores allows you to assemble a device of any configuration.
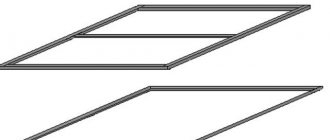
Drawing and diagrams
Before starting work, decide on the dimensions and draw a diagram or drawing - this will help to correctly calculate the required amount of materials and properly organize the work.
Size calculation
The height of the pipe is determined in accordance with the requirements of SNiP 41-01-2003, but should not be lower than 5 m from the grate. The diameter is assumed to be equal to the diameter of the outlet of the heating device.
Ceramic chimneys
The walls of the ceramic chimney retain heat well and do not react to condensation. Combustion products are completely removed. Installing a chimney made of baked clay requires careful attention, because such a gas outlet is expensive and heavy.
Prefabricated design
The assembly of a ceramic chimney for a stove in a bathhouse, made by yourself, is carried out according to the manufacturer’s instructions. At the same time, strictly adhere to the recommendations prescribed there.
How to choose a prefabricated kit
For trouble-free assembly, take a kit consisting of the following components:
- ceramic pipe modules (chimney pipes);
- cover plate;
- connection tees going from (to) the inspection, furnace;
- condensate collector;
- audit department door;
- ventilation grille;
- tip for head;
- thermal insulation, waterproofing for foundations.
To work you need tools and materials:
- fireproof ceramic adhesive;
- concrete solution;
- steel rods (1.5 m) to reinforce the support shaft.
Assembly and installation principles
When installing a smoke exhaust duct, you need a pre-drawn diagram of the chimney and a work plan. According to the instructions, calculate the parameters of the foundation and the length of the chimney. Take the steps in order, starting from the bottom up:
- Install the foundation for the chimney duct. Place a layer of waterproofing on the pillow.
- Install a shaft made of ceramic elements and heat-insulating mats.
- Attach the modular base in the center of the foundation.
- Install the adapter for connecting the exhaust system to the stove. tee providing maintenance of chimneys.
- Install the chimney pipe.
- Connect the condenser collector, an element under the ventilation grille.
- Next, gradually increase the pipe according to the scheme until the calculated height is reached. Finish areas of passage through ceilings and roofs with insulating materials.
- Carry out thermal insulation cladding work.
- Secure and arrange the pipe on the roof.
There are reinforcement channels in the corners of the expanded clay concrete blocks enclosing the sleeve. Install several blocks in height, placing them on metal rods. Two reinforcements are placed in one channel, overlapping beyond the horizontal level of the block (minimum 10 cm), and filled with concrete. This fastening ensures the rigidity and strength of the pipe complex.
However, do not make the fastening of the chimney circuit in the places where the ceiling or roof passes too rigid, taking into account that the foundation will shrink some over time.
Specifics of installation, details of pipe connections
To join ceramic elements, heat-resistant adhesive that is protected from acidic environments is used. The sealant is made from liquid glass and is produced in the form of a powder diluted in water, proportion 7:1.
The following acts as thermal insulation:
- asbestos sheet;
- basalt wool;
- leaf mineralite.
Sections of the ceramic circuit are joined using the socket method, which eliminates leakage of gas and condensate beyond its boundaries:
- Clean the surfaces of the connecting sections from dust.
- Using a gun, apply glue to the upper edges of the modules, connecting them.
- Remove squeezed out excess sealant with a damp sponge.
For 24 hours after joining, do not touch the chimney, waiting until the sections of the bathhouse pipe are completely dry. The final stage is to equip the head with a spark arrestor, reflector, and cap.
Installation features
Installation begins from the stove or fireplace. The first starting element is mounted on the boiler or furnace pipe. This element does not have insulation for technological reasons (the alt-free filler melts and sinteres into stone). All elements are designed in such a way that one end has a smaller diameter and is inserted one into the other, like into a socket. One of the docking options is to slightly pull out the inner pipe and insert it into another inner pipe. Press down. Then lower the outer pipe with insulation along it and press down. Secure the connection with a crimp clamp and tighten it with a bolt and nut. All joints must be coated with sealant.
Then a tee is mounted, modules with a cleaning hatch and a condensate drain are mounted below. There are designs for installing the lower part of the chimney on the floor.
Then the rest of the structure is installed. After a meter, the sandwich is attached to the wall with special brackets. An element with a cleaning hatch must be installed on each floor and in the attic.
It is advisable to connect the chimney elements “via condensate” - the pipes are mounted in such a way that the upper one is inserted into the lower one and the condensate cannot seep through the joints, but flows down the walls into the condensate drain.
An element with a gate is mounted under the ceiling.
The passage of the pipe in the ceiling is covered with a galvanized sheet and filled with insulation. The distance to structures must be at least 130 mm.
The most difficult stage of installation is the roofing. Mark a hole in the desired location on the roof. Make a hole in the roof. The under-roof sheet is attached from the inside, and the roof trim is installed on the roof. It is selected depending on the angle of the roof. The cutting edges are placed under a sheet of roofing material.
If necessary, install stretch marks. Install the deflector.
Interference and obstacles
The process of smoke exiting the firebox can be prevented by the appearance of an area of high pressure, which, like a plug, will “plug” the chimney.
Cooled air in the chimney can become such an obstacle. That is why increasing the height of the chimney makes sense only up to a certain limit, beyond which each centimeter of height will not increase the draft, but decrease it.
I recommend: How to install sectional garage doors yourself
If the chimney has the required length, everything happens decorously and gracefully. But again, as long as all the particles of the air flow move at a relatively equal speed and in the same direction (this nature of the flow is called laminar).
Laminar and turbulent flow
But as soon as turbulence, or otherwise turbulence, arises, local zones of increased pressure appear in the chimney, which, under certain conditions, will impede the flow.
There is no ideal smooth flow; there will always be turbulence, for example, near the walls of the chimney, but if the transverse dimensions are small and (or) the walls have significant unevenness, the turbulence zone can occupy the entire cross-section of the chimney, weakening or completely blocking the draft.
Turbulence, redistribution of zones of high and low pressure, can not only reduce or completely destroy draft, but even cause a phenomenon called reverse draft, in which air begins to enter the firebox from the chimney side, pushing combustion products into the room.
Frequent errors and problems during installation
The most serious mistake is the lack of a condensate collector and elements with hatches for cleaning.
In places where structures pass through ceilings, it is strictly forbidden to install joints of individual elements - leaking hot smoke can cause a fire.
A very significant mistake is the absence of a deflector or at least a cap over the chimney.
Snow and rain should not get inside the pipe - they increase the formation of condensation, and ice can block the cross-section of the pipe.
Maintenance and cleaning
Any chimney requires regular cleaning of soot. This will avoid fires and reduce draft. Cleaning should be done 2 times a year.
There are two cleaning methods - mechanical and chemical.
With chemicals, special products are burned in the firebox. They burn at a very high temperature and accelerate the wear of the internal walls of the chimney, so it is better to use mechanical cleaning methods for the sandwich.
Icicles and ice from condensate can freeze on the head - they block the cross-section of the duct and reduce draft, which increases the risk of carbon monoxide poisoning for residents.
Chimney insulation
Many may have a completely appropriate question - why should the chimney be insulated? After all, this is not very cheap.
But, in proper care, insulation plays a very important role. It is a mistake to think that thermal insulation does not change the temperature in the room.
If you compare this work with analogues that are carried out with walls or ceilings, it will be slightly different.
The walls are covered with insulating building material until a protective casing is created that does not allow warm air to escape outside. But in this way the chimney is protected from regular changes in temperature.
Many people know the term dew point. This is the area where condensation occurs. This process is natural and occurs when there is a difference in temperature.
Temperature changes are gradual and less frequent, and this significantly reduces moisture formations.
In the case of chimneys, everything looks completely different. Steel products for combustion exhaust heat up and cool down quickly. As a result, the volume of condensate becomes higher.
Video
Chimney made of 159 pipes /// Cheap chimney /// DIY chimney
And this causes significant damage to nearby elements. This is especially noticeable when the channel operates from a gas boiler, where heating occurs to significant temperatures.
IMPORTANT! You need to know that condensation is not only moisture and steam. This is the concentration of various microelements, acids and other combustion products. If simple condensation dries out in a short time and is not absorbed as quickly, then the moisture on the pipes from the stove quickly performs its detrimental effect.
Because of this influence, the metal chimney begins to become covered with rust. Also, moisture flows into the middle of the boiler, and this should not be allowed.
Insulation options
There are many means that allow you to isolate the furnace channel. Metal chimneys are somewhat reminiscent of asbestos. Therefore, you can perform actions yourself in a short time.
Pipes are often installed at the outlets of a gas heater; this is facilitated by their light weight and mobility. Laying these products with your own hands is not at all difficult. Addition to all this: it’s easy to make a bent terminal out of steel and route it as required by a specific design.
Video
Chimney insulation part 3 (final)
The process itself is easy. The pipe is wrapped in a layer of mineral wool and secured. Then everything is covered with a casing.
If compared with the asbestos version, a steel pipe will require thicker insulation. The methods of attaching the material to the chimney of their steel will also differ.
A few words about safety
There are some requirements for safe use. It is important not only to build such a system with your own hands correctly, but it must also be used according to strict rules:
- Do not use flammable liquids or flammable materials for kindling. In solid fuel heating devices it is not allowed to stack firewood that is longer than the length of the firebox.
- Chimney pipes should not be used for drying clothes and other items of clothing.
- Cleaning by burning off soot is not allowed; this may result in rapid failure.
- Do not use chlorine-containing substances for cleaning.
- Any attempt to douse the flames in the firebox with water can end disastrously.
- It is recommended to clean the chimney at least 2 times every six months.
- It is recommended to perform maintenance at least twice a year.
- To avoid additional problems with the functioning of the smoke exhaust duct, you must strictly adhere to the advice given by the manufacturers. You should not try to use heat-generating devices in any other way.
Video
Typical mistakes when installing stoves and chimneys
IMPORTANT! The influence of the chimney on the level of safety is very large. For these reasons, the correct functioning of the fire control authorities is checked. Without their written permission, a self-assembled steel structure will not be connected to gas networks.
Arguments for self-building
A beautiful and functional homemade chimney can be built easily if you carefully read all the recommendations provided. At the same time, there is an opportunity to save significant money.
Also, a do-it-yourself design, unlike the modular version, allows you to do without a lot of additional work. Indeed, in some cases, the use of a modular chimney can be severely limited.
And if in doubt, you can always turn to professional experts for help. They will give competent advice or provide assistance with competent installation work.
Expert advice
It is necessary to choose pipes in which the thickness of the outer metal layer is 1 mm (not 0.5 mm). It’s very easy to check - for a product with a thin wall, the wall bends if you squeeze it with your hands.
When installing sandwich structures, it is necessary to use a special sealant for high operating temperatures (automotive sealant with an operating temperature of 500° is not suitable).
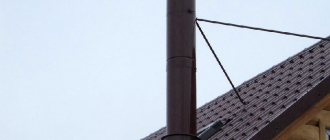
If the pipe rises more than one meter above the roof, it should be reinforced with guy wires.
The places where the sandwich passes through the roof and ceiling must be additionally insulated.