Today, many new lightweight and at the same time durable materials have appeared on our market, intended for a wide variety of buildings. One such material is polyvinyl chloride or PVC.
This material is very well suited for swings, because it not only ensures safety, but also looks very aesthetically pleasing.
In this article you will learn about:
- the difference between swings made of polypropylene pipes and why some builders choose it;
- physical characteristics of PVC as a material;
- several options for swings made of PVC pipes (hanging on a tree and stationary);
- safety rules when using plastic swings;
- characteristics of some popular purchased models that contain polyvinyl chloride.
General description of the design
A swing requires support posts, a crossbar, a seat and a mounting structure. They ride them in ones, twos, and even several people. We need to take this into account.
Support posts can be made in different versions by connecting “legs” to each other:
- Triangular, reminiscent of the letters “L” or “A”. The angle between the legs is 30-40 degrees.
- "P" shaped. Stiffening ribs and spacers are required.
- In the form of the letter "Zh". Very convenient for installing an awning or roof.
Seats can be made in any shape and for a different number of seats.
We suggest adding a canopy to the structure so that neither the sun nor the rain interfere with your relaxation. You should pay attention to its height to avoid hitting your head when getting up from the swing.
Ceiling vs. pillar
In many photos and videos there are 2 main options for hanging chairs. This is the ceiling, or its own stand. The chair is suspended from the ceiling with hooks, rings, chains or shock-absorbing springs. The idea is to find a solid area on the ceiling, drill a hole and install the fastener. Like a hanging bed. Just don’t confuse it with a floating bed, where the installation principle is completely different. A free-standing stand is mostly made of metal. There are also wooden structures. What you choose is a rather individual decision. But it is important to consider the material from which the chair is made. If it is rattan, then it is better not to use it outside. The material does not like ultraviolet radiation and humidity. Synthetic materials will be relevant for the street.
Which option would you choose? And why?
I think this is where we can say goodbye. Thank you all for your attention!
Next, loops are welded to the four points, and the ends of the hangers are connected to the eyes. Metal parts are degreased, treated with anti-rust agent, and painted.
Advantages and disadvantages of garden swings made of pipes
On the swing you can not only swing, but also lie down to rest and even just sit contemplating the nature around you or knitting, reading books and enjoying a simple conversation.
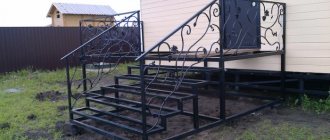
Swings made of pipes are stable, they are made on four supports “legs”, and due to the use of corrugated pipes or round pipes, they can withstand a large weight load and are resistant to lateral stresses.
They are not afraid of rain, wind and heat.
The price of the material is accessible to all segments of the population.
Conclusion
As you can see, you can make almost anything from scrap materials, including a solar collector from polypropylene pipes. However, this design will require a lot of space and access to water supply, although, of course, the construction is worth it - in the summer you will always have warm water.
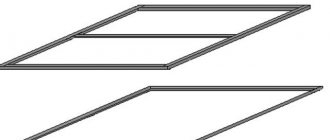
Make a portable clothes dryer that attaches to the stairs of the motorhome and has many undeniable advantages: 1. It is very durable and takes up little space, and you can hang quite a lot of clothes on it, especially using hangers and clothespins. There are even small hooks at the bottom of the drying rack for hanging shoes or small items. 2. It is lightweight, and when disassembled it is convenient to store and transport. 3. You can adjust the horizontal slats so that they do not block the window or door and do not dangle in the wind. 4. “Inconvenient” things can be hung between others, hiding them from prying eyes. Let's get started!
Purchasing materials
To make such a dryer, you will need:
- 7 PVC bends.
- 10 PVC tees.
- 12 PVC plugs.
- 3 PVC pipes 3 meters each.
- 15 meters of clothesline (uncoated) or other non-stretch rope.
- 9 aluminum screws.
- Acetone.
- A washcloth with steel thread.
- PVC glue.
- Drill bit 22 mm.
Erase markings from PVC parts
This can be done using acetone and steel wool. If the markings don't bother you, you can skip this step.
If you prepare the drawings in advance, it will be much easier for you to complete all the work.
Description of options for making a swing yourself
First, you should prepare the place in order to install a pipe swing with your own hands. Level the area and fill it with crushed stone or sand to eliminate the viscosity of the soil after rain. You can lay slabs of artificial grass. For stationary swings, prepare places for installing supports - dig holes and prepare material for making concrete.
Next come:
- Manufacturing of side supports.
- Assembling the swing frame.
- Assembly and fastening of the seat.
- Canopy installation.
A mandatory step after assembly and fastening will be priming and painting all metal parts of the product. Before these works, it is advisable to apply a rust converter. This forms a barrier film that will stop the aggressive effects of the environment.
And the most important stage, which is often ignored, is testing the strength and reliability of all fasteners.
Throughout all work, all safety measures for electrical and welding work should be applied, as well as the use of protective equipment.
How to weld a swing from a pipe
Garden swings made from corrugated pipe do this. For the frame, take a 40x70mm profile pipe with walls of 1-2 mm. In this case, the product is reliable, but does not look too bulky. The profile pipe bends well, and you can use it to make a shaped swing. In addition, it is resistant to breakage and wear, lightweight, durable, resistant to environmental changes, and also has an optimal cost. A 15x25 mm profile can be used on the partitions and seat structure.
Advice! It is good to make suspensions for sitting from chains, providing a hook or ring with a carabiner on the top crossbar.
The pipes can be marked and cut; by the way, this can be done upon purchase; it will be even more convenient to deliver them to the installation site. Most stores provide this service.
The frame is assembled exactly according to the drawing. All holes must be plugged to prevent water from entering the pipes.
Construction games
I have already managed to make some of the following homemade products from polypropylene pipes, while others are still waiting for their turn. But I would like to share with you the entire set of designs that I liked:
Greenhouse
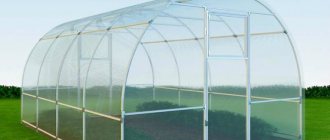
Greenhouse with a frame made of plastic pipes
It’s difficult to call a greenhouse just a craft; rather, it’s almost a building. But, nevertheless, plastic pipes do an excellent job with its construction. The finished arched structure will decorate the site and provide you with invaluable assistance in growing many types of plant crops. In general, every gardener will understand what we are talking about, and here I want to describe the features of the installation process itself.
That such a building is not suitable for year-round use, since it will not withstand harsh winter weather conditions. So it’s better to limit yourself to the spring-autumn period.
Main elements of the structure:
| Name | Comments |
| Frame | This is a kind of “skeleton” of the greenhouse, which gives it its shape and is the basis for the subsequent installation of finishing. This is exactly what I built from the polypropylene products in question. |
| Coating | Here you can use either film or polycarbonate, but the plastic frame will not withstand more capital and heavy materials. |
| Foundation | It is not necessary to create a reinforced base for a light plastic building. I managed quite well without it, but if you still have a desire to install it, then it will be enough to bury several low brick pillars around the perimeter of the greenhouse. |
Construction instructions:
The main stages of assembling a greenhouse frame from polypropylene pipes
- To begin with, I made a basic drawing , in which I noted the most important parameters of the future structure:
- Length – 5 m;
- Width – 3 m;
- Number of arches – 6;
- The distance between the arches is 1 m;
- Leveled the surface of the selected area;
- I marked pipes with a diameter of 25 mm and cut them into:
- 10 meter sections for the side elongated sides;
- One three-meter section for the back wall;
- 2 x 110 cm and one 80 cm to create a passage on the front side;
- 12 three-meter ones - to create arches;
- One six-meter fragment, which will become a rib connecting the top of the arch;
For cutting, I recommend using special pipe shears. With their help, you can make an even cut with just one movement of your hand, which greatly speeds up the work.
Cutting a plastic pipe with special scissors
- Now I connected all the pieces around the perimeter , except for those prepared for the arches, using couplings in the form of crosses, so that at the place of each joining there was a through hole. For the corners I used similar rotary fittings;
Polypropylene cross
- I drove thin metal rods into the holes so that they fit tightly into the ground, but at the same time rose about 15 cm above the lined plastic frame. With their help, it will be possible to securely fix the structure in one place and strengthen its base;
- Now, into the same holes, only now placing them on steel rods, I inserted the pipes of the arches ;
- I also connected them at the top with crosses , into which I then threaded a six-meter pipe as a stiffening rib;
- Installed the walkway frame . For greater convenience, you can even build a door, but since the greenhouse is not for the whole year, I just made do with a thick retractable film curtain;
- I screwed in short self-tapping screws at all joints between fittings and pipes ;
- Covered the finished “skeleton” with film. Polycarbonate is also well suited for this purpose.
The finished frame in the process of stretching the film
As a result, I received a wonderful summer greenhouse, which I safely dismantled in the fall and hid in the utility room until next spring.
Onion
Bow made from plastic pipe
This idea will appeal not only to children, but also to adults, since the finished onion will have a fairly high lethal force. Personally, as a lover of medieval themes, I was very glad to have the opportunity to recreate such a bright representative of it.
Main elements of the product:
| Name | Comments |
| Lever | The main part that makes most contact with the hand and gives direction to the arrow |
| Shoulders | Two edges of the structure that create the necessary force to launch the arrow when tensioned |
| Bowstring | Attached to the shoulders, being the transmitting element of their strength to the arrow |
Implementation process:
The main stages of creating a bow from a plastic pipe
- I took a half-meter piece of pipe, marked the center on it, from which I then retreated 50 mm in both directions, where I placed marks;
- Then he heated one side to the marked place using a heat gun until it became pliable. You can, of course, use other melting methods, but I consider this the most convenient and safe, since the presence of an open flame is excluded;
An industrial hair dryer is ideal for softening polypropylene pipes
- Using two planks, I compressed the soft plastic so that the edge of the pipe became a semicircular, flattened shape, and closer to the center it expanded again;
- I did a similar manipulation with the second side;
- Then he also warmed up the still untouched middle and, while it was soft but not burning, he grabbed it and squeezed it with his hand, forming a comfortable handle;
- Now he warmed up the edges again and bent them in the opposite direction ;
- After the plastic hardened again, I made slits for the bowstring , put it on and, with childish delight, fired the first shot with an arrow prepared in advance.
Hanger
Multifunctional plastic pipe hanger
This simple and at the same time incredibly useful household item has many options for making it from the material in question. Depending on your imagination and what you want to get in the final form, you can assemble either such a complex structure as in the photo, or a floor structure with a stand, but I will describe to you the simplest and easiest option, which I used myself:
- I took a meter-long piece of polypropylene pipe and cut it into three parts :
- One is 400 mm long;
- Two 300 mm long;
- a piece of rope through the resulting plastic cylinders , folded them in the shape of a triangle and tied the protruding rope ends together;
Sample of polypropylene hangers
- The protruding edge of the rope was tied to a metal hook borrowed from an old broken hanger.
Chair
An example of a children's chair made from polypropylene pipes and fittings
I will not indicate the dimensions, since using a similar technology you can make both a children’s and an “adult” chair or stool. So it’s better to take the linear parameters from a regular purchased sample and use them as a guide. I also note that you can build a table or even a small single bed in a similar way.
The assembly instructions look like this:
- First of all, as in the options described above, I applied markings to the pipes in accordance with the measurements taken, and then cut them into the required pieces;
- Then I took the crosspiece, which will later be under the seat, and soldered four short pieces leading to the legs to it. Instead of soldering, you can use glue; self-tapping screws will not look aesthetically pleasing, but all joints must be strengthened, since the product must subsequently withstand the entire body of a child or an adult. A little about soldering technology:
- We place the soldering iron on a level place, screw on the mandrel and sleeve of the required size, set the thermostat to 260 degrees Celsius, plug the plug into the socket and switch the power switch to the working position;
- After the nozzles are properly heated, we install the edge of the pipe and the corresponding coupling into them;
Melting polypropylene with an iron
- We wait a few seconds, after which we remove the products and join them strictly at an angle of ninety degrees and now wait for them to harden;
Docking of heated products
- I welded a tee onto the free edges of the tubes;
Snow white plastic tee
- I attached legs to the lower holes, and inserted plugs into the lower ends of them;
- Assembled two handrails:
- I welded it to the corresponding tubes on one side along the bend, and on the other along the tee;
Sample of plastic turn
- I soldered another short section to the fittings going in one direction;
- I installed the resulting products of the prepared structure on top of its legs so that the edges with crosses were on the back side, where the back is planned;
- Assembled the back:
- I took the tube corresponding to its top and welded it to both ends along the bend;
- I attached sections half the length of the back to the turns;
- I soldered tees to their edges, which in turn were connected by another tube, thereby creating a stiffening rib. Depending on the size of the chair, you can make several of them;
- Using two more pieces the length of the second half of the backrest, I attached the resulting polypropylene rectangle to the crosspieces of the railing;
- I screwed pieces of plywood to the seat and back with self-tapping screws, which I then covered with foam rubber and covered with fabric.
Bottom view of a children's chair made of plastic pipes
If you complicate the design using a similar assembly technology, you can get, as I noted above, even a bed:
Bunk bed made of polypropylene pipes
Organizer
Simple and tasteful
Here is another incredibly simple and original method of using plastic pipes:
- From the remains of pipes of different diameters, I cut several neat sections so that one of their sides was beveled at the same angle. At the same time, the length for each was chosen in accordance with the stationery, for example, larger for pens and pencils, and smaller for a scraper;
- I cleaned all the edges with a file . This was especially necessary for pieces with a large cross-section, which had to be cut with a hacksaw rather than scissors;
Filing cut edges
- Then I placed them on a flat surface in a “flock”, but so that all the bevels were turned in one direction, and glued all the touching walls together .
Using the same method, I made an excellent organizer for the bathroom, only here I no longer made the slanted edges:
Sample of an elegant bathroom stand
I would also like to note that using a similar technology, that is, by gluing tubes to each other with walls, you can create strikingly beautiful pieces of furniture in a modern original style, as shown in the following photo:
Chic chair made from many polypropylene tubes
Table lamp
The first thing I did here was take care of the electrical part:
- I disassembled the old lamp and took out the inside: wires, switch and base;
- I cut several pipes and prepared fittings according to my creative idea;
- I coated the edge of one of the segments with glue and inserted a base into it , having first threaded it through the inside of the wire;
- Then I assembled the body of the lamp itself , which can take the most unexpected shape. Here are some ideas as examples:
- Robot. My daughter was simply delighted with this idea, although she had to tinker with the design:
Plastic robot sitting down to rest
- Snake. If you want something simpler, but equally unusual, then by connecting the tubes with different rotary fittings you can get a very cute reptile:
Polypropylene snake with flaming eye
- Alien life form. If, on the contrary, you want to unleash your creative impulse to the fullest, and you have time for this, then you can even build a very unusual alien:
"They are among us!"
- I connected the switch and the cord with the plug, after which the work was completed.
Advice from the experts
The chain is chosen with welded ends of the links so that they do not open when the swing is in operation. The ends of the rings, which are used to connect the cable and the eye, are welded after completion of the work. The back is made at an angle, bending according to the shape of the body.
For a swing, it is better to mount a roof, for which they use polycarbonate and corrugated sheets on a metal frame.
Before making a swing, it is better to try out different designs in a park, public garden, or with friends, so that you can confidently choose the type of structure in your own yard.
How to make a tire swing
You can make a number of unusual children's toys from an ordinary car tire. This is a favorite material for summer residents to create flower beds, objects, obstacle courses, and swings for children in the country. At first glance, an accessible and inexpensive form of creativity can pose a threat to children’s health. Wheels belong to the 4th degree of danger, therefore in many regions of the country the use of this material for landscaping purposes is prohibited. Before you start creating a children's swing, first of all, you should think about the kids and their well-being.
When making a swing with your own hands, you need to remember safety measures. Sharp corners, untreated surfaces, low-quality materials, and poor fasteners should be avoided in the design. It is necessary to cover parts that could cause injury to the child, such as chains. If children's fingers get caught in the links, there is a risk of pinching. To avoid unpleasant moments when riding, you can use garden hoses. There should be no other objects in the close area where the swing is installed, no thorny plants should grow, the landing surface should be soft, the area under the swing should be covered with sand, and an artificial spring covering should be made.