The problem of masking pipes in a bathroom room faces those homeowners who are trying to give an aesthetic appearance to absolutely all rooms of a house or apartment. It can be noted that there are, of course, exceptions: open pipes can fit perfectly into one industrial design style - “loft”. However, there are still not many of its adherents. The overwhelming majority are those owners who prefer a cozy, warm environment even in small spaces that are specific in purpose and small in area, such as a toilet.
How to hide pipes in a toilet
Therefore, the question of how to hide the pipes in the toilet always remains relevant for them. Moreover, new decoration options are appearing, developed by manufacturers of various accessories for bathrooms, as well as invented by home craftsmen.
Masking pipes - a necessity or a whim?
So, your toilet is probably no exception, and it, like most rooms of this type, has water supply connections. Should they be closed? Only the homeowner can answer this question, based on the general style of the apartment and his own aesthetic ideas. We can only say with certainty that closed pipes are:
- aesthetically pleasing;
- convenient (easy to clean);
- functional.
The hidden space can be used as a place to store household chemicals.
There is an opinion that first you will have to replace old iron pipes with modern plastic ones, and only then disguise them. This is partly true: it is more convenient, safer and more practical. However, if replacement of the water supply is not planned or is postponed, the pipes in the toilet will continue to spoil the overall appearance.
Important: choose materials and finishing options that will allow you to smoothly repair and dismantle pipes in the future.
Characteristics of materials for water supply pipes
What is it and why is it needed?
Owners of apartments and private houses are trying to replace old, outdated steel utility networks with more neat pipes made of polypropylene or metal-plastic. But even they, having a more attractive appearance, are not always able to fit harmoniously into the modern interior of a living space. And here, to disguise them, you can use decorative boxes.
They are a frame structure covered with plastic, plasterboard, perforated metal panels, MDF or natural wood. The box is mounted in such a way that its parts do not come into direct contact with pipes or radiators, but are separated from them by at least 2 - 3 cm. This will preserve the integrity of the system elements during the linear expansion of the materials from which they are made under the influence of high temperatures.
Other options for hiding them - inside a wall, ceiling or in a monolithic floor - can lead to deformation of the building material surrounding the pipe (most often concrete) or to destruction of the surface of the pipe itself.
The box will not only allow the pipe material to expand slightly, but will also provide the possibility of unhindered heat exchange of air flows and protect communications from possible mechanical damage or other negative influences, such as moisture.
Material selection
Before you start masking the pipes, you should understand which material is most suitable for your bathroom. As a rule, the pipes in the toilet are the sewer riser and water communications that run vertically through the floor and ceiling, as well as water flow meters. Taking this into account, the pipes will also be overlapped vertically from the floor to the ceiling.
Communications in the toilet - riser, pipes, meters and valves
This fact significantly influences the choice of material: the specifics of the room are such that it simply will not allow you to carry out volumetric finishing from brick or gas silicate blocks. Accordingly, you will need thin-walled material that can be fixed throughout the communication area. Thus, the finishing of communications in the toilet should be:
- durable;
- beautiful;
- moisture resistant.
Attention: moisture resistance is an important property, because in any bathroom the humidity is high. If the material is afraid of moisture, it will not last long.
Prices for water pipes
Water pipes
Finishing materials for pipes in the toilet: options
Among the finishing materials, there are several of the most convenient and practical; each of them, to one degree or another, meets the requirements and has its advantages. Let's look at each in more detail.
Table. Characteristics of finishing material options
| Name of finishing material | Name of finishing material | Characteristics / properties |
| Drywall. The most common option | pros | Easy to install. To install or dismantle plasterboard trim, you will need ordinary tools (not highly specialized ones). It will also be quite easy to make mortises and inserts (hatches) into a profile from this material. |
| Environmental friendliness. Drywall is an environmentally friendly substance. Flammability – minimal | ||
| Moisture resistance. There are types of material that do not react to high humidity | ||
| Availability. The material is inexpensive and will not harm the budget | ||
| Finishing. Some people consider this a disadvantage, but many people like the opportunity to decorate a plasterboard wall as dictated by the overall style of the bathroom. | ||
| Minuses | If repairs are necessary, you will have to dismantle the box. This is easy to do, but you will need to create another one from new drywall | |
| Plastic panel (PVC). Very popular | pros | Cheap. This is the most budget option. |
| Easy to install. To install PVC panels you will need a metal or wooden frame made of beams | ||
| Lungs. The weight of this material is small, but sufficient to withstand the installation of hatches | ||
| Resistant to moisture. Fungus and mold do not form on PVC panels and are easy to clean | ||
| Beautiful. A variety of shades and patterns allows you to choose the material to suit any interior | ||
| Flaws | Fragility, it is quite easy to damage the PVC panel | |
| Aluminum blinds. The option is not very common, suitable for small toilet rooms | pros | Small price |
| Functionality. The space behind the blinds can accommodate shelves that will be hidden from prying eyes | ||
| Durability. Aluminum blinds can last for many years | ||
| Moisture resistance. They are not afraid of dampness, they are easy to care for | ||
| Easy to install. To install blinds, you only need to strengthen them from above; you don’t need to touch the side walls for this. | ||
| Minuses | Low noise insulation | |
| Gaps between walls | ||
| Additional complications (the pipe coming from the toilet will prevent the blinds from completely lowering, you will have to make a separate plastic box for the bottom) | ||
| May change color over time (turn yellow, darken) | ||
| Laminated MDF (sanitary cabinet). Often used in Khrushchev buildings. As a rule, doors are made of this material and are attached to the side walls using timber and hinges. The result is a design similar to a utility cabinet. | pros | Space saving. You can put various household items in the cabinet niche |
| Convenience. Always have access to communications | ||
| Aesthetics. Doors can be made in the general style or become an advantageous accent in the room | ||
| Minuses | Cost (if doors are made to order) | |
| Fragility (MDF does not always withstand moisture) | ||
| Roller shutters. One of the most modern finishing options | pros | Style and beauty. Even photo printing is possible on the surface of this finishing material (to order) |
| Professional installation. Installation is carried out by specialists, which will eliminate errors and unnecessary hassle. | ||
| Ease of use. Roller shutters do not obstruct access to communications | ||
| Flaws | High price | |
| Difficulties in placement (ventilation from above and toilet pipes from below will cause additional difficulties) |
Please note: in some cases, gypsum fiber boards, hinged plastic doors, or waterproof plywood can also be used to cover toilet pipes. A good and economical option is a former countertop or cabinet door.
Battery screen
In order to hide the heating radiator in the kitchen, special screens are often used. If desired, you can make the screen for the battery yourself, since this design is not very complicated. Such a screen will not only cover the radiator, but will also become another shelf for you.
The screen for the heating radiator differs in that it has a lattice structure. This quality allows heat to freely enter the room and warm it. Such screens are made from different materials:
- tree;
- plastic;
- metal.
Wooden screens for heating radiators have one significant drawback - wood absorbs moisture from the room and evaporates it due to its location next to the radiator. Subsequently, this leads to deformation, cracks and blisters on the wooden surface.
Wooden screen for heating radiator
Plastic structures are inexpensive, but when exposed to high temperatures, they emit various harmful substances that can harm human health.
Metal screens do not deform, have fairly good resistance to mechanical stress, and also have a high heat transfer coefficient. The surface of such screens is painted using high quality powder paint. Over time, this paint does not darken, which is a very important advantage.
Types of installation structures
As already noted, when it comes to the toilet, we are talking mainly about the vertical arrangement of communications. Horizontal distribution pipes are also subject to closure. Based on this, there are several types of structures for masking water pipes:
- Mounted. This is an option suitable for installing blinds; roller shutters also have a hinged design.
- Frame. PVC panels and plasterboard are suitable for covering the frame.
- Combined. As the name implies, this is a symbiosis of the first two options - frame and mounted.
Combination of frame and hanging structures
- Ready array. As a rule, this is a one-piece structure that is mounted in an assembly. For example, a frame made of metal-plastic, in which a door is mounted for access to the water supply.
Box of blinds
One of the interesting ways to hide communications. First you need to build a support for installation. The box should look like a unique version of a window.
To do this, a corresponding frame is built, which is sewn up with plastic, plywood for painting or plasterboard.
Next, the blinds are installed according to the instructions that come with them.
Required Tools
To be fully prepared, before you start improving your toilet, it’s a good idea to prepare the necessary tools. Here is an approximate list of equipment for installation work:
- electric drill/hammer;
- dowels;
- screws;
- screwdriver;
- hammer;
- hacksaw;
- jigsaw;
- level;
- painting knife;
- screwdrivers;
- pliers;
- Bulgarian;
- centimeter.
For efficient work and convenience, it is better to ensure the availability of the listed tools.
Before work, prepare the necessary tools
Prices for angle grinders (grinders)
Angle grinders (grinders)
Gating procedure
Suitable for country houses only. High-rise buildings will not give permission for such a procedure. All wiring is hidden under the wall, through punched grooves.
Grilling can only be carried out by a plumber. To do this, use either a wall chaser or a hammer drill. Special grooves are carefully made in the walls, where all the plumbing units are hidden. It is recommended to use the described method for direct wiring.
This procedure has many advantages, but there are certain rules that every employee must follow.
- It is prohibited to use gating in load-bearing walls;
- To hide pipes behind walls, you must use only solid or brazed options. Mandatory access is required to joints, connections and important parts of the pipeline;
- It is forbidden to carry out gating in places where wiring passes;
- When forming the groove size, it is necessary to take into account the expansion of the material being laid;
- Use clamps wisely to ensure the system is soundproofed;
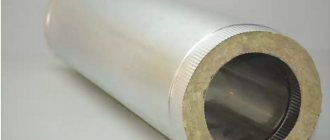
- If necessary, the pipes are wrapped with heat-insulating material.
- Don't forget about the anti-odor drain pipes.
Keep the wiring diagram under the walls so you know where the wiring system goes during renovations.
Preparing for work
In order for the process of creating a closing structure to be as simple as possible and not cause you any trouble, you need not only to choose the material, acquire it, prepare the tools necessary for the work and think through the configuration of the structure. Before you begin installation, it is very important:
- check pipes for the presence/absence of damage and defects;
- if any are found, eliminate them;
- check the strength and serviceability of tees, couplings, angles and other transition elements to reduce the risk of future accidents.
Many experts strongly recommend completely replacing old pipes with new ones. This makes sense, but the decision is made and all risks are assessed by the owner himself.
Check the serviceability of all transition elements
False walls
This design hides not only pipes, but also possible defects in the main wall. This technique does not spoil, but rather greatly enlivens the bathroom interior, creating three-dimensionality and a constructive accent. The only thing you have to put up with is that the false wall will take up at least 30 cm of free space.
Inside the device you can install shelves for storage, niches for a toilet adjacent to the wall, viewing windows for meters, doors for functional units. The decoration of the false wall will match the overall tone of the room.
Ways to close toilet pipes
The question of how to close the pipes in a toilet can be quite controversial. The following factors influence the decision:
- pipe sizes;
- their location;
- presence/absence of water meters;
- interior design, room style.
Please note: if the interior of the room is classic, then blinds will not be suitable as a finishing option, but for a minimalist style they are just right.
Which method to choose is up to you. Below we will talk about several of the most common and easy-to-implement options for closing communications.
Find out what ideas and design options exist for the design of a small toilet in a special article on our portal.
Complete wall closure
This method is very popular and is used to camouflage pipelines quite often. The essence of the method is that the space behind the toilet (where the pipes pass) is covered with a false wall. It is created from plasterboard sheets, PVC panels, suspended structures, or a combination of frame and suspended arrays (blinds). Any option will do. To fasten the material, a metal profile frame and sheathing are made.
Important: do not forget about the hatches for access to meters and valves!
This design looks neat, is simple in execution, and economical. It can be decorated in the same way as the rest of the walls in the toilet, which will create the effect of the absence of pipes. In addition, the free space inside can be used to store various household appliances if you install shelves there. However, there is also a minus: a false wall will significantly complicate access to the pipes.
False wall in the toilet
Oblique false wall: step-by-step instructions
The design is similar to the previous one, however, in this case, not the entire wall is closed, but the part of it in which the pipes pass (if they are located in the corner). It is impossible to install niches inside the slanting false wall for storing household chemicals, but this design helps to significantly save space in a small room. To arrange an oblique false wall:
- Secure the metal profile around the perimeter of the pipeline (walls, floor, ceiling).
Make a profile frame located horizontally
- Cover the structure with plasterboard.
Frame covered with plasterboard
- Cover the false wall with tiles or other cladding material of your choice.
Please note: regardless of the type of structure chosen, leave 3-4 cm between the wall being installed and the pipeline!
Square box
This design would be appropriate when the pipes do not run across the entire wall, but only occupy a corner of the bathroom. This option is great if the area of the room is small, since it will not take up much space. To create a square box you will need a metal profile (attached to the floor and walls), guides, and cladding/cladding material. Don’t forget about the door, which is positioned so as to provide access to water meters and valves. The advantages of this design are obvious:
- ease of installation;
- efficiency;
- possibility of dismantling.
The only thing: in the event of an accident, the box is not entirely convenient, since dismantling it can take considerable time.
If the communications have an angular vertical arrangement, then the box will look like a column. If the position of the pipes is horizontal, then you will get something like a small step that can be used as a stand for air freshener, paper or anything else.
Square box in the toilet
Video - Creating a box frame
Multi-level box
The design is a little more complex in composition than the previous one, therefore, more effort will have to be made to install it. Essentially, this is the creation of two or more successively arranged boxes made of plasterboard, fixed to a metal profile sheathing. These structures will perfectly hide the pipeline located below horizontally.
This is a good option, it allows you to improve the design and make it more interesting to play with. In addition, multi-level boxes are an excellent way to create niches not only in walls, but also on ceilings. This option is good for those who want to install multi-level spot lighting.
Multi-level box
Roller shutters
This design option is used quite often, but not everyone likes it, and here’s why:
- complex installation (it is better to entrust it to specialists);
- high price;
- Not suitable for every interior.
Despite the listed disadvantages, the design is good in that it will provide complete free access to communications. This greatly simplifies their repair in the event of an accident. You can also install shelves and store many necessary little things there.
Roller shutters
Built-in cabinet
A convenient, functional and attractive way to disguise pipes in the toilet. This design looks stylish and will easily fit into the interior if you choose the desired door color. Access to the water supply will always be free. In this case, the lower part of the communications can be covered with plastic, matched to the color of wooden chipboards or plywood doors. The downside of this option is its cost. Good materials are always expensive, and installing such a cabinet is not an easy task. Typically, owners who are not strapped for money choose this method: in this case, the marking, creation of the structure and installation are carried out by a specialist.
Utility cabinet
Original decor
If you are a lover of originality and know how to create interesting things with your own hands, then this method is just for you. With some imagination and a little effort, you can design the pipes in an individual style. It will turn out extraordinary and fresh. To decorate communications, any material will be used: rhinestones, mosaics, glass, paints, shells, etc. The main thing is that they match the overall style of the room.
You can make original pipe decor yourself
Prices for tiles for bathrooms and toilets
Tile
Decorating for apartment design
Masking a heating system is not always an annoying necessity. Such practical decor can serve as an additional decoration for the room. Just look at the photos of the finished options to be convinced of this.
If the design of the apartment is classic, or baroque reigns there, stucco molding is perfect as a disguise. The popularity of this method can be explained simply - this is an unusual design solution that complements the overall design of the apartment. In addition, stucco allows you to completely hide the structure.
If your apartment has a lot of wooden furniture, its color scheme is made in restrained tones, a lattice constructed from wooden blocks would be an ideal camouflage option. This original detail will not just hide the unsightly structure, but will give the apartment a more noble look.
If the now fashionable high-tech technology has “settled” in your apartment, the optimal solution for disguising the system would be a chrome-plated metal grille. This is a great addition to this modern and distinctive design.
You can see photos of ready-made solutions. Perhaps you will find an option that suits you completely. The main thing to remember is that when choosing a disguise, the decisive factor is not so much your personal preferences as the general style of the apartment. Decorative products should fit optimally into the interior design. Otherwise, having eliminated one, you will get another zone that is very noticeable.
Decoration options
- The structure can be tied with hemp or jute rope. In this case, the system will heat the room worse. However, possible heat losses are not significant;
- You can use bamboo trunks split lengthwise. From them you can build something like a casing;
- Crafters should like the idea of decorating the structure with artificial flowers;
- The areas where the structure meets the floor/ceiling can be decorated with decorative overlays that match the interior design of the apartment. They can also be installed in drainage areas from the riser;
- If you have a suspended ceiling installed, you can hide the cuts in it around the risers using decorative rings;
- You can make drapery from the material from which the curtains in the apartment are made.
There are many ways to decorate heating pipes. You yourself can easily come up with something new in this area. The main thing is imagination and determination to do quality work with your own hands. You can see the already camouflaged pipes in the photo. If you like any of the ready-made options, you can easily bring it to life.
Previously, during the construction of a house, communications were not hidden, as a result of which the premises acquired an unpresentable appearance. You can correct the situation if you find out how to decorate a heating pipe, especially since there are many such methods.
A little about the plumbing hatch
Structures masking communications must certainly be equipped with hatches, in other words, small doors for access to pipes, meters and valves. If you use options such as roller shutters, blinds, or a plumbing cabinet, then there will be no problems with this. However, in structures made of plasterboard or PVC panels, you will have to think in advance about the presence of a special inspection hole. In the case of plastic, everything is quite simple: it is easy to install a plastic door in the right place. The stores offer a large selection of models of any size. The plasterboard construction option is a little more complicated, because it is usually covered with tiles. In such cases, you can choose one of several options:
- Install a simple metal or plastic hatch, the doors of which will swing outward. Such an opening will be visible, but will not stand out too much from the overall picture.
Simple plastic hatch
- Buy a special hatch that can be hidden. The surface of the door of such a hatch will look like part of a false wall. This option is not the cheapest.
Camouflage hatch
Find out how to decorate a toilet with PVC panels with your own hands, and also read interesting ideas (photos) and instructions.
Step-by-step instructions for covering pipes with drywall
A material such as drywall is attached to a metal profile. To mount the box, you need the following:
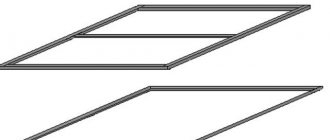
- Measure the desired length of the profile and cut it. Use a pencil to mark the floor (3-4 cm from the pipes) and screw the profile along the markings (with dowels). Do the same on the ceiling and walls.
- Cut racks from the profile (the length is up to the ceiling), install them in the corners and near the walls and screw them from the bottom and top with special profile screws (“bugs”).
This will create a frame for the box
- Cut the rack profile with a hacksaw and mount the sheathing horizontally from them. For fastening you will need the same “bugs”.
Horizontal sheathing will be needed to attach drywall to it.
- Mount a window for the hatch from sections of the profile. To do this, place the profile sections vertically and horizontally (in the form of an opening) in the selected location.
- Using a painting knife, cut the drywall into sheets of the required size.
Using a screwdriver, attach the sheets to the sheathing
Attention: when attaching drywall, make sure that the screw head is flush, but does not break through its surface.
Prices for drywall and sheet materials
Drywall and sheet materials
Video - Create a box from plasterboard
Installation of roller shutters
Markings are made on the guide rails. 10-15 cm retreat from each edge of the tire; on the remaining segment, the marks are distributed evenly, in increments of 45-50 cm. Holes with a diameter of 11.8 mm are drilled in the inner wall of the tire to attach the box to the opening. At the edge of the front flange of the box and its lid, joint holes with a diameter of 4.2 mm are drilled, two on each side. In the future, they will be used to secure the box lid with rivets. Next, a hole with a diameter of 8 mm is identified and drilled in the upper flange of the box panel to secure it in the opening.
Installation diagram of roller shutters for a sanitary cabinet
Assemble the roller shutter frame (frame and guides) and install it in the opening strictly according to the level. The iron sheet is inserted over the drive shaft from the rear wall of the box into the guide bars. Traction springs are attached to the edge of the web and secured to the shaft. Fix the box lid. Close the holes with plugs. Check the operation of the system.
Advice! Roller shutters for the toilet are usually plain, and this does not have the best effect on their aesthetic qualities. You can make them more attractive and consistent with the finish using airbrushing.
Step-by-step instructions for covering pipes with PVC panels
Installation of PVC panels is considered quite easy and quick. To implement it, follow several steps:
- Make a sheathing from beams or a metal profile: attach the guides with a hammer drill to the floor and walls using dowels and screws. Use long screws to attach the vertical posts to the guides.
Using horizontal planks, make the sheathing and the frame is ready
- The hatch window is an important detail. If the hatch door is plastic, the PVC panels will support it. If the large one is metal, make a window of the required size from the timber.
- Attach the plastic panels to the sheathing. This is done with staples, small screws, nails - whatever is more convenient for you.
Box covered with PVC panels
Please note: as a rule, the location of PVC panels is vertical.