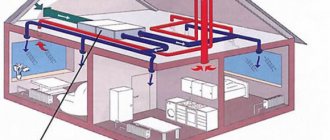
When constructing a drainage system, it is necessary to comply with sanitary standards for the distance of the sewerage system from a private house. This is an important issue on which the comfort and health of people depends. It is relevant only for residents of the private sector who independently build an autonomous sewer system on their property.
All attempts to build “by eye” can lead to outbreaks of diseases, the appearance of a bad smell in the house and other undesirable phenomena. Any owner understands that containers should be located as far away as possible. However, the size of the site does not always allow the tank to be carried over a long distance. You need to know what the minimum values are, otherwise you will face penalties and unpleasant conversations with inspectors. Let's take a closer look at this issue.
What standards regulate the location of objects on the site of a private house?
The main document according to which the construction of a house and the installation of communications is carried out is the project. It contains a work plan indicating all distances and dimensions. The distance from the house to the sewer drainage point is also indicated here. During design, we are guided by two standards:
- SNiP 2.04.01-85;
- SanPiN 2.2.1/2.1.1.1200-03 (or 2.1.5.980-00).
These documents detail all the requirements for sewerage and define the minimum permissible distances between objects and buildings. It must be taken into account that instead of SNiP, the updated version of SP 30.13330.2016 is used today. It is more in line with current realities, although there are no fundamental differences. Regardless of where and by whom the sewerage system is built, the rules and regulations must be strictly followed.
Some owners of private houses believe that the location of the sewer system is their own business. This is a wrong point of view. The rules and regulations specified in building and health directives must be followed by everyone without exception. If the system is being built on the site of a country house, the requirements are more relaxed. But, for a residential building, all existing requirements must be met.
It is noteworthy that the issue of the distance from the septic tank to the house is ambiguous. While the minimum value is clearly defined, the maximum value is not mentioned anywhere. Sanitary standards for sewerage for the private sector also do not mention a maximum. It is only noted that it is advisable to make the distance as large as possible. However, if the septic tank is too far away, blockages or defrosting of the pipes are inevitable. Under such conditions, the system will not be able to operate normally. Therefore, the location of the sewerage system on the site must meet not only sanitary, but also operational requirements.
Purpose
There is no need to spend a lot of time figuring out why a sewer inspection is needed - the element provides plumbers with access to the internal space of sewer pipelines and is used to quickly remove blockages. In most cases, the problem can be solved with the help of a regular plunger, but sometimes a blockage occurs where it can only be eliminated with the help of a plumbing cable. There are many reasons for blockages, the main ones being fatty deposits on the inner walls of pipelines and small irregularities, roughness or differences in cross-section at the points where system elements are connected.
Blockages appear in the form of small thickenings of plaque on the walls and quickly progress, blocking the entire section of the sewer pipe. If this problem appears in the vertical riser of an apartment building, it will be a disaster for the residents of one of the apartments, especially if it is located on the ground floor. All drains that cannot exit through the riser find their way out through the siphons of toilets and other plumbing fixtures.
example
The presence of inspection hatches makes it easier and faster to troubleshoot problems. Working with a long cable is difficult and ineffective, but using inspection hatches you can quickly get to the problem area.
Conditions for placement of receiving tanks
It is best to install a cesspool, septic tank or other receiving device in an area with soft soil. It does not create difficulties when performing excavation work. However, the home owner does not have to choose. If there is a high groundwater level, it is necessary to ensure the maximum possible distance from the septic tank to buildings and drinking wells. This is important, since drainage may break into the ground.
When choosing a location for a septic tank, you should first consider the lowest points of the site. This will reduce the amount of excavation work. In addition, it will be easier to ensure the slope of the pipelines.
An important point is the possibility of access of special equipment. From time to time, the septic tank will have to be cleaned of accumulated waste.
If the sewer truck cannot fit, you will have to do the work manually.
When drawing up a plan for the placement of a septic tank, it is necessary to draw a drawing of the site to scale. It must indicate all buildings, structures, and communications. This will allow you to more correctly determine the optimal location for the septic tank.
You may also like:
Sewage pipelines made of high-density polyethylene pipes with sleeves with a diameter of 110 mm: technology and features
Slope of sewer pipes according to SNiP
Once again about the rules
- Products for installation must be free of mechanical damage (chips, cracks, dents are unacceptable).
- The fewer turns in the system, the more reliable the highway
- Be sure to ensure tight connections when making connections.
- It is forbidden to cut or shorten the bells
- The pipe cross-section is selected in accordance with the number of plumbing fixtures
- Horizontal pipes are laid at an angle
- The internal line should be fixed to the floor or wall
- Be sure to install ventilation
- Installation of "revisions" is necessary
- Installation of a riser with a horizontal pipe is prohibited at right angles
- Connection to plumbing is carried out with flexible hoses
- The external system should be insulated
- An inspection well is installed for every 15 meters of external sewerage.
If you follow all the rules for laying sewer pipes, the installation will be high-quality and durable.
Allowable distances
SNiP defines the minimum distance from structures to the foundation as 5 m. However, this requirement applies primarily to filtration wells or fields. The sealed receiving tank may be located closer to the house. But even in this case, there remains the danger of wastewater leaking into the ground. Pipe connections sometimes come apart. Mechanical loads or soil movements can destroy pipes. Therefore, you should not take risks and install the container close to the walls.
For cesspools, the distance must correspond to standard values. This is prescribed by sanitary standards for the sewage system of a private house. The tanks emit an unpleasant odor and the waste releases harmful gases. Failure to comply with the requirements may result in unbearable living conditions. In addition, there is a danger of the spread of infections and biogas poisoning.
In addition to the distance to home, it is important to meet other requirements. The location of the sewerage system on the site according to SNiP requires that:
- from the septic tank to the border of the site (neighbors’ fence) must be at least 2 m;
- the distance to the garden (planting area) should be 3 m or more;
- it is necessary to provide a distance of at least 30 m to the water intake site (well, drinking well). If the site has loose sandy soil, the norm increases to 50 m;
- to a river or stream - 10 m;
- the nearest body of water - at least 50 m;
- to the road (roadway) - 5 m.
The design standards for sewerage in a private house are primarily designed to ensure comfortable living for people. The second task is to preserve the structures of buildings. In addition, it is important to create normal conditions for plant growth and eliminate any influence of the external part of the system on neighbors. If violations are committed during the construction of the sewerage system, the owner will have to bear the appropriate punishment. This may be financial, administrative or even criminal liability. Ill-considered actions are fraught with undesirable consequences, so it is important to carefully follow all the requirements of regulatory documents.
When building an autonomous system in a private house, you will need to coordinate the project with the BTI. If this is not done, the construction will be considered illegal. When the presence of an unapproved structure is discovered, you will have to pay a fine and register the system. In some cases it may be forced to be demolished.
Riser replacement procedure
Very often in old buildings it is necessary to change the sewer riser , mainly due to wear and tear. Dilapidated cast iron structures rust, holes form on them - sources of unpleasant odors in the room. Let's look at how to replace a sewer riser.
You may be interested in information about how risers are replaced
Old cast iron sewer riser
The replacement procedure itself, regardless of whether it is in a country house or a city apartment, will consist of the following steps:
- dismantling the old structure;
- installation of a new riser.
Each of them requires its own materials and tools, which must be prepared in advance.
You may be interested in information about what a hydrodynamic sewer pipe cleaning machine is.
What to do if the area of the plot is too small
A standard plot does not always allow you to fully meet the requirements for sewerage in a private house. Various factors interfere:
- presence of outbuildings;
- difficult ground conditions;
- site configuration (narrow and long shape).
It is necessary to take into account that the installation of the drainage system must be carried out in accordance with all current regulations. If the characteristics of the site do not allow the construction of an autonomous sewer system, it is necessary to solve the issue by other methods. Possible options:
- sealed storage container. It does not communicate with the field or filtration well, so the danger of saturating the soil with wastewater is eliminated. However, you will have to constantly monitor the volume of drainage and periodically pump out. The option is quite dubious, especially for a residential building with permanent residence;
- local treatment plant. This is a complex that completely processes waste and does not require soil treatment. The design is quite complex and requires connection to a power supply.
The most reliable option is a local station. It is expensive and requires some care. But, if there are no other options, you have to use all available possibilities.
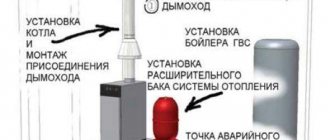
What does a sewer riser consist of?
If you ask an ordinary plumber about what elements a riser consists of, he will answer something like this:
“At the very bottom there is a cross that goes under the toilet, then a compensator, a pipe, an inspection, then everything ends with a pipe again. In addition, between the compensator and the cross there is a 50x100 mm tee for connection to the sink. This is a standard scheme."
At first glance, everything is extremely vague and incomprehensible. But the images of the sewer riser below clearly demonstrate all the elements of this design.
Structure of the sewer riser
Dimensions and material
Inspection made of cast iron
The inspection is selected from raw materials that correspond to the internal wiring. There are two types of products in use:
- Cast iron - have 4 bolts for fastening the hatch door, which can only be unscrewed with keys.
- Plastic - with a lid mounted on a thread, which is easy to open manually.
Products made from polymers are more popular. Unlike cast iron pipes, they have a smooth inner surface, are easy to install, are not subject to corrosion and are resistant to slightly alkaline and slightly acidic compounds. They are not afraid of temperature changes, the products are frost-resistant and do not need painting.
Pipes made of polyvinyl chloride and polypropylene have sockets on one side, with which they are easily connected to each other. Fittings of various configurations are used to perform turns, connections, repairs and transitions from one section to another. Each type of plastic has its own characteristics that you need to know about in order to make the right choice.
Advantages and disadvantages of polyvinyl chloride revision
The polymer is made from ethylene and combined chlorine derived from salt. It has a number of advantages:
- long service life;
- a light weight;
- simple installation;
- resistance to sunlight and aggressive compounds.
Disadvantages of products made from polyvinyl chloride:
- high heat capacity of the material, ensuring rapid cooling of wastewater;
- fragility that appears at 0 degrees;
- When burned, toxic gas is released.
It is impossible to attach plastic products to metal pipes, since the polymer has difficulty withstanding mechanical stress, such as threads.
Advantages and disadvantages of polypropylene revision
The main advantages of the products are elasticity, lightness and strength, smooth and non-oxidizing surfaces. The disadvantages are hidden in high flammability, destruction under ultraviolet radiation and significant expansion when exposed to high temperatures.
Revisions with a diameter of 50 mm and a length of 115 mm are produced and are used in the installation of sewer drains for sinks, bathtubs and showers. For bathrooms, tees with a section size of 110 mm and a length of 185 mm are used.
Stage one. Dismantling the old riser
It is quite difficult to properly remove an old pipe, so it is better to entrust this task to a specialist. If this is not possible, then you can do everything on your own.
What will be required at work
There are quite a lot of tools that you will need when working. You will need:
- Bulgarian;
- Sander;
- chisel;
- plastic film (to seal any holes that appear);
- screwdriver;
- perforator;
- hammer;
- nail puller;
- personal protective equipment – rubber gloves, goggles.
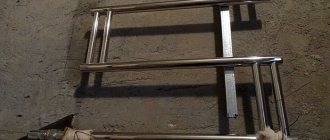
Tools needed for work
Prices for silicone sealant
silicone sealant
Step-by-step instruction
First, you must decide exactly where you will replace the sewer riser. There are exactly two options:
- a pipe located in the interfloor ceiling;
- the section between the ceiling and the floor.
In the first case, dismantling work must be coordinated in advance with the neighbors, since some of the work will be carried out in their apartments. Often people resort to the second option.
Preparation for dismantling work
First of all, turn off the water supply. Check to see if anyone is using the drain, then follow the instructions.
Step 1 . Take a grinder and make two horizontal cuts on the riser approximately ½ of its diameter (make one of them 10 centimeters from the ceiling, the second 80 centimeters from the tee).
Step 2 . Then take a chisel and a hammer, use them to make one blow to each cut - first from above, then from below. Often this is enough to split the cast iron pipe and remove its middle part. If not, take another hit.
Dismantled cast iron riser
Step 3 . Cover the upper section of the pipe, which remains under the ceiling, with plastic film, then dismantle the lower section (in addition to the tee, it also contains other fittings). You can try to loosen the tee with a nail puller and remove it. If the nail puller does not help, remove the concrete solution at the joint using a hammer drill.
Step 4. Remove the remaining pieces of mortar with a screwdriver and remove the tee.
Note! It may happen that none of the methods helped to dismantle the tee. In this case, cut it with a grinder about 3 centimeters from the socket.
Step 5 . Prepare the lower and upper sections for installing a new pipe - clean them of dirt and solution residues. Use a sanding machine for this.
If you do everything correctly, your new pipes will last you for many years. Now you can start installation.
Additional recommendations:
Sometimes rubber seals (gaskets) are sold separately from pipes and may not ensure a tight connection of pipes during installation.
When purchasing pipes and gaskets, insert one gasket into the socket and try joining two plastic pipes. If one pipe fits quite easily into the socket of another, then it is advisable to immediately change the gaskets or look for another seller.
To facilitate the installation of plastic pipes, it is recommended to use lubricant.
Since a high-quality pipe must fit very tightly into the socket of another pipe, the use of shampoo or liquid soap (they are usually always on hand) greatly facilitates the joining process.
When joining pipes, one pipe enters the socket of the other by 47 and 36 mm with a diameter of pipes and fittings of 100 and 50 mm, respectively.
When installing plastic sewerage, pipes of standard length are used.
But the design of the apartment should not be changed because of the modular dimensions of the pipes, and the modular pitch is not very pleasing: 150 mm, 250 mm, 500 mm, 1000 mm, 2000 mm, 3000 mm. If you need a pipe of a different size, then you can always cut it evenly and accurately, as a result you will get a pipe cut that is sometimes better than the factory one.
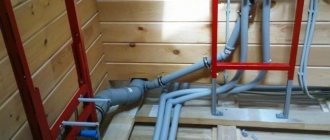
General information
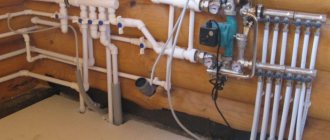
The construction of private houses is experiencing a real boom. For this reason, future owners of such buildings need to install a convenient sewer system, which even a non-specialist in this field can install. At the same time, the drains must be endowed with good performance, because many owners have significantly increased the number of connected plumbing fixtures. First of all, this is due to the availability of a variety of modern washing machines and dishwashers, and showers and Jacuzzis are gaining popularity. These devices increase the usual volume of water consumption by two hundred liters during the day.
The increase in the number of installed plumbing fixtures becomes the reason for the complication of the entire drainage system. Fortunately, to set up a good system, you can use PVC pipes, which come with additional fittings that allow you to assemble an engineering structure in a few days. In addition, plastic parts are sold together with O-rings, which can be easily replaced if a mechanical defect or other damage occurs.
The assembled internal drainage system consists of a large number of plastic pipes. As well as shaped elements intended for connecting main pipes. The entire engineering system is designed to drain wastewater from plumbing installed in a house or apartment. It is worth remembering that installation of sewer pipes in violation of established installation rules leads to disruption of proper operation and other unpleasant consequences.
How to indent a sewer riser
If you need to make an indent, that is, move the riser horizontally, then it is recommended to follow the following recommendations.
- The width of the indentation should not exceed one meter, otherwise in the inclined area the movement of sewage will accelerate and create noise.
- Sometimes they resort to creating an indentation in order to slow down the movement of wastewater and thereby reduce the noise level. In this case, you will need bends at an angle of 45°, as well as a vertical pipe, the length of which must be more than two diameters of the riser.
- None of the elbows used to create a setback should exceed 45° in slope.
Using the diagram below, you can become more familiar with the features of the indentation in the sewer riser.
Indentation in the sewer riser