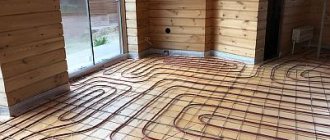
Warm floors are an excellent solution for improving your home. The floor temperature directly depends on the length of the heated floor pipes hidden in the screed. The pipe in the floor is laid in loops. In fact, the total length of the pipe is determined by the number of loops and their length. It is clear that the longer the pipe in the same volume, the warmer the floor. In this article we will talk about restrictions on the length of one heated floor circuit.
Approximate design characteristics for pipes with a diameter of 16 and 20 mm are: 80-100 and 100-120 meters, respectively. These data are provided as approximate estimates. Let's take a closer look at the process of installing and pouring heated floors.
Cost calculation
Approximate cost calculation for a water heated floor for a house with an active heating area of 100 m2:
- A package of Penoplex extruded polystyrene foam 5 cm thick costs approximately 1,150 rubles. The area of the material in it is 5.04 m2, which means we will need 20 packages of insulation, a total of 23,000 rubles.
- Reinforced mesh 15*15 cm, made from 5 mm rods costs 53 rubles per square meter, which means that in total it will cost us 5,300 rubles for reinforcement.
- A roll of 200 micron polyethylene waterproofing has an area of 300 square meters. m., and costs 3800 rubles.
- The price per meter of metal-plastic pipe is 40 rubles. When laid in 15 cm increments, the consumption will be 6.7 linear meters per square, in total we will need 670 meters of pipe costing 26,800 rubles. Plus additional reserve for supplying circuits to the collector.
- To save money, we will make our own damper tape from foamed polyethylene; it will take about 30 square meters. The price of a polyethylene backing 8 mm thick is approximately 22 rubles per square, a total of 660 rubles.
- 2 collectors from Valtec for 7 circuits will cost 3200 rubles.
- 14 fittings for connecting pipes to the collector will cost 1610 rubles.
- A ready-made mixing unit with a pump for 7 circuits costs 14,500 rubles.
- Plus we will add here the additional costs for fasteners (screws, nylon ties) +1000 rub.
- In total, the materials will cost you 79,870 rubles, excluding the purchase of the boiler.
The cost calculation of warm water floors is shown in the photo
The cost of a floor screed together with sand concrete work 6 cm thick is approximately 480 rubles per meter, a total of +48,000 rubles.
If you hire a professional, you will also need to consider the cost of pipe laying, insulation, mesh, and system testing. The total cost of installing a turnkey system will be approximately 1,500 rubles per square meter.
Tips and tricks
To get the most accurate calculations, it is advisable to seek advice from professionals who specialize in installing internal utilities.
It is possible to use an online calculator, which will facilitate the calculations, but will give very rough calculations that provide general information about the scale of the upcoming installation work.
An example of calculating a water heated floor
To heat old and dilapidated buildings that do not have high-quality insulation, it is not advisable to use a warm water floor system as the only heating element, which is due to the low degree of efficiency and high energy consumption.
The level of technical literacy of all calculations performed has a direct impact on the quality characteristics of the installed heating system. Correct calculations allow you to optimize financial costs not only for the process of installing water floor heating, but also to minimize costs during operation and maintenance of the entire heating system.
Video - Calculation of water-heated floors (part 1)
How to correctly calculate before installation?
To calculate the pipe pitch, take into account the following parameters:
- Coverage area. The space that is not occupied by built-in furniture, kitchen appliances, a bathtub or shower stall and other objects under which it makes no sense to heat the floor is calculated.
- The coolant temperature is usually from 30 to 60 degrees. It should also be taken into account that the floor screed or the coating laid on top of it leads to heat absorption, so the base itself usually does not warm up above 35 degrees.
- Type of coverage. Some of them (for example, parquet) do not tolerate too high temperatures, so the step must be taken less frequently.
- Heat dissipation power. The smaller the step, the higher it is. It is necessary to calculate the heat transfer power, taking into account the required temperature in the room and heat loss when heating the room (on external walls, windows, front door, door to a loggia or balcony, etc.).
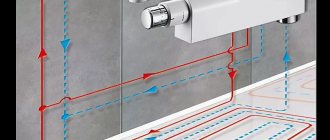
- Snail (spiral, shell). The tube is laid along the walls with a large pitch, then brought closer to the center of the room, and spread in the opposite direction so that the output pipe passes between the turns of the input spiral.
- Double helix. The room is divided into two zones, each of which has its own spiral contour.
- Snake. Here the pipe is simply laid so that it runs in a zigzag (more precisely, a snake) from entrance to exit. The easiest way to plan, but also the most ineffective heating method: the last steps of the snake will be too cold.
- Double snake. It is similar to a regular one, but the return part is laid parallel to the input part.
When calculating the step, you need to consider the following:
- When using a spiral or double helix, it must be taken into account that half of the pipes in the circuit will be return. Therefore, we must proceed from the fact that those pipes that go directly from the entrance will be seriously heated.
- With a snake, the shorter the distance, the better.
- With a double snake, the calculation will be the same as with a spiral.
Temperature
The maximum recommended temperature in pipes should not exceed 60 degrees. In addition, it is knocked down by various flooring options, for example, laminate or linoleum, so in fact it turns out to be about 35 degrees.
Be that as it may, it is worth installing sensors to monitor the temperature. One of them must be placed immediately at the entrance to the system, after the pump. The second sensor is installed in front of the pump, respectively, at the outlet of the system.
In addition, there are certain parameters for each type of premises:
- In living rooms, the floor temperature should be about 29 degrees.
- Passage-type premises should have a temperature setting of 35 degrees.
- Workspaces should be slightly colder than walk-through areas - 33 degrees.
Installation diagrams for water heated floors
The layout of the heated floor pipe can be made using a “snake”, “snail” or a combination.
Laying a water circuit with a snake is the simplest. It is carried out in loops. This installation scheme is optimal in a room divided into functional zones in which it is planned to use different temperature regimes.
When the first loop is mounted around the perimeter of the room, and a single snake is launched inside it, then half the area will be sufficiently heated by hot water. In another part of the room, the cooled coolant will circulate. Therefore, it will be cool in it.
Another variation of this scheme is used - a double snake. With it, the supply and return water branches run side by side throughout the room.
The third variation of this scheme is the distribution of turns using an angular snake. It is used in corner rooms when two walls are external.
The coils of the snake can be installed evenly. However, the bends of the water loops in this case will be very curved.
The advantage of the scheme is that the layout of the heated floor pipe with a snake is simple. It is easy to plan and install.
Minuses:
- temperature difference in one room;
- the pipeline bends are excessively sharp, which can lead to kinks if the laying step is small.
Installing a water floor with a snail is also called a “shell” or “spiral”. With this scheme, the supply and return branches are mounted across the entire area of the room and run in a spiral parallel to each other. Installation is carried out from the perimeter of the walls to the middle of the room.
The supply branch in the center of the room ends with a loop. From it, a return line is installed in parallel with your own hands and runs from the middle of the room along its perimeter further to the collector. When there is a cold external wall in the room, a double snail can be laid along it.
Laying heated floor pipes with a snail has the following advantages:
- The room warms up evenly.
- The hydraulic resistance in the system is low.
- Installing a shell requires less material consumption than snakes.
- The bends of the turns are smooth, thanks to this the step between the turns can be made smaller.
The disadvantage of the snail is complex planning and labor-intensive installation.
Not all rooms have a rectangular configuration, and the room may also have two external cold walls. To keep it warm there, you can use combined laying of contours with your own hands.
To make the room warmer along the outer walls, loops of supply pipes are placed there. It is best to mount them almost at an angle of 90º to each other.
A competent approach to insulating a balcony: a calculator for calculating the thickness of the insulator
Reading time: 1 minute No time?
It just so happens in our country that our winters are frosty, autumns are rainy and windy, and even in summer there is nowhere to escape from the ubiquitous drafts. The dream of every owner who has a balcony or loggia is to create a real oasis or recreation area on this, at first glance, unsightly territory. The only question is how to correctly and accurately calculate the consumption of materials in order to plan expenses and not overpay. Especially for our readers, the editors of HouseChief.ru have developed a convenient and visual calculator that will help home craftsmen without special training accurately calculate the required thickness of insulation for a balcony or loggia.
A warm balcony is most often a multi-layer structure that needs to be calculated correctly
Read in the article
Calculation of the power of a warm water floor
Before calculating a warm water floor, you should pay attention to the following parameters:
- room area;
- characteristics of the room (desired temperature, wall material, window design);
- type of floor covering, that is, what the floor will be made of. So, when covering a floor from a solid board, a higher degree of heating of the room is required.
- boiler power, pump, pipe diameter.
Calculation of a warm water floor includes several stages.
- It is necessary to draw a floor plan on a sheet of paper, preferably on a millimeter paper, setting the scale. The plan should show the locations of windows and doors.
- Calculation of pipe pitch (a certain gap between pipes during installation), their location and diameter.
unevenly should not be above 30 degrees.
The contour of the pipes when laying should be within 80-90 meters. The longer the pipe, the greater the hydraulic resistance. As the length of the pipe increases and the number of turns increases, the resistance will increase. The heating area should not exceed 20 m². If the room has a large area, then it must be divided in half and made two circuits, or divided into three or more circuits. When the number of circuits is known, then a collector with a certain number of taps is purchased. The best option is a manifold with control valves that help change the temperature, and therefore regulate the supply of coolant to each circuit.
The amount of hydraulic resistance must be the same in each circuit that is connected to the distribution manifold. Independent circuits are required for different rooms (balcony, veranda). These rooms must be heated separately because heating them requires a lot of heat.
The uniform distribution of heat and the required length of the pipes depend on the pitch of the pipes. The average pipe consumption is 5 linear meters per 1 m² of room area, if the distance between turns is 20-30 cm. That is, about 100 m of pipe is needed for a room with an area of 20 m².
To achieve a heat transfer of 50 W per square meter, the pitch of the pipes with the coolant must be 30 cm. When the heat transfer increases to 80 W, then the step should be reduced to 20 cm. If the size of the gaps between the pipes increases, then it is recommended to increase the temperature of the coolant
When placing heating pipes for a warm water floor on the plan, do not forget about the main places of heat loss, which are windows and doors. The pipe extending from the riser should run along the window. The distance from the pipes to the walls should be 20−25 cm, but not less than 8−10 cm. The distance between the pipes depends on the diameter of the pipes. Based on the drawing and outline of the pipes, the number of pipes required for installation is calculated. Additionally, you need to add two meters for connecting the pipe to the riser.
Calculation rules
To install a heating system on an area of 10 square meters, the best option would be:
- use of 16 mm pipes with a length of 65 meters;
- the flow rate of the pump used in the system cannot be less than two liters per minute;
- the contours must be of equal length with a difference of no more than 20%;
- the optimal distance between pipes is 15 centimeters.
It should be taken into account that the difference between the temperature of the surface and the coolant can be about 15 °C.
A specific example of calculating a heating branch
Let's assume that you need to determine the parameters of the thermal circuit for a house with an area of 60 square meters.
For the calculation you will need the following data and characteristics:
- room dimensions: height – 2.7 m, length and width – 10 and 6 m, respectively;
- the house has 5 metal-plastic windows of 2 sq. m;
- external walls - aerated concrete, thickness - 50 cm, Kt = 0.20 W/mK;
- additional wall insulation – polystyrene foam 5 cm, Kt=0.041 W/mK;
- ceiling material – reinforced concrete slab, thickness – 20 cm, Kt=1.69 W/mK;
- attic insulation – 5 cm thick polystyrene foam boards;
- dimensions of the entrance door - 0.9 * 2.05 m, thermal insulation - polyurethane foam, layer - 10 cm, Kt = 0.035 W/mK.
Next, let's look at a step-by-step example of performing the calculation.
Step 1 - calculation of heat loss through structural elements
Thermal resistance of wall materials:
- aerated concrete: R1=0.5/0.20=2.5 sq.m*K/W;
- expanded polystyrene: R2=0.05/0.041=1.22 sq.m*K/W.
The thermal resistance of the wall as a whole is: 2.5 + 1.22 = 3.57 sq. m*K/W. We take the average temperature in the house to be +23 °C, the minimum temperature outside is 25 °C with a minus sign. The difference in indicators is 48 °C.
Calculation of the total wall area: S1=2.7*10*2+2.7*6*2=86.4 sq. m. From the obtained indicator it is necessary to subtract the size of the windows and doors: S2 = 86.4-10-1.85 = 74.55 sq. m. m.
Substituting the obtained indicators into the formula, we obtain wall heat loss: Qc=74.55/3.57*48=1002 W
By analogy, heat costs through windows, doors and ceilings are calculated. To assess energy losses through the attic, the thermal conductivity of the flooring material and insulation is taken into account
The final thermal resistance of the ceiling is: 0.2/1.69+0.05/0.041=0.118+1.22=1.338 sq. m*K/W. Heat loss will be: Qp=60/1.338*48=2152 W.
To calculate heat leakage through windows, it is necessary to determine the weighted average value of the thermal resistance of the materials: double-glazed window - 0.5 and profile - 0.56 sq. m*K/W respectively.
Ro=0.56*0.1+0.5*0.9=0.56 sq.m*K/W. Here 0.1 and 0.9 are the proportion of each material in the window structure.
Window heat loss: Qо=10/0.56*48=857 W.
Taking into account the thermal insulation of the door, its thermal resistance will be: Rd=0.1/0.035=2.86 sq. m*K/W. Qd=(0.9*2.05)/2.86*48=31 W.
The total heat loss through the enclosing elements is: 1002+2152+857+31=4042 W. The result must be increased by 10%: 4042*1.1=4446 W.
Step 2 - heat for heating + general heat loss
First, let's calculate the heat consumption for heating the incoming air. Room volume: 2.7*10*6=162 cubic meters. m. Accordingly, ventilation heat loss will be: (162*1/3600)*1005*1.19*48=2583 W.
According to these room parameters, the total heat costs will be: Q=4446+2583=7029 W.
Step 3 - required power of the thermal circuit
We calculate the optimal circuit power required to compensate for heat loss: N=1.2*7029=8435 W.
Next: q=N/S=8435/60=141 W/sq.m.
Based on the required performance of the heating system and the active area of the room, it is possible to determine the heat flux density per 1 sq. m
Step 4 - determining the laying pitch and contour length
The resulting value is compared with the dependence graph. If the coolant temperature in the system is 40 °C, then a circuit with the following parameters is suitable: pitch – 100 mm, diameter – 20 mm.
If water heated to 50 °C circulates in the main, then the interval between branches can be increased to 15 cm and a pipe with a cross-section of 16 mm can be used.
We calculate the length of the contour: L=60/0.15*1.1=440 m.
Separately, it is necessary to take into account the distance from the collectors to the heating system.
As can be seen from the calculations, to install a water floor you will have to make at least four heating loops. We looked at how to properly lay and secure pipes, as well as other installation secrets here.
Design of cable heating
The main differences between electric heated floors are heating elements consisting of cables or cable sections. Let's consider the varieties and calculation methods.
A resistive heating cable is a heating element made of a single or two-core cable in a protective screen, with a constant resistance, which is laid over the floor area.
The cable has standard lengths, and therefore resistance and heat generated. The cable length cannot be changed, this will lead to a change in current and malfunction.
Specific power and length
This is the capacity of one sq.m of heated floor. The length of the heating electric cable is selected based on this indicator.
For example, the power of the cable system for proper heating should be about 100-150 W/m2; if the heated floor is planned to be used as the main heating, then 150-200 W/m2 is needed. If we need to heat 10 m2, then we need a cable with a power of 10*100=1000 W.
How many meters of cable is this?
This will depend on its cross section. The thicker the wire, the greater its power, and the larger the installation step will be during installation. A thinner wire will have to be laid at a smaller pitch in order to maintain the selected power density, and accordingly the cable consumption will be greater.
For ease of calculation and installation, electrical transformer transformers are sold in the form of mats rolled into a roll. The cable in them is laid in a snake with a certain pitch and fixed. The width of such a “mat” cannot be changed; as a rule, it is 50 cm. It turns out that the specific power is set by the manufacturer, for example 130 W/m2. The buyer can only select the appropriate heating element area from those available for sale.
What data is needed for the calculation?
The traditional contour calculation is performed for pipes with a diameter of 16 mm, but the scheme for any pipe size remains the same: they are calculated according to the length of the loop along which the coolant will move.
Initial data collected:
- Desired temperature above the floor:
- Contour laying diagram;
- Distance between pipeline elements;
- Maximum length of pipe used;
- The number of contours used with different lengths;
- Possibility of connecting loops to one pump and manifold, the number of such connections.
Distance between pipes in the circuit
Along the perimeter of the room, the circuit with heating elements is laid in increments of 0.1 m. In the rest of the space, the increment is usually considered to be from 0.15 to 0.25 m. If you exceed the maximum value, then when the owner walks on the floor covering, a strong temperature difference will be felt, which is extremely unpleasant.
Allowable contour length
The indicator depends on the parameters of pressure in the loop and hydraulic resistance - they are determined by the amount of coolant passing through a certain pipe diameter per unit of time.
When a heated floor is installed, the water circulation in one of the loops is disrupted, and even a circulation pump cannot be restored. The coolant becomes locked in the circuit, cools down, and reduces the pressure to 0.2 bar.
Experts recommend the following dimensions in the outline:
- A metal-plastic loop with a diameter of 16 mm can be up to 100 meters. The optimal value is considered to be 80 m;
- Polyethylene pipes with a diameter of 18 mm can form loops up to 120 m (preferably 80...100 m);
- A metal-plastic pipe with a diameter of 20 mm allows loops of 125 meters. The shorter the length in this case, the more reliable and stable the operation of the system is predicted.
How to calculate contours with different lengths?
Sometimes a heated floor is made with several contours. Ideally, they should be equal in length, then there will be no need to balance the system. In practice, such a scheme is practically impossible to implement even by experienced specialists.
To calculate the pipeline in different rooms, the difference in the length of each circuit is taken into account up to 40%. It is recommended to vary the diameters of the pipes and change the pitch of their laying, which will compensate for the lengths of the loops.
Possibility of connection to one pump and manifold
The number of loops connected to the collector and pump can be determined by the power of the equipment, pipes (diameters and material of manufacture), the number of circuits, the footage of the room, as well as the material from which all enclosing structures are made.
It is difficult to cope with such calculations on your own, so at this stage it is worth engaging professionals who have enough experience and knowledge in calculating underfloor heating projects.
How to count a loop?
After collecting the initial data and determining the optimal option for heated floors, we begin to calculate the maximum length of the water heated floor circuit:
Such calculations make it possible to create floor heating systems with sufficient power to regulate and maintain the temperature in the living room set by the owner. When calculating the length of pipes in several circuits for a large house, assuming their connection to one collector, it is worth contacting designers with experience in performing such work.
What temperature should be in the rooms of a private house?
Calculating the length of the pipeline in heated floors is important for the heating rate and sufficient heat release. A stable temperature must be maintained inside the room, for which the coolant is heated to 60 degrees Celsius. If this value is exceeded, communication materials may be damaged.
Thermal comfort values for residential premises of a private house should be approximately the following:
- The rooms should be maintained between 27 degrees and 29 degrees;
- Corridor or hallway (all passage areas) - 35 degrees Celsius;
- Bathrooms and places with high humidity - up to 33 degrees Celsius.
Date: September 25, 2021
Calculating the circulation pump
To make the system economical, you need to select a circulation pump that provides the required pressure and optimal water flow in the circuits. Pump passports usually indicate the pressure in the circuit of the longest length and the total coolant flow in all loops.
The pressure is influenced by hydraulic losses:
∆ h = L*Q²/k1, where
- L—contour length;
- Q - water consumption l/sec;
- k1 is a coefficient characterizing losses in the system; the indicator can be taken from hydraulic reference tables or from the equipment passport.
Knowing the pressure value, calculate the flow rate in the system:
Q = k*√H, where
k is the flow coefficient. Professionals assume the flow rate for every 10 m² of a house is within 0.3-0.4 l/s.
Among the components of a warm water floor, a special role is given to the circulation pump. Only a unit whose power is 20% higher than the actual coolant flow will be able to overcome the resistance in the pipes
The figures regarding pressure and flow rates indicated in the passport cannot be taken literally - this is the maximum, but in fact they are influenced by the length and geometry of the network. If the pressure is too high, reduce the length of the circuit or increase the diameter of the pipes.