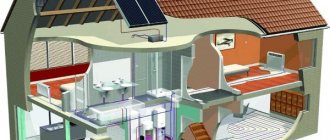
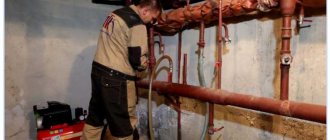
How does water heating work?
Water heating is a heating system using a coolant fluid (usually water, occasionally water-based antifreeze). Main parts of the system: heat generator, piping system, heating devices (radiators, registers, convectors). Heat is transferred into the room by convection and infrared radiation. All kinds of stoves, fireplaces, boilers, and electric heating devices are used as heat generators. The fuel used is coal, firewood, fuel oil, natural gas, pellets, peat, briquettes, and electricity.
The water does not have a very high temperature, the pressure in the system is low - water heating is safer than heating using stoves and fireplaces located directly in the house, or high-temperature steam heating. Heating units are usually located in specially adapted rooms in large buildings - boiler rooms are also located in separate buildings and are supervised by trained personnel.
In water heating systems there can be natural and forced circulation of water. Systems with natural circulation of water are reliable, but require proper design and are less efficient than systems with forced circulation. Therefore, such systems are gradually becoming a thing of the past and are preserved in old, small one-story houses.
What is single-pipe heating?
Any heating system consists of the following components:
- Heating device (boiler). Can be solid fuel, electric, gas, etc.
- Heat-dissipating devices. Batteries or underfloor heating system.
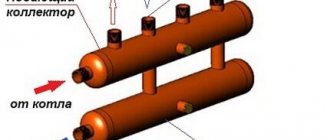
- A device for creating circulation inertia of the coolant. This could be an accelerating section of the main line or a water pump.
- Compensator for excess coolant pressure in the system. Expansion tank (open or closed).
- Pipes, fittings and necessary fittings.
The choice of heat supply scheme is directly dependent on the type of devices used.
The difference between one-pipe and two-pipe heating systems
The main structural difference between one- and two-pipe heating systems:
- With one-pipe heating devices are connected to each other by one pipe; The coolant is supplied to the radiators in series.
- With a two-pipe system - two pipes (supply and return) - the coolant is supplied to each radiator through the supply pipe, and is discharged back to the heating boiler through the return.
Starting the system
When all elements of the Leningradka are installed, the valve should be opened to fill the system with coolant. Next, air is removed from the system, and the central screw on the pump is unscrewed (located on the housing cover). Liquid emerging from under the screw will indicate complete removal of air and the possibility of starting the equipment (the screw should be tightened before turning on).
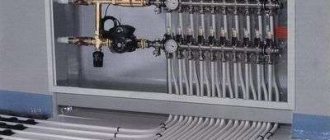
Photo of the expansion tank and built-in pump
Owners of private homes often face a choice of which type of home heating to choose. There are only two types of heating systems traditionally used in everyday life: one-pipe and two-pipe. Each type has both advantages and disadvantages. The difference between both systems is the different method of delivering coolant to heating devices. Which heating structure is better for your own home, one-pipe or two-pipe, is to be chosen directly by the owner of the house, taking into account his own household needs, the expected heated area and the availability of finances.
In the first option, heat is distributed throughout the house through one pipe, sequentially heating each room of the house. In the second case, the complex is equipped with two pipes. One is a direct supply of coolant to the heating radiators. The other pipe serves to drain the cooled liquid back into the boiler for subsequent heating. A correct assessment of your own financial capabilities, an accurate calculation of the optimal parameters of the coolant in each individual case, will help not only decide on the type of heating system, but also correctly carry out the installation of heating.
You can understand and figure out what is best for you, a single-pipe or two-pipe heating system, only after carefully studying the technical nuances.
Options for single-pipe heating schemes
Single-pipe heating systems are divided into:
- By type of coolant circulation - with natural and artificial circulation.
- Closed (sealed) and open.
- Vertical and horizontal.
- With top and bottom wiring.
Systems with natural and forced circulation
Previously, the plan for single-pipe heating systems for private houses had an expansion tank under the ceiling; hot water flowed into it from a stove or other heating unit, and then flowed by gravity through the pipes to the radiators. The system was quite simple and reliable and was successfully implemented by craftsmen when upgrading a stove heating system in small one-story houses with a piping length of within 30 m (and previously, most houses had an area of 50-70 m² and had a shape close to a square).
To heat water, pipes were installed in the furnace firebox, which served as heat exchangers between the coolant and the fire in the firebox. But progress does not stand still, and stoves have been replaced by coal, gas and wood boilers. Houses began to acquire heated kitchens, verandas, and bathrooms - the area began to increase, the systems became more complicated, and the scheme stopped working.
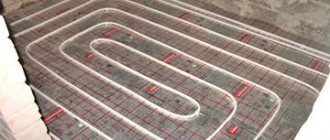
Progress does not stand still, and modern automatic boilers are all produced with built-in circulation pumps. For heating units that are difficult to automate (solid fuel boilers), the pump is installed separately. The main reason is severe overheating of the pump due to strong fuel combustion. A system with forced circulation allows you to implement the most complex heating schemes, including underfloor heating - with natural circulation, floor heating simply will not work.
Another reason for using forced circulation of the coolant is the increase in the area and number of floors of houses under construction (a two-story house or a house with an attic is cheaper than a one-story house of the same area).
Open and closed heating system
Previously common systems with natural circulation were most often open; the water level in the tank increased when overheated, and decreased when cooled. A pipe was installed in the tank to release excess pressure and steam into the atmosphere (or sewer) in case of overheating of the system.
In fully automated modern boilers (gas, fuel oil, pellets) there is a small expansion tank that allows you to compensate for a slight increase in coolant pressure. But in principle, pressure depends on temperature, and in a working boiler, when the pressure rises, the boiler simply turns off and the pressure drops.
The situation is much worse in boilers burning coal, peat or wood - burning in them cannot be stopped quickly, and overheating of the water is possible. Therefore, when developing a project, the system necessarily includes a fairly large expansion tank, a valve for discharging steam into the sewer or into the atmosphere, and an automatic water make-up system. Even when installing modern solid fuel boilers, an open system is sometimes used.
Upper and lower wiring
Pipelines can be laid above or below the radiators. There is no fundamental difference, but in private houses they often use a scheme with lower wiring - it’s more beautiful. Overhead wiring is rarely used in office or industrial buildings - there is less chance of the pipes being touched by a load or feet.
Vertical and horizontal
A vertical single-pipe multi-storey heating system used to be often used in multi-storey buildings - water was supplied to the attic or top floor and descended through separate risers, passing successively through radiators. This system is called Leningradka or Leningradskaya.
Horizontal - when the pipe is laid horizontally, the heating devices are connected in series - used in one-story buildings.
The most effective single-pipe system scheme for houses with 2 rooms
In small houses, horizontal pipe routing is always used.
The most effective single-pipe system scheme for houses with 3+ rooms or an area of more than 60 m2
The choice of wiring diagram for a medium-sized private house comes down to horizontal for a one-story house and vertical single-pipe for two-story houses. The heating is distributed from the top of the second floor, lowered to the bottom and collected back to the boiler.
If the house is very large (more than 150 m²), it is worth ordering the project from a specialized organization - it is almost impossible to calculate all the parameters of the system yourself. In any case, you should choose a more progressive and economical scheme with forced circulation.
Classification of single-pipe heating systems
There are two different types of single-pipe heating systems:
- Vertical . This type of system is used in two-story buildings. In this case, the devices are located under each other (only a slight displacement is allowed) and are connected by a common riser. Structurally, this circuit is more similar to a combined one, since the difference between the supply and return lines is very clearly visible in it. A pump is not required in this system, but it can always be installed for reliability.
- Horizontal with bottom wiring. This single-pipe heating scheme is used in one-story houses with a small area. Natural circulation in this case is quite sufficient, although there are also systems with an installed pump.
You can connect heating devices in three ways:
- Bottom;
- Side;
- Diagonally.
The most widespread is the bottom connection of radiators, which is valued for its almost invisible pipes, which improves the interior of the premises. However, from the point of view of efficiency, this option is far from ideal - the heat transfer of the batteries in this case is noticeably reduced.
The best option is a diagonal pipe supply scheme, in which the heating devices warm up properly and demonstrate maximum efficiency. In any case, before making a one-pipe heating system, you need to develop a project that shows the smallest details of the future design.
Advantages and disadvantages of a single-pipe system
Disadvantages of a one-pipe system
It is generally accepted that a one-pipe system is cheaper than a two-pipe system. This opinion arose as a result of the use of this scheme for heating apartment buildings in the Soviet Union. But when implementing such a scheme in a private house, especially a fairly large one, a one-pipe system is no cheaper than a two-pipe one.
A two-pipe system requires an increase in the number of radiator sections along the heating system, thermostatic valves are required to adjust the temperature, and pipes of a sufficiently large diameter are required for normal operation - all this together does not help reduce the cost of the system.
The second serious drawback is the difficulty of adjusting the temperature in each room. For this purpose, thermal valves or radiator regulators are used.
For normal operation of the system, it is necessary to create a sufficiently high pressure and install a sufficiently powerful pump and expansion tank at the highest point of the system - in a two-story house, the coolant must flow from above. In addition, such a system is quite difficult to adjust.
If the house is large, then the requirement to increase the number of sections of the next radiator in can lead to a significant lengthening of the radiators and difficulties with their placement.
Advantages
Modern technologies and installation procedures make it easier to balance the system: shut-off valves, thermal valves, balancing valves allow you to balance the system well and ensure uniform heating in all rooms.
The use of taps when connecting a radiator allows you to disconnect and remove a separate radiator without turning off the heating system.
With single-pipe wiring, only one pipe is laid, which looks more aesthetically pleasing than two.
A single-pipe system warms up very quickly - faster than a two-pipe system.
If the house is small, then there are savings on materials. With a large house, the costs of materials are almost equal to the costs of installing a two-pipe system.
Schemes of single-pipe systems
For heating country cottages and apartments in multi-storey buildings, only 2 types of single-pipe circuits are used:
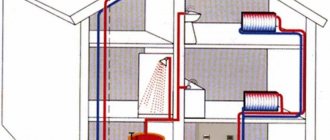
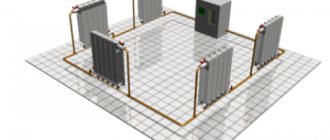
- The classic Leningrad heating system with lower horizontal wiring is shown above in the first picture.
- Radiator network with vertical risers.
On the right is a classic “Leningradka” with a bottom battery connection, on the left is a connection to a single-pipe riser
“Leningradka”, which involves connecting radiators to a common ring main laid horizontally above the floor. A classic of the genre is the lower side connection of both eyeliners. With a more modern approach, the pipes are connected to the battery diagonally; installers practice both methods.
The second scheme is used in apartment buildings and two-story private buildings. Vertical single risers pass through the ceilings; batteries are connected to them on each floor. Water supply to the risers is provided from the lower or upper horizontal collector.
Vertical distribution of apartment buildings with bottom and top filling
Note. Please note: the general line of the “Leningrad” with horizontal bottom wiring is a solid pipe that does not change diameter along its entire length. Single-pipe risers are equipped with jumpers - bypasses, which allow part of the coolant to pass past the batteries.
Both types of wiring can operate with forced and natural circulation of water (gravity). Schemes are modified depending on operating conditions:
- To operate the Leningradka in gravity mode, you will have to increase the internal cross-section of the annular collector to 40-50 mm, make slopes and raise the vertical acceleration section from the boiler, otherwise there will be no flow through the radiators. An open expansion tank is connected to the highest point, as shown in the schematic diagram of the heating of a one-story house.
The height of the accelerating loop is under the boiler room ceiling. The pipe then lowers to the floor and goes horizontally to the radiators - It is better to implement the gravity principle in a two-story building according to a scheme with risers passing through the necessary rooms. The supply pipe Ø40-50 mm rises directly to the expansion tank installed in the attic. Horizontal branches with slopes diverge to the sides from it, supplying water from above to risers and radiators. On the rise, you can install a bypass unit with a circulation pump.
Open gravity scheme with vertical single-pipe risers - A closed single-circuit distribution with pressure circulation is presented at the beginning of this section. In a two-story house, the Leningradka must be made double-circuit - provide a separate horizontal loop with coolant supply through the ceiling, as shown in the axonometric diagram.
Initially, the Leningrad system was conceived as a cheap option for supplying heat to convection heating devices. But if desired, you can connect a small circuit of a water-heated floor to the main line. You will need a second circulation pump, a check valve and a three-way valve to regulate the water temperature.
Important. The underfloor heating circuit can be connected at the end of the line, behind the last radiator. One condition: it is necessary to ensure the required coolant flow in the collector - increase the diameter and increase the productivity of the main pump. Otherwise, the warm floor will take away some of the heat from the radiators.
Hydraulic calculation
Hydraulic calculations are usually carried out by specialists when designing complex systems. The calculation calculator includes calculations of losses in all areas of the system depending on the coolant speed, the difference in supply and return temperatures, pipe roughness, diameter, turns, narrowings, the presence of thermal valves, balancing devices, taps, the type of heat generator and the number of radiators, fittings, density and fluid viscosity. The calculation is complex, and when installing a system in a private home, they usually do without it.
Strengths and weaknesses of single pipe systems
The popularity of single-pipe heating in private construction is explained by the fairly low cost of the structure and the ability to independently carry out installation work. This makes it possible to save on hiring specialists.
Among other advantages of single-pipe systems, the following should be highlighted:
- High level of hydraulic stability. If you turn off some of the circuits, this will not affect the heat transfer of the remaining elements of the system. The same applies to replacing batteries or increasing the number of their sections.
- Low pipe consumption for organizing a main line.
- Slight inertia. To heat up the system, an order of magnitude less coolant is required than in schemes with two pipes.
- External aesthetics. Installation of a single-pipe system usually does not affect the beauty of the interior of the room, especially when using hidden laying of the main pipe.
- Thanks to the use of innovative shut-off valves (automatic and manual thermostats), it is possible to fine-tune the operating modes of the heating circuit and its constituent devices.
- Simplicity and reliability of the design, which makes it possible to install a single-pipe heating system on your own. The same applies to heating maintenance during operation.
By organizing the connection of control and monitoring devices for the heating system, it is possible to achieve its functioning in automatic mode. Integration into the Smart Home system is also allowed: as a result, it becomes possible to program optimal heating modes, taking into account the time of day, season, etc.
The main disadvantage of a single-pipe heating scheme is the presence of an imbalance between the heating of the radiators, depending on their distance from the boiler. This is explained by the gradual cooling of the coolant as it circulates through the pipes. As a result, the batteries closest along the coolant path turn out to be hotter than those located further away. In such cases, it is better to use cast iron devices, which are characterized by slow cooling.
Common design mistakes
The most serious design mistake is an attempt to adapt a single-pipe heating system to heating a large house (100 m² or more), hanging a large number of radiators on one branch of the system.
An equally serious mistake is underestimating or significantly overestimating the boiler power. High power will lead to a decrease in efficiency and high fuel consumption, while too little will lead to cold in the house. Boiler power is often insufficient if the boiler is used to heat water and the required power is not taken into account when calculating the required boiler power.
Another mistake is connecting radiators using corners (bends), rather than tees, and the absence of a jumper when connecting a radiator. In this case, it is impossible to regulate the temperature in each room; if one radiator fails, the entire system will have to be turned off completely.
Another serious mistake is choosing a small diameter line - the heating circuit will not work well.
Negative and positive qualities of a single-pipe system
Let's consider what other advantages , in addition to those described above, a single-pipe open-type heating system with forced circulation has.
- Errors in calculations will not affect the operation of the system, because the diameter of the pipes can be small, which reduces the cost of installing heating in the house.
- All components of the system have a long service life, which is achieved by the absence of temperature changes in the system.
- It is possible to regulate the temperature both in individual rooms of the building and in the entire system as a whole.
It is worth remembering the disadvantages of the system:
- forced circulation systems are not recommended for installation in regions with frequent power outages. When the electricity is turned off, the circulation pump stops working, and the coolant flow continues to move naturally due to the forces of gravity and temperature differences in the system. Performance and heat transfer drop sharply when the pump is turned off;
- pumping equipment is rarely completely silent. It is recommended to allocate a separate utility room for the boiler room.
Which boiler is better to choose
Gas
The best option for home is compact, automatic, with easy fuel delivery. Gas heating is the cheapest option. Typically, the installation of such a boiler does not require a separate room - the unit is simply hung on the wall. There are single-circuit and double-circuit models that simultaneously heat water for household needs.
Among the shortcomings, it should be pointed out that all work with gas must be carried out by specialized organizations with a license, and in full accordance with the project agreed with the city gas.
Wood-burning
Such a boiler takes up a lot of space and requires a separate room for installation. Fuel is loaded manually. Firewood also requires a lot of storage space - dry and separate from the boiler (for safety reasons). The firewood must be dry - it needs to dry for one to one and a half years. Firewood burns out quickly, and you will have to add fuel to the boiler almost every day. Boiler operation is difficult to automate - only by limiting air access to the firebox. There will be times when the house will be cool.
The advantages are the availability of fuel and low price. But you will have to carry the firewood manually.
Carbonic
It practically has all the disadvantages of a wood-burning boiler, plus dust and dirt in the boiler room. And the problem of ash disposal. On the positive side, coal takes a long time to burn, and fuel is loaded once every few days.
Pellet
Such boilers appeared on the domestic market relatively recently. A fully automated boiler, with a very high efficiency (up to 90 and even 95%), relatively compact, with the formation of a small amount of soot and virtually no ash. The fuel is clean, environmentally friendly - sawdust. One loading of the bunker is enough for several days.
Disadvantages: fuel is not the cheapest (but not the most expensive either). Pellets will have to be stored in a dry place and manually transferred to the boiler room.
Liquid fuel
Heating units using fuel oil operate automatically, are economical, and not very cheap. Requires installation of fuel tanks and pipelines. It can be quite difficult to bring fuel, reload it, and not spill it - fuel oil stains do not decorate any yard.
Electric
Electricity is the most expensive form of energy, and heating will cost you a pretty penny. Otherwise, everything is excellent: the boiler does not require a chimney, is easy to control, compact, and safe. But if your electricity often goes out, this is not your option: you have the prospect of living in the cold for a couple of days without heating. Uninterruptible power supply will not help in this case.
The choice of heating unit often does not depend on our preferences. First of all, you should soberly assess the availability of various types of fuel in your area, its cost and complexity of transportation.
The most optimal type of boilers is gas. If the area is not gasified, a pellet boiler would be the best choice. Wood and coal require manual loading, delivery and manual carrying of fuel. For dachas with intermittent people, fireplaces, fireplaces, and metal stoves have proven themselves well. Electric heating is very expensive, and this type of heating is used very rarely.
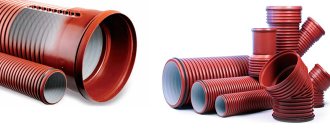
Which pipes are best to use?
Steel pipes for heating systems in private homes are almost never used anymore. There are practically three options: plastic, stainless steel and copper. Systems made of copper and stainless steel are expensive and require certain skills during installation, so their use is still limited.
Plastic pipes as a material for heating systems have many advantages: they are durable, strong, chemically inert, do not rust, do not become overgrown with salts, and are easy to install.
Metal-plastic
Pipes reinforced with aluminum foil are most widely used for heating systems. The great advantage of composite pipes is their low thermal expansion - 3-5 times less than that of plastic pipes without reinforcement. Composite pipes are made of polyethylene and polypropylene.
Polypropylene
In practice, polypropylene pipes (reinforced) are used for home heating systems - they hold their shape better at temperatures of about 95°C, look neat, are easy to install by welding, pipes and fittings for welding are very cheap.
Diameter selection
For efficient operation when installing a one-pipe heating system, it is necessary to use main pipelines with a diameter of: for a house with a living area of up to 80 m² - at least 25 mm; for a larger house - at least 32 mm.
Efficiency of a single pipe system
When developing a project for installing a single-pipe heating system, it is necessary to take into account many factors:
- Is there a constant power supply?
- Possibility of allocating a separate room (boiler room) for equipment.
- How many floors are there in the house?
- Design features and level of aesthetics of the future system.
Each individual situation is characterized by its own specific arrangement of equipment and methods of its switching. It is most practical to equip small premises (for example, a country house) with a simple gravity circuit with sequential switching of radiators directly into the main pipe. Using 2-3 batteries, you can do without a significant amount of shut-off valves: in this case, you can simply drain the water from the system if necessary.
If the building has a large area, a complex heating system with a number of branches is required. In such a situation, the best option would be a forced heating scheme of the Leningradka type. It is characterized by the use of diagonal switching of heat-releasing devices and the presence of adjustable bypasses.
How to choose radiators
The entire range of radiators comes down to 4 types:
- Cast iron (modern) - ordinary and decorative. They take a long time to warm up and give off heat for a long time. Durable. Heavy, quite expensive, installation requires only two people. Decorative imported ones are exorbitantly expensive. In a private home, the use of such radiators is justified only when using beautiful decorative models. The so-called “eternity” of cast iron is shattered by the fragility of the intersection gaskets - it may happen that in ten years the radiators will have to be rebuilt;
- Aluminum. They warm up quickly and release heat quickly;
- Bimetallic - aluminum elements are strung on durable steel pipes. The best option for radiators, there are practically no disadvantages, but this is an expensive option;
- Steel thin-walled radiators. The cheapest and most common. They are susceptible to corrosion and are poorly resistant to high pressure in high-rise buildings.
Radiators are also divided by design into sectional, panel and registers. Panel radiators are designed for pressures up to 0.6 MPa. The advantage of panel radiators is that the kit includes fasteners, plugs, and a Mayevsky tap, but for a sectional radiator all these parts will have to be purchased separately. Registers are steel batteries made of metal pipes without radiators.
The device is bulky, requires a large amount of coolant, and is not very effective. The decorative qualities of tubular registers do not allow their installation in houses and apartments.
In practice, the choice of radiators in a private home depends on your financial capabilities and visual preferences. The cheapest steel radiators will last freely for 15-20 years or more, then in case of a leak, you can replace or simply throw away one section and resolder the pipes and continue to use the radiators.
In apartment buildings, you cannot install panel radiators and you should not install thin-walled steel radiators - only if you are sure that they will withstand pressure up to 16 atmospheres (this is the maximum, the operating pressure in high-rise buildings does not rise above 1.0 MPa = 10 atmospheres).
How to calculate the number of radiator sections and fittings?
Traditional advice - 100 W per 1 m² of room area with one external wall and one window, 120 W per 1 m² of room area with two external walls and one window, 130 W per 1 m² of room area with two external walls and two windows.
The required amount of heat is calculated, the resulting power is increased by 20% (multiplied by 1.2) and the required power of the heating unit is obtained. Divide the power by the power of one radiator section and get the number of sections. If you live in the north of the Russian Federation, it is worth increasing the number of sections and the power of the boiler by another 20 percent.
But these calculations are correct at an incoming coolant temperature of 90°C and an outgoing coolant temperature of 70°C. In reality, such temperatures do not exist either in private houses or in apartment buildings. The maximum temperature of the coolant in the supply pipeline usually does not exceed 60-70°C. For normal heat transfer, it is necessary to increase the number of sections by one and a half times. In addition, due to the peculiarities of the single-pipe system and taking into account the decrease in temperature in each subsequent radiator, the number of sections is increased by 10%.
A more accurate method is to calculate heat loss through walls, windows, roof, floor, depending on wall materials, insulation, and type of windows. The method is more accurate, but labor-intensive, and is used mainly by designers.
Basic wiring diagrams
All types of wiring can be implemented, depending on the method of moving the coolant along the circuit.
- Gravitational. In other words, the coolant moves along the circuit by gravity.
- With forced circulation.
In order to understand the design, all the pros and cons of each method, it is necessary to consider the structure and operating principle of the simplest gravitational CO.
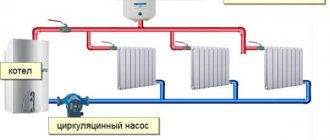
This CO consists of: a heat generator (1), a main pipeline (2; 3; 4; 5; 6), to which batteries are connected, and an atmospheric or membrane expansion tank (7), which compensates for the thermal expansion of the coolant.
The boiler heats up the water, which rises up the riser and from there falls to the radiators. The coolant cooled in the batteries is returned to the boiler unit for further use. As you can see, in this embodiment no device is provided for moving the coolant. In gravitational COs, a so-called accelerating manifold or riser is used to create pressure in the circuit. In the diagram it is indicated by number 4.
For proper operation, it is necessary that the height of the accelerating manifold above the first radiator in the circuit be at least one and a half meters.
In order for the coolant to move by gravity along the circuit, one accelerating riser is not enough: the slope of the line is necessary. The normal slope should be 5° or 0.01 meter (10 mm) per 1 linear meter of pipe. The condition of raising the last radiator in the circuit above the heat generator must be met.
Advice! To avoid stagnation of the coolant, you should be guided by the following rule: the higher the last radiator in the circuit above the boiler, the better. Despite this, this value should not exceed 3 m.
What else affects the operation of such a CO: the length of the circuit, the diameter of the main pipeline and branches, and the method of connecting radiators.
The figure shows four main methods of installing radiators in a single-pipe circuit: “a” and “b” - serial connection; “i” and “g” - connection parallel to the main pipe. As is clear from the figure, normal coolant gravity flow can only be ensured by a circuit with a lower series connection of radiators (a). In practice, this method has all the disadvantages that are inherent in single-pipe CO.
To improve heat transfer, the battery connection diagram was modernized (b): this method of installing radiators contributes to more uniform heating of all battery sections (radiators, registers, etc.). This method also has disadvantages: such a connection is practically ineffective when water moves by gravity; an even greater difference in coolant temperature is created between the first and last battery in the circuit. Installing a circulation pump in the circuit will help solve the first problem.
In practice, it is not only the pump that needs to be installed. To bleed air from the batteries, it is necessary to install automatic air vents or Mayevsky valves on them.
This wiring will no longer be gravitational, so the slope of the pipeline may not be observed.
If it is intended to install CO with a closed expansion tank (10), then the best place for its installation is the return branch of the main line, in any place convenient for installation. When using a closed one in this scheme, a safety group (11) is used, consisting of a blast valve, a device for monitoring pressure and a device for venting air.
Such a system is fully operational and has the right to exist. Moreover, it is successfully used for heating small one-story rooms. Next, the modernized scheme of the Leningradka single-pipe heating system will be considered.
Why this joint venture was called “Leningradka” is impossible to know for sure. Some sources claim that this particular scheme was developed and tested in the “Northern Capital”. Others say that this name was received as confirmation of the efficiency of this heating system. "Leningradka" is successfully used in both mass and private construction.
The main feature of this technology is the presence of a jumper between the radiators (12). It is this design that allows for more even distribution of heat between the batteries. The disadvantage is the impossibility of cutoff and the difficulty in temperature balancing of each battery.
By installing a shut-off valve (13) on each radiator, and a balancing valve (14) on each jumper, the heating system is free of these disadvantages. For better heat transfer, you can use this wiring diagram with diagonal connection of batteries.
This modernized type of CO allows you to make a branch for heating an additional room, or use it to heat a small two-story building.
The problem with any one-pipe system is that as the water passes through all the batteries it cools down quite significantly, and this can lead to the formation of condensation on the boiler heat exchanger. Installing a buffer tank, or as it is also called a heat accumulator, will help solve this problem. The diagram of a single-pipe heating system with a heat accumulator is shown in the figure below.
Such a system will work as follows: After starting the boiler, water will circulate in a “small circle” boiler - heat accumulator - boiler, thanks to a thermostatic valve installed on the supply pipeline after the buffer tank. After the temperature reaches the desired value, the valve opens and supplies the heated coolant to the radiators.
Cooled water will flow into the heat accumulator and mix with the heated coolant. This solves the problem of low return temperature and the appearance of condensation on the heat exchanger of the boiler unit.
How to choose a pump
The ideal case is when the pump is built into the boiler. But if you have a solid fuel boiler installed, then due to overheating of the pump and rubber in it, this is impossible.
If the boiler requires the installation of a separate pump, then you will have to select its parameters.
Pump performance is calculated using the formula:
Q = N / (t2-t1), where
Q – pump capacity,
N – boiler power (kW),
t2 – maximum temperature of the coolant at the outlet of the boiler, take the maximum values (90° C),
t1 – the coolant temperature at the boiler inlet is taken on average (70° C).
The supply height of the circulation pump is calculated by the formula (calculated for all sections of the same pipe diameters and summed up):
P = RI + Z, where
P - pressure loss in the heating system, Pa,
R—coolant friction losses, Pa/m,
I is the length of a pipeline of the same diameter, m,
Z – pressure drop in local resistances, Pa.
This is what experts calculate. The calculation is quite complicated, so a simplified calculation can be used: 10 m of system length corresponds to 0.6 m of pump delivery height.
Based on the calculated data, a pump is selected. For heating in private homes, units with a wet rotor are installed - they are compact and make little noise. The pumped liquid also serves as a lubricant for the pump.
Installation
Operating principle and elements
A single-pipe closed heating system is a ring that includes all its components:
- a boiler that heats the coolant to a given temperature;
- pipes through which hot water is delivered to the radiators, and after passing through them - to the boiler;
- heating panels;
- expansion tank.
When choosing a boiler, pay attention to the type of fuel it uses. The most economical heaters are those where water is heated by gas. But for this you need the main gas pipeline to approach your site. In addition, equipment using solid or liquid fuel, liquefied bottled gas or combined units are often used.
Boilers for heating the coolant
The diameter of the pipes depends on the length of the heating network, the type of radiators, the area of the house, the power of the boiler, and so on. Currently, pipelines made of various polymers are the most common.
When choosing pipes and radiators for constructing a one-pipe heating system, it is necessary to take into account engineering parameters (the volume of the required liquid, its pressure, temperature, pipeline diameter, radiator area, etc.), which must be determined in advance.
The calculation of hydraulic heating - a single-pipe system with any location of the main line supplying the coolant - can be done independently or you can entrust this work to a specialist. The price for such a service is usually not very high.
An expansion tank is necessary to regulate the fluid pressure in the system and prevent its breakdown if it increases. A modern heating system involves the use of a closed expansion tank. It consists of two chambers separated by a flexible partition. One of them is filled with air under high pressure, the second is connected to heating pipelines.
Expansion tank design diagram
Note! Closed expansion tanks can be installed not only at the top point of the system, but also in any place convenient for you, for example, a boiler room or utility room. Another advantage is that the lack of direct contact with air prevents premature corrosion of the metal parts of the heating system.
Selecting heating panel connection options
A single-pipe connection scheme for heating radiators provides for the flow of coolant or the construction of so-called bypasses - sections of pipes through which hot water can pass, bypassing the radiator.
In the first case, it is not expected to install a riser for transporting liquid. Water comes from the boiler and flows through each radiator: from top to bottom or from near to far. In this case, the water temperature will gradually decrease and the lowest (farthest) rooms may not be heated well.
This situation can be avoided if radiators of a smaller area are installed at the beginning of the heating system than at the end.
Diagram of water flow in a series system
The disadvantage of the system is rightly considered to be the inability to install shut-off valves and thermostatic valves on the pipelines, since shutting off one tap will entail the inoperability of the system as a whole.
In the second case, a transit pipeline - a bypass - is installed under the heating radiator, thanks to which more efficient heating of all rooms is ensured.
Note! Bypasses must be made of pipes of smaller diameter than the main pipeline, otherwise a sufficient amount of coolant will not flow into the radiator.
Radiator with bypass and shut-off valves
All water entry points into heating panels, as well as bypass pipes, must be equipped with taps. This will allow you to regulate the temperature of the heating system in each room separately. In addition, in the event of an accident, you can temporarily turn off one or another section and repair or replace it without completely stopping the heating.
Installation technology
Installation of the described utility network can only be carried out after a hydraulic calculation of a single-pipe heating system has been completed. It depends on him which elements will be used.
The sequence of actions itself is as follows:
- A heating boiler is installed in a pre-selected and prepared location. Instructions describing this process are included with the unit. It is advisable to entrust the installation of this equipment to a specialist from the organization where you purchased the device. He will guarantee his work.
- The pipeline is being constructed. In this case, it is necessary to install tees in advance in the places where the heating radiators are installed. Be sure to ensure that all pipes are installed with a slope, otherwise the natural circulation of the coolant will be disrupted.
Pipes and fittings for arranging a heating system
- If you install heating with forced water flow, you need to install an electric pump. Remember that this equipment is designed to pump water whose temperature does not exceed 60 degrees. Therefore, it must be installed at the end point of the system - before the cooled coolant enters the boiler.
- Next, the expansion tank is connected. As already mentioned, a closed container with a membrane can be mounted anywhere, while an open container can only be installed at the highest point of the system.
- At the end of the previous stage, you can begin to secure the heating radiators. They are attached to the wall using supplied brackets. Before marking and drilling, you should familiarize yourself with the manufacturer's installation recommendations. It is important to maintain the prescribed distances from walls, window sills, floors and other structural elements of the building.
- Heating panels are installed based on the scheme you choose. Don’t forget to connect shut-off valves, thermostats, plugs, air bleed valves, and so on.
Don't forget to install radiators correctly
- Before filling the coolant, pressure testing is carried out with compressed air, after which the system is filled with water, a test run is carried out and operating modes are adjusted.
A single-pipe vertical heating system with bottom pipe routing is more suitable for multi-storey private houses, while a horizontal one is more suitable for single-storey houses. But remember that if the house area is more than 200 sq. meters and a pipe length of more than 30 meters, you need to either install powerful pumps or choose a different installation scheme for the heating system.
Selecting a security system
A pressure gauge, safety valve, and automatic air vent are installed in the supply after the solid fuel heating unit. The valve relieves excess pressure when the coolant overheats. A bypass and a three-way valve are installed in front of the pump - it does not let cold water into the boiler until the water in the boiler heats up to a certain temperature - this protects the firebox from condensation and damage to the boiler.
Common mistakes when choosing components
A very serious mistake when installing a solid fuel boiler is the absence of an expansion tank. Its volume must be at least 10% of the volume of the entire system. With an open circuit, the tank is installed at the highest point of the system, with a closed circuit - in front of the pump on the return line. You cannot install the system without a strainer and a mud trap (installed on the return line in front of the pump, after the expansion tank). All fittings must be the same diameter as the wiring. You cannot narrow the cross-section of the pipe - this has a negative effect on heating.
Installation features
First of all, it is worth noting that any heating system requires accurate calculations, which should be entrusted to professionals. Stages of installation of a single-pipe heating system with natural coolant circulation.
- Install a heat generator. This is where the installation of any autonomous heating system begins.
- Directly from the boiler installation outlet, a vertical riser is laid, on which an atmospheric expansion tank and an accelerating manifold are installed.
- Next, the location of the radiators is marked. Do not forget about the height of the collector relative to the radiators. Make markings taking into account the required slopes.
- According to the markings, assemble the heating circuit. The assembly technology depends on the material of the pipes used.
- Install fittings and the necessary shut-off valves to connect the batteries to the branches of the main pipes.
- Install air vents on radiators.
- Mount ball valves on bypasses (jumpers between radiators) to be able to balance the operation of the system.
- Connect batteries of the selected type and corresponding to your CO to the pipeline
Next, it is necessary to check the integrity of the pipeline with the expansion tank closed. If the circuit is sealed, fill it with water, brine or antifreeze and start the boiler. After this, set up operation with balancing valves.
Advice: If you decide to equip your home with a more complex heating system, we strongly recommend contacting specialists.
Step-by-step instructions and installation procedure
What tools and consumables will be needed
Tools:
- Grinder with cutting discs.
- Electric drill, hammer drill, screwdriver.
- Adjustable wrenches.
- File.
- Welding machine for polypropylene pipes.
Consumables for the heating system:
- Radiators and installation kits (plugs, Mayevsky tap, taps, American valves, thermal valves, gaskets), brackets.
- Pipes, tees, bends, fastenings.
- Pump, three-way valve, taps, tank, filter, sump, pressure gauge, safety valve, automatic air vent.
Preparing a sketch or diagram
When installing even the simplest heating system, it is necessary to draw a drawing or diagram accurately indicating all dimensions, devices, fittings and components of the boiler piping. Without a diagram, it is impossible to accurately calculate the amount of materials and provide for all the features of the system.
Boiler installation
Installation of a gas boiler can only be carried out by a specialized organization that has a license. Installation of other boilers, including solid fuel ones, can be done for a private home with your own hands.
Gas and electric boilers are often wall mounted. For a gas boiler, a chimney is required at the installation site - conventional or coaxial (horizontally discharged through the wall). All other heating units require vertical chimneys.
Heating units with a power of up to 60 kW can be installed in the kitchen; more powerful heat generators require boiler rooms. Electric and gas boilers have built-in expansion tanks, all automation and pumps, and installing them in the kitchen does not create problems.
But solid fuel and liquid fuel units with all the fittings and fuel take up a lot of space, create difficulties during cleaning (and often generate dust or litter the kitchen). Therefore, if possible, they should always be taken out to a separate boiler room, ensure sufficient air flow, and install a chimney.
The minimum distances from the boiler to walls, furniture and other equipment are usually specified in the instructions. If there is no information in the instructions, then the following requirements should be adhered to:
- There must be a passage of at least 1 m on the front side of the boiler.
- Passage from the side or behind – 0.7 m; if there is a need to service the unit - then at least 1.5 m.
- Distance to furniture or nearest equipment – 0.7 m.
- The distance between two boilers is 1 m, when placed opposite it is at least 2 m.
When the boiler is connected to a system with natural coolant circulation, the return connection level must be below the level of the first floor radiators.
For piping boilers, it is necessary to use metal pipes.
Installation of the security unit
The safety unit is installed after the boiler and includes a pressure gauge, safety valve, and automatic air vent. Solid fuel boilers (except pellet boilers) cannot be quickly extinguished, and a situation may arise with overheating, evaporation of water in the heat exchanger and a sharp increase in pressure - the valve in this situation will release the pressure. If air accumulates in the coolant, the air vent will automatically release the collected air from the system.
It is desirable that excess pressure be released into the atmosphere - water vapor mixed with boiling water cannot be discharged into a modern plastic sewer, chimney, general ventilation duct - plastic is not designed for such temperatures, in a chimney or duct the steam will quickly condense on the walls and will gradually destroy a pipe or box.
It is strictly forbidden to install a tap between the heat generator and the safety unit.
Pump installation
The pump is installed in front of the boiler. Installing a bypass with a tap near the pump is mandatory - in case of possible breakdown and removal of the pump. Ball valves are installed before and after the pump. The pump is installed so that the shaft is horizontal.
Filter installation
The filter and sump are installed in front of the pump (after the expansion tank). The mud trap is installed horizontally, the cleaning plug should be located at the bottom.
Installation of expansion tank
If the boiler design does not include a tank, it must be installed. The volume of the expansion tank must be at least 10% of the amount of coolant. Nowadays, connecting a membrane expansion tank is becoming increasingly popular, which allows you to effectively smooth out pressure surges in the system.
An expansion tank is installed in a gravity-fed open heating system; it is installed above the highest point of the system - under the ceiling of the second floor and even in the attic. In schemes with forced circulation of coolant, the tank is installed in front of the pump, valve, filter and sump.
Connecting the heating system to the cold water supply system
When overheating and steam is released, or for unknown reasons, the pressure in the system may drop over time. To do this, a water inlet from the water supply is cut into the system in front of the expansion tank. A tap or special valve is installed that automatically recharges the system when the pressure drops.
Marking pipe laying locations
Places for laying pipes are marked in advance using a pencil and ruler. It is advisable to lay pipes in both open and closed heating systems with a slight slope of 5 mm per m - in case of pump failure.
Drilling holes for fasteners and pipes
Drilling holes for pipe fastening is not particularly difficult. When laying pipelines through walls, a larger diameter sleeve should be inserted into the wall (and the holes should be covered with decorative trims).
Laying highways
When laying pipelines, it should be borne in mind that top wiring (when the pipelines are located above the radiators) reduces the efficiency of radiators by 50%. Main pipelines must be firmly fixed in special clips located every 0.5-0.7 m.
Marking installation sites and assembling radiators
Radiator installation locations are marked first. Radiators are usually installed in places of greatest heat loss - near external walls, in window sill niches. The distance of the battery from the floor must be at least 200 mm, from the window sill - 100-150 mm, otherwise heat transfer by convection will not occur. For the same reason, it is undesirable to cover radiators with screens, especially blind ones - heat transfer from radiators will go to zero.
Installation of radiators, Mayevsky taps, bends and plugs
Before installing the radiator, four plugs are screwed into it, taps are installed at the inlet and outlet (or a tap and a thermostatic valve), and a Mayevsky tap is installed in one of the top plugs. All plugs are equipped with gaskets. If necessary, use a special tool to twist together the required number of radiator sections (don’t forget about the gaskets!). If the number of sections in the radiator is more than 12, it is worth mounting it on 3 brackets.
How to connect radiators to the main pipeline
There are three ways to connect radiators:
- Diagonal.
- Lateral one-sided.
- The lower (or upper) side is bilateral.
- Bottom (if there are pipes at the bottom or a bottom connection unit - usually the case with panel radiators).
The most effective method is diagonal - it allows you to use the entire surface of the battery. The most ineffective is the upper side bilateral one.
To connect radiators to taps or thermal valves, screw on an American union nut, MPH and solder the outlet, then solder it into the system. Connection to the main line or riser must be made using tees - the radiator is connected in parallel to the main line or riser, otherwise it is impossible to regulate the temperature of each battery. Nowadays they produce cranes combined into one unit with an American valve, an MPV, and sometimes with an outlet.
Starting the system
Before turning on the heat generator, it is necessary to fill the system with water and check for leaks, and only then turn on the boiler.
Useful video on the topic
It’s better to see it once – our videos show in detail all the intricacies of installing a heating system.
Expansion tank
Connecting the tank to polypropylene
Video - pump installation
System startup video
Expansion tank for closed heating system
The expansion tank is designed to compensate for changes in coolant volume depending on temperature. In closed heating systems, this is a sealed container divided into two parts by an elastic membrane. At the top there is air or inert gas (in expensive models). While the coolant temperature is low, the tank remains empty, the membrane is straightened (picture on the right).
Operating principle of a membrane expansion tank
When heated, the coolant increases in volume, its excess rises into the tank, pushing back the membrane and compressing the gas pumped into the upper part (in the picture on the left). This is displayed on the pressure gauge as an increase in pressure and can serve as a signal to reduce the combustion intensity. Some models have a safety valve that releases excess air/gas when a threshold pressure is reached.
As the coolant cools, the pressure in the upper part of the tank squeezes the coolant out of the container into the system, and the pressure gauge readings return to normal. That's the whole principle of operation of a membrane-type expansion tank. By the way, there are two types of membranes - disc-shaped and pear-shaped. The shape of the membrane does not affect the operating principle in any way.
Types of membranes for expansion tanks in closed systems
Volume calculation
According to generally accepted standards, the volume of the expansion tank should be 10% of the total coolant volume. This means that you must calculate how much water will fit in the pipes and radiators of your system (it is in the technical data for radiators, and the volume of the pipes can be calculated). 1/10 of this figure will be the volume of the required expansion tank. But this figure is only valid if the coolant is water. If non-freezing liquid is used, the tank size is increased by 50% of the calculated volume.
Here is an example of calculating the volume of a membrane tank for a closed heating system:
- the volume of the heating system is 28 liters;
- expansion tank size for a system filled with water 2.8 liters;
- the size of the membrane tank for a system with non-freezing liquid is 2.8 + 0.5 * 2.8 = 4.2 liters.
When purchasing, select the nearest larger volume. Don't take less - it's better to have a small supply.
What to look for when purchasing
There are red and blue cans in stores. Red tanks are suitable for heating. The blue ones are structurally the same, only they are designed for cold water and cannot tolerate high temperatures.
What else should you pay attention to? There are two types of tanks - with a replaceable membrane (they are also called flanged) and with a non-replaceable one. The second option is cheaper, and significantly, but if the membrane is damaged, you will have to buy the whole thing. For flanged models, only the membrane is purchased.
Place for installing a membrane type expansion tank
Usually they place an expansion tank on the return pipeline in front of the circulation pump (if you look in the direction of flow of the coolant). A tee is installed in the pipeline, a small section of pipe is connected to one part of it, and an expander is connected to it through fittings. It is better to place it at some distance from the pump so that pressure differences are not created. An important point is that the piping section of the membrane tank must be straight.
Installation diagram of an expansion tank for membrane-type heating
A ball valve is installed after the tee. It is necessary to be able to remove the tank without draining the coolant. It is more convenient to connect the container itself using an American nut. This again makes installation/disassembly easier.
Please note that some boilers have an expansion tank. If its volume is sufficient, installing a second one is not required.
The empty device does not weigh much, but when filled with water it has a significant mass. Therefore, it is necessary to provide a method of mounting on the wall or additional supports.
The heating expansion tank can be hung on a bracket
Make a support platform
The tank on legs can be installed on the floor
Common installation mistakes
The most common installation errors:
- Errors when connecting and piping the heating unit - all heating elements must be installed (see installation features above).
- Incorrect connection of radiators.
- Absence of a safety block and a tap between the block and the heat generator.
- Installation of standard seals when the system is running on antifreeze. Antifreeze corrodes most types of rubber, is toxic, expensive, and its use is justified only in houses with occasional occupancy during the winter. When using antifreeze, it is necessary to replace all gaskets, including those between radiator sections.
- Poor quality installation of the entire system.
- Installing more than five radiators on one branch of the system - the latter will be cold.
- Availability of free air access to radiators to ensure heat transfer by convection.
- When installed in niches, the wall behind the radiator should be insulated - glued with a layer of polystyrene foam 3-5 cm thick, putty and paint. It is also advisable to glue a sheet of foiled polyethylene foam to the wall.
With forced circulation
A circulation pump for a single-pipe connection scheme is the best solution. With forced circulation, the coolant reaches the last radiators in the circuit with minimal temperature loss, eliminating the main disadvantage of the circuit. When heating is started for the first time, the entire system warms up an order of magnitude faster , and there is no need to wait six to ten hours before the entire circuit warms up.
If there is no need to design the heating to operate in gravity mode, the pipes can be laid in a screed or sewn into the walls so that they are not visible.
Forced circulation circuit
Increases system controllability. The resistance that thermostats create to the coolant current needs to be taken into account when choosing a circulation pump. A sufficiently powerful pressure will allow the coolant to be pumped throughout the entire circuit with any installation of control valves installed on each individual heat exchanger.
The circulation pump significantly increases the maximum permissible length of the circuit. The permissible reduction in the thermal power of the outer radiators is maintained even with a circuit length of up to 150 meters. If it is necessary to cover a large area, it is enough to divide the circuit into two or more circuits connected in parallel with the installation of pumps in each of them.