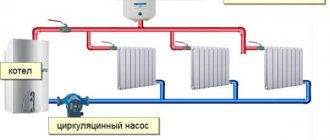
The heating system in private houses differs significantly from city apartments due to its complexity; it may contain several circuits of heated floors and heat exchange radiators with a large number of connections. After installation, a performance test procedure is mandatory; for this test, a technique called pressure testing of the heating system is used.
To carry out crimping work, special automatic or manual equipment is used; if it is available, the test will not cause any particular difficulties even for an unprepared homeowner. The only thing you should know when pumping water or air into the system is the pressure limits and time intervals for checking a specific heating network, which are specified in the regulations.
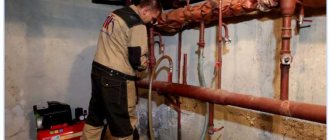
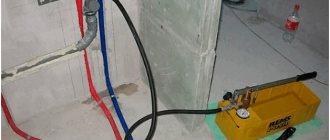
Fig.1 Hydraulic test process in the basement of a building
What is pressure testing of a heating system?
It is not difficult to understand why pressure testing of the heating system is necessary, using simple logical reasoning - after installing the circuit by specialists, it must be checked for functionality before the final payment for the work performed.
Pressure testing is the testing of a heating system by injection of water or air into it for a certain time under pressure exceeding the working pressure by 1.5 - 2 times. In private homes, the circuits of heat exchange radiators and heated floors, collectors and shut-off valves, joints between appliances and pipes, electric circulation pumps, heating boilers and boilers are checked.
This method determines the ability of equipment materials and heating pipes to withstand high pressure, as well as the tightness of all butt joints - a positive test result means the heating system is ready for long-term operation in trouble-free mode.
Rice. 2 How to install a flushing compressor for cleaning pipes
When is heating pressure tested?
Tests for “strength and density” in accordance with the Technical Operation Rules (RTE) of thermal power plants from the Russian Ministry of Energy (clause 9.2.12) are carried out in the following cases:
- Primary. In cottage-type houses, the system is tested after installation before putting it into operation; diagnostic work is carried out before sealing pipelines into grooves and pouring heated floors. It should be noted that it is possible to re-hydrotest the heating circuits after sealing all pipelines in the walls and screed - this will save expensive finishing materials when leaks are detected.
- Periodic. Hydrotests are carried out annually at the end of the heating season; their purpose is preliminary preparation for operation of heating networks in the event of their unplanned connection to operation. Before the start of each heating season, a repeated hydraulic check of heating systems is carried out.
- Extraordinary. After repairs, before starting up after a long period of inactivity with draining of the coolant, the system needs to be hydrotested for tightness and strength.
It is clear that in all of the above cases, pressure testing is a diagnostic tool that allows you to identify in advance problem areas and equipment that can lead to coolant leakage - which means repairs and lack of heating of the house in cold weather.
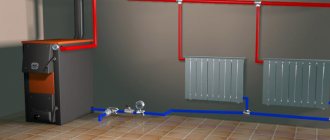
Rice. 3 Example of installation of heating systems with a water-heated floor circuit
About wiring diagrams
The simplest heating wiring diagram is considered to be a single-pipe one.
Its features:
- There is 1 circuit (closed in a ring);
- All radiators are connected in series;
- The coolant circulates in a closed circuit.
This is one of the simplest designs. But there are significant drawbacks here too. Thus, a single-pipe system is not suitable for large multi-story buildings. Since the further away the radiator is, the weaker it heats up. This means that the rooms will warm up unevenly.
And increasing the number of sections on a separate battery will not solve the problem. It’s just that the coolant tends to cool down along the way. And the last radiator in the line will be colder than the previous ones.
Therefore, it is worth installing a single-pipe system only in houses with a small area. You can compensate for this moment using a forced circulation pump. The changes are obvious:
- Pumping equipment is connected to the boiler;
- The coolant begins to circulate through the system with acceleration;
- The temperature will not change and all radiators will heat up correctly.
And at the same time, there are several disadvantages:
- Purchasing a pump is an expense;
- The equipment requires power supply;
- If there is a power outage, the heating will stop working.
Norms and rules for testing
Pressure testing of the heating system is carried out at positive ambient temperatures; testing when the thermometer readings are below zero is allowed only in emergency situations; inside buildings the temperature should not drop below +5 C. The system successfully passes hydraulic tests if:
- No fogging of welding seams, no leaks in heat exchange radiators, boilers, pipes, fittings and other heating equipment were detected.
- The pressure drop in the heating circuit did not exceed 0.2 bar in 5 minutes.
- In panel heating, the pressure drop according to the control pressure gauge in a 15-minute time interval did not exceed 0.1 bar.
- In hot water supply systems (DHW) with metal pipes, the permissible pressure drop did not exceed 0.5 bar. in a 10 minute interval.
- For plastic pipes, the permissible pressure drop was no more than 0.6 bar in the first 30 minutes from the start of hydrotesting; during a subsequent 2-hour test, the pressure drop did not exceed 0.2 bar.
- During air tests of steam and panel heating, the pressure drop did not exceed 0.1 bar. in the first 5 minutes.
Rice. 4 Pressure testing in a private country house
Video
- What is a heating point?
- Repairing leaks
- UUTE with VIS.T
- TO No. 1 of the thermal point
- TO No. 2 of the thermal point
< >
Air crimping
The essence of the process comes down to analyzing the state of the heating system: its tightness and resistance to coolant pressure. Pneumatic testing is carried out by pumping air. This method is used in low-rise buildings and private houses in the absence of the technical ability to conduct hydraulic tests.
Select a calculator to calculate the cost of work
- Calculation of the cost of a contract for hydraulic testing
- Calculation of the cost of chemical flushing of the heat exchanger
- Calculation of the cost of maintenance (TO) of ITP and TsTP
- Calculation of the cost of installing UUTE
- Calculation of the cost of designing a heating point
- Calculation of the cost of operating engineering systems
- Calculation of the cost of chemical flushing of central heating pipelines
- Calculation of the cost of diagnosing pipeline damage
Sequencing:
- Using shut-off valves, the circuit is cut off from the main heating pipeline, and the coolant (water or antifreeze) is drained from it.
- Pumping equipment is installed at the inlet (or outlet) of the circuit. Its functions can be performed by a mechanical pump or an electric compressor equipped with a pressure gauge.
- The system creates an excess - compared to the working - pressure of the environment, not exceeding 1.5 atm.
If the quantitative characteristic of the parameter is higher, depressurization of the pipeline may occur. This is fraught not only with its mechanical damage, but also with injury to those conducting testing.
- The readings of the pressure gauge indicate the time when the pressure of the medium has stabilized throughout the entire circuit. From this moment, observation of environmental parameters begins for half an hour.
- If the pressure in the pipeline does not drop, a conclusion is drawn that it is tight and ready for use in winter.
- If after 30 minutes the devices detect a decrease in pressure, the process stops.
Then a visual inspection of the pipeline is performed to identify mechanical damage. Once a breakdown is detected, the element is repaired or replaced. When installation is completed, the system is again checked for leaks.
How to pressurize a heating system
There are two main methods of pressure testing of systems:
- Pressure testing with water. The main method for testing heat-transfer circuits, water is pumped into the lower part of the pipeline through the shut-off valve of the drain pipe using an automatic or manual pressure test pump. The advantage of the method is the ease of detecting leaks using water prints.
- Air pressure testing. Not a very effective method due to the difficulty of detecting leaks, it can be used to check the heating circuit in the cold season, when the use of water is difficult due to the possibility of freezing. To pump air, a compressor is used, which is connected to the pipeline through a special adapter. To detect the location of a leak, auditory methods are used; to accurately localize the air-permeable connection, a soap solution is used, similar to checking gas pipes.
Rice. 5 Pressure testing of pipes with a special flushing compressor
Test pressure
The rules for pressure testing of heating systems are regulated by the PTE for heating installations from the Ministry of Energy (clause 9.2.13) in force since October 1, 2003, according to them the test pressure in an apartment building should not be less than:
- 1 mPa (10 bar, atm.) in home hot water supply and heating systems with water heaters;
- 10 bar (atm.) for panel and convector heating circuits;
- 6 bar (atm.) in a circuit with radiators made of cast iron or stamped steel;
- pressure equal to the working pressure with the addition of 5 bar (atm.) but not more than 10 bar for hot water supply;
- pressure, which must exceed the operating pressure (set by the manufacturer and indicated in the technical parameters of the devices) by 1.5 - 2 times for heating air heaters and heating ventilation.
For panel heating in conjunction with heat exchange devices, the test pressure cannot exceed the tolerances for these devices.
Preparations
Before crimping pipes, you need to do certain work:
- The pipeline being tested is subject to inspection for specific faults (missing components, rusty fragments, etc.). Detection of disorganizations is eliminated. If the infrastructure is filled with some means, it must be emptied;
- Then the pipeline is washed. Here it is possible to eliminate scale, corrosion, and deposits of various types from the route. Cleaning can be carried out using a variety of technologies, some of which require the use of a supercharger. Adhering to the regulations, when finishing, you need to check the quality of its work by cutting off a half-meter part in a certain area and analyzing the position of its surface from the inside;
- Preparations end with the installation of a return valve and a pressure gauge, if they are not included in the design of the heating equipment. The reversible damper is needed to maintain the working area in the infrastructure;
Types of testing and crimping of the system
The above standards of the Ministry of Energy on the frequency and testing regimes of heating systems are mandatory for government organizations and public utilities; in private homes, their compliance is by no means mandatory. Pressure testing is always carried out after delivery of the system to the customer before its operation; further inspection is usually carried out no more than once every 5 years.
To carry out testing work, no special skills or knowledge are required, so any owner can do it independently. To do this, there is no point in buying a manual or electric crimping unit (the lowest price for manual devices is about 100 USD), you can rent an electronic device and carry out the tests yourself within a couple of hours.
If there is no desire to carry out the tests yourself and financial resources allow, an official certificate of the work performed is required; a specialized company will help you do the crimping; the services of its specialists will cost an hourly rate of 1000 to 2500 rubles per hour.
Rice. 8 Testing the system in an apartment building
Pressure testing in an apartment building
Pressure testing of the heating system of an apartment building is carried out to find faults and leaks in fittings and pipes at the end of seasonal heating (from mid-April to May).
If there are complaints from residents about the low heating temperature in their apartments, the radiators are first calculated with their further replacement or installation of additional sections if necessary. All risers are also checked for blockages and pressure flushing of the problematic riser and radiators of the heat exchangers of individual apartments or the entire circuit is carried out.
The following preparatory work is also carried out:
- The shut-off valves in elevators, on central line pipes and risers are inspected. On cast iron valves, the seals in the form of sealing cords are replaced, new paronite gaskets are installed between the flange connections, and stuck bolts are replaced. Other pressure gauges are installed in the elevator units and the old ones are sent for testing; the oil level is monitored in thermometers.
- Pipes and fittings are visually inspected for defective areas, corrosion damage, fistulas, and if problem areas are detected, they are repaired.
- The condition of the thermal insulation of the basement main and risers going to the floors is checked.
Next, pressure testing procedures begin, the system is tested taking into account the technical parameters of the radiator heaters located in the apartments. In accordance with standards that take into account the operating parameters of heat exchange radiators, for cast iron models the permissible maximum pressure is 6 bar. If heating pipes are located in the walls, the maximum coolant pressure should not rise above 10 bar. Thus, with cast iron and steel radiators the test pressure is 6 bar, with panel heating - 10 bar.
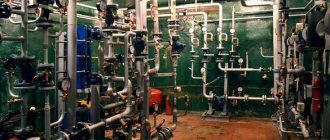
Rice. 9 Pressure testing station
Hydrotests are carried out in two stages, first the system as a whole is checked, and then the thermal unit is checked at higher pressure; the system is usually checked in the following sequence:
- Fill the heat-transfer circuit with special network water (has low hardness to avoid scale formation), pumping it with an electric pressure tester under the required pressure (6 or 10 atm.). To do this, the supply and drain hoses of an electric pressure tester are lowered into a container of water, and a pressure hose is connected to the inlet pipe of the network, after which the pressure tester is turned on to a preset pressure and the entire circuit is waited for filling.
- A 30-minute time interval is measured, during which the pressure should not decrease beyond the permissible standards (given above in the PTE); if the pressure gauge does not show a decrease in readings, the pressure test is considered complete.
- A drop in pressure indicates that leaks are appearing in various places; after they are detected, water is drained and the leak is eliminated, then the system circuit is again filled with water and pressure testing is carried out again.
- In the same way, the inlet unit is checked with a pressure of 10 atmospheres; upon completion of the work, an inspector from the control service is called to draw up a report on the readiness of the heating network of an apartment building for the heating season.
Shut-off valves
Shut-off valves must perform their main function - block the flow of coolant. If there are valves on the heating unit that do not “hold”, they need to be replaced. Different sections of the system are pressurized under different pressures, and if there is a non-working valve in the circuit, it will definitely manifest itself.
Marking of fittings
Ideally, everything should look like this: at the heating point there should be a diagram showing numbered and marked inlet and outlet pipelines, shut-off and control valves, drainage and drainage devices. The diagram must correspond to the current state of the system, that is, if changes have been made to the system, they must be displayed on the diagram.
All of the above devices must have tags with symbols corresponding to the symbols in the diagram (1,2 - shut-off valves on the supply and discharge pipelines, t1 and t2 - thermometers, P1 and P2 - pressure gauges, etc.).
In practice, at small heating points, inspectors do not always focus on this. The main thing is to make it clear what goes where, for example: “supply to the left wing”, “return from the right wing”, “supply to ventilation”, etc.
But if everything goes according to Feng Shui, this is an additional plus.
Inspection of wedge valves
Old-style wedge valves require additional attention during operation.
Wedge valve design: 1 - wedge, 2 - cover, 3 - flywheel, 4 - seat, 5 - body, 6 - o-ring, 7 - spindle, 8 - threaded bushing, 9 - bushing, 10 - stand, 11 - gland flange , 12 — stuffing box made of thermally expanded graphite.
In such valves, it is mandatory to pack the stuffing box every year. And during the year, if a leak occurs from the seal, it is necessary to tighten the flange. If this is not done, the valve will become unusable.
To replace the stuffing box, you need to unscrew the nuts on the union bolts, lift the flange, remove the old stuffing box and install a new one. The seal is wound in rings around the spindle and pressed against the flange.
There should be no signs of rust on the valve. The body should be painted black, the flywheel red, and the retractable spindle should be lubricated with grease.