Installation of a heated floor requires subsequent long-term and uninterrupted operation of the heating system. In a city apartment, private house or country house, water-heated floors are equally effective and convenient. Such a heating system can be equipped in almost any residential space, but the effectiveness of its use depends on the compliance of the technical characteristics of the equipment with the design features of the room. Correctly calculated and installed heating circuits and professionally performed pressure testing of the underfloor heating system will allow homeowners to forget about the hassle of servicing heating devices for a long time.
Pressure testing procedure for the heating circuit of warm water floors
However, the idyll cannot continue indefinitely - any technology is not eternal and needs repair over time. Heated floors are a complex complex of a wide variety of equipment, the failure of one of the elements of which can lead to failure of the entire heating system.
In some cases, for example, if there are problems with the throughput or tightness of the floor water heating pipe, it is necessary to drain water from the heating circuit when preserving housing.
Let's take a closer look at the cases in which it is necessary to drain liquid from the underfloor heating system, and how this is done.
The main reasons for draining water from a heated floor system
There can be quite a few reasons why you need to drain the water from the heating system pipeline yourself - from the upcoming long absence of residents from the house to replacing the water in the system with antifreeze. In order to do everything correctly and not cause damage to the heating system, we will look in more detail at how to drain the water from a heated floor yourself.
A common reason for the need to drain the coolant is the preservation of the heating system for the winter when using ordinary water in the circuit. Before the onset of cold weather, this event is mainly carried out at dachas and country houses that are not used in winter. To simplify and speed up the draining process, special equipment is used.
Mobile air compressors (electric motor driven)
Important! In seasonal housing, failure to drain water from the heating circuit of underfloor heating before frost sets in can result in the system defrosting, so using antifreeze as a coolant is undoubtedly preferable - in addition to being resistant to low temperatures, these liquids are less subject to wear on pump parts.
Another equally important measure when operating underfloor heating is preventive maintenance on the heating system. Boiler water contains a lot of impurities, which, when heated, precipitate or form layers on the walls of the pipeline. Due to a decrease in the internal clearance of heat pipes, the circulation of the coolant in the system is disrupted and heat transfer is reduced. For this reason, when using water, the coolant must be drained once or twice a year.
A water circuit filled with antifreeze does not suffer from this problem. In this case, the coolant is replaced every 3-5 years - provided that the boiler is operated without overheating (for heated floors, the maximum permissible heating temperature threshold for the coolant is 45-550C).
One type of antifreeze for filling the circuits of underfloor heating systems
*
Another reason for the need to drain the coolant may be the liquid losing its physical properties. A change in the characteristics of antifreeze occurs after overheating - the solution begins to foam, filling individual sections of the heat pipes with foam, which disrupts the circulation of the coolant in the system and reduces heat transfer.
Failure to comply with the technology for installing heated floors, or the use of materials not intended for contact with chemicals, causes the occurrence of corrosive processes in the heating system, as a result of which the circulation of the coolant is also disrupted and leaks in the water circuit occur.
Naturally, you will have to drain the water from the heated floor pipeline when replacing it with antifreeze - modernization.
These are the main reasons for the need to empty the underfloor heating system and, regardless of the base, the water must be drained in accordance with all the rules, following safety precautions and observing the technological sequence of the component operations.
Step-by-step installation guide
Self-construction of a water pipeline requires preparation.
Drawing up an action plan
The plan takes into account:
- depth of soil freezing;
- at what distance from the surface is groundwater;
- relief;
- underground communications;
- buildings on the site and its boundaries;
- points of consumption (home, bathhouse, summer shower, watering, etc.).
Draw a site plan and a profile image of the water pipeline to take into account its slope. The pipes are laid 20 cm below the soil freezing depth. Outline where and what fittings will be needed. According to the plan, the number of each type is counted and a list is made. They calculate the total length of the pipes and buy them with a margin of 10%.
Preparing the necessary tools
To install a major water supply, you will need tools, including special ones. You can buy a plumbing kit or separately:
- scissors for cutting plastic pipes;
- gas and adjustable wrench;
- sealant gun;
- knife, sandpaper;
- tape measure, pencil.
If so, you will need a welding machine for them. A shovel and crowbar are prepared for excavation work. If you plan to install the electrical part yourself, stock up on electrical tape, screwdrivers, a tester, and pliers.
Water supply installation
First, dig a trench of the required depth. Further actions are performed in the following sequence:
- Install the pump. Surface - next to the well in a caisson, pit or warm room. The submersible is lowered into the well.
- The water supply pipe is connected to the pump and laid in the trench. If the depth is insufficient, insulate or lay a heating cable. Lay the power cable.
- The second end is connected to a fitting with 5 outlets. A tank, a pressure switch, and a pressure gauge are mounted on its free outlets.
- Before entering the pipe into the house, a shut-off valve is installed so that it is possible to turn off the water if necessary.
- They test the system to make sure there are no leaks. They fill up the trench.
- Install internal wiring, connect plumbing fixtures
At the entrance of the water supply to the house, a filter is installed, at least a coarse filter. If the quality of the resulting water is poor, more subtle purification may be necessary.
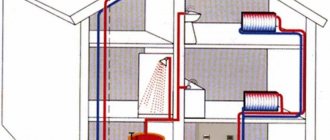
Selecting a water heating device
Hot water for the bathroom and washing dishes is obtained from flow-through heaters or storage heaters (boilers). In terms of speed, performance, and ease of use, geysers take the lead. It makes sense to buy if the house is connected to natural gas. It is irrational to use a cylinder to heat water. The column is connected only by gas service specialists.
You can install a flow-through electric heater yourself, but in terms of heating speed it is inferior to a gas water heater. A boiler powered by electricity heats water even more slowly. But if you use it constantly, do not turn it off, but set the thermostat to the desired temperature, there will always be hot water in the house. The boiler is inexpensive and anyone can install it. The capacity varies and is selected depending on the needs of the family.
The video will help you understand the intricacies of laying a water supply system in your dacha.
Procedure for draining water from the system
Warm floors are a closed system, so it is necessary to take care of the drain taps at the installation stage. The number of valves must correspond to the number of water circuits.
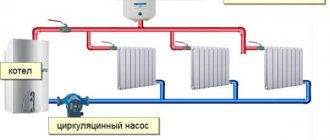
A heated floor is actually a long hose laid into the floor. Installation method - the configuration of the circuits may be different, but the principle of operation of the water circuit is the same - the coolant transfers heat to the surrounding space by heating the floor surface.
Image of the outline of a copper pipe underfloor heating system laid on reinforcing mesh in front of the screed device
Before starting the operation to drain the coolant, the heating system is turned off, after which the time necessary for all its elements to cool completely is waited.
Considering the fact that the water circuit is connected to the main pipeline, and the connection point is located above the floor level, the water is drained forcibly using an air compressor.
Note: the power of a household vacuum cleaner is not enough to empty a heated floor system.
*
Important! To purge the water circuit, a compressor with an operating pressure of up to 5 bar is used - using a more powerful unit risks destroying the heat pipes.
The pressure gauge needle is at 6 bar - the maximum permissible blowing pressure of the underfloor heating system has been exceeded!
The drainage is carried out through a return line equipped with a drain valve, and the compressor is connected to the manifold on the inlet pipe, so the check valve may create some interference when purging the pipe. After connecting to the manifold, the compressor is turned on to displace the coolant from the circuit, and the air supply pressure is gradually increased - to a value after which liquid begins to flow out at the outlet. It should be remembered that the volume of water in each of the heated floor circuits is insignificant, so an ordinary bucket with a volume of 8-10 liters is sufficient to receive it.
The compressor should operate until air begins to flow continuously from the pipe following the water.
Note: if you do not have a compressor at hand, there is another way to empty the system of water and avoid defrosting the heating system. A hose of suitable diameter 1 m long with a funnel at the end is tightly placed at the inlet of the heat pipe. The end with the funnel is raised higher and liquid for washing car windows is gradually poured into it - “anti-freeze” (it is better to use a brightly colored one). As it is displaced, water will flow out of the return pipe, and then technical fluid - a lengthy but effective process.
Installation of summer water supply
So, we figured out the types of pipelines. Now let's talk about assembling the plumbing system.
The main stages of installing a summer water supply system:
- Drawing up a diagram of a water pipeline.
- Purchase of materials.
- Laying sewerage according to the diagram.
- Installation of taps, sprinklers and other devices.
- Connection to a water supply.
- Testing.
The summer water supply plan consists of the following stages:
- First you need to draw a sketch. Paths, buildings, beds and other plantings must be marked.
- On the site, pegs mark the nodes and places where the future water pipeline will lie.
- Then the number of branches, bends, taps and other nuances are entered into the project.
- The places where the water supply pipes come to the surface are marked.
Depending on the source of water, pipelines have their own characteristics.
Installation of water supply in the presence of a centralized network
When installing a seasonal water supply, you should adhere to the following plan:
- A detailed site plan is drawn up. The places where the water supply will run, where the taps and sprinklers will be located, are outlined. Corners, plugs, sockets, etc. are outlined. The number and location of taps is calculated so that watering of all plantings in the garden plot is carried out using a short hose, about 3-5 meters. The depth of the trenches is calculated, as a rule it is 30-40 cm. If you are planning to install utilities under the beds, then the depth must be increased to 50-70 cm (for safe operation with a shovel or cultivator). The main water pipeline is made of pipes with a diameter of 40 mm, and branches to the water supply points are made of pipes with a diameter of 25 or 32 mm. It is better to lay it at a slight slope from the water supply source for better circulation. A drain valve must be installed at the bottom. It is necessary to consider how drainage will be organized.
- After drawing up the diagram, the quantity of all necessary materials and tools is calculated. After which you can go to the store.
- If the water source of the country water supply is a central network, it will be necessary to make an insert. The simplest way that does not involve turning off the water is to use a special “saddle” (a clamp with a seal and a threaded pipe). The saddle is installed on the pipe, a ball valve is screwed onto the pipe, through which a hole is made on the surface of the pipe.
- The next stage is preparation of the trench.
- Then the pipeline is assembled, taps and other elements are installed.
- The finished water supply system is tested for leaks, and when water is supplied, the condition of the joints and connections is checked.
- The water supply can be buried.
Laying a water supply from a well or borehole
If there is no centralized network near the site, then a well or well is used as a source of water. In this case, a pump is needed.
Pump installation methods:
- The submersible pump is suspended on a special cable or chain. This type of pump is capable of pumping water from a depth of no more than 8 meters. A metal cable is not used to install the vibration pump! A nylon cable is used.
- A surface or self-priming pump must be installed on a flat surface. To do this, prepare a flat concrete stand and protect the device from rain (using a canopy or booth).
Tools and materials for installation
To install a seasonal water supply you will need:
- Pipes.
- Fittings and tees.
- Couplings.
- Wrenches: adjustable, gas, wrench No. 17-24.
- A special knife for cutting polymer pipes or a hacksaw for metal carving.
- Shovel.
- Scrap.
- Soldering iron. In some places it will be possible to do without fittings and a gas wrench by using the connection with a special gas soldering iron. Such a tool can be purchased and is relatively inexpensive. Some stores rent soldering irons.
- Ball valve ½.
- Compression angle 20 mm.
- Compression tee 20 mm.
- Saddle 63 (1/2).
- Fumlenta or fum thread.
- Sanding paper for cleaning pipe joints.
- Roulette.
- Marker or pencil.
Additional products used in summer water supply installations
The main devices that will be needed when installing the pipeline:
- Union. It will help you quickly connect the hose to the tap. On one side it is screwed onto the tap, on the other side a hose is secured.
- Corrugated hoses. They are inexpensive and take up little space when folded.
- Special hoses for drip irrigation, if provided on the site.
- Sprayers or watering guns.
- Sprinkler or watering heads.
- For automatic watering, you can purchase a special timer or soil moisture sensor.
Technical subtleties and nuances
*
In preparation for draining, it is necessary to study the structure of the collector in order to find and mark on the supply and return the location of the valves, marked as follows:
- servers are red;
- reverse flow - blue.
Connection diagram for a compressor for emptying the circuits of a heated floor system.
If you confuse the supply with the return, the drain system will not work - the check valve will block the pipeline.
If there is no receiving container, then you can connect the drain hose to the return valve and stretch it to the nearest sewerage intake - a toilet, sink or drain.
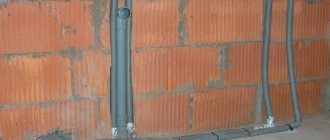
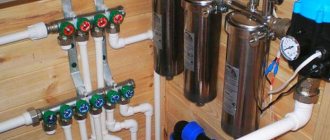
Collector unit for a warm water floor system
Having finished draining water from one circuit, empty all the others in the same way. When draining a section of the system, the valves of the remaining circuits must be closed, and at the end of each stage, the taps of the emptied pipelines must also be closed.
To completely empty the circuits, the purge procedure can be repeated after an hour - when the moisture from the walls of the heat pipes has drained and accumulated in some area.
Laying depth of winter water supply pipeline
It depends on the region. For example, in St. Petersburg and Moscow, the calculated depth is 1.2-1.4 meters, the pipe is laid 30 cm lower. However, in reality, the soil freezes so deeply only in harsh conditions: there is sand on the site, the groundwater is high, there is no snow or it is being cleared. Often the soil freezes deeply under a house if it stands on stilts or a columnar foundation.
The actual freezing depth in these regions rarely exceeds 60 cm in depth. But we still lay the pipe at a depth of 1.5 meters, and we control this moment using the installer’s photo report.
If you do not know the standard freezing depth of the soil, it can be calculated using the formula. You will find it in document SP 22.13330.2011:
5.5.3 The standard depth of seasonal soil freezing dfn, m, in the absence of long-term observation data, should be determined on the basis of thermal engineering calculations. For areas where the freezing depth does not exceed 2.5 m, its standard value can be determined by the formula:
where Mt is a dimensionless coefficient, numerically equal to the sum of the absolute values of average monthly negative temperatures for the winter in a given area, taken according to SNiP 23-01, and in the absence of data for a specific point or construction area - according to the results of observations of a hydrometeorological station located in similar conditions with the construction area; d0 is the value taken equal to 0.23 m for loams and clays; sandy loam, fine and dusty sands - 0.28 m; gravelly, large and medium-sized sands - 0.30 m; coarse soils - 0.34 m. The d0 value for soils of heterogeneous composition is determined as the weighted average within the freezing depth. The standard depth of soil freezing in areas where dfn > 2.5 m, as well as in mountainous areas (where the terrain, engineering-geological and climatic conditions change sharply), should be determined by thermal engineering calculations in accordance with the requirements of SP 25.13330.
Let's calculate the standard freezing depth in St. Petersburg. Open SP 131 13330.2012, table 5.1: Average monthly and annual air temperatures. It states that in St. Petersburg the average subzero temperature persists for four months: December (-3.9°C), January (-6.6°C), February (-6.3°C), March (-1. 5°C). We add these values and calculate the root. It turns out 4.3. Multiply this by d0.
For clays: 4.3x0.23 = 0.99.
For sandy loam and fine sand: 4.3x0.28 = 1.2.
0.99 and 1.2 are the standard freezing depth in meters.
For Moscow the numbers will be as follows:
For clays: 4.8x0.23 = 1.1.
For sandy loam and fine sand: 4.8x0.28 = 1.3.
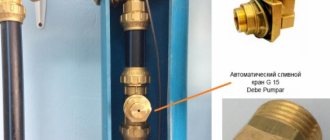
How to install the drain valve correctly?
It is better to install the drain valve below freezing of the soil, that is, at a depth of 1.5-2 meters. If you install the valve in a well, then mount it closer to the adapter or head; if in a well, install it closer to the bend. The installation sequence is as follows:
- A hole is drilled in the HDPE pipe between the adapter and the pump
- The valve is fixed using two removable parts of the seat and mounting screws.
- The sealing ring is installed between the hole and the saddle.
You can install a homemade drain valve in the well:
— Install a tee or saddle with a tap in the well.
— Attach a 20 mm polypropylene pipe to the butterfly ball valve through a 32-20 mm adapter coupling.
— Use a grinder to make a slot in the coupling on the bottom side.
— Mount the pipe, which acts as a rod, in the well using plumbing clamps. To securely fix the pipe, two additional stop sleeves must be installed between the clamps. This is done so that the homemade rod does not “walk” vertically and fly off the tap.
However, such a winter valve has problems - the ball valves turn sour, and after some time it may not turn. We recommend periodically, for example, once a month, opening and closing the tap.
Insulation of equipment for winter water supply
In order for the water supply of a private house to work in winter, it is necessary to keep not only the pipe warm, but also the rest of the equipment: a hydraulic accumulator, a pumping station, automation, filters. If all this is located in the house, in the bathroom, then there is no problem. But sometimes equipment for autonomous water supply is located in an unheated technical room or in a caisson. For normal operation, the temperature in them must be above +5°C. Additionally, the hydraulic accumulator and the station can be insulated with sheets of foam plastic, penoplex, roll insulation with a foil layer, mineral or basalt wool.