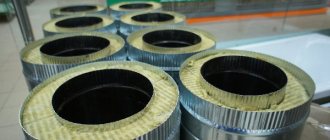
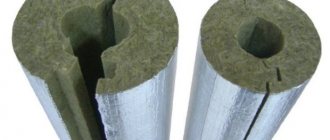
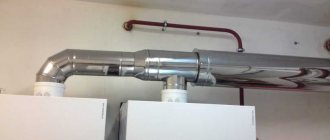
Sandwich chimney is a double-circuit stainless steel structure with non-flammable insulation between the pipes. Installation of a chimney made of sandwich pipes is used for safe, efficient and economical heating. A chimney system with insulation is used where it is impossible to install an internal structure: stoves, fireplaces, ventilation systems. But when placing this device, it is necessary to comply with strict fire safety requirements and select all the elements correctly.
Design features of sandwich chimneys
Like any device, a three-layer chimney made of sandwich pipes has a number of distinctive features. the chimney, like any other device, has a number of features that distinguish it from other similar structures.
The main elements of an insulated chimney are the following components:
- Straight sections of sandwich pipes for chimneys. Fragments with a diameter of 80–600 mm, length up to 1 m.
- Stainless steel elbows and tees for the chimney. They are used when you need to bring a product through a wall or bypass structural elements of a house - beams, rafters. Sometimes, for straight turns, tees with inspection are installed, which make it possible to clean the chimney in hard-to-reach places.
- Feedthrough pipe. It insulates sandwich pipes from interfloor partitions and serves as a fastening for the chimney.
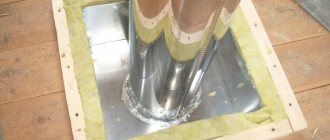
- Roofing cutting. It is a metal cone that is attached to the roof at a certain angle. Facilitates the installation of a chimney through the roof without compromising its tightness and increasing fire safety.
In addition to the above parts, many other devices are used during installation and operation.
When installing a chimney made of sandwich pipes through a roof or wall, it is necessary to study the thickness of its contents. Technical characteristics of the basalt thermal insulation layer can vary from 2.5 to 6 cm.
The cross-section of the chimney pipe can also be different and it depends on the power, another indicator that should be taken into account when installing the product, in accordance with building rules and regulations.
For sandwich chimney pipes, the diameter dimensions depend on the boiler power:
| Power indicator N (kW) | Section value (mm) |
| Less than N < 3.5 | 140*140 |
| 3.5 < N < 5.2 | 200*140 |
| 5.2 < N > 7 | 270*140 |
In this case, narrowing the chimney is not allowed, but widening, on the contrary, is encouraged.
As a rule, devices with a round cross-section are used. In this case, you first need to calculate the cross-sectional area according to the rules of SNiP 21-01-97, and then select suitable products with certain indicators.
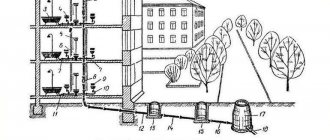
Schemes for exhausting the chimney through the ceiling and roof
1st floor
The passage of the chimney through the 1st floor ceiling is equipped with a metal box filled with a layer of thermal insulation. To do this, you can use expanded clay filling and filling cavities with mineral wool. For non-residential premises, the use of asbestos slabs is allowed.
Installation diagram of a chimney through the ceiling with access to the roof (one-story house)
2 or more floors
When passing through slabs of the 2nd and subsequent floors, a situation may arise when the chimney cannot be installed vertically. Builders could move partitions or install a beam in the floor structure.
Therefore, in order not to take risks, when installing chimneys in a multi-story building, it is better to use a house ventilation system. If you make a horizontal indentation, possible condensation will collect in this place and a thick layer of soot will be deposited on the walls. And it will be difficult to clean the chimney through turns.
Installation diagram of a stove chimney in a 2-story house
Diagram with a description of all elements
Advantages and disadvantages of sandwich technology
Modern sandwich technology for assembling a chimney pipe has many advantages. Consultants of the Plumber Portal resource identified the main ones:
- Simplicity and accessibility of installation. Assembly of all elements and installation of the finished product can be easily done with your own hands. Whereas similar devices require supervision of work by specialists.
- Versatility. The sandwich chimney is capable of extending upward and to the sides, that is, into the walls.
- High-quality insulation. Thanks to thermal insulation, the device provides low heat loss, good traction and high performance. Three-layer walls prevent the rapid cooling of combustion products, which are quickly removed through the chimney, and this prevents the active formation of condensation and soot formation.
- Safety. It is safe to use such a system for humans, since the external circuit heats up only to certain values and cannot harm or cause burns.
- Variety of options. To assemble the installation, straight and angular models are made. The chimney duct can be led up or into the wall; it can go around the rafter structure and all kinds of building parts.
- Minimal soot settling. The smooth surface of stainless steel elements allows ash and soot to be released into the air more quickly and accumulate more slowly.
- Relatively light weight. The small mass makes it easier to support the structure and there is no need to build a special foundation, as is the case with a brick chimney. Sandwich pipes can be fixed to ceilings and walls, or attached directly to heating equipment.
However, it is fair to note that the system also has disadvantages:
- Short service life. The service life of sandwich devices reaches only 10-15 years, while conventional devices can last much longer.
- Rapid loss of tightness. Due to constant temperature changes, the internal and external sections are constantly narrowing and expanding, as a result, the tightness decreases.
- High price. High-quality stainless steel components have a high price. More details below.
The sandwich chimney has much fewer shortcomings than positive qualities, which significantly distinguishes it from its analogues. In addition, the insulated structure has a high standard of safety and reliability.
Types of pipes based on material of manufacture
For different heating installations and types of fuel, a different type of steel is selected. It must be highly alloyed and stainless, suitable for the production of chemically resistant and fire-resistant chimneys.
When different types of fuel are burned, chemically active substances (sulfur, sulfuric and hydrochloric acids) accumulate in the chimney, and the temperature can reach 700 °C. Therefore, when choosing a system for removing combustion products, it is worth considering one of the main parameters - the quality and properties of the manufacturing material.
The following types of materials are used to manufacture sandwich chimney systems:
- stainless steel with alloying additives (with titanium AISI 321, with molybdenum AISI 316, heat-resistant steel AISI 304). The most popular brands AISI 409 and 430 are not able to withstand high temperatures and acids. Most models assembled in China, and some domestic products, are made from these grades of stainless steel. To check the correspondence between the markings and the actual grade of steel, you can use a magnet. Low grade material is attracted to a magnet, but steel with alloying additives is not;
- black metal. This metal wears out rapidly - it oxidizes and burns out. Therefore, it is coated with a special protective enamel. This increases endurance to the influence of an acidic environment. Enamel can last for a long time at temperatures not exceeding 400 °C and can withstand short-term temperature increases of up to 750 °C. Enameled pipeline is used to remove combustion products from heating devices. Unlike stainless steel products, they can be painted in different colors to match the shades of the interior or facade of the building;
- combined sandwich designs. To reduce the cost of production, factories are striving to use more affordable materials. If the inner pipe is made of expensive stainless steel, and the outer pipe is made of galvanized or enameled metal, then this has little effect on the service life of the model. It’s worse if it’s the other way around: stainless steel is used on the outside, and inexpensive low-grade material is hidden inside. With intensive use, this design can last no more than two years.
Thus, before purchasing, it is necessary to request accompanying documents for the equipment to ensure the quality of the product. It is important that the internal element is made of high quality stainless steel.
How to choose a sandwich chimney?
When choosing a ready-made chimney sandwich pipe in a store, you should pay attention to several important factors:
- it should provide normal traction;
- the chimney must not become clogged;
- the device must be installed correctly;
- the design must meet safety and comfort requirements.
At the same time, the cost of the product and its components should not be the determining factor.
How to choose the right chimney using sandwich technology for different types of heating equipment:
Another parameter that affects the diameter of the chimney is the thickness of the insulating layer. It varies between 25-100 mm. The larger the insulation layer, the better it exhibits its qualities, but its price also increases. The thickness of the metal itself, which is used to make pipes, can be up to one millimeter.
If it is necessary to add on, replace or modernize any part of the chimney system, the purchaser may find himself in a difficult situation. Parts from different brands do not provide a sealed joint. When purchasing the necessary elements, it is better to find components of the same brand as the entire structure.
Calculation of the chimney system
Installation of a sandwich system should be carried out after preliminary calculations have been made to determine not only the cross-sectional dimensions, but also the length and location of the structure.
When determining the location area, the following must be taken into account:
- In a situation where the building has a flat roof, the sandwich pipe should be installed at least half a meter (0.5 m) higher than the roof.
- When the distance between the outlet and the roof ridge is less than one and a half meters (1.5 m), then the chimney should be located half a meter above the ridge.
- If the distance between the chimney and the ridge falls within the range of 1.5 to 3 meters, then the height should be created equal to the height of the ridge.
- When the above distance is more than 3 meters, the height of the chimney is set according to the principle of an imaginary line, which it should be equal to.
The imaginary line, in turn, is drawn from the ridge to the horizon at an angle of 10 degrees.
When calculating the length, it is important to consider several basic rules:
- In accordance with building codes, a sandwich structure must have a height of at least 5 m.
- When using roofing material with a high degree of combustion, the chimney above the roof ridge must be additionally raised by approximately 1 - 1.5 m.
- If a coating made of non-combustible material is used on the roof, the height should not be 1.5 half a meter.
- If the building has extensions on the roof, then the chimney must be installed so that it is higher than the buildings.
Thus, if you take into account all the requirements and rules when calculating the location of the sandwich chimney, its height and length, then the installation of the chimney system will be completed correctly.
Cutting a chimney on the roof
The cutting of the chimney on the roof is carried out taking into account several dimensions:
- the minimum distance from the roof surface to the rafters is 250-300 mm;
- if roofing felt or roofing felt is used as a surface covering, the size up to the chimney pipe is from 300 mm;
- if metal or concrete parts are used as rafters, this distance is reduced to 200 mm.
Difficulties arise when pipes pass through layers of roof protection (steam, waterproofing, wooden sheathing of the structure and layers of insulation). We carry out the work very carefully, trying not to disturb all layers of insulation and structure.
To install the glass, we perform additional lathing, connecting 2 adjacent rafters with 2 jumpers according to the size of the sleeve.
We carefully pull up all the old layers and tuck them inward, fixing the edges with a stapler or nails with heads. We fill all gaps with a layer of thermal insulation and sealant.
Waterproofing surfaces is carried out in several stages:
- on the roof we lay a groove over the entire surface of the pipe for drainage and removal of possible leaks;
- we fix and fill all the gaps and install the outer waterproofing apron. It can be made of steel or rubber. We place its edges under the roof covering and fix it on top of the internal apron of the main structure and seal all the joints;
- Now, when water passes through small cracks, it will enter the drainage groove or be removed along the covering of the roof apron.
After laying the roof covering layer, we install the outer apron and seal it tightly to the surface of the chimney and roof.
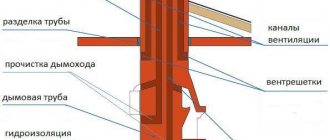
Scheme:
Scheme of cutting a chimney on the roof
Installation of a brick chimney
What equipment is needed for installation?
Before you assemble the chimney yourself, you need to prepare some tools, parts and other equipment:
- a special adapter that will allow you to bring the device to the roof;
- console (bracket) for fixing the sandwich structure;
- platform for unloading, thanks to which it will be possible to evenly distribute the weight and thereby remove the load from the base;
- a kind of hole (window) through which the chimney will subsequently be cleaned;
- clamps for fixing structural elements;
- several adapters;
- an elbow at an angle of 90 or 45 degrees, it will allow you to change the direction of the sandwich chimney;
- device for the upper part - cone, mushroom, woppler, etc.
Before installation, it is also worth finding out how and in what way the elements can be connected. There are several such methods:
- Flanged. This connection allows smoke to escape through the pipe without obstacles due to excellent draft, but if the joints are poorly closed, moisture can seep into the structure and damage the basalt insulation.
- Condensate. This method is used when it is necessary for condensed moisture, which arises due to temperature differences, to flow freely down the walls. With this installation, the inner tube is placed in a socket so that moisture does not penetrate inside, but at the slightest crack, smoke will enter the room.
- Bayonet or bayonet. This connection of elements is obtained as a result of axial movement and rotation, and sometimes lateral displacement, of one part relative to another.
- Smoke. The sandwich structure is assembled according to this method in cases where it is necessary to prevent carbon monoxide from entering the house.
When choosing any of the methods of connecting the structure, it is important that all the cracks are thoroughly closed, then moisture will not be able to spoil the insulation, and flue gases will not harm the health of the residents. In addition, it is necessary to install the internal pipes of the installation against condensate so that moisture does not get into the joints and does not leak.
After careful planning, preparation of the necessary equipment and selection of the joining method, you can proceed directly to the assembly. Installation of the structure does not require special or additional skills and abilities. It can be produced even by a person who is far from construction. The main law that needs to be remembered is that installation must begin from the bottom, that is, from the boiler, and continue towards the roof.
Consequences of poor installation
As a rule, the work of a stove maker or gas equipment installer does not include chimney installation services; the homeowner must ensure the passage of the chimney pipe through the roof independently. The imaginary simplicity of the task makes home craftsmen refuse the services of professional roofers. However, poor-quality pipe installation on the roof can have serious consequences:
- Through an unsealed pipe passage, moisture seeps into the masonry, gradually destroying the brick chimney.
- High humidity inside the chimney pipe stimulates the spread of mold and mildew. Spores of some types of fungus are dangerous to the human condition, so it is unsafe to use an infected tube. In advanced cases, both the chimney and the stove masonry must be replaced
- The penetration of water into the passage of the chimney pipe through the roof reduces the thermal insulation properties of the insulation by half. Moreover, after the thermal insulation layer dries, its characteristics will never return to their previous level.
- Even the rafter system suffers from poor-quality pipe removal through the roof, since moisture penetrating into it through a leaky passage leads to rot and destruction.
- Gaps near the pipe passage disrupt the normal air circulation inside the attic, leading to increased energy losses and heating costs.
By the way, not only stove chimneys are brought to the roof; pipes from gas boilers and ventilation outlets are also placed there, for the installation of which the same methods are used.
Chimney installation options
First you need to assemble the parts. Connecting the elements together is quite simple, the main thing is to note that one end of the tube has a small radius, and the other has a slightly larger diameter. To connect the parts, you need to insert the end with a smaller radius into the larger one.
Such an assembly has many advantages:
- there will be no accumulations of soot;
- quick removal of moisture.
Attention! For additional insurance against condensate escaping outside, it is better to install a tee.
A sandwich pipe can be installed on the street in two ways:
- Through the wall.
- Through the roof.
Let's consider each of the options.
Chimney outlet through the wall
Correct installation of a chimney made of sandwich pipes through a wall requires the following steps:
- It is necessary to disassemble the entire structure and secure the mounting parts for the brackets (supports).
- Install the outer console and attach a couple of corners to it to create a “runner” shape. They will allow you to move the tee during operation without obstacles.
- Cover the wall with a 1 cm sheet of plywood and secure the fine-fiber asbestos material on top with screws.
- One galvanized sheet with dimensions of 12*20 cm should be installed on top of the asbestos.
- Next, you need to make a square hole in the sheet through which the pipe will come out; the sheet itself must be carefully secured with screws.
- After installation, the support should be coated with varnish with an anti-corrosion effect.
- Insert an adapter into the hole in the wall, make a hole in it, and put on the pipe.
When installing a chimney sandwich pipe through a wall, you need to take into account the indentation. A concession is a space that must be left between the wall and the pipe. The indentation value depends on the thickness of the chimney wall.
During the installation process, it is important to correctly place the first element of the entire structure so that the first part is attached to the second above the level of the ceiling. Such installation will allow visual control of fire hazardous elements.
Pipe outlet through the roof
To route an insulated chimney through the roof, perform the following steps:
- The sheet was applied to the outlet hole from the inside.
- Assemble the chimney and lead it outside through the roof.
- Attach the sheet to the roof using screws.
- If necessary, it can be brought under the edge.
- Insulate the pipe with non-flammable material and fix it with annealed wire.
- Install a galvanized steel chimney hood.
- Seal with weld-on roofing materials, heated or self-adhesive.
If the roof of a building is covered with flammable material, it must be additionally protected from possible ignition. To do this, the deflector itself must be equipped not with a cone or fungus, but with a spark absorber.
The roofing installation method is more complex and in this case one more element will be needed - roof cutting. This is a special metal structure that serves to prevent the chimney walls from coming into contact with the roof finishing materials.
Installation diagram of a sandwich chimney through the roof:
When fastening the structure and its component elements, some features should be taken into account:
- all parts and elbows are connected and fixed together with clamps;
- the tee needs to be additionally secured with brackets;
- if the top of the structure remains unfixed, then to be on the safe side it should be secured with guy wires;
- The connecting parts must be additionally secured and secured to each other with clamps, and with other elements, for example, with an adapter, with clamps on both sides.
After placing the chimney, it is necessary to conduct a test fire to check the tightness of the joints and make sure that the adjacent structures and materials do not heat up. During the first use of the system, slight smoke and a specific smell may occur from heating oil residues, sealant, and dust on the surface of the pipes.
Passage through metal tiles
Metal tiles are sheets of steel, copper or aluminum, which are coated with a polymer layer. In appearance they resemble natural tiles, which are folded in even rows. This roofing material is very popular. If a round pipe is to be passed through the metal tile, flexible adapters are used, which we have already described. When using a square or rectangular brick pipe, a different method of installation is used. It is as follows:
- The connecting unit is being manufactured. It consists of two aprons - internal (main) and external (decorative). The material of manufacture is thin aluminum sheet or tin.
- Before the metal tiles are laid, an internal apron is installed on the sheathing. These are 4 strips located on 4 sides of the pipe. They simultaneously extend under the metal tile (no less than 250 mm) and onto the pipe (no less than 150 mm).
- The apron elements are installed in a groove - a groove that is cut along the perimeter of the pipe to a depth of 10 to 15 mm. The groove is cleaned and filled with fire-resistant sealant.
To install an apron, you need to make a special groove in the pipe Source experttrub.ru
- The apron is attached to the pipe using heat-resistant dowels. The joints between the four planks are soldered. On the slats that are located on the sides, sides are made, the purpose of which is to drain water down.
- The lower part of the apron is installed on the so-called tie - a sheet of metal with sides. This ensures water drainage from the chimney to the bottom of the roof. The width of the tie should be greater than that of the pipe by at least 0.5 m on both sides. Its length depends on the distance from the pipe to the edge of the roof.
- After installing the tie and interior apron, the metal tiles are laid.
- An external apron is installed on top. It is usually a corrugated sheet of lead or aluminum. There is a decorative strip in its upper part. It is attached to the pipe using self-tapping screws. The attachment point is slightly higher than parts of the inner apron. Before fixing the decorative strips, the fastening points are coated with sealant. To attach the corrugated sheet, its back side is provided with a self-adhesive coating.
Finished chimney pipe passed through a metal tile Source tproekt.com
Insulation of the chimney pipe from the outside
After all installation and fastening work is completed, it is necessary to remove the protective film. It is important to check whether all cracks and joints are well sealed. It is better to seal using a fire-resistant sealant that can withstand very high temperatures, at least 1000C.
- The most dangerous areas of the chimney should be checked for temperature.
- Don’t forget to set aside a place for the inspection window so that there are no difficulties during inspection and cleaning.
- The correct length of the structure should ultimately be approximately 6 m, counting from the grate.
In this case, the sealant must be applied, taking into account some nuances:
- if it is applied to internal pipes, then it covers the entire area of the outer surface of the upper element;
- if on the outside, then it is applied according to the same principle;
- if at the point of transition from a regular pipe to a sandwich, then they should seal the entire area from the outside around the circumference;
- if at the junction of an ordinary pipe and other elements, then also to the entire area from the outside around the circumference.
If the chimney is installed correctly, its operation will not cause problems. But maintaining the structure is also important. Even in such a system, soot accumulates over time, which significantly narrows the useful cross-section and can even cause a fire. Therefore, the pipe must be cleaned regularly - twice a year through a special inspection window.
All the rules for installing and operating a chimney made from sandwich pipes were invented for a reason. Behind each requirement is practical research and statistics on the main causes of fires. Therefore, it is necessary to strictly comply with all instructions for installation and operation of the structure.
Elastic penetration
Most often in private construction they are faced with the installation of round metal pipes. To ensure the tightness of the passage, a special device is used - an elastic penetration. This is a product made of high-strength silicone or rubber, shaped like a funnel with a wide flange in the form of a square or circle, called an apron. Thanks to its properties, the elastic penetration takes any shape, adapting to the angle of inclination of the slope. It can withstand extremely high or low temperatures, exposure to aggressive chemicals and comes in a wide range.
Installation diagram of elastic penetration
Elastic penetration on a metal chain
When purchasing an elastic penetration, they are guided by the diameter of the pipe and the color of the roofing material. Universal models, in the form of a stepped pyramid, are suitable for any size; adjustment is carried out by trimming the penetration to the desired level. Installing an elastic apron on the roof is very simple, you need to place it on the chimney passage, apply a metal circle with holes for fasteners, treat the joint with fire-resistant sealant and secure it with a screwdriver. For roofs with steep slopes, a special type of plastic penetrations with a specified flange mounting angle is used.
How much does a stainless steel sandwich pipe cost?
The cost of sandwich pipes for chimneys varies and depends on several factors:
- inner pipe diameter;
- quality of thermal insulation material;
- thermal insulation thickness;
- pipe thickness;
- module length, etc.
When installing a sandwich chimney yourself, you should take into account many features and rules, the exact implementation of which will not only allow you to install the chimney correctly, but also safely.
On average, the cost of one sandwich pipe module ranges from 500 to 4,000 rubles. Short sandwich pipes 0.25 m and not very thick can be purchased for 500-600 rubles (we are talking about one element). Pipes made using sandwich technology, about 1 m long, will cost a little more: 2,000-3,500 rubles. As a result, the arrangement of such a chimney will cost a lot of money. However, its outstanding performance and safety are worth the expense.
Self-installation of a chimney from sandwich pipes will require the consumer to study some of the nuances and subtleties. But by doing the job correctly, you can be confident in the safety of your family and yourself. It is also important to choose the right chimney exhaust; for this you can read the characteristics, consult with specialists, and study useful information on installation on the Plumber Portal website.
Design rules and regulations
First of all, even at the roof construction stage, you need to design the exact location of the chimney. For this, there are certain rules that regulate the height and location of chimneys on the roof:
Today in Russia, the passage of a chimney through the roof of a house is carried out in accordance with the requirements of SNiP 41-01-2003. They are a little outdated, but they are the ones that guide the supervisory services, and therefore this document is important.
Be careful also with combining the chimney and other pipes, ventilation and sewer, into one large box, which is so fashionable today. Sometimes architects want to reduce the number of unnecessary visual details on the roof.
The result is huge boxes on the roof, which are sometimes up to 6 meters long and up to 1.5 meters wide. Moreover, it is much more difficult to correctly bypass them with roofing elements than the same 6-8 pipes, but separately.
When you have determined the location for the future chimney, then it’s time to prepare the rafter system for installation. And this depends on how wide the chimney itself is and what shape it is.