Repair of coolant leaks in heated floors
Here is a selection of materials:
Everything you need to know about heating and climate control Features of the selection and maintenance of boilers and burners. Comparison of fuels (gas, diesel, oil, coal, wood, electricity). Do-it-yourself ovens. Coolant, radiators, pipes, heated floors, circulation pumps. Chimney cleaning. Conditioning
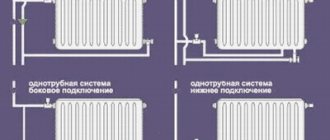
After six years of operation, collets on a metal-plastic pipe began to leak. Apparently, the rubber gaskets dried out and wore out. And this pipe lays heated floors throughout my entire house. Moreover, some connections are made so that they are accessible for inspection and repair, and some are located inside the walls. If open ones began to leak, then leaks probably also appeared in hidden ones. The pressure in the heating system began to gradually decrease. I had to add water to the circuit every two days, although no water leaks were observed. With such an intensity of the leak, the water apparently had time to evaporate. But I'm afraid the leak may have gradually worsened.
I used car radiator leak sealant (radiator sealant). I took a bottle designed for 15 liters. I have 80 liters of coolant in my system. The next time water was added to the system, sealant was also pumped into the system. The leak did not stop immediately. As water was added, I added another bottle of sealant. I filled 4 bottles in total. Eventually the leak stopped completely.
Of course, there is no guarantee that this method will help. If the leak is due to a large hole, then the sealant will not help. But if the leak is not very intense, 5-7 liters leak out per day, then you can try.
The better liquid sealant for heating repairs
It is not always possible to use external agents to repair heating. What to do, for example, if the location of the leak cannot be detected because the house had hidden pipes and installed a heated floor? Will we really have to break down the walls and open up the floors? No, you don't have to! In such situations, a relatively new method of eliminating leaks is used - by pouring liquid sealant for heating pipes into the system. This sealant is also suitable for radiators when it is not possible to apply a clamp to a leak.
The fundamental difference between liquid sealants for heating systems is their ability to eliminate leaks not by applying to the damaged area from the outside, but directly from the inside.
The essence of this method is that when mixed with a coolant, the sealant remains liquid, and only upon contact with air penetrating into the system does it polymerize. Gradually hardening, the sealant clots are sealed from the inside of the crack exactly in those places where the integrity of the system is compromised.
Several types of liquid sealants for heating are produced, each of which is adapted to special conditions of use, in particular:
- the coolant is water or antifreeze;
- gas or solid fuel boiler;
- heating or water pipes.
You should not try to look for one universal sealant for your home heating system. It is better to purchase a specialized composition for the specific parameters of your heating system.
The most famous among consumers are liquid sealants for heating systems produced by the German company BCG. The use of these products is considered an ideal solution for eliminating hidden coolant leaks. When used correctly, liquid sealant does not pose a danger to heating boilers and does not cause damage to the circulation pump and measuring instruments.
Sealant for pipes and heating radiators must remain in the system for a long time. Once you add this sealant to your heating system, you can forget about leaks for several years.
Sealants for closed heating systems eliminate pressure losses associated only with leaks in pipes and radiators, but are powerless in cases where the membrane in the expansion tank is damaged.
Locations of water leaks
Leaks can occur along the entire water path. If a double-circuit gas boiler is leaking, the problem may be in the following components:
- heat exchanger;
- pipes;
- expansion tank;
- places of detachable connections.
The level of complexity of the upcoming repair largely depends on the location of the water leak.
The easiest way to eliminate leaks is at detachable connections. It is more difficult to repair a leaking pipeline inside the equipment. The most labor-intensive process is repairing or replacing the heat exchanger.
The double-circuit boiler is equipped with pipes for connecting 4 pipes through which water is transported. If the joints are not properly sealed, a leak of coolant, cold or hot water occurs.
Leaks must be repaired as quickly as possible after they occur. Loss of coolant can lead to automatic shutdown of the boiler.
An attempt to compensate for the loss of coolant by periodically adding a new portion is fraught with accelerated wear of the boiler. Water is saturated with oxygen, which accelerates the corrosion of metal components, which reduces the life of heating equipment.
The problem is in the expansion tank
The volume of water filling the heating circuit varies depending on the heating level. As the temperature rises, the volume of water increases, which entails a change in the hydraulic pressure inside the closed heating system.
At this moment, the elements of the heating circuit would undergo increased load, fraught with their breakdown. But this does not happen, since the boiler design is complemented by a safety system, including an expansion tank, which receives the resulting excess water.
The design and principle of operation of an expansion tank divided by a membrane into two chambers, the location of the air valve and the pipe for connection to the water main
For installation on heating pipelines, open and closed expansion tanks are used. Open tanks are installed outside boiler rooms, for example, in attics, and are equipped with a whole system of pipes for connecting expansion, circulation, signal, and overflow pipes.
All models of wall-mounted, double- and single-circuit boilers are equipped with built-in expansion tanks. They are of the closed type, have only one pipe and two internal cavities separated by a membrane. To ensure the standard pressure in the expansion tank, its upper cavity contains air or an inert gas, for example, argon, and there is an air valve with a nipple.
Excess coolant flows through the pipe into the lower cavity. The membrane bends, the air is compressed in the upper cavity, and the coolant occupies part of the internal space of the expansion tank.
The excess coolant produced during heating is discharged by the safety valve of the boiler or heating system itself. If necessary, the liquid is replenished through the boiler feed tap.
In open and closed expansion tanks, leaks occur at the threaded connections of the pipes and pipes. To eliminate them, tighten the union nuts or replace the gaskets, as discussed above.
The metal housings of expansion tanks are susceptible to corrosion due to the presence of oxygen bubbles in the water mass. Corrosion leads to the formation of fistulas (holes), which become the site of coolant leakage.
The more often you have to pump a new portion of water into the system, the higher the risk of damage to the expansion tank housing and other metal components. If there are fistulas, the tank is replaced with a new one.
Sensitivity is the key to rapid wear.
Of course, everyone likes a comfortable temperature. Modern systems offer fine-tuning of heat exchangers that are able to maintain a strictly specified temperature in the room.
With volumetric gas boilers, everything is clear - 100 or 200 liters of water will take an extremely long time to cool, even by one degree. However, the situation is completely different with wall-mounted appliances with a volume of up to 10-12 liters. There the count goes on in minutes, which causes clocking. The situation is especially typical during the off-season.
Near-zero temperatures outside the window are a difficult problem for boiler automation. Heat transfer to the environment is not strong enough for constant operation even at low powers, but still manifests itself in the absence of heating. A small range of 2-4 degrees causes constant starting and interruption of the cycle, which significantly wears out the boiler. The right decision would be to increase the spread to 10-12 degrees.
System errors
When a malfunction occurs in the Baksi double-circuit wall-mounted gas boiler, an error code is displayed on its electronic display, which can mean one of two things: either blocking the operation of the heating device or turning on the standby mode.
In the first case, you need to manually restart the boiler. The device can be blocked when problems are detected affecting the main parts of the system, which can cause harm not only to the equipment, but also to the health of its owner. Such errors include excessive heating of the boiler, insufficient or reverse draft, as well as its absence. If gas does not flow into the storage tank, the equipment also becomes blocked. Sometimes this problem resolves itself, and then the device turns on automatic startup mode.
Code E01 - burner sensor
Code E01 appears on the display when the sensor monitoring the burner operation reacts. This error can be caused by a number of reasons:
- gas stopped supplying to the burner;
- there is no correspondence between zero and phase;
- sensor is disabled;
- the sensor needs cleaning or repair;
- malfunction in the ignition device;
- the gas supply valve has failed;
- the electronic board does not work;
- there is not enough air to maintain the flame;
- There is not enough gas pressure for combustion.
Having seen such a signal on the display, you first need to check whether the flame sensor is working correctly. Then see if gas is supplied to the device. If there are no problems, you should press the R button or switch the toggle switch to neutral mode, which is also indicated by this letter.
If the sensor is triggered involuntarily, the boiler will continue to operate as usual. If the error repeats, it is better to ask for advice from a gas equipment repair specialist. This fault code indicates problems in the chips, and trying to fix the problem yourself may lead to undesirable results.
E10 - water cycle indicator
Code E10 relates to sensors that monitor the operation of pumps and regulate the water cycle in the system. Such a cipher can diagnose the presence of the following problems:
- pressure decreased;
- the conductivity between the relay and the board is broken;
- the pressure switch does not function properly;
- malfunction of the pump sensor;
- the pump itself needs repairing;
- the heat exchanger is dirty.
Having noticed the E10 code, there is no need to rush to deal with the problems yourself. You can replace the pump yourself; it is not very difficult. It is also easy to clean clogged filters yourself. Other faults are best left in the hands of a qualified worker.
E96−98 - electronic board problems
The remaining Codes E96, E97, E98 indicate problems in the operation of the electronic board. If they appear on the display, the owner should not take any action and immediately call a repairman, because only an experienced specialist can deal with them without outside help.
Fixing problems with household appliances is a kind of treatment . There are simple diseases that a person can get rid of on their own, but for complex diagnoses it is better to consult a doctor. But both can be prevented with timely prevention. This also works in the case of preventing malfunctions of the Baksi wall-mounted double-circuit gas boiler.
Scale deposits inside the heat exchanger
The heat exchanger can be clogged not only with combustion products, but also with scale and limescale that forms with each portion of water entering the boiler. Scale is formed as a result of heating hard water.
Inside the heat exchanger, solid deposits of salts turn into a kind of insulator, reducing heat transfer from heating. The larger the scale layer in the heat exchanger, the worse the heat transfer from fire to water will be, because heat will not be able to penetrate a thick layer of solid deposits. This significantly reduces the energy efficiency of the entire system and the boiler stops reaching the desired temperature.
To remove scale, the heat exchanger must be removed and descaled using a special acid. As a preventative measure, it is recommended to maintain the operating temperature in the boiler.
Traditional methods for descaling include the use of ordinary table vinegar (3-10% acetic acid solution). Table vinegar is poured in equal parts with water, the solution is left to interact with the scale overnight. Cationation and reverse osmosis methods are also used.
Leaking through threaded connections?
The boiler heating circuit is closed. The heated coolant flows from the heat exchanger tube into the supply pipe and then into the radiators. The coolant returns through the return pipeline, entering the heat exchanger again and then continuing to circulate in a circle.
The heating circuit pipes are connected to the supply and return pipelines using threaded (detachable) connections using connecting parts - connectors with union nuts, or otherwise American ones.
Threaded connections are sealed with elastic, heat-resistant ring-shaped seals. When they wear out or are installed incorrectly, water leakage occurs. Poorly tightened nuts lead to the same consequences.
If you see water dripping at the threaded connection, you should first try tightening the nut. There is no need for excessive zeal here, since if the nut is tightened too much, it may break. If water leakage continues after tightening the nut, the seal must be replaced.
Turn off the gas and water supplies in advance and drain the water from the heat exchanger. Unscrew the union nut, replace the seals and install the nut in place.
Manufacturers of heating boilers seal detachable connections using gaskets made of rubber, silicone, paronite or other elastic materials. They are easy to use, durable and always available for sale. They often come complete with clamps. When choosing gaskets, take into account the thread size.
You can also use sanitary flax as a sealant. Regardless of the presence of leaks, seals are changed every time water communications are dismantled.
Repairing leaks mechanically
If you want to reliably repair the system and forget about the problem for a long time, you will have to spend money. Moreover, the list of means used is significantly expanded (the price of the product is indicated in brackets):
- clamp clamp for car cooling pipes (0.4 cu);
- pipe bandage with 4 bolts (0.7...10 cu depending on the material and workmanship);
- self-vulcanizing tape (2.5 cu);
- saddle clamp used for insertion, plus a plug (2...10 cu);
- reusable Kibosh clamp from the ROTHENBERGER brand for emergency leak repair (20 euros).
In addition to these devices, “original” fittings – couplings – are used to restore the tightness of plastic lines. The branch of the system is emptied, the pipe is cut at the point of leakage, then the ends are joined using a coupling.
Metal bandage (left) and plastic saddle clamp (right)
Another simple connector for steel is a reinforced hose of suitable diameter. The latter is installed instead of the cut out rotten section of the water supply system. Fastening method: tight or wire clamps.
Now we will explain one by one the technology of using mechanical sealing means:
As you can see, only vulcanizing tape is suitable for all types of damage. The remaining clamps and bandages are mounted on straight sections of pipes; it will not be possible to seal the battery, joint or bend. But there are various chemicals for this purpose.
How to drain water from a water supply system
From time to time, it may be necessary to completely turn off all taps, fittings, sanitary equipment, or even drain water from the entire water supply network (for example, if the house remains unheated throughout the winter).
In this case, it is necessary to perform the following operations, which we present in technological sequence.
Draining. We turn off the water supply to the house. We disconnect gas and electricity from water heating systems. If you have central heating, you must open the outlet valve located on the boiler or on the pipes, for which you usually use a hose. Then you need to open all the valves on the radiators. Starting from the top floor of the house or mansion, open all the hot water taps in the shower, bath, etc. Don't forget to also drain the toilet tank.
We remind you once again: all water outlet taps on the heater and other equipment must be open. And lastly: it is necessary to open the outlet taps of the main water supply line so that all the remaining water leaves. If you leave your house or cottage for a long time in the winter, then take the time to make sure once again that all the water has left the system. As additional protection against frost, add salt or a glycerin tablet to the water remaining in the siphons. This will protect the siphons from possible rupture and eliminate the possibility of odors from the pipelines entering the room.
Rice. 1. 1 - compression plug; 2 - pin; 3 - threaded plug; 4 - nozzle
In the process of draining water from the system, it often becomes necessary to disconnect some of its sections. In this case, you need to use plugs. The most common plugs are shown in Figure 26.
Filling the system with water. The first step is to close the drain valves on the main pipes. Then you need to close all the taps in the house, including the boiler and water heater taps. If you have a cold water heater, you need to open the valve on the radiator and let air in. After all these manipulations, slowly open the main valve of the system and gradually fill the system with water.
Even before turning on the boiler, the batteries must be purged with air. At the final stage, turn on the gas and electricity to turn on the heater and boiler.
Measures to prevent water from freezing. There is a possibility of cold penetration from the street due to malfunctions in the heating system
In this case, it is very important to immediately take the necessary measures against freezing of pipes, since frozen water in them will immediately rupture the pipeline. In very cold weather, even those pipelines that were laid without violating the requirements can freeze, which often happens with pipes for supplying heat to a garage or basement. What measures can be taken to prevent this? If the country house is electrified, in the cold area where the pipe runs, turn on an electric heater or simply place a 100-watt lamp near the pipe
For these purposes, you can even use a hair dryer to dry your hair. It is very good if you insulate the pipe before the onset of winter by wrapping it in newspapers and tying it with rope.
What measures can be taken to prevent this? If the country house is electrified, in the cold area where the pipe runs, turn on an electric heater or simply place a 100-watt lamp near the pipe. For these purposes, you can even use a hair dryer to dry your hair. It is very good if you insulate the pipe before the onset of winter by wrapping it in newspapers and tying it with rope.
If the pipe is already frozen, wrap it in rags of any material and pour a thin stream of hot water so that the material around the pipe remains hot at all times.
A properly functioning heating system is an essential component of comfortable living in a house or apartment. Occasionally there is a need to replace radiators, fix leaks in the network, move or move the riser closer to the wall.
Any work on the system requires draining the coolant. And this is understandable. After all, it is impossible to open pipes when the network is full. Therefore, before starting repair and maintenance work, you need to drain the heating riser.
How to fix a leak
If a breakdown is detected, it must be repaired. Even a small drip, if left unattended, can develop into a major leak that can destroy the entire heating system. Boiler leaks can be eliminated using soldering. To do this, you need to remove water from it and wait until it cools completely. After this, markings are made, the device is disconnected from the network and the places where water is leaking are sealed with a gas burner. When the leak is eliminated, water is poured into the boiler again and the device starts up.
In order to repair the boiler as little as possible, and perhaps not at all, it should be carefully inspected at the time of purchase for defects or defects.
Pay special attention to the quality of knocks and connections. Only by fully checking the purchased unit can you be sure of its quality and serviceability.
Leak elimination methods
So, we figured out the reasons. Now let's talk about how and with what to seal the hole so that you don't have to buy a new heating boiler. Strictly speaking, welding is usually used to repair metal products. To do this you need to take a few simple steps.
- Disconnect the boiler from electricity or wait until the fuel burns out in it and the equipment cools down.
- Drain all coolant.
- Disconnect the heat exchanger.
- Weld or solder the hole.
Of course, for this you need to have at least some skills in working with a welding machine or a soldering iron. But you can do without welding. The first three steps are performed in exactly the same way: turn off and drain the boiler, disconnect the heat exchanger. And then apply “liquid welding” according to the instructions.
Perform all these actions only if you are at least relatively confident in the result. If in doubt, it’s better to call a specialist. This is especially important in the case of gas boilers, where any poor-quality work can lead to very negative consequences. Therefore, to repair them, it is necessary to hire specialists licensed for the relevant type of activity. Good luck!
Damage to the heat exchanger and pipes
If the heat exchanger of a gas boiler is leaking, the wall may have burned out, a crack or a fistula has formed. Based on the material used, heat exchangers are divided into copper, steel, and cast iron.
Cracks in metal are formed under the influence of thermal stress and hydraulic pressure. Corrosive processes lead to the formation of fistulas. Repairs are carried out by soldering.
Main stages of the process:
- dismantling the heat exchanger;
- cleaning and degreasing the area around the leak;
- soldering using flux and solder;
- trial;
- installation.
If there is a leak in an easily accessible place, complete dismantling of the heat exchanger for repair is not necessary. It is enough to remove the casing, turn off the gas and water, disconnect the electrical wires, and drain the remaining water.
For soldering, select a solder that corresponds to the material of manufacture, for example, copper-phosphorus solder containing silver is suitable for copper heat exchangers; the temperature regime at the soldering site must be observed
The soldering area is cleaned and degreased with a solvent. Soldering is performed using a soldering iron or gas torch. The heat exchanger is installed in place and communications are connected to it.
Tests are carried out by crimping. The circuit is filled with water, the pressure is increased to the test value and monitored using two pressure gauges for at least 5 minutes. If no pressure drop is detected and no leaks are noticed during a visual inspection, the repair can be considered complete.
In case of severe damage, repairing the heat exchanger is impractical. It is simply replaced with a new one. It is also impossible to solder many Chinese-made heat exchangers, since they are made of thin-sheet alloys that cannot withstand soldering.
Wall thickness and corrosion
Heat exchangers installed in heat generators can be made of copper, steel and cast iron. Each of them has its own pros and cons. Copper heat exchangers are corrosion resistant and durable if the boiler is used correctly. Steel heat exchangers are the most common, due to their low cost, resistant to thermal stress due to their ductility, but are more often subject to corrosion.
Heat exchanger corrosion
Cast iron is resistant to corrosion and has a long service life, although they are susceptible to temperature changes and water hammer. Most manufacturers do not use anti-corrosion coatings. But in the latest models of Ferroli gas double-circuit boilers, steel heat exchangers are covered with an anti-corrosion aluminum coating with environmentally friendly internal insulation.
On Baxi units, copper heat exchangers are coated with a special anti-corrosion compound. Protherm, Buderus and Beretta have a cast iron heat exchanger, which is coated with a special anti-corrosion compound. In addition, such a heat exchanger consists of separate sections that can be replaced if they are damaged without completely replacing the heat exchanger.
Wall-mounted boilers Rinnai, Celtic, Bosch are equipped with copper heat exchangers, Vaillant and Navien are made of stainless steel, it is believed that they are less susceptible to corrosion.
Frequent feeding of the boiler has a great influence on the formation of corrosion. Ideally, so-called “dead water”, without oxygen, should circulate in the heat generator. It is oxygen that promotes the formation of corrosion.
If you often have to recharge the heat generator, you should eliminate the reasons for the pressure drop in the unit. Oxygen corrosion forms an ulcer on the inside of the heat exchanger, which is very dangerous. Growing inward, it forms through rust and destroys the heat exchanger.
AnswersMail.Ru Gas boiler clocking. On time
what is 17 kilowatts of coolant? it should be in liters
17 kilowatts of coolants? This parameter is the OK losses and in double-circuit ones, the consumption for heating DHW. The on/off time depends on the temperature of the coolant and the internal temperature of the room.
Clocking the boiler, in principle, does not interfere with its operation, but the less often it turns off, the better. The boiler needs to be adjusted to the system or immediately select the boiler power for the heating system. You can reduce the power by going to the engineering menu or inviting a specialist so as not to mess things up yourself.
from home conditions and from the weather and from the sensitivity of the boiler....
How to drain water from a heating system
When is it necessary to drain water from the heating system? Most often, the need for it arises when it is necessary to clean or replace a heating radiator, for example. If we are talking about a city apartment that is connected to a central heating system, then such an operation can be carried out independently on the internal section of the network. In the event that it is necessary to drain the heating system of a private house equipped with a boiler, it will have to be temporarily emptied.
The essence of the
The first step is to shut off the branch of the heating riser that goes to the apartment. It is enough just to close the distribution valve located here. For a private house with an autonomous heating system, this process is slightly different:
- firstly, you need to stop the supply of fuel or electrical energy;
- secondly, you should carefully read the user instructions for this case.
Only after this can the boiler be turned off. Then you should close the valve through which water is drawn into the system.
Only after this can the boiler be turned off. Then you should close the valve through which water is drawn into the system.
To speed up the process a little, you will need to know those places in the system where taps with air-type valves may be located. They all need to be opened. In this case, nothing will interfere with the flow of water to the hose.
During this operation, small leaks of water from the system onto the floor are possible. Therefore, at the very beginning, it is better to place a large bowl or basin under the place where the hose is connected to the tap (drain). As all the water leaves the system, it is necessary to disconnect the hose and drain the remaining water from it into a substitute container.
Only after completing all the described procedures can you move on to the main thing - to the work for which the water was drained from the heating system of a residential apartment or private housing construction.
If the owner of an apartment or house does not quite understand how to drain the water from the heating without harmful consequences, then it is better to contact a qualified contractor. For example, to a plumber from a company that services a specific home.
Important Operating Instructions
In terms of operation, gas boilers with a closed combustion chamber are considered safer. Their firebox does not communicate with the room air. However, the power of such boilers is significantly inferior to the power of boilers with an open combustion chamber. Therefore, in private households a second type of boiler is often installed.
The choice of future coolant depends on the goals and operating conditions of the system. If the boiler is expected to be turned off frequently, then it makes sense to think about using antifreeze
The operation of such boilers requires compliance with safety precautions. So, to install a powerful floor-standing boiler, it is customary to use a separate room with a certain size. The boiler is mounted at some distance from the walls. Nearby walls should be protected with fire-resistant material to prevent fire.
A ventilation system must be installed in the boiler room. There should also be a source of natural light. The width of the entrance door must be at least 80 centimeters. The chimney is laid in accordance with the instructions for the boiler and from heat-resistant material. The chimney must rise above the roof ridge by at least half a meter.
One safety measure is to install carbon monoxide detectors. The gas detector will promptly detect the leak of a volatile toxin and warn users about it. It can also be configured so that the ventilation is automatically turned on and the gas supply is turned off. Modern automation allows the implementation of a variety of smart systems.
If the temperature, pressure or gas sensor fails, you must immediately turn off the boiler and call a service technician. Using a boiler without these devices is fraught with serious negative consequences.
SNiP requirements state that a gas boiler must be connected to the main line using a copper pipe or a bellows hose. In this case, a faucet must be installed
If signs of a gas leak are detected, you must immediately turn off the gas tap and open the windows to ventilate the room. Do not turn on the light and try to illuminate the room by lighting matches or a lighter.
The gas boiler must be serviced at intervals specified by the manufacturer. Information about the necessary procedures is indicated in the instructions for the device. For example, you need to clean the chimney, remove scale from the heat exchanger, or clear the fumes from the burner. Then the boiler will last a long time, and the risk of serious malfunctions will be significantly reduced.
When using a gas device, do not turn it on at maximum power for a long time. This may result in the release of steam, which is unacceptable.
Sometimes the boiler begins to make unusual noises and vibrations. This may be due to the operation of the fan. We warn you that all actions that require disassembling the boiler casing automatically deprive the owner of the right to warranty repair or replacement.
However, the owner of the unit needs to monitor the operation of mechanisms and systems that protect the boiler from fire. It is necessary to maintain the temperature in the circuits at around 50 degrees, which significantly reduces the likelihood of mineral deposits forming on the internal surfaces of pipes and devices.
Why is water dripping
The most common causes of leakage:
- Damage to the integrity of equipment shells.
- High pressure in the system.
- Wear and tear of equipment, lack of preventive actions.
- Marriage.
- Incorrect installation.
- Safety valve failure.
From the water heater safety valve
This valve protects the system from damage by high pressure by releasing excess water automatically.
Why is water dripping from the water heater safety valve:
- Removes excess water formed during heating. This is the norm.
- It is faulty if water drips constantly and its quantity does not depend on the scale of work.
- Scale has formed on the spring and is unable to fully close the device.
- The rubber or silicone seal is worn out.
- Increased water pressure. (Presumably it should also drip during non-working hours, but with different intensity.
- Incorrect installation.
Procedure for elimination:
With increased pressure in the system, there are several ways:
- Purchase and install a pressure reducer.
- Install an expansion tank (costs more than a gearbox).
- Install protective fittings designed for these pressure indicators.
From check valve
The release of a small amount of water (drips) from the valve mechanism during operation of the water heater is normal.
When you first start using the device, a leak from the check valve may indicate that the outlet pipe and the inlet pipe are not connected correctly.
Solution to the problem:
- If there is a small amount of liquid released during operation of the equipment, a solution to the problem will be to place a container under the valve to collect the liquid.
- You can also attach a hose to the leak and direct it into a container on the floor so that its end is not in the water.
Dripping from the bottom of the boiler
Using the Ariston boiler as an example, let's look at the reasons for the release of water from the bottom of the water heater.
There are only two of them:
- The tank is leaking. This problem can occur due to lack of grounding (leading to electrical corrosion), improper maintenance, or wear.
- Water flows from under the flange securing the heating element.
Solution to the problem (tank leak):
- Repairing the tank is practically impossible, since the outer casing is difficult to separate from it, its wall thickness is 1-2 mm, and it can be made of plastic.
- If the model allows it and the tank is removable, it can be replaced with a new one. But it is expensive.
Solution with a heating element when the gasket wears out (next to the flange):
- Remove the cover.
- Disconnect the wires and drain the fluid.
- Remove the flange. Pull out the heating element.
- Replace the gasket.
- Treat the fastening points with silicone.
One of the pipe connections is leaking (liquid will flow down the pipe and may be rusty):
Unscrew the unit, then remove the damaged gasket and install a new one.
If the shell of the heating element is damaged by rust:
- Find the fistula and solder it or cover it with cold welding (resistant to high temperatures).
- Purchase a stainless steel flange.
In Electrolux tanks, a non-working heating element is very easy to replace with a new one.
At the top
A leak at the top is possible:
- In case of mechanical damage to the device from the outside.
- If the device is installed incorrectly.
- If the magnesium rod wears out or does not work properly.
Solution to the problem:
- Replace the magnesium rod. In the future, monitor its level of wear.
- If the warranty period has not expired, the device is not damaged, it is installed correctly and the rod has been checked, you should return it to the store.
- If the expiration date has expired (destruction of a leak using the example of a Termex boiler):
- Remove water.
- Remove the boiler.
- Clean off the insulation with a knife.
- Clean out the tank.
- Calculate fistulas by filling with fluid.
- Drill, create threads, screw in screws.
- Cover with cold welding.
It is worth adding that the use of water heaters without safety fittings is prohibited. If the water supply system initially has high pressure, it is worth installing the reducer in advance. If the actions do not bring any results, you should call a professional.
>
How to fix a leak
To stop a leak in the radiator, you can use the soldering method. Before draining the water, unplug the device and wait until the boiler cools down. If the heat exchanger leaks, drain the water from the circuit.
Now remove the radiator:
Unscrew the screws of the outer casing and camera protection and remove them. Disconnect the wiring of the sensors and tubes that are connected to the node. Take a photo or mark with a marker the correct connections to make the connection. Turn off the fan and smoke detector. Carefully remove the heat exchanger.
Soldering is carried out with a gas torch. First, the area of corrosion is cleaned with fine sandpaper, then degreased. Solder is used for soldering; upon completion of work, the damaged area can be covered with aluminum for protection.
To avoid further operational problems, when purchasing, inspect not only the outer casing, but also the internal components. Radiator material, quality of seams, joints, connections. Follow the manufacturer's recommendations regarding flame modulation and temperature.
Workmanship
The strength of the boiler depends on the quality of the welded joints. If a weld seam has cavities or irregularities, sooner or later this seam may leak. The void located inside the seam is considered especially dangerous. Ideally, the seams should be X-rayed, but not all manufacturers do this.
Although heating boilers are pressure vessels and must be subject to increased manufacturing requirements, defects sometimes occur. And, as a rule, it drips from the heating boiler after the warranty expires. It is not always possible to weld the boiler inside and stop the leak.
It depends on how the heat exchanger is designed. In models where a bithermal heat exchanger is installed (the secondary and primary are in the same housing, heat exchange occurs thanks to the two-in-one design), this is problematic. But, even if you did this, as practice shows, this will not help you for long.
This is interesting: Mats for warm water floors: types, how to choose, installation and installation
How can you tell if your boiler is leaking?
A coolant leak reduces the hydraulic pressure in the heating system. Let us say right away that pressure can change for other reasons, for example, due to changes in the density of water. But if the pressure gauge needle stubbornly falls down or a notification about a lack of water in the system appears on the display, you must definitely check for leaks.
Problem areas are inspected: primarily detachable connections, including taps. But the location of the leak cannot always be determined visually, because the coolant will not necessarily flow in a continuous stream, flooding the floor. Most often it just drips. When the droplets fall on hot surfaces they evaporate.
Therefore, you need to pay attention not only to wet places, but also to traces of drips and rust stains. It is better to look for leaks with a flashlight; inspect hard-to-reach areas with a mirror
Place napkins under possible leaks. Getting them wet will confirm that there is a coolant leak.
A mandatory element of the heating system is a pressure gauge that measures hydraulic pressure; a drop in pressure may indicate a coolant leak.
If a leak is indicated only by a drop in pressure, the problem may not be in the boiler, but in other elements of the heating system, including radiators, which also need to be checked.
It can be done as follows: water is drained from the circuit and air is pumped in using a compressor. It will come out of the leak with a characteristic noise. If the pipes are laid under tiles or in concrete floors, you will have to use a phonendoscope to hear the sound of the air escaping. Also in this case, leak detection can be done using a thermal imager.
Leaks through the safety valve
An important element of the safety system is the safety valve, which is necessary to “secure” the closed expansion tank. In boilers for individual heating systems, spring safety valves are usually installed.
Diagram of a spring type valve showing the main functional parts including pressure spring, poppet, seat
In the body of such a valve there is a metal spring that presses on the stem, and it, in turn, holds the support plate in a position where it is pressed tightly against the seat.
If, when the pressure in the heating system increases, the expansion tank for one reason or another does not cope with its functions, the coolant increases the pressure on the plate. At this moment, the spring compresses and lifts the plate above the saddle. Through the resulting hole, excess coolant flows into the drainage pipe and further into the sewer.
If the expansion tank is not selected correctly and its volume is not enough to accommodate all the incoming water, the membrane may rupture and water will fill the entire upper cavity. With a further increase in pressure, the safety valve is activated, through which the resulting excess coolant is removed.
The safety valve also operates if the membrane is torn due to wear, if air leaks through a faulty nipple, or if the automatic control system malfunctions
If the connection between the valve pipe and the drain pipe is not tight enough, the coolant will end up not in the sewer, but on the floor. To prevent this from happening, during a technical inspection, pay attention to this area and, if there is the slightest leak, perform sealing.
The safety valve installed outside the heating boiler has a similar design and can also leak, requiring urgent repairs
Be sure to determine the reason for the valve operation. If necessary, install a new expansion tank taking into account the volume of coolant in the system, change a worn membrane, faulty nipple or tank assembly, and solve problems with settings and control.
An emergency situation for a heating boiler is normal for the safety valve itself, because it is needed precisely in order to reduce damage from the consequences of an accident. But the valve itself may fail, causing a coolant leak.
Most often, the breakdown is associated with a spring, which is constantly under stress and eventually loses its elasticity, which leads to leaks even during normal operation of the system. The faulty valve is replaced with a new one.
When choosing a valve, its technical parameters are taken into account:
- nominal diameter of the pipe opening (DN);
- threaded connection size;
- response pressure.
The requirements for safety valves for heating systems are regulated by GOST 12.2.085-2002.
The traditional material for sealing threaded connections is plumbing flax (tow); to increase the reliability and durability of sealing, flax is impregnated with a special composition
But what to do if the gas boiler leaks due to a breakdown of a recently installed valve? This happens when a grain of debris gets between the plate and the seat, for example, rust from the expansion tank. In this case, the valve is removed, washed under running water and reinstalled.
The valve is installed so that the spring is vertical. There is an arrow on the body indicating the direction of coolant flow. To seal threaded connections, heat-resistant elastic gaskets or plumbing flax are used.
How to eliminate leaks in hidden wiring pipes
To quickly seal hidden heating pipelines, use mustard powder or a ready-made special sealant. The existing substance is added to the expansion boiler and the system is put into operation. After a few hours, the sealant (or particles of mustard powder) will seal the damaged area, eliminating the leak.
Such repairs will give time to prepare for a complete restoration of the heating circuit. However, if a large damage has occurred in a hidden area, then the internal sealant is unlikely to help. The heating circuit will have to be drained and repaired immediately.
Affordable repairs begin with the correct design and installation of the heating system. All detachable connections must be accessible for inspection. Hidden areas must be made of high-quality, durable materials and not have detachable connections. Timely replacement of worn-out equipment will allow you to live peacefully in cold weather, enjoying warmth and comfort.
High system pressure
Excessive pressure in the system can also cause a boiler leak. There can be many reasons for high blood pressure. The main reason may be a malfunction of the expansion tank, air locks in the system, a clogged strainer, a malfunction of the safety valve, or the make-up tap.
A malfunction of the safety valve is indicated by constantly leaking liquid from the tube. High pressure can not only cause a crack in the boiler, but also cause an explosion. Monitor the serviceability of the pressure gauge and relief valve; sometimes the valve jams due to the formation of a layer of salts on it. Wash it in citric acid.
Heating boiler safety valve
It is necessary to regularly check the correct pressure on the valve and in the expansion tank. When installing an expansion tank, it is necessary to calculate the volume of coolant. How to calculate - there is a calculation formula, and the average value is -1.5 Atm or 0.2 Atm lower than in the system. For prevention, do not forget to wash the filters at the inlet and outlet of the heating circuit; after recharging the system, it is necessary to ventilate the batteries.
Why does a gas boiler click and why are these noises dangerous?
Knocking, clicking, vibration or sometimes even an “explosion” in gas boilers most often occurs due to the build-up of dirt and fossils in the hot water heat exchangers or in the main heat exchange center of the heating system.
The clicks or hums themselves do not pose a danger to the residents of the house. No defects or problems will appear due to them.
The most they will bring is discomfort.
Reference! However, clicks (and other noises) usually become an indicator of malfunctions in the gas boiler. This could be either a serious breakdown of the part or a build-up of dirt.
The gas boiler clicks during heating, switching on and/or switching off.
During power on
- In case of malfunction of the three-code valve.
- If you hear a loud bang or knock, the ignition system is most likely faulty. This happens when the spark ignites much later than it should.
In this case, a large amount of gas accumulates. When a spark appears, the gas ignites and a bang is heard.
- Such noise is caused by a clogged wick (if the gas boiler is semi-automatic) or a defect in the chimney. At the same time, the electrodes (in boilers with automatic ignition) also become clogged, which short-circuit and click. When heated, they deviate more.
- Clogged nozzles in the burner lead to a poor-quality mixture of natural (or liquefied) gas and air. This is evidenced by the noise when lighting a fire.
During heating
- The gas boiler makes noise if the radiator mounting brackets are installed incorrectly. Then during heating (sometimes during cooling) the thermal expansion in the heating system will not be balanced.
- A clogged mesh in the housing also leads to clicking sounds. At the same time, the draft decreases when heated.
- Sometimes resonance occurs in the system due to improper operation of the pump.
- The evaporation of a large amount of water is also accompanied by various sounds.
When cooling
A lot of free space is needed for heat to spread, and if the pipes were installed without taking this into account, then most likely the boiler will click or crack.
This phenomenon is most noticeable when cooling the heating device, when the temperature changes downward.
Why do boilers made of cast iron leak?
There are several reasons why a cast iron boiler may leak.
We will tell you about one case that happened to our Customer.
At the request of the client, employees of Termosystem LLC inspected the heat generating installation for repeated leaks of the boiler block of the Viessmann Vitorond cast iron boiler. The rear section of the boiler was replaced, after which the boiler was operated for 3 months, but the situation repeated itself:
the same section leaked.
As our professionals found out, there were a couple of reasons
causing cracks in the rear wall of the boiler block:
- High temperature difference between flow and return lines
- Low temperature of the make-up water and the make-up process itself during the operating period of the burner (repeated make-up with cold water just at the moment the burner warms up). As a result of a sharp temperature change, cracks may form
- Lack of water in the boiler, and, as a consequence, heating of the empty boiler block by the burner
To prevent problems caused by leaking cast iron boilers, the boiler room equipment manufacturer recommends protecting the heat exchanger made of cast iron by installing a 3-way valve with a servo drive and a mixing pump at the inlet and outlet of the coolant from the boiler.
The temperature sensor will monitor the temperature of the return line and turn on the mixing pump, which will begin to pump the coolant from the supply to the return line, at this moment the servo drive will shut off the supply of coolant from the boiler to the circuit, thus ensuring the permissible temperature difference between the supply and return lines.
You need to know that the expansion tank installed in a heat-generating installation must have a volume equal to 10% of the total volume of water in all heating circuits.
If the tank has a small volume, it will not be able to cope with the task assigned to it.
In the case of our Customer, it may happen that when the temperature in the boiler was lowered, the tank was unable to release the coolant back into the system (i.e., compensate for the decrease in volume). The pressure may have dropped, there are no sensors monitoring the water volume in the system, but the boiler continued to operate with low water content in the boiler block. As a result, a burnout of the boiler combustion chamber could occur - and as a result, a crack. If we add recharge at the moment the combustion chamber is “burned out,” then, of course, in such conditions it costs nothing to burst the rear end.
Since the feed to the boiler is organized precisely through the rear section.
The manufacturer suggests installing a very low pressure relay and a controller for filling the boiler block with water in such options for additional security. When the water level in the boiler decreases, these devices block the operation of the burner. The boiler fails and there is a reason to find out the reason for the blockage.
All measures for installing additional equipment listed in this publication are aimed at reducing the risk of leakage in a cast iron boiler. They are not considered mandatory, but we advise you not to neglect them and install special equipment, thus protecting the boiler from malfunctions, leaks and cracks.
As for our Customer, the main difficulty and basis that led to the breakdown is considered to be that the boiler was connected incorrectly hydraulically. We recommended that he take all measures to protect the boiler from low temperatures, and also expand the water volume in the boiler block.
Why does moisture appear in gas boilers?
In addition to condensation in the chimney of a gas boiler, moisture can also form in the water pipes. The main reason lies in the temperature difference.
The appearance of “dew” on pipelines is also affected by:
- improper ventilation operation (insufficiently powerful exhaust hood);
- high level of humidity in the room;
- incorrect operation of heating equipment.
The design of a gas boiler does not allow you to completely get rid of condensate. However, you have the power to reduce the rate of moisture formation and its amount.
Fighting condensation in an atmospheric boiler
If an atmospheric wall-mounted or floor-standing gas boiler is installed in the house, then the combustion products heat up to 170-200°C. The gases formed during combustion also contain water. However, it does not condense, but turns into steam and is discharged through the smoke channel along with other smoke and volatile soot particles.
When starting up floor-standing gas equipment after a long period of inactivity, a small amount of condensation is allowed to appear, which will evaporate after the boiler warms up. During the cold season, the boiler operates non-stop, so the appearance of liquid is unlikely
If condensation forms in the chimney pipe, then the problem is poor-quality thermal insulation of the chimney. Moreover, the formation of condensate drops on the smoke duct can occur either due to insufficient insulation or due to excessive insulation.
In pipes made of stainless steel, the problem of condensation formation can be solved by installing a condensate neutralizer and adding an element for removing condensation moisture that settles on the surface of the pipe.
When assembling conventional metal chimneys and sandwich chimneys, it is imperative to follow the order of assembly and connection of elements, which provides for spontaneous drainage of condensate outside the smoke channel.
Warning of “dew” in a turbine boiler
Models with a closed burner are equipped with a coaxial chimney. It has a slope of 3° in the outward direction, i.e. from the boiler, it ensures spontaneous drainage of condensate to the street.
The internal channel of the coaxial system is constantly cooled by the air flow coming from outside, due to which the temperature difference during normal operation is minimal.
The standard length of a coaxial smoke exhaust system is 1.2 meters. If extension is necessary, (necessarily indoors) the distance should not exceed 6 meters. There must be at least 0.6 m between the outlet of the outer part of the coaxial chimney and the nearest obstacle (wall, large tree, etc.).
If the boiler is equipped with a coaxial chimney, problems with condensation formation arise during frosty periods. They are solved by insulating the part of the smoke duct located outside the house, increasing ventilation or starting the boiler at full power.
When using a boiler with a coaxial chimney in the northern regions, it is advisable to insulate the outer part of the exhaust pipe. This way you can prevent the formation of condensation on the chimney of a gas boiler. After all, the difference between the temperatures of the incoming air flow and the outgoing flue gases will be reduced.
You can temporarily provide the boiler with air flow from the room. Most turbine models of floor-standing and wall-mounted gas boilers are designed for the possibility of installing separate supply and exhaust systems. You just need to find the plug for the hole to which the exhaust pipe should be connected and open it slightly.
With the exhaust duct plug slightly open, you can wait out the frost. Then it should be covered tightly. In these cases, it also helps to increase the boiler power during frosty periods. In automated systems, a temporary reduction in the interval between the boiler activation and shutdown temperatures set by the owners works well.
Features of condensing boilers
The ideal solution would be a condensing boiler that is correctly balanced with the heating system, correctly configured and operating in the appropriate mode. In this case, the appearance of condensation is absolutely not harmful, because its energy is rationally used by the system itself.
The amount of gas saved directly depends on the amount of condensate formed. The condensation heat generated during operation of the equipment is collected and redirected to the heating circuit. The efficiency of such a boiler is 98%.
What to do with condensate?
A puddle of water under the boiler is not necessarily a sign of a leak. Perhaps this is condensate, that is, water formed when steam condenses.
When the boiler starts, air containing moisture enters its combustion chamber. When a gas-air mixture burns, this moisture turns into hot steam much faster than the coolant heats up. The vapors come into contact with the still cold surface of the heat exchanger and settle on it in the form of condensate.
When condensing, steam settles on cold surfaces in the form of water droplets, which contain a small percentage of acids that cause corrosion of metal surfaces
After the coolant warms up to 60-70 degrees, the condensate evaporates. To speed up this process, when starting the boiler, you can set the adjustment knob to the appropriate division, and then, if necessary, reduce the heating to 40-50 degrees.
The formation of condensation when the boiler has been operating for a long time with a coolant temperature above 60 degrees may indicate improper organization of the heating system. It is worth checking again to see if any mistakes were made during the design and installation of the harness.
The problem of condensation formation should not be underestimated, since prolonged exposure to an acidic environment on metal surfaces leads to their corrosion. Wet surfaces attract soot, which deteriorates the thermal conductivity and reduces the efficiency of the boiler.
Condensation also settles on the internal surfaces of uninsulated chimneys, which leads to accelerated contamination and wear. Insulating the chimney helps solve the problem.