Polypropylene is classified as a hard material that is resistant to abrasion and high temperatures. They are not afraid of any corrosion, therefore they are not exposed to stray currents. The material is recognized as environmentally friendly due to the presence of polyolefins. Any technical process will be characterized by safety and compliance with all necessary standards. But sometimes you have to repair these pipes yourself.
Polypropylene pipes are characterized by rigidity, strength, and thermal conductivity, which explains the lack of thermal insulation. Due to the material used, the installation is considered safe and of high quality at the level of the European standard. The product significantly extends the service life of the structure, which is why construction engineers often recommend choosing PPK polypropylene.
Repair work is only necessary after a long period of use. Plumbing structures function as distribution mechanisms in buildings of various types and purposes. The pipes are suitable for cold and hot water supply, heated floors, and central heating systems. This possibility became a reality due to its resistance to heat exceeding 100 degrees.
How to eliminate leaks in polypropylene pipes
Modern water supply and heating systems (indoor) are assembled from polypropylene pipes. Splicing is carried out using a hot welding method, without the use of threaded connectors. It is fast, convenient and inexpensive, but there is a problem of lack of quality control. If the welded joint is not made in good faith (insufficient heating, violation of technology), over time, a leak will form at the joints.
Repair usually involves dismantling and replacing the leaky unit. Such work can only be done after draining the coolant, which is difficult at the height of the heating season. Especially in an apartment building.
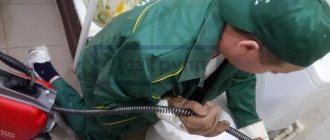
This material will help you eliminate a leak in a welded joint without dismantling pipes and costly calling plumbers.
First of all, we localize the location of the leak.
To do this, wipe the leaky joint dry and apply a paper napkin. It will become wet exactly at the leak site. Then there are two repair algorithms: emergency and long-term. We will need the following tools and materials:
- crimp clamps (with screw tightening)
- polypropylene connecting fittings of the appropriate diameter (for the manufacture of a repair coupling)
- a piece of galvanized sheet or thin PVC sheet (for making a bandage)
- cold welding glue
- automotive RTV sealant (it can withstand high pressure, temperatures up to 350°C, and retains plasticity after hardening)
- degreaser, sandpaper
- metal saw, screwdriver
- metal scissors
Emergency repair without draining coolant
Possible if the water does not stream, but simply drips.
1. Crimp with a screw clamp without using glue. Let's take advantage of some of the elasticity of polypropylene. A crimp clamp is applied to the coupling from which it is leaking. After tightening the screw, the leak will decrease and possibly disappear altogether. You can leave it like this until the end of the heating season. But when the temperature of the coolant changes, polypropylene contracts and expands. You will have to constantly monitor the joint.
Therefore, it would be more correct to additionally seal the connection using an adhesive.
2. Application of “cold welding”. Most of these compounds can be used in damp environments.
The main thing is that the binding force of the glue can withstand the pressure of flowing water. This is where preventive crimping of the coupling using a clamp will help. Simply covering up the leak is not enough.
After several temperature changes, micro gaps will appear between the glue and the pipe, and the flow will resume. For reliability, it is necessary to install another supporting coupling opposite the defective joint, let’s call it a repair coupling.
It is cut from standard connecting fittings. To put it on the pipe, we make a longitudinal cut (cut).
We clean the pipe with sandpaper, degrease it, and dry the leak area if possible.
We put a repair coupling on the pipe, prepare “cold welding” glue, and cover the leak area. We move the coupling to the joint, fix it with a second clamp.
In this case, the glue will compact between the couplings and fix the leak. Due to the mixing of “cold welding” with water, the appearance is not very aesthetic. This does not affect the strength (the glue is designed for such use).
The goal has been achieved: the leak has been eliminated. But this solution is temporary; the epoxy glue will gradually crack.
Long-term repair
It can be carried out after the end of the heating season, when the system is drained for prevention.
We clean the leak site from temporary repairs, sand and degrease the surface. We put a repair coupling on the pipe.
We apply a layer of RTV sealant; you can use a mirror to control invisible areas.
We move the repair coupling until the sealant appears from the gap.
Coat the surface with a layer of sealant 2-3 mm thick. Be sure to fill in the repair coupling section.
We make a bandage from a sheet of galvanized sheet or thin PVC sheet. We wrap around the junction of the couplings. The cut location of the bandage should not coincide with the leak point.
We put on the second bandage on top, turning the incision site 180°.
We put on threaded clamps and tighten the bandage couplings tightly. Excess sealant should be squeezed out of all joints and crevices. This means that there are no air voids left inside the repair area and the connection is airtight.
After final tightening, remove excess sealant.
Schematically, the repair area looks like this:
It is important that the leak point, the cuts on the repair coupling and bandages, are in different sectors. After 12 hours, the connection will gain the necessary strength. RTV sealant maintains plasticity and compensates for thermal gaps when the temperature of the coolant changes. So there will definitely not be any leakage in this place.
Of course, materials have some price. But the cost of a plumber's work is much higher. In addition, there is no need to disassemble the leaking unit and install new pipes.
PS
I was prompted to write such an article by the complete lack of adequate information on the Internet. Despite the many reviews when forming a search query on the topic, there are no really working tips in principle. As a result, a solution was found independently; the sealed leak has not manifested itself for two heating seasons.
Source: https://homemasters.ru/articles/santekhnika-i-otoplenie/kak-ustranit-tech-v-polipropilenovyh-trubah/
New in blogs. How to repair a hole in a polypropylene pipe
MiscellaneousHow to repair a hole in a polypropylene pipe
In modern communications, plastic pipes are increasingly used, especially for domestic needs. Sewage, plumbing and heating systems mostly consist of polypropylene pipes or PVC products. This popularity is due to the long service life, ease of installation and reliability of polymer pipes. But even such products sometimes need repair. This article will discuss how to seal a plastic pipe.
What to do first when a leak appears
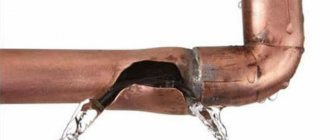
Tube leak
If there is a leak in the high-pressure pipes, heating system or other communications in an apartment or house, the first step is to shut off the shut-off valves. This truth is familiar to everyone. But what to do next?
Metal clamp with rubber gasket
Any leak that appears can be “plugged” using clamps. Such structures are simply put on the desired area and tightened with bolts.
Use of rubber
You can use the old method - use rubber. I often repair heating or water pipes using this method. The problem area is wrapped with a piece of rubber (for example, from car tires) and clamped with a clamp or tied with a thin wire or strong cord.
Note! You can use regular paint. The area where the crack or leak appears is wrapped in cloth and painted over with oil paint.
But all of the above methods can be considered a temporary solution. If such patches are left for a long time, the leak will appear again. This is why many craftsmen recommend replacing the problem area, especially since it is quite easy to do this using plastic pipes.
Sealant and epoxy glue
There can be a large number of possible circumstances for the appearance of cracks or leaks in plastic pipes. This could also be a violation of installation rules, incorrect operation, or a simple manufacturing defect. If the crack is small, you may not need to replace it, but try to seal the pipe.
The first method to carry out repair work is the use of silicone sealant. This method is suitable when the crack is not through. In most cases, this method is used when repairing sewer pipes. The flow of work will be as follows:
How to eliminate a leak in a plastic pipe: methods and methods
Modern, reliable and practical plastic pipes are an excellent solution for arranging a water supply system in a country house or in a private home. Their advantage is quick installation and low weight of the pipeline system, ease of system modernization and pipe repair. The disadvantage of plastic pipes is that a poorly soldered joint inevitably loses its tightness, and the pipes themselves (with the exception of reinforced ones) are poorly resistant to mechanical damage.
A leak can appear in any type of plastic pipe.
The first signs of a leak and how to eliminate it
Wet pipes, the appearance of drops of water similar to dew in the area of the fittings, or a sharp drop in pressure in the system directly warn the owner that it is time to pay attention to the plumbing system and fix the problem with your own hands. If the leak is not eliminated in time, then even a small trickle of water can cause a lot of harm, getting on electrical appliances, power lines or newly renovated neighbors living on the floor (or even several floors) below.
To repair a plumbing or heating system made of plastic pipes, you will need minimal practical skills and a set of special tools. An amateur can easily repair a plastic pipe with his own hands, but for a professional, repairing a leak that suddenly appears will not be difficult at all.
Important! The main task of the installer-repairer is to choose the most optimal way to eliminate the malfunction and eliminate the leak as quickly as possible.
The appearance of moisture on the pipes may indicate depressurization of the system
The first action an installer must take when repairing a water main is to shut off, if possible, the water supply to the system or area to be repaired.
Once the leak area has been localized or the water supply has been stopped, restoration work can begin. Next, the best option is selected to eliminate leaks in plastic pipes.
Mandatory conditions - the leak must be eliminated in the minimum time, and the detected pipe crack or hole must be repaired as efficiently as possible.
Important! It is necessary to shut off the water supply in front of the area where a leak is detected. In a multi-circuit system, in order to eliminate a leak, it is enough to turn off the water supply directly to the circuit being repaired, also closing the diverter valve of the local section of the water supply system.
How to seal holes in a plastic pipe - repair options and causes of leaks
The most common problem with plastic plumbing is loss of tightness at pipe joints. Leaks occur for various reasons, depending on the type of pipe installation, the type of fittings used and the skill level of the installer, for example:
- incorrectly selected temperature conditions during soldering of plastic water pipes lead to destruction of the integrity of the pipe-fitting-pipe transition. A leak appears, and to repair the system you have to cut out the entire assembly and install it from new components. It will not be possible to seal the connection with sealant;
- loosening the nut. Fixing a leak in a tightening fitting with your own hands (just tighten the clamping nut) is not difficult if the internal tabs are intact and the nut itself has not burst. It will also not be possible to seal such a fitting with sealant, and if it is damaged, it must be replaced;
- poorly pressed crimp fitting. It can also be used in conjunction with a plastic pipe, and if such a joint leaks, a new connecting fitting must be pressed in. Manufacturers of fittings of this type strongly recommend not to crimp the same shrink ring twice with special pliers;
- pipe not properly prepared. A pipe joint made using the sliding fitting method will inevitably leak if the pipe cut is uneven;
- Joints of plastic pipes made using the adhesive method leak due to an incorrectly selected type of adhesive, or when the interval after installation work before putting the system into operation is too short. The glue has not dried, and the surface of the joints does not have time to polymerize until completely sealed.
How does the pipeline material affect the solution to the problem?
Metal pipes are distinguished by their enviable resistance and durability. Almost their only drawback is their susceptibility to corrosion. This is often what causes a leak in the circuit.
Less commonly, other pipelines also fail: plastic, polypropylene (mainly in places of threaded or fitting connections).
Metal pipes are the most difficult to seal, since electric welding is not applicable to them. After such exposure, corrosion processes only become more active.
It is enough to compress the plastic pipe in the problem area, and all manipulations can be carried out under water pressure. The main thing is not to overdo it with the screed, otherwise the plastic will crack, and then you will have to replace the entire pipe.
A polypropylene pipeline can be easily repaired by soldering a separate fragment; a metal-plastic pipeline requires inserts . In the latter case, if the damage is not extensive, wrapping with electrical tape or treating with an adhesive (polyurethane, epoxy) will be sufficient.
Soldering polypropylene pipes in hard-to-reach places – Pipes and plumbing
When installing new polypropylene pipes to replace outdated metal systems, a situation may arise when connecting pipes by welding must be performed in places that do not quite meet the conditions for such an operation.
Therefore, to independently update the pipeline, certain knowledge is required to help organize the welding of polypropylene pipes in an inconvenient place, using auxiliary tools for this.
Tools for work
A special soldering iron for polypropylene pipes and a set of Teflon nozzles help to make a high-quality connection of pipe elements. Using a soldering iron, you can easily make a welded connection on any section of the pipe. Using nozzles, you can connect pipe elements of different diameters.
In addition, soldering polypropylene pipes in hard-to-reach places requires the following tools:
- A device for cutting polypropylene pipes (most often the cutter comes complete with a soldering iron).
- A solution that allows you to degrease the soldering area.
- Set of connecting elements.
You also need to prepare a tape measure, ruler and pencil, as well as a corner and a knife. In some cases, a rag may be needed.
Methods for welding polypropylene pipes
Soldering pipes in hard-to-reach places can be done in different ways depending on the working diameter of the pipes:
- The butt welding method is used to connect pipes with a wall thickness of at least 4 mm and a diameter of up to 50 mm. In everyday life this method is used quite rarely.
- The socket method is used when connecting pipes with a diameter of up to 40 mm. The operation requires a special welding mechanism equipped with a centering device.
- When saddle brazing, a special bell-shaped saddle is welded to the pipe at an angle of 90 0 using a butt joint. The saddle is drilled and a piece of pipe is welded to the connection point, resulting in a T-shaped adapter at the outlet.
Welding in hard-to-reach places
Soldering hard-to-reach areas of polypropylene products is much more difficult than straight runs. To create favorable working conditions in such places, a sufficient amount of effort is required.
“Inconvenient” places include:
- Space under the ceiling.
- Corners of the room.
- Cramped conditions for placing a soldering iron.
When welding polypropylene pipes in hard-to-reach places under the ceiling, you need to prepare a place where the welding machine will be placed when manually forming the connection. For this purpose, you can invite an assistant or hang the device on a special hook prepared in advance.
If the pipes are located very close to the wall, a special technique is used: the direct and mating parts of the joint being formed are alternately heated with a soldering iron. In this case, the heating must reach such limits that the first heated section does not have time to cool down while the counter part is heating up.
Features of soldering in corners
To solve the problem of how to solder polypropylene pipes in hard-to-reach places, for example, in corners, you need to know the features of such connections.
The joining of pipe elements in the corners of the room is carried out using blanks cut at an angle of 90 0. It is important that their ends are thoroughly cleaned and treated with degreasing agents.
The use of special corner adapters and fittings contributes to the formation of smooth transitions on pipe elements at corner connections.
The formation of corner joints on pipes located at a short distance from the wall is also performed by sequentially heating the straight and mating parts. In this case, special attention should be paid to the depth of insertion of the pipe element into the body of the corner piece. To ensure high accuracy, it is necessary to make the appropriate mark with a marker or pencil.
Deciding on how to solder polypropylene pipes in hard-to-reach places requires careful attention and accurate execution of all actions. Connecting elements that have even a slight defect must be replaced with new parts. According to experts, when making connections in hard-to-reach places, you should not turn off the power to the welding machine; it is better if it is always on.
Preventing the problem from recurring
It is easier to prevent problems in the heating circuit than to suddenly look for ways to eliminate them. So before the start of the heating season, communications are checked by testing, especially focusing on dangerous areas.
These include:
- level spans;
- threaded connections and welds;
- zone of joining sections at radiators;
- places of implantation of heating equipment;
- near fittings;
- hard-to-reach areas.
First, everything is checked by eye, then with the circuit running.
Repair and replacement of damaged sections of polypropylene pipes
Polypropylene pipes are a relatively new material, but are already widely used. Compared to metal pipes, polypropylene is much lighter and more durable. But despite all the positive qualities, polypropylene pipes can leak. To avoid accidents, you need to know the main causes of pipe leaks and be able to eliminate them in a timely manner.
Causes of accidents
The weak points of any system, both pressure and non-pressure, are the joints, so more than two-thirds of accidents occur due to depressurization of the joints.
In non-pressure pipelines made of polypropylene
The causes of accidents in non-pressure pipelines are related to both operating errors and manufacturing defects or improper installation.
Poor-quality soldering of joints always causes depressurization, and polypropylene is easily subject to mechanical damage. Most often, it is the intervention of an external force that violates the integrity of the free-flow polypropylene pipeline.
The reason may also be:
- Mechanical impacts - since the throughput is calculated in advance and the joints are sealed with rubber seals, accidents occur due to external interference.
- Improper operation - failure to comply with temperature conditions, use of highly active chemical elements.
- Errors during assembly.
- Factory defects.
Accidents in pressure pipelines
Pressure piping systems fail as a result of increased pressure in the fluid transported through the pipes.
Causes of emergency situations in pressure polypropylene pipelines:
- Third party damage.
- Incorrect operation.
- Installation errors.
- Exceeding the permissible pressure.
- Incorrect assembly or poor quality materials for the docking system.
Most often, accidents occur due to accidental damage to a pipe during drilling or other repair work.
To eliminate the damage, the damaged area must be replaced.
Just like in non-pressure systems, depressurization of joints often occurs. To avoid this, during installation it is worth checking the location of the O-rings, measuring the depth in several places. If the ring is installed correctly, the depth will be the same in all places.
Polypropylene pipes are quite resistant to chemical elements.
Factory defects are detected extremely rarely, due to enhanced control at all stages of production.
Please note: Chinese-made pipes are often found on sale, so when purchasing, you should pay attention to the quality and carefully check the materials for visible defects. Conscientious suppliers always provide a 50-year guarantee on materials.
Repair of polypropylene pipes
Repair begins with identifying the location of the accident; leaks usually occur due to depressurization of joints, both in pressure and non-pressure systems.
The first step is to turn off the water supply in the system or in the area where repairs will need to be made.
In non-pressure systems, all joints are mounted using a socket method and are sealed using a rubber seal at the joints.
In pressure pipelines, accidents are a frequent occurrence, so the precise actions of the technician determine how long the pipeline will last.
It is necessary to dismantle the joint and replace (or correct) the rings. Joints in pressure systems are connected by welding.
For soldering, a special apparatus is required, and work should be carried out on dry pipes and with dry connecting elements in order to avoid depressurization in the future.
Signs of leaking polypropylene pipes
More often than not, a leak can be detected quickly in cases where it is obvious.
But minor leaks may not be noticed immediately:
- if the leakage is small, the pipes become wet and drops of water appear at the joints;
- if the pipe is severely damaged, the leak will be immediately noticeable;
- deterioration in water pressure. The damaged section of the pipe is not always located in the apartment. A decrease in pressure in the pipe leads to a deterioration in pressure.
Any leaks found must be repaired as quickly as possible.
Important! To detect leaks, it is worth inspecting the pipes from time to time. Even a small leak left unattended can create an emergency situation.
Causes of leaks
A leak at a pipe junction can occur as a result of:
- natural wear and tear of the pipeline system;
- mechanical impact on the joint. This is especially true for plastic and polypropylene pipes;
- corrosion when it comes to metal pipes;
Joint leakage due to the formation of corrosive deposits
- poor-quality connection during pipeline installation;
- incorrectly selected fittings;
- water hammer;
- wear of insulating material and so on.