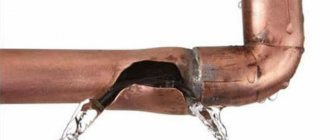
Water supply pipes experience regular hydraulic and corrosion stress. Metal defects, cracks in plastic and loose joints can allow water to enter the room.
To avoid flooding your neighbors, you need to know why a bathroom pipe may be leaking, what to do if this problem occurs, and how to detect it in the early stages.
How to quickly fix a leak?
A leaking water pipe can cause flooding of your home and damage to your property and that of your neighbors. You need to act quickly in such a situation:
- If possible, turn off the water supply to the system (area being repaired).
- Clear the repair area. Move the furniture aside and put down dry rags.
- Prepare tools: pliers, screwdriver, flexible wire or clamps, thin rubber.
- Cut out the desired piece of rubber sheet. It should cover the leak site with a margin of 2–3 cm in each direction.
- Press the pad firmly onto the fistula (crack). If it is too thin, wrap it in 2-3 layers.
- Holding the overlay with your hand, place the wire on top. Tighten it by making tight turns with pliers.
- Cut off the excess wire, leaving 5mm ends.
- Bend them so they don't protrude.
Pipes leak especially often in houses with old plumbing. In bathrooms and toilets where humidity levels are high, metal is at high risk of corrosion. Salts and various impurities in the water contribute. To prevent leaks, anti-corrosion paints and primers are used. Some of them can be applied directly to the rust.
Emergency measures to eliminate leaks
You can quickly eliminate a leak using clamps, sealants, bandages and cementing the defect site. If water drips from the joint, you can try tightening the nut before disassembling.
Bandage and clamps
A plumbing clamp is a crimped metal ring that wraps around the damaged area of the pipe and is tightened with screws. The diameter of the part must match the pipe.
To stop the leak, you need to compress the defect area with a rubber seal (bandage), put on a clamp, adjust its position and firmly tighten the fasteners on the sides.
In most cases, it is applied temporarily to restore water supply in a house or apartment. A damaged pipe requires replacement or repair.
If there is no clamp, you can tighten the seal using wire; instead of a special plumbing bandage, use a piece of a bicycle inner tube or any soft rubber.
Folk method: self-tapping screw
It is recommended to use self-tapping screws only for holes and cracks whose size does not exceed 1-4 mm. It allows you to eliminate leaks under pressure if it is not possible to completely turn off the water supply.
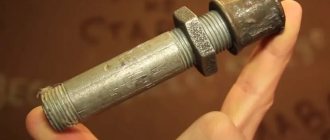
For repairs, you will need a galvanized fastener and a press washer. Using a hand drill, a self-tapping screw is screwed into the leak site, wedging it in and tightly fixing it in the hole. To increase efficiency, you can place a thin elastic spacer under the washer.
The method is suitable for temporary repairs of cold water and sewage systems. The presence of an obstacle inside can lead to clogging of the pipe, so you need to replace the damaged section as quickly as possible.
Cold Welding Tools
Cold Weld adhesive contains epoxy resins, a hardener and reinforcing particles that consist of metal or ceramic. The composition is used to repair water supply systems with pitting corrosion or a crack in a straight section.
How to use Cold Welding:
- turn off the water supply to the apartment and wait until it dries;
- put on gloves;
- carefully remove rust and paint from the pipe (processing with sandpaper should be local, since removing a large layer of oxides can lead to the appearance of new fistulas);
- Apply glue thickly to the damaged area, wait for it to dry according to the instructions (to speed up polymerization, you can warm it up with a hair dryer).
To repair sewer plastic pipes, you can use the patch method. An additional section with a margin covers the damage, and is attached with polyurethane sealant or “Cold Welding”.
To repair, you need to cut a patch from a pipe of the same diameter, apply glue to both surfaces, press tightly and wrap it with tape or a bandage. After polymerization, the additional screed is removed.
Advice from professionals
Plumbing professionals have extensive experience in finding the causes of condensation and eliminating it effectively. For example, one of the modern ways to solve the problem is to coat pipes with a special liquid heat-insulating composition. It is applied to the surface of the pipes, forming a durable, elastic and corrosion-resistant layer when drying, which allows you to get rid of moisture.
However, if the temperature difference is very large, the pipes must be additionally insulated. For this purpose, polyethylene foam is often used, which is secured with ordinary wire. This is a lightweight and rot-resistant material. It is produced both in the form of sheets and in the form of soft tubes of various diameters with a longitudinal section.
To obtain maximum effect, it is necessary that the inner diameter of the tube matches the outer diameter of the water pipe. In this case, the tube is put on tightly, without unnecessary gaps. If it is smaller in diameter, there will be a gap; if it is larger, it will dangle. At the same time, it will bring practically no benefit. The ease of use is that you can put the part on the pipes yourself and immediately get the desired result.
Before using them, it is necessary to clean the pipe, remove rust and degrease the surface with solvent or acetone. After this, putty is applied, and a layer of fabric is applied on top, without waiting for the putty to dry. The layers of fabric are wound over each other, without gaps, and at the end they are secured with a bandage or strong thread. This method is quite simple and effective.
When building a private house, in order to prevent such phenomena, the existing sources of heat and high humidity, as well as their relative placement, should be taken into account. Based on this, it is worth immediately increasing the ventilation of the premises.
To learn how to eliminate condensation on cold water pipes, see the following video.
Eliminating leaks in pipes - first steps
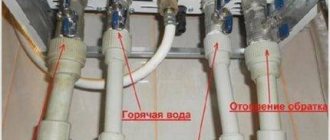
Turn off the water (for the water supply system). In apartments, the water supply valve is most often located in the bathroom. It is installed at the location where the water meter is installed. There are different lines for hot and cold water supply. Close both valves until the problem is resolved; Prepare towels and containers (basin, bucket); Remove valuables and electrical appliances that are in close proximity to the leaking pipe; Protect your hands (for heating system). A rupture in this communication system is accompanied by the leakage of hot water under high pressure. Place a basin in the place where the pipe is leaking and prepare another one to empty the first one when filling
To muffle the pressure, carefully wrap a towel around the area; Report an accident. After completing all the previous steps, you need to call the utility company and tell them about the broken pipe.
Repairing leaks at pipe joints using cement
What to do if a pipe is leaking, and the only possible materials available are cement?
In such a situation, work is carried out as follows:
- The pipe junction area is cleaned, with the obligatory removal of the old seal. To avoid damaging the pipes, it is better to refrain from using heavy tools.
- Next, you need to get a wide gauze bandage. Cement is mixed with water to form a slurry. A bandage is immersed in the resulting solution.
- The same cement mortar is used to treat the joint between the pipes, and then wrap a bandage there.
- The hardening of the seal usually lasts for two hours, after which it can be sanded and painted.
In cases where a leak was detected directly on the pipe body, a completely different algorithm of actions will be required.
Who should change the sewer riser in an apartment?
In the previous paragraph, we found out who owns the sewer riser in the apartment and it was proven that the sewer riser belongs to the collective property of the house. As you know, the maintenance and all types of repairs of common property must be carried out by the communal organization that is assigned to maintain the house.
If an apartment is flooded due to a fault in the risers, then the first step is to submit an application to the management company. In particularly difficult and emergency situations, you can additionally contact the emergency service to quickly resolve the problem.
Representatives of these organizations are obliged, in the presence of witnesses and all interested parties, to inspect the leak and damage caused and draw up a special report. This document must necessarily reflect: in which apartments the flood occurred, for what reason, what property was damaged, etc.
Pay special attention to the preparation of this report and under no circumstances leave repair services without it. The document will actually state who is to blame for the leak that occurred.
If the report shows that the flood occurred due to a faulty sewer riser, then the utility services are considered to be at fault. Because monitoring the serviceability and wear and tear of plumbing supplies is their immediate duty. However, if the act reflects that the flood occurred due to the fault of the residents, for example, an unauthorized replacement of equipment was made or any mechanical damage was caused to the riser, then the blame will lie entirely with the owners of the apartment.
At the very beginning of our article, an example was given with an insured apartment. Neighbors who have insured their property contact the insurance company. And she already issues an invoice for compensation for damage to the person at fault in this incident. If the flood occurred due to the fault of rotten risers, who will be charged to the management company? If due to mechanical damage - to the property owner.
What if cast iron
Repairing a sewer riser in an apartment is possible if a small leak, a minor fistula, a small crack is detected, or a cast iron fitting (coupling, adapter) has burst. Such not very dangerous damage will withstand temporary measures.
Quick repair methods:
1. Clean the small fistula from debris and sand the edges with sandpaper. Wipe again with a cloth. Then we take a handful of cement and coat the affected area.
There is no need to thin the cement. Take a dry solution. Water is oozing from the fistula. The cement will get wet little by little. A layer was applied - the solution got wet - another layer. Little by little the fistula will heal. Cement adheres well to cast iron - it will hold on.
2. You can’t hide a more serious leak behind cement. The large hole must be closed with a clamp. Purchase a clamp that matches the diameter of the riser. Cut a rubber strip underneath it. The width of one should be equal to the width of the clamp, maybe a couple of millimeters more. The length is the diameter of the riser.
We wrap the ribbon around the pipe to check if it fits. Open the clamp. We put it on the riser. We tighten it a little. We insert a rubber gasket under it. We try to get her to close the fistula. And tighten the clamp all the way. Another repair option is cold welding. But the clamp is more reliable.
Trouble may arise in the sewer system. Especially if the network is already old and has been in service for decades. The most common of them are leaks of varying intensity. They can occur at joints, through defects. Urgent repair of the sewer riser is needed. If the damage is serious, then replace it. Let's talk about renovation.
Defects are different. Consequently, repair measures are also different. Sometimes a simple putty will be enough, and sometimes you will have to stitch it up. In any case, repairs are a temporary measure. The pipe will have to be replaced soon.
Preparation and necessary tools
Before repairing a pipe, the water supply must be shut off. Wipe off any escaped water and prepare the necessary materials and tools:
- “grinder” or hacksaw for metal;
- gas and pipe wrenches;
- coupling;
- putty or special tape.
This method involves replacing the damaged communication area with a new one, so you will need to buy a pipe with the same diameter as the old one.
How to take measurements to install a new site
Instructions for eliminating leaks
A more complex and reliable way to fix a leak is to replace the broken area. To do this, you must perform the following sequence of actions:
- Using a grinder, cut off the damaged section of the pipeline, taking into account a distance of 30 cm in both directions.
- Unscrew the threaded connection of the pipeline located adjacent to the leak.
- Using a gas wrench, hold the end of the cut pipe and cut the thread.
- Screw the coupling onto the machined end.
- Measure how long the new pipe should be, taking into account the threaded location.
- Thread the new pipe section at both ends.
- Apply putty to the threaded sections of the section to seal them.
- Connect the new section of the coupling, holding it with a pipe wrench.
Pipe replacement
Thus, there are several simple and quick ways to fix a leak. However, we note that all of the above methods will only help temporarily eliminate the problem. In any case, you need to contact specialists.
Is it possible to temporarily seal it with something?
Independent intervention is required if it is impossible to call a specialist. To eliminate leaking heating pipes, you will need additional material and tools. Manufacturers offer the following product options:
- Pipeline bandage;
- Clamp;
- Steel wire;
- Gasket - it is made of various materials, including rubber, fabric, polymer and other options;
- Cold welding.
Each of the options requires skill, so in the absence of knowledge and practice, it is advisable to contact specialists even for minor repairs.
It is also important to remember that sealing a leak is carried out only after the circulation of hot water in the heating equipment has completely stopped, after which it is necessary to wait for the system to cool down. Otherwise, the repair cannot be carried out or will not be effective even for a minimum period of time
Hot and cold H2O - is there a difference in the way the gap is sealed?
It's all about the difference in coolant temperature. It is this factor that is decisive when choosing a material.
With hot pressure, minor damage can heal without outside intervention . Larger gaps can be easily repaired with regular salt and a bandage.
But when the water cools, the flow will resume. It will not be possible to fix a leak in a cold water pipe with salt and a bandage. It is easier to repair a failed hot water pipe in the summer when it is turned off. Then you don’t have to control the temperature in the room while fixing the leak.
Repair of polypropylene pipes in hard-to-reach places
It is not always convenient to carry out repair work directly at the accident site. The difficulty lies in using a soldering iron, since the process is carried out in a limited space.
Plumbers work
In this case, to perform welding, perform the following steps:
- The tool is prepared and checked.
- Burrs, dust, dirt and grease are removed from the surfaces being welded. Degreasing is performed with wipes soaked in solvent or white spirit. The substance used must be completely dry.
- The soldering iron heats up to 260 °C.
- The hot pipe nozzle is removed using a gas wrench and quickly put on the pipe in a hard-to-reach place. At the same time, the fitting is heated on the soldering iron.
- The nozzle is removed from the pipeline element in a limited space, and the connecting part is removed from the tool.
- The heated PP parts of the pipeline system are joined.
The repair process in difficult places can also be carried out using a classic fitting with a union nut - an American one. It can be easily installed and removed. This fitting allows you to quickly remove the system assembly for repair or complete replacement. American provides a high level of tightness.
Manufacturers produce American fittings with internal, external threads and mixed types. They are made from various alloys, including steel and brass. American ones are produced in the form of plugs, crosses, tees and adapter couplings.
When is repair needed and when is replacement needed?
The sewer riser can be cast iron (in old houses) or plastic. Cast iron pipes are by far the most dangerous. Imagine how many years this sewer system has been standing! Naturally, the cast iron has already rusted in some places and is leaking.
Plumbers don't even want to repair cast iron drains. Just change it! And it is right. I replaced it with new plastic and forgot about it. But cases are different. Today there is no money for replacement, there is not enough time. For now we'll make do with the repairs. If
- a crack has formed on the pipe and water is oozing from it;
- a leak appeared at the junction of the riser with the tee, coupling, adapter, and crosspiece;
- the sewer pipe is broken or rotted in some place.
Replacement is the only salvation if the riser has collapsed.
How to solve a problem?
When water circulates under pressure in the pipes, most major repairs cannot be done. Therefore, you have to act in other available ways in order to at least temporarily stop the leak and wait for emergency services.
Using a self-tapping screw
This option is applicable only for minor holes with a diameter of no more than 3-4 mm.
To plug the hole, you need a galvanized self-tapping screw, which is additionally equipped with a press washer.
It is simply screwed into the hole and secured. As a result, the water is blocked. After such repairs, the pipe can last up to 3 years, but it is better to replace the burst fragment as soon as possible. In addition, a self-tapping screw inside the pipeline leads to clogging of the system.
Cementing
Cast iron or steel pipes can be easily patched using cementation.
The sequence of actions is as follows:
Using a special hard metal brush, carefully remove the layer of rust in the area of the fistula. The metal that is being painted is also removed, even if this leads to an enlargement of the hole. Cut the bandage to a certain length and dip it in the cement solution. They wrap it around the crack in several passes to form a kind of cocoon. The top is coated with cement to consolidate the result. After completion of the repair work, the pipe must be given time to dry completely.
Usually a day is enough
After completing the repair work, the pipe must be given time to dry completely. Usually a day is enough.
Clamp
A clamp is a fairly simple design consisting of a metal ring, a rubber gasket and a tightening bolt.
This device is sold in stores, but in emergency situations you can quickly make it yourself. You will need a piece of plastic rubber, scissors and a metal clamp corresponding to the diameter of the pipe.
Further actions:
- clean the damaged area from rust;
- put on a clamp, and slip a rubber gasket under it;
- The coupling is pressed tightly.
If the pipe is very rusty, a clamp will be almost the only way to disguise the leak. This is because welding cannot be used here.
Bandage and table salt
Salt is ideal for sealing leaks in hot water pipes under pressure. Step-by-step instruction:
- Distribute digestive salt over the bandage in as large a layer as possible.
- Wrap it around the hole, preferably more tightly.
Once wet, the salt sets into a crust, which prevents further water from flowing out. The method is not particularly convenient to implement, but it is suitable if nothing else is at hand.
Sealant
Using sealant (also called “cold welding”) to eliminate leaks in existing pipelines is not productive, since there is no guarantee that the problem will be solved 100%.
This is due to the fact that such compositions are designed to work with dry surfaces, and condensate is present on pressure pipes.
But if there is a small crack, you can try to seal it with a heat-resistant sealant. Outwardly, it is similar to plasticine.
Peel off a small piece, carefully crumple it with your fingers and insert it into the hole, followed by smearing it to the sides. Large holes cannot be masked this way; first you will need to insert a wooden chip.
Glue
Here you will need fiberglass fabric and BF-2 glue.
Step by step steps:
- the problem area is thoroughly cleaned of rusty particles and degreased with aviation gasoline (acetone is an alternative);
- wait 15 minutes until the surface dries;
- cut a tape from the fiberglass of such a width that it completely covers the area of the leak;
- an adhesive composition is applied along the edges, and epoxy resin is applied to the center;
- apply to the crack, press with your hand and wrap;
- fixed with copper wire.
The patch will take about a day to dry if the batteries are hot. In the summer, when the room is cool, this takes about five days.
Wire or harness
A method somewhat reminiscent of the one with a clamp. Only instead of it they take a medical tourniquet and any metal wire. Rubber is tightly wrapped around the damaged pipe fragment and tightened with wire.
Wooden chop
It is necessary to quickly plan a wedge-shaped peg of a suitable diameter from any piece of wood. Then they hammer it into the hole with a hammer.
Rules for choosing a material to solve a problem
When the cause of the pipe damage has been established, it is necessary to look for acceptable repair methods. There are several of them. Only most are suitable for low water pressure in the water supply circuit or heating system.
The most common way out of a difficult situation is to use an industrial clamp (screed). This is a metal ring with thick walls, a rubberized inner surface and a fastening nut for a tie.
If you don’t have such a device at hand, then any piece of rubber (for example, from a bicycle inner tube) and wire or something similar will do .
But other methods of eliminating leaks when it comes to heating or hot water supply systems are unlikely to work. Thus, often used cold welding and special sealants are not relevant for wet surfaces.
Other instantly hardening composites (epoxy resin, dichloroethane) are also excluded, since they can be used on dry and disconnected water supply routes.
A minor leak in the pipeline can be repaired on your own . But this will only be a temporary measure. At the end of the heating season, it is recommended to carry out major repairs so that the system no longer fails.
Where to call if a pipe is leaking
In the event of a break in the water supply, heating or sewerage lines, you must contact the Housing Office to call a plumber (locksmith), or the emergency service. The telephone numbers of service organizations can be found in the help desk, on the notice board at the entrance to an apartment building, or on the receipt for utility services.
If a leak occurs on a weekday during business hours, you need to call the housing office, the management company, or directly the plumber assigned to a specific residential area. During non-working hours, at night or on weekends, you should contact the emergency service of the water utility. They will not do the work for the management company’s specialists, but they will come to the site and turn off the water in the heating, water supply or sewerage system until the housing and communal services specialists arrive.
Mechanical ways to clear a clogged kitchen sink
The cause of the blockage is the entry of foreign objects into the drain pipe: food, hair, grease, scale, dirt, small stones, wool. Often the drain is clogged by a tuft of hair or fur, to which small particles stick. A plug forms that blocks the passage of water. It needs to be eliminated.
The natural accumulation of dirt in the bathroom pipes and grease in the kitchen sink over time begins to interfere with the drainage of water. Washing shoes in the sink, washing a floor rag in the toilet, or throwing spoiled food into the sink will lead to clogs.
A traffic jam can also form due to improper installation of a corrugated pipe. The corrugation is similar to an accordion: it stretches to a certain length. If it is stretched unevenly, the overtightened part sags and stops removing small debris. A blockage forms in such a pocket, which can only be eliminated by replacing the corrugation.
Replacing drain parts is a radical method. Often the blockage can be cleared mechanically.
plunger
A plunger is a rubber valve on a wooden handle. The principle of operation is simple: the valve creates increased pressure, which breaks through the blockage.
Step-by-step instructions to clear a sewer clog:
- Completely remove the water from the sink and dry the area near the drain. This is necessary so that the rubber fits as tightly as possible to the surface. An alternative method is to leave about 10 cm of water in the sink so that the tool is immersed in it while working.
- Grasp the handle and press the plunger firmly several times until the rubber valve presses into the surface of the sink. Quickly tear it away from the drain. Some of the clog will rise out. Remove dirt quickly to prevent it from being sucked back up.
- Run a test flow of water.
- Repeat the procedure 2-3 times, each time removing any debris that comes out.
- If you are unable to completely unblock the drain, pour a full kettle of boiling water into the hole and use the plunger again. Water will dissolve the fat stuck to the walls.
If you need to clear a blockage in a two-section sink, use two plungers at the same time. If you don't have a second tool, you can plug one drain with a wet rag or your hand. A dense cork cannot be removed this way.
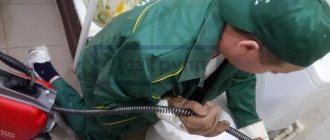
Cable
A plumbing cable is used to remove a severe clog in a kitchen sink. It is not difficult to determine the degree of blockage; water does not go down the drain and periodically rises from it.
The cable will help remove deep-seated dense debris plugs. This plumbing fixture is a spirally bent steel wire. It pushes into the pipe, pushes a build-up of dirt into a wide area of the drain, or pulls a plug out through a hole.
Wire cannot be used to clear blockages in chrome and plastic pipes.
This method will require an assistant. Algorithm of actions to eliminate a traffic jam:
- Insert the cable into the hole. One person inserts the wire, the second rotates the handle. This effectively breaks up debris buildup and avoids getting stuck in bends. Do not push with force, as this can damage the pipe. If the cork is very dense, the cable will not be able to crush it, and you will have to call a specialist to clean it.
- Once the wire passes through the clog, jerk it back and forth sharply several times.
- Run water to flush any remaining dirt down the drain.
- Remove the cable and remove any dirt that comes with it.
Do not try to use the cable yourself if it is clogged. Firstly, it is impossible to rotate and push the wire at the same time. Secondly, the tool can jump out and hurt your hands.
If the debris that needs to be removed is shallow, then a straightened hanger can be used instead of a cable. You need to lower it into the sink hole by the hook.
Elimination of minor defects in cast iron pipes
Connection diagram for cast iron pipes.
It also happens that a defect has formed on a still normal cast iron pipe. But you don’t want to change your only pipe to plastic yet or you don’t have enough money for it. There is also a good way out of this situation. But it only works in cases where a minor defect has formed on the cast-iron riser (the so-called small “fistula”) and water only flows slightly under the bathtub without flowing out in a stream. Of course, in this case you can use an ordinary clamp. But if you think about it, by and large it is not really needed here. You can eliminate the defect in a simpler way, using ordinary cement.
To do this, first turn off the water and wipe the pipe. Then take sandpaper and thoroughly clean the defect area. Use a rag to remove dust and lightly wet the surface. Take a small handful of dry cement and place it on the leaking pipe. Once the cement is wet, apply a little more. Do this until the cement stops getting wet. Due to the fact that cement adheres well to the metal, the defect site will be completely healed and will not leak.
If the problem is more serious and not a fistula, but a crack has formed on the cast iron pipe, then you need to make a gasket from a bandage and cement. Alternate layers of bandage and cement, going around in a circle about three times. This makes it more reliable to hold the metal together. It should be noted that eliminating a defect on a metal pipe in a bathroom using cement requires waiting about three days, during which the cement will set. Only then can you use the riser.
Article on the topic: Crafts from tires: flower beds, flower beds, figures, garden furniture
The next way to prevent a metal pipe from leaking is to wrap it with a rubber band. You will need either a medical tourniquet or elastic rubber from a bicycle inner tube. Then you simply wrap the leak area with this bundle and secure everything with wire. For greater reliability, it is recommended to wrap the problem area with a bandage on top and paint it with oil paint. But if the pipe flows very close to the bathtub itself, this method will not work.
Installing the bandage
If a pipe in the bathroom is leaking, a temporary solution to the problem is to install a bandage. Before this, you need to determine what type of damage you will have to deal with (fistula or leakage), and where exactly it is located.
The rubber band is applied as follows:
- A rubber gasket is installed in the emergency section of the pipe.
- After pressing tightly to the pipe, fixation with a clamp is applied.
You can easily purchase a clamp in a store, but it happens that you don’t have it at hand at the right time. In this case, you can make the clamp yourself, or use wire, a harness, rope or hose instead.
The bandage rubber can be an old rubber boot, from which the boot is cut off. The same goes for a rubber hose and a bicycle tube. The width of the bandage is made depending on the diameter of the pipe being repaired.
Clamp to help
Difficulties often arise when winding wire. In order for the structure to be sealed and withstand pressure, it must be pressed very tightly against the rubber. But if you apply too much force, the wire breaks off or cuts through the pad.
To tighten the wire, many craftsmen use a homemade tool - a clamp. The device is easy to make at home. With it, the wire tightens the elastic evenly along the entire length.
How to do it yourself?
The clamp is a simple design. Usually craftsmen make it from what is at hand: a steel sheet, a piece of pipe, a stud and nut, a door hinge, a furniture screw, etc.
Here is just a small part of the device options:
- A good clamp with a handle:
- DIY clamp in 30 minutes:
- Door hinge clamp:
We suggest making the simplest clamp from 2 bolts (long and short), a stud, 2 nuts and electrical tape:
- We sharpen the end of the short bolt shaft to a blunt wedge.
- In the middle we make a shallow slot 3 mm wide.
- We weld a nut placed in a vertical position to the bolt head.
- In the same way, weld the second nut to the long bolt.
- We screw the pin all the way into the middle and wrap it with electrical tape to secure it.
- We retreat 2 cm from the edge of the long bolt and drill a hole with a diameter of 2.5-3 mm.
- At a distance of 2 cm, drill another similar hole.
- We screw the nut welded to the short bolt onto the long bolt until it is between the two drilled holes.
How to use the clamp?
Twisting the wire using a clamp occurs as follows:
The wire is folded in half. Then they put it on the pipe with an elastic band. The side of the wire with 2 ends is threaded into the resulting loop. Then another turn of the wire is made around the pipe, and again the ends are threaded into the loop. It turns out a reliable double knot
It is important that the lines do not intersect, but run parallel to each other. Now the clamp comes into play. The notch on the short bolt is pressed against the loop, and the ends of the wire are inserted into the holes in the long bolt. Rotate the bolt with holes
The wire is evenly tightened. When the overlay is well fixed, the ends of the wire are inserted into the loop and cut off, leaving 5 mm.
If the connection to the drain under the bathtub is leaking
Water breakthrough between the gander or at the junction, what to do. We solve the problem as follows:
- turn off the water;
- unscrew the pipe from the drain, placing a container to collect water;
- clean the cavity inside with a brush or vacuum cleaner;
- heat the piece of pipe and the drainage area with a blowtorch until the steam stops flowing, which means the moisture has completely dried out;
- clean the places on the gander and drain with sandpaper;
- degrease with acetone, wipe with a dry cloth;
- apply a piece of silicone to the pipe and the bottom around the gander;
- attach the gander to the bottom of the bath, wrap it around the circumference with a sickle mesh, and add another layer of silicone on top;
- wrap with construction polyethylene;
- wait 2 days until the silicone and polyethylene dry completely, and check if the pipe is leaking.
If dismantled correctly, the structure will last at least 3-4 years.
Repair of sewer riser
If a leak occurs at the joints, then the plumbers who installed the system are to blame. To resolve the problem, you need to take the following steps:
1. Ask your neighbors not to use the sewer system for a while.
2. Dry the joint with a rag or hairdryer. Clear it of debris and cement.
3. Pack the area between the pipes tightly with linen winding.
4. Thoroughly wet the joint with a polymer-cement compound (construction adhesive plus water plus cement) or sealant.
It happens that the joint in the system is sealed tightly, the mortar does not fall off, but flows through a small crack in this mortar. Then you just need to dry this area and cover it.
Initial solution to the problem
Plastic pipes are installed everywhere, because they cannot be demolished. For decades there will be no cracking, rotting, or corrosion, although the joints are weak and may begin to leak over time.
The main reason is poor installation. To solve the problem, take the following steps:
- We turn off the water valve with cold and hot water. Fortunately, the valve was installed directly in the apartments, and not in the basement of some old Khrushchev-era buildings.
- If water still oozes out after closing the valve, then we try to tighten the threaded connections.
- We replace the gasket at the joint in case of leakage directly from the sewer pipe.
Causes of leakage
Steel pipes are not resistant to rusting and oxidation due to the constant circulation of water inside and the deposition of air condensate and moisture outside. Polyethylene is more resistant to the onslaught of aggressive substances from the outside, but leaks in the heating system also occur for certain reasons:
- Incorrect selection of material, improper use. For example, polyethylene and polypropylene are not suitable as heating and sewer pipes.
- Savings, because people make mistakes when buying cheap polypropylene pipes for cold water. You can expect them to swell, deform, or burst when high temperatures are applied at any time.
Metal products for the heating system also do not last forever. The walls become thinner over the years and become corroded. Leaks appear on threads, fittings, section joints, and even sections of pipeline.
Constant contact of a hot pipe with cold air from the outside sooner or later leads to the accumulation of condensation or the formation of rust, injury due to constant humidity.
Plastic ones are unstable to mechanical damage or are made of low-quality material, when they begin to ooze and leak long before the end of their service life.
What and how to clean water pipes
They also accumulate inside metal pipes due to the roughness of their internal surfaces. All this leads to a decrease in water pressure in taps and the need for intervention in the water supply system. Therefore, in this article we will determine how to clean a water pipe made of various materials.
Places where the water supply is likely to be clogged
There are places in the water supply system that are most susceptible to clogging:
It is recommended to replace mixers and taps every 5-6 years.
- mesh filters located on faucets. They get clogged with small hard particles. Cleaning is done after unscrewing the nut on the mixer spout,
- water meters. The mesh filters become clogged and salts are partially deposited on the walls of the metal adapters. The problem can be solved by cleaning the filter or partially disassembling the meter. You just need to be sure that the meter is the cause of the blockage,
- bends in the pipeline, especially if they go at an angle of 90 degrees. Due to the weakening of water pressure in places of bends, a narrowing of the gaps inside the pipes is observed. This is a disease of steel structures.
Next, let's see what is the best way to clean water supply pipes if the water pressure has weakened, and manipulations with faucets and strainers have led nowhere.
Cleaning a water pipe using a cable
There are special plumbing cables made of elastic steel. With their help, you can radically solve the problem of blockages in metal pipes clogged with scale. The cable has a handle, which you can rotate to clean inside the line. At the same time, the bends can be easily passed by the cable due to its design.
- the water in the pipeline is blocked,
- taps or mixers are unscrewed,
- a cable is inserted into the clogged pipe,
- By rotating the handle, the cable is advanced along the line. In the process of movement, the cable destroys deposits on the internal walls of the water pipeline,
- Periodically it is necessary to turn on full water pressure, which will wash away all the dirt from the pipes.
It should be noted that this cleaning method is unacceptable for plastic pipes in which deposits do not form.
Cleaning the water supply with dismantling the pipe
If cleaning with a cable does not give anything, then there is a more labor-intensive way to restore normal water flow. To do this, you need to partially dismantle the pipes and clean the clogged areas.
Of course, radically solving the problem in this way is very problematic. Moreover, other sections of the pipes may subsequently become clogged. So it is better to replace them with new products.
How to clean pipes in the bathroom or kitchen? The metal sections are connected by hollow corners with threads. Therefore, disassembly is carried out by unscrewing straight sections of pipes from such corners using two gas wrenches. Disconnected pipes are cleaned with strong pressure of hot water or by mechanical cleaning with a cable. After cleaning, the system elements are connected in the reverse order.
Chemical cleaning of water pipes
How to clean water pipes with chemicals? The product is simply poured into the water supply system. After a certain time, the system is flushed with a large amount of running water. The properties of the reagents that are used as chemical cleaning agents are such that they dissolve only deposits formed on the pipe walls. They do not affect metal, polypropylene, galvanized or metal-plastic.
Chemical cleaning is especially effective in private homes, since in high-rise buildings it is very difficult to circulate the reagent through the system.
How to clean plastic drain pipes?
The question of how to clean plastic pipes is the most pressing, because now plastic plumbing is very popular. Plastic pipes have a smooth inner surface that is not subject to corrosion. Therefore, such products rarely become clogged. If deposits occur, they occur exclusively in the drainage system. Typically, fatty deposits and hair accumulate on the walls of pipes. They gradually clog the wastewater passage, which forces them to be removed.
Chemical or mechanical means can be used to clean drain pipes. Usually it is possible to do without disassembling the entire drain system. As mentioned, a plumbing cable works well. Excellent results are obtained by using chemicals that are simply poured into the sink or bathtub. After a certain time, the system is flushed with water.
Room treatment and precautions
After cleaning, the room in which the mercury has scattered must be thoroughly washed. This can be done using a chlorine-containing liquid. It is necessary to wash the floor, baseboard and, if possible, walls with a chlorine solution. The chlorine solution must be left for 15-20 minutes, then rinsed off with clean water. For more information about cleaning principles, watch this video:
The room must be ventilated daily for 7-10 days. It is advisable to maintain a high temperature inside the room so that the remaining mercury can evaporate and leave the room. Ventilation is carried out with the door tightly closed to avoid drafts and movement of potentially dangerous air into other rooms.