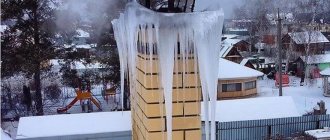
There are often cases when a gas boiler or water heater may stop working due to freezing of the gas pipe. But no one wants to be left without hot water or even heating on a winter evening, right?
Therefore, let's talk about why the chimney of a gas water heater or boiler freezes, what measures need to be taken to cope with this problem, and what can be done to avoid a recurrence of a similar situation in the future. We will supplement the presented material with thematic photos and videos.
The main reasons for freezing chimneys
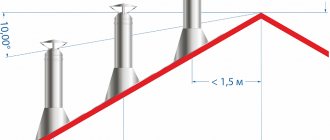
Among the reasons for freezing of chimneys, first of all, are unfavorable weather conditions : wind, low air temperature, high humidity levels. All this leads to freezing of the gas boiler pipe. Reasons include snow getting into the pipe , as well as errors made during the installation stage . In this case, the result is the same: the mini-boiler room stops functioning.
The most important rule that must be strictly followed: strictly follow the manufacturer’s recommendations, take into account the length and angle of the pipe, its location.
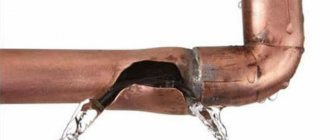
Another reason is the occurrence of condensation . Condensate is the presence of water vapor in combustion products. At the same time, its temperature is lower than the dew point. When water droplets freeze, a crust of ice forms. It prevents the access of air that supports the combustion process. If the boiler is located on the upper floors of the house, it is impossible to get to the terminal to get rid of the ice crust.
If the formation and accumulation of condensate is not prevented, it has a destructive effect on the chimney
The main signs that the chimney pipe of a gas boiler in a private house is freezing are as follows:
- the appearance of the “Flame break” error on the boiler display;
- formation of condensation on the surface of the air duct;
- After turning on the boiler, it goes out after a short time.
There are the following ways to reduce the amount of condensate: insulating the chimney duct; careful care of the system (timely cleaning); use of a steam trap .
The latter is a container made of stainless steel. Its purpose is to collect emerging moisture.
The installation location of the condensate drain is under the pipe (or, as an option, the outlet channel) of the gas equipment. It is also necessary to take care of the constant drainage of condensate into the sewer system
If we talk about preventive measures, we can note the following:
- at the stage of building a house, comply with all standards;
- install the chimney in strict accordance with the project;
- do not forget about cleaning the smoke duct using special products;
- improve existing pipes (insulation measures, use of stainless steel liners);
- monitoring equipment power and, if necessary, cleaning the chimney.
This approach is entirely justified, since preventing a problem is always easier than eliminating it. We recommend that you familiarize yourself with methods for preventing condensation formation in more detail.
Types of boilers with a chimney
A coaxial gas pipe may freeze under unfavorable weather conditions due to installation errors.
The role of the chimney is to remove combustion products. But the fuel consumption, and therefore the efficiency of the boiler, depends on how it is designed. The height of the pipe and the diameter of its cross-section, the material from which the chimney is made and its location - all this has a direct impact on the efficiency of the heating system.
A decrease in efficiency from 95% to 60%, wet walls, carbon monoxide entering the room, excessive gas consumption - all this can be a consequence of improper selection and installation of the chimney. When designing, the boiler power, burner type, barrel height and flue gas temperature are taken into account.
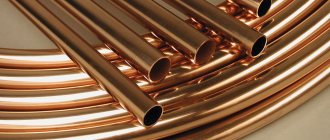
The chimney can be steel, asbestos or brick. Brick accumulates heat well, but is destroyed after 3 years of use. Asbestos is not susceptible to corrosion, has low thermal conductivity, has a long service life, but is fragile due to the physical and chemical properties of the material. A steel chimney is the best option.
Advantages of stainless steel pipe:
- The inside of the pipe is perfectly smooth (brick rough).
- The inner surface of a brick chimney absorbs substances formed during gas combustion, and the resulting acids destroy the walls of the chimney. This does not happen in steel pipes.
- It is easier to insulate steel pipes than brick ones (you can also buy a pipe with a ready-made thermal insulation layer).
- The cleaning process and condensate removal are easier to carry out in steel pipes. Condensation in a metal chimney is eliminated after 2 minutes, in a brick chimney - after 40 minutes. Prolonged contact with water destroys the chimney.
- It is better to install a complex pipe system from metal, since in this case you can use connecting installation material.
If an already built house does not have a pipe for removing combustion products (it was not provided for in the project), it is possible to build a chimney made of stainless steel.
Ways to get rid of icing
The purpose of the chimney is to remove compounds formed during fuel combustion. Fuel consumption, that is, the efficiency of the boiler, largely depends on its design.
The efficiency of the system depends on the following factors:
- chimney material;
- height, diameter and location of the pipe.
Reduced efficiency, excessive gas consumption, wet walls, carbon monoxide penetration into the room, freezing of the chimney pipe - all these problems can arise due to the fact that the chimney is selected and installed incorrectly.
The chimney is made of asbestos, stainless steel or brick with a metal pipe inside. A cheaper option for a geyser is to use stainless steel corrugation
Now let's talk about what measures can be taken to prevent the formation of ice. A partial solution to the problem is to remove the plug at the top of the boiler. Combustion products will continue to come out as before. The air that is necessary for the combustion process will be directed into the system from the room. Therefore, for safety reasons, it is so important to arrange proper ventilation for the gas boiler.
However, the plug must be returned to its original place when the ice build-up melts. This regime cannot be maintained continuously. The fact is that impurities contained in the air of the room (dust, soot from the kitchen) will quickly damage the heating unit. You can use this method if cases of icing are rare, no more than twice a year. If you experience regular freezing, use an anti-ice kit.
In addition to drawing air from the room, there are other ways to de-ice.
Method #1 - reducing the temperature difference
If the boiler equipment does not include regulators and (or) programmers, then it is turned on according to the difference between the temperatures of the heating circuit lines: supply and return. If the equipment model is programmable, then the indicator can be adjusted.
To prevent the coaxial chimney from freezing in winter, set the temperature difference to a minimum. Thus, the time interval between turning off and turning on the unit is reduced. It is advisable to carry out work at air temperatures below -10 degrees.
Method #2 - increasing boiler power
An increase in boiler power leads to an increase in the temperature of the gases, which heats the pipe more strongly. Of course, fuel consumption will increase, but there will definitely not be a problem with icing.
The algorithm for adjusting the boiler power is specified in its passport. As a rule, a low-pressure U-shaped pressure gauge is used for this at the maximum permissible operating mode of the equipment
Regulating the power of gas equipment without professional skills is a risky and dangerous activity. If changing the gas flow rate at the valve is a process unfamiliar to you, then it is advisable to use the services of a representative of the organization with which you have a service agreement. The specialist will perform the work efficiently and quickly.
Method #3 - improving the coaxial pipe
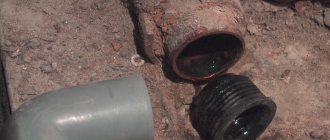
For the column and boiler, coaxial pipes are installed with an inclination towards the street. This is necessary so that the condensate formed in the air channel flows out.
Sometimes the cause of water accumulation is that the outermost part of the air duct is severely deformed. Good results can be achieved by cutting off the outer part of the pipe by 150-200 mm or making holes in it. The length of the inner tube remains unchanged.
The picture shows a coaxial pipe of gas-using equipment. The reason for freezing of the coaxial pipe is errors made during the installation stage
Method #4 - insulating the chimney pipe
The chimney is insulated in order to prevent condensation from occurring due to the difference between the internal and external temperatures. In addition, thermal insulation serves to protect the roof in the immediate vicinity of the chimney of the boiler or water heater.
The following methods are used for insulation: plastering with slag mortar, brick, mineral wool, slag concrete slabs.
The benefits of thermal insulation include:
- significant reduction in the deposition of chemically aggressive combustion products on the inner walls of the pipe. The flow of smoke and heated air removes them almost completely;
- reducing the temperature difference between the pipe walls and the hot air that comes out of the firebox;
- minimizing heat loss, increasing the energy efficiency of the system - heat loss in the presence of an insulator is significantly reduced;
- additional stability of the chimney - thanks to the insulating casing, it becomes more resistant to bad weather and wind, the pipe is less damaged by external factors.
If the insulation is selected correctly and all work is done correctly, you should not be afraid of freezing even in forty-degree frost. In addition, areas of the roof located in close proximity to the chimney suffer much less from high temperatures. Next, we will consider the main methods of insulation.
Applying a layer of plaster
The area of application of mesh plastering is external insulation of brick pipes. If the work is done correctly, the level of heat loss is reduced by about a quarter.
Plastering a chimney requires construction skills, but users note a short service life and not very good waterproofing
To do this, prepare a mixture based on slag, cement and lime. The solution is applied to the reinforced mesh in a layer of 30 mm. After the mixture has dried, mineral wool is placed on top of it. Next comes a layer of plaster and fiberglass mesh.
When the entire multilayer structure has dried, the pipe is covered with a layer of primer and painted - you can use any paint for exterior work. Metal siding can be used as external cladding.
The advantages of plastering pipes include: low cost of work, aesthetics of the final result, availability of implementation for almost everyone.
Use of mineral wool
The area of application of mineral wool is the insulation of pipes made of asbestos or metal. Compared to conventional plaster, the use of mineral wool has a number of advantages: low weight, minimal labor intensity, resistance of the material to high temperatures, non-flammability and low cost.
Insulation with mineral wool is one of the simplest and most effective: you just need to do everything right
The procedure for insulating mineral wool is as follows:
- cleaning the outer surface of the pipe;
- making sheathing from profiles - the guides are secured with dowels;
- fastening the vertical posts , connecting them to the guides - the interval between the posts corresponds to the thickness of the heat insulator;
- laying mineral wool in the sheathing - a layer of polyethylene is placed on top of the heat-insulating layer, the joints are sealed using aluminum tape.
The final stage is the installation of the corrugated sheet cladding.
Construction of a brick casing
Building a casing made of brick is one of the most common methods of thermal insulation of metal chimneys.
This design has many advantages: beautiful appearance, durability, moisture resistance, and the ability to use improvised materials. There are also disadvantages: high labor intensity of work, the need for certain construction skills. In addition, additional costs for thermal insulation cannot be avoided.
Inside, the brick chimney contains a metal pipe. Before starting cladding, you should prepare the components for the mortar, a trowel, a metal mesh for masonry, and a level. If the channel is located outside the building, the structure must rest on the ground surface
To make the structure reliable and durable, you need a small foundation.
- Dig a hole to a depth below the freezing level of the soil. Otherwise, after the first frost the structure will become deformed and collapse. The length of the pit and its width must exceed the design parameters of the same name by 100-150 mm.
- The bottom of the pit is compacted and the walls are leveled. A 100 mm sand cushion is poured onto the bottom and compacted.
- Formwork is installed inside, possibly non-removable. To do this, buy a ready-made structure or make it yourself from polystyrene foam. The formwork also serves as additional waterproofing.
- Using 10 mm fiberglass or metal reinforcement, a sheathing is made with crossbars every 400 mm and dimensions 50 mm smaller than the pit.
- The bottom is laid out with bricks, on which the prepared sheathing is placed. The resulting structure is poured with concrete and compacted with a vibrator. The foundation is left for 3 weeks to harden.
After the base is completely ready for use, proceed to installation of the casing. Its dimensions are such that the internal distance to the pipe is about 50 mm. For masonry, use a ready-made building mixture or mix cement, fireclay sand and crushed brick in a ratio of 1:3:1. First, mix the dry ingredients and only then add water.
Before starting work, the foundation is protected from water with a layer of bicrost or roofing felt. Brickwork is done in a circle with binding. Every 3-5 rows a metal mesh is laid out. The plane is constantly monitored by level. As the casing is laid out, the void between the pipe and the masonry is filled with insulation.
External chimney with brick lining: practical. durable and beautiful. You can use: facing bricks, aerated blocks, sand-lime bricks
Use of extruded polystyrene foam
The area of application of extruded polystyrene foam boards is external insulation of chimneys made of brick. The properties of penoplex and technoplex are a high level of strength and impermeability to water.
G2 as a heat insulator . Products of classes G3 and G4 have less fire resistance, so they are not used at high (more than 600 degrees) temperature of the outlet gases.
To perform penoplex insulation work you will need:
- insulation (the required amount is calculated individually);
- pendants;
- metal profile;
- fastenings;
- construction foam;
- Tools: drill or hammer drill.
The slabs are attached to the surface of the pipe using non-flammable glue (it is also used to seal joints). You can also use construction foam.
Penoplex is an innovative heat-insulating material for construction work. Available in assortment. It is easy to install, effective and durable
The algorithm is as follows:
- Suspensions are fixed at the corners of the chimney on all sides. The vertical distance between them is chosen so that the heat insulator can be secured. The pendants are given a U-shape.
- A sheet of penoplex is applied and lightly pressed down so that traces of the fastenings remain.
- The insulation is unrolled and through cuts are made in the places where the marks are.
- The reverse side of the insulator is covered with polyurethane foam.
- Metal plates are threaded through the insulation, the sheets are pressed tightly against the pipe.
- The profile is mounted to the hangers. It is necessary to level it, since it is this that serves as the basis for the cladding.
- The sheets are secured with self-tapping screws with press washers or rubber seals. The corners are covered with special strips. This is necessary to create a monolithic effect. The gap between the insulator and the profile is closed with a tin plate that prevents the penetration of water.
- A visor is mounted in the upper part.
To form thermal insulation for an asbestos pipe, install a galvanized casing at a distance from the pipe of no less than 60-80 mm. Glass wool is used as insulation. Cement mortar is used to fill the remaining gaps.
You can do without a casing, then it is better to choose mineral wool as a heat insulator - its consumption will be twice as much.
Installation of a chimney made of sandwich pipes
This is an excellent solution that allows you to solve the problem of chimney insulation almost one hundred percent. Sandwich pipes have one drawback: the channels will need to be completely redone or, alternatively, their installation will need to be provided for at the design stage of the house.
Sandwich pipe is an excellent solution for chimney construction. The use of sandwich pipes is equally effective for both boilers and geysers
A sandwich is 2 pipes with different diameters, the smaller of which is located inside the larger one. They are separated by a layer of insulating material. Condensation does not form on the sleeves, overheating also does not occur, so the system is completely fireproof.
Installation of such a chimney does not cause any particular difficulties; the sandwich system is assembled according to the principle of a designer. The panels are inserted into each other to the required size. The connection to the boiler is made using special additional adapters.
San Samych
Diagram of parallel connection of radiators, it is easiest to defrost.
Winter is approaching its end. The frosts are subsiding. The sun is getting warmer and hotter. And I would like to “hammer the final nail” into the topic of freezing of various systems of a country house, although I do not exclude the possibility of returning to this later.
So, how to prevent the heating system return from freezing. Again, I see several ways to solve this problem. They will be discussed below.
Antifreeze.
The simplest solution is to add antifreeze to the heating system. But this decision imposes a number of restrictions on the use of the system. Firstly, the heating system must be closed. Those. You can forget about combining a heating system and a hot water supply system, but, in my opinion, this is even good. Secondly, it is advisable to know in advance in what proportions to prepare a solution of antifreeze with water, counting on a certain winter temperature. This is not difficult, especially since this information is usually present directly on the canister labels.
Thirdly, it is advisable to figure out in advance how you will fill the system, and how, in the event of an accident, you will drain it, providing for this separate tees and taps. And lastly, due to the fact that antifreeze is more fluid than ordinary water, especially at low temperatures, increased demands are placed on all system connections. Personally, I would not risk pouring antifreeze into a system assembled from metal-plastic pipes with threaded compression fittings.
Moreover, in the event of a leak, in addition to a stain that is difficult to wash off, an unpleasant, pungent odor will also appear.
Small energy source.
Electric boiler as a small source of energy. A simple but expensive option.
In order for the heating system to safely survive a cold night or several frosty days, you can provide a small source of energy with sufficient power to prevent the system from freezing. This can be an electric boiler or a heating element built into a solid fuel boiler. You can also use a gas or electric water heater connected to the heating system.
I also do not rule out the possibility of connecting a gas or liquid fuel burner with low fuel consumption to the main solid fuel boiler. Nowadays, many solid fuel boilers already have the option of installing a burner at the factory. So here, it all depends on your imagination and the state of your wallet.
Naturally, all this will work only in the case of forced circulation.
Additional heat source.
This method will also work only in heating systems with forced circulation. Actually, you don’t need anything for this. You need a backup or additional heat source in the house and a constantly running circulation pump in the heating system. By heat source I mean a stove, fireplace, convector, electric or chimney, electric heated floors. The heating system itself will select part of the heat for its operation, distributing this heat to the rooms of the house adjacent to the heat source. But make no mistake, it will not be able to heat the house by transferring this energy, the heat exchange is not the same. But it won't freeze.
Use of thermal accumulators.
A boiler is used as a small source of energy, a heat storage tank and a source of hot water. But the system has become open.
If the heating system design provides for the possibility of storing heat by heating an additional water tank or a brick heat shield, the accumulated heat may be enough for several days. True, in this case, the boiler power must be at least twice the design power in order to create excess heat. Or you need to have an additional heat source, due to which the heat will be accumulated.
The expansion tank is like a heat accumulator.
As an additional tank, you can install an expansion tank of increased capacity with two (this is a mandatory condition for heat exchange) inputs: inlet and outlet. Or place a sealed and thermally insulated tank, designed for the pressure in the system, in any convenient place in the heating system (you can adapt an electric boiler, however, with a capacity, preferably, of at least 200 liters, and that’s a lot!!!). It is possible to provide the possibility of connecting this tank to the heating system, if necessary.
You can use the accumulated heat of a brick heat shield using a heat exchanger built into it (roughly speaking, you need to wall up the radiator in the masonry of the heat shield). And then, due to this heat, the heating system will heat the rest of the house for some time. The heat shield does not have to be connected to the heating boiler; together, for example, with a stove-stove, it can be an additional source of heat in the house. And in order not to heat up the heat shield once again, no one bothers to make the heat exchanger switchable.
Common insulation mistakes
The main indicator that a mistake was made when installing thermal insulation is the heating of the external parts of the structure to high temperatures. If there are flammable materials nearby, this situation poses a fire hazard.
The reasons for this are as follows:
- an incorrectly selected or low-quality insulator shrinks;
- violation of the integrity of the internal part of the pipe (happens quite rarely);
- non-compliance with work technology;
- unsheathed heat insulator at the chimney head.
Thus, there are quite a few ways to insulate chimney pipes. The materials are available for sale, so there will be no problems with the purchase.
You should not purchase cheap materials, because in reality their quality leaves much to be desired. It is important to carry out work in accordance with technical standards. Otherwise, money and time will be wasted
What is condensate?
Whatever type of fuel you use, you burn hydrocarbons. Coal, coke, firewood, fuel oil, gas, pellets - everything consists of hydrogen and carbon with small admixtures of sulfur and some other chemical elements. Any fuel also contains a small amount of water - it is impossible to completely remove it. During combustion, they are oxidized by atmospheric oxygen and the output is water, carbon dioxide, and other oxides.
Sulfur oxides at high temperatures react with water and form very aggressive acids (sulfuric acid, sulfurous acid, etc.), which also enter the condensate. A few other acids are also formed: hydrochloric, nitric.
How to protect the column from freezing?
Is your gas water heater freezing through your chimney pipe and you don’t know what to do to avoid this problem? Let's take a closer look at this issue.
The instructions for the equipment specify the temperature conditions at which the equipment functions normally. When the outside temperature drops, individual components of the water heater may fail. Just because a device is under warranty does not mean there is absolutely nothing to worry about. The manufacturing company clearly defines operating standards, violation of which may result in loss of warranty.
If the location of the column is an unheated room, and the equipment itself is equipped with a chimney, the problem is solved by installing a check valve that prevents frosty air from passing through the chimney directly to the body of the device
You can avoid freezing if you drain the water in a timely manner . This applies not only to country speakers, but also to devices that are located in private houses or apartments.
It is necessary to drain the water in the following cases:
- abnormally frosty weather;
- frequent power outages;
- unheated room.
This measure will not hurt if you are leaving for a week or more, which means the gas water heater will not be in use.
To drain the water, turn off the gas valve and the incoming water supply tap. Then turn on the hot water on the mixer and wait until the water is completely drained.
You can avoid costly repairs by using the “Winter-Summer” mode, if, of course, the speaker is equipped with it. By increasing the heating temperature, you save equipment from freezing
Another case is possible when the column is in a warm room and still freezes. The part of the pipe located indoors remains warm. And that part of it into which the “street” air enters goes into minus. The condensation formed in the pipe turns into ice , which, in turn, binds the check valve. The removal of gases from the column will thus be blocked - the fan will not be able to open the valve. It will be impossible to turn on the column in such a situation.
The solution to the problem is quite simple. You can use a regular household or construction hair dryer. The device must be turned on in maximum heating mode. Now all that remains is to heat the pipe. The ice will quickly melt and the valve will be released. Now you can turn on the column and let it run for 10 minutes so that the smoke exhaust line completely warms up and dries out.
Sometimes the cause of freezing is problems with ventilation or defects in the manufacture of the housing . If the device is under warranty, you should contact a service center. If the warranty period has passed, sealing the case helps.
Making a deflector
The simplest version of a deflector such as a Volpert-Grigorovich device is quite easy to make with your own hands.
Required tools and materials
- Marker or felt-tip pen.
- Ruler.
- Iron scissors.
- Mallet.
- Wooden beam for stand.
- Riveting device.
- Drill, metal drills (or drill-tip screws).
- Galvanized iron sheet 0.3–0.5 mm thick (aluminum sheet or thin stainless steel is suitable).
- Metal parts that are available: corner, studs, thick wire and the like.
Size calculation and diagram
Since the quality of the deflector depends on the accuracy of manufacturing, drawing up the correct drawing is the most important step in the entire process. The dimensions were verified by scientists in a wind tunnel, and they must be followed. The parameter to start from is the diameter of the chimney channel D.
The dimensions of all parts of the deflector are set in proportion to its diameter
Table: dimensions of deflector parts relative to its diameter
| Index | Coefficient in relation to diameter |
| Lower diffuser diameter | 2 |
| Upper diffuser diameter | 1,5 |
| Diffuser height | 1,5 |
| Recessing the pipe inside the diffuser | 0,15 |
| cone height | 0,25 |
| umbrella height | 0,25 |
| reverse cone height | 0,25 |
| Gap between umbrella and diffuser | 0,25 |
Instructions for making a deflector with your own hands
- We transfer the drawn details onto cardboard and make a cardboard mock-up. We check that the parts match each other.
- Let's open the layout back up. We trace this cardboard pattern, placed on a galvanized sheet, with a marker.
- We cut out all the details with iron scissors.
- We roll up the casing and drill holes in its edges.
- We fasten the casing with rivets (or we don’t drill or fasten it, but use drill-tip screws).
- In the same way, we fasten the lower and upper cone plates in turn.
- The top plate is larger, so we cut 6 tabs in its edge to attach to the bottom plate.
- We attach studs to the bottom plate to connect to the casing.
- We use them to attach the umbrella to the casing.
- To secure the finished deflector to the chimney, it is better to separate the top part of the pipe and connect it to the deflector on the ground. The strength of this connection is extremely important. The wind load at altitude will be great and can interfere.
The deflector may not be very beautiful, but you will immediately feel its usefulness: the draft will increase by a quarter, the roof will be protected from sparks. The pipe with it can be one and a half to two meters lower.
Installation procedure
Installation of an exhaust pipe for a geyser made of any material begins with taking measurements and preparing all the necessary elements. In the case of corrugation, the work procedure is very simple. It is enough to take a pipeline of the required length, put it on the smoke exhaust pipe of the water heater and clamp it with a clamp. The free end is inserted into a decorative ring and fixed in the opening of the smoke channel. The main thing here is to ensure that the diameter of the corrugated pipe matches the size of the outlet hole of the column.
For all other materials, you need to prepare the required number of straight and rotary elements that will be inserted into each other, forming the desired chimney configuration according to the principle of a designer. Rotation angles are standard or made individually for specific sizes.
During assembly, ensure maximum tightness of connections. The entry of one element into another must be at least half the diameter. For better sealing, heat-resistant sealant is used. The joints are fastened with clamps and are located outside the ceilings and are freely accessible.
Due to the limitation on the number of permissible turns, the number of possible chimney configurations is quite limited. There are three main options depending on the location of the exhaust vent. Two more can be obtained by mirroring the previous ones.
All requirements and recommendations stated above apply to devices with an open combustion chamber. The standards also allow the removal of combustion products through an external wall without a vertical smoke duct from geysers with a closed combustion chamber and forced release of exhaust gases. In this case, installation is carried out according to the manufacturer's instructions in compliance with the standard distances and lengths of the coaxial chimney specified in SP 42-101-2003.