- Assembly order
- Features of a brick pipe: main disadvantages
- Passage through ceilings
In your private home or bathhouse, if you have a heating boiler, fireplace or stove, it is very important to correctly choose the method of getting rid of combustion products. And the main one is smoke. If you approach the issue inattentively, you can not only reduce the efficiency during functional operation, but also put your own life in danger. Carbon monoxide, if it spreads indoors even in small quantities, can cause serious poisoning of the body. Correct installation and installation of a chimney pipe with your own hands is a task today accessible not only to professionals, but also to amateurs who have studied the technical side of the issue in detail.
Arrangement rules
Carbon monoxide is almost impossible to detect; it has no taste or smell, and is invisible visually. Moreover, it is heavier than air, so it settles and remains in the room. In this regard, it is necessary to follow the basic rules when installing the heat generator and chimney:
- When installing a stove or fireplace with a large mass, prepare a foundation for it in advance: a small platform that will not budge if the base of the building sag.
- Wall and ceiling ceilings, if they are made of flammable materials, should be located at a considerable distance from the flame source (about 40 cm). When passing through wall and ceiling ceilings: 500 mm - to combustible, 380 mm - to non-combustible.
- Maintain a minimum number of bends in the smoke duct. At the same time, do not allow right angles in the system; it is better to split such a bend into two sections or use elements with a smaller and larger angle.
There are standards put forward during installation work depending on the type of fuel used. These are SNiP 41-01-2003, NPB 252-98 and VDPO. Ignoring them can cause many violations that affect the quality of the heat generator. Incorrect selection of the device can lead to overheating of the floors, insufficient draft leads to soot settling, and a leaky assembly leads to smoke in the room.
Main technical characteristics of the chimney
Diameter
As a rule, manufacturers of heat-generating devices prescribe the recommended chimney diameter in their instructions. This parameter directly depends on the traction force. And it is already determined by height, the dependence is directly proportional. The main requirement: the diameter cannot be narrower than the diameter of the furnace pipe; this is prohibited.
Height
Calculation of the height of the chimney relative to the ridge is based on the requirements of SNiP 41-01-2003 and SP (building rules) 7.13130.2009, as well as on the recommendations of the heating device manufacturer.
If the roof has a flat structure, then the height above the roof is at least 50 cm. On pitched roofs, if the chimney is located at a distance from the ridge of up to 1.5 m, its height must be at least 50 cm relative to the last or enclosing parapet. If it is located within 1.5–3 meters, the height cannot be lower than the ridge or parapet. When the structure is located more than 3 meters from the ridge line, its minimum height is determined by drawing a line at an angle of 10 degrees relative to the horizon.
Material
Today, consumers have many options when choosing a smoke exhaust system:
- classic version of pipes made of brick;
- ceramic analogues;
- modular chimneys made of stainless steel, which have become popular relatively recently, but have already established themselves as a simple and at the same time reliable device.
How to install a chimney correctly - choose the type of outlet
There are two options for the passage of the chimney:
- Through the wall. The advantages of this solution are improved fire safety, minimization of smoke, the ability to simply increase draft depending on the height of the pipe, as well as installation in a finished building. But there are also disadvantages: more complex and expensive installation.
- Through the roof. The advantages of this solution are high structural stability and the absence of overcooling of flue gases. But at the same time, the probability of “missing” the occurrence of a fire is higher, since smoke occurs in the ceilings that are located in the attic and on the roof, and they are simply not visible until the fire appears.
Types and sizes of connecting elements
Depending on where the stove heating will be used, the diameter of the pipe is determined. The diameter of the inner pipe is selected, since it bears the main temperature load. The diameter of the sandwich pipe is determined based on the power of the heating device: the more powerful it is, the larger the cross-section is required. The dimensions of furnace equipment are regulated by SNiP. Basically, the diameter is indicated in the technical data sheet of the device: for example, 120180; 150210 or 200260 mm. The first number is the internal section, and the second is the external. A stainless steel pipe can be used for gas and solid fuel boilers, stoves, fireplaces, saunas, and as a segment when installing vertical parts of stove heating. Connecting parts made of stainless steel of the appropriate diameter are selected for this pipe:
- Chimney-convector 120, 150, 200 mm - designed to remove combustion products;
- Elbow 120, 150, 200 mm - consists of several parts welded at an angle, thanks to which you can change the direction of the chimney;
- Tee 120, 150, 200 mm - used for removal of gases and condensate;
- Revision 120, 150, 200 mm - designed to clean the chimney from soot;
- Adapter 120, 150, 200 mm - used to connect elements;
- Kagla 120, 150, 200 mm - used to regulate traction;
- Thermal weather vane 120, 150, 200 mm - designed for protection from precipitation and blowing wind;
- Thermo cone 120, 150, 200 mm - serves to protect against precipitation;
- Rosette 120, 150, 200 mm - is an auxiliary element and is intended for decoration;
- Mushroom 120, 150, 200 mm - consists of galvanized steel and is intended for the top of the chimney.
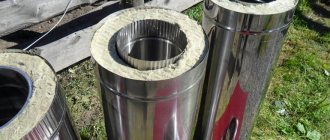
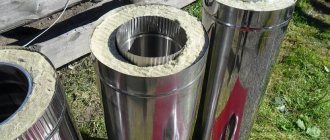
Sandwich chimney connecting parts
The thicker the stainless steel, the longer the service life of the stove heating.
Sandwich structures made of stainless steel ensure high-quality removal of combustion products, and thanks to galvanized steel, the chimney can be supplemented with various decorative elements.
Installation
It is imperative to adhere to the requirements of SPiP 41-01-2003 “Heating, ventilation and air conditioning”:
- The cross-sectional area of the smoke duct must be no less than the cross-sectional area of the boiler pipe. Smoke channels should be installed vertically, without ledges.
- An inlet vacuum of at least 5 Pa must be ensured. The recommended duct height is at least 5 m from the boiler air intake.
- It is mandatory to use polyurethane foam when crossing a roof or wall.
- Lack of horizontal channels for cleaning in the attic.
- Connections of parts cannot be installed in interfloor and attic floors.
- The smoke duct should not come into contact with any communications.
- Heating of nearby building elements should not exceed 50 degrees.
How to mount:
- It is not recommended to use a sandwich pipe as the first element installed directly on the outlet pipe of the heat-generating apparatus. The first item should be the adapter.
- Installation proceeds from the bottom up, each subsequent element is included in the previous one.
How to assemble a sandwich: using smoke or condensation
An important point is the choice of method for assembling the chimney. The question is especially relevant when it comes to the installation of industrial chimneys.
So, there are two basic types - condensate or smoke assembly. We definitely recommend condensate assembly: each subsequent pipe is inserted inside the previous one. Do not forget that the installation of the chimney goes from the bottom up to the heat generator.
When collecting by condensate, moisture flows down the inner wall and does not settle on the pipe, accumulating soot and corroding the walls. Another important point when assembling by condensation is that moisture does not enter the thermal insulation layer of the sandwich chimney, thereby not destroying it. This increases the service life of stainless steel pipes.
| Type of furnace or boiler | Average combustion temperature in ℃ | Sandwich pipe thickness in mm |
| Gas | 60 | 25 |
| Gas condensing | 110-180 | 25 |
| Diesel | 150-250 | 25 |
| Gas piston | 450-600 | 50 |
| Solid fuel | 400-700 | 50-100 |
| Wood burning | 300-600 | 50-100 |
Basic requirements for the smoke channel
The main criteria are prescribed in fire safety standards. As mentioned above, the correct installation of the chimney (chimney) pipe is influenced by the diameter, height and type of assembly. A prerequisite is maintaining the distance from the walls and ceilings, the presence of a ceiling passage unit, and proper insulation of all joints.
Installation instructions for specific types
Ceramic chimneys are characterized by high resistance to high temperatures, durability and excellent performance. The smooth surface reduces the chance of soot or ash accumulation.
Divided by material:
- They are found from high-quality types of clay (this in itself is a very expensive material), the main feature of which is fine dispersion and uniformity.
- In the production of fireclay, inexpensive types of clay that have coarse particles are used.
The service life of these models also varies.
According to the type of assembly, ceramic chimneys are:
- ceramic-expanded clay - the pipe is “edged” with expanded clay blocks and looks like a brick one;
- ceramic-stainless - the shell is made of mirror stainless steel 0.8 mm thick (external effect - the pipe seems to be metal);
- expanded clay-stainless steel.
Chimneys with ceramic walls
A logical continuation of the technological development of sandwiches was the use of new material. Such innovations involve the use of particularly heat-resistant ceramics for internal pipes instead of stainless steel.
A striking example is the sandwiches of the German company Schiedel:
- the internal channel is made of high-quality and heat-resistant ceramics;
- outer layer made of reliable stainless steel;
- 60 cm insulation is made of compacted basalt wool.
The manufacturer includes in the kit all the necessary elements and shaped parts from which you can build a structure of any shape. The use of highly resistant sealant to fasten the elements makes assembly easy and reliable in the area of the joints.
Ceramic is an excellent sandwich material that exhibits high resistance to combustion products at high temperatures. If assembled correctly, such a system will last more than 30 years. Heat resistance allows you to mount ceramic sandwiches on any boilers (gas, solid fuel, liquid fuel).
Assembling a ceramic chimney
A prefabricated structure consists of several elements:
- Inner layer. The base is made of ceramic. It is thanks to it that no harmful substances or residues accumulate inside.
- Intermediate layer. Its main purpose is heat insulation. Naturally, it is made from various non-flammable materials (mineral wool).
- External covering. Typically made from expanded clay blocks or a stainless steel casing.
Assembly order
So, in order to understand how to properly install a chimney pipe, you need to keep in mind that a ceramic chimney has several key features.
First, you need to build a foundation. A flat surface without the slightest shifts or roughness is required.
Secondly, we connect the tee using a special module. It has a pipe, and all joints are covered with a solution when connecting.
The part protruding above the roof can be covered with bricks or blocks to create a pleasant appearance and protect the thermal insulation from external influences.
Nuances
Remember that you are dealing with a modular system. And all fastenings should be as tight as possible, without any gaps.
Ceramics are a fragile structure; care should be taken; a strong mechanical shock can crack the product.
If the elements have chips or cracks, replace them immediately; they are no longer suitable for use.
Working with glue
A special acid-resistant glue is used. It is purchased in powder form and diluted with water in a ratio of approximately seven to one. Cooking time is only ten minutes.
Remember that before applying the surface must be thoroughly wetted with a sponge. And it is better to use glue with a reserve so as not to accidentally miss the gap
Types of connecting elements
In addition to sandwich pipes, the heating structure contains the following shaped elements:
- Chimney-convector. Used to remove combustion products outside the house.
- Knee. It consists of several elements joined at a certain angle. Using this device allows you to change the direction of the chimney.
- Tee. It is used quite often in chimney structures and performs the function of removing smoke and condensate.
- Revision. Needed to clean soot from the structure.
- Adapter. The most common shaped element through which individual pipes are joined.
- Kagla. Performs the function of traction control.
- Weather vane and cone. These products are used to protect the system from precipitation.
- Rosetta. An element that is used to decorate a chimney structure.
- Fungus. Made from galvanized steel sheet and used to protect the chimney from rain and snow. Installed at the end of the outlet pipe.
Connectors, adapters, fasteners and other elements must correspond to the diameter of the pipe
All these additional products are used in certain cases, depending on various factors and design features of the chimney, and have diameters of 120, 150, or 200 millimeters. When naming the diameter of a sandwich chimney and its shaped elements, as a rule, they mean the cross-section of the internal pipe.
Instructions for laying bricks
Perhaps the most traditional chimney option. This option is used as an external casing, but we recommend that such pipes be lined with a stainless steel pipe.
Material Features:
- Resistant to extremely high temperatures. Modern fireclay bricks can easily withstand even 1000 degrees Celsius.
- The material perfectly absorbs and releases heat and accumulates it.
Features of a brick pipe: main disadvantages
This is the difficulty of assembling such a heavy structure if you do the assembly yourself. High cost – this is one of the most expensive options. And:
- The presence of vortex flows. Unfortunately, without professional intervention there is no way to avoid sharp corners in the final version. And this will not affect the output of combustion products one way or another, it will be slowed down. Some of them will accumulate inside.
- A brick chimney that is not lined with stainless steel pipes will absorb condensation, which will cause the internal walls of the chimney to peel off, ultimately leading to a pile of sludge at the bottom. Gradually, condensation will reach the outside, which will manifest itself as streaks.
- This is a very heavy and dimensional system that will require not just a platform, but a full-fledged separate foundation, designed at the stage of developing the house project.
Selection of material and preparation of solution
There are currently several types of bricks on the market. Red is the most average option. Burnt, as it is commonly called, is suitable as a material for a chimney, but it cannot be said that it is the best choice. It is better to choose a dark sample, which is also called burnt. It is the most fireproof and durable, designed for just such tasks.
But the pink color of the brick indicates that no strong heat treatment was used during its production.
A mixture of clay and river sand is suitable for the solution. You can add cement. It is important to choose a pure mixture, without impurities and small debris. When choosing clay, focus on the one that was mined at a significant depth of more than two meters.
The proportions are two to one, more sand accordingly. And remember that before work the mixture is soaked for two days. Only in this case will the correct consistency be achieved.
The order of laying the main parts
The first step is to lay out the nozzle pipe. This is a small element located immediately above the heating or furnace system. The height is small, 5-6 bricks will be enough. A regular rectangular shape is used.
Next, the fluff, the thickened part, is installed. It is laid out in gradual increments of diameter in half-brick increments. Its usual dimensions are 600 by 450 mm. And immediately behind it the main pipe begins, right up to the neck; a cap or umbrella is installed at the finish.
Advantages and disadvantages
When developing sandwiches, manufacturers wanted to make products without the negative qualities that other types of chimney materials have. Any chimney material is subject to negative effects from the environment and combustion products. The fuel material often has a very harmful chemical composition and also produces high temperatures, so over time the inner walls of the pipe succumb to corrosion or erosion.
Also, after several months or years, the channel becomes covered with soot, which causes poor permeability and efficiency of the structure.
This pipe has pros and cons
The chimney is also not protected from the outside. It is negatively affected by precipitation, temperature fluctuations, excessive humidity and condensation. The latter appears due to the difference between external and internal temperatures. This, in turn, can cause excessive soot formation.
The classic option is to install brick chimneys. But they have many disadvantages:
- a chimney in the shape of a rectangle is not ideal for such structures, since smoke turbulence is constantly formed there, and there is also no sufficient draft;
- the porous structure of brick and mortar contributes to the adhesion of soot, which cannot be said about a tubular chimney;
- the design is quite massive and difficult to install;
- Even a brick model is susceptible to erosion, so brick chimneys often crumble under the influence of temperature.
The main disadvantages of the design are:
- most of the elements are made of stainless steel, they cost an impressive amount;
- their service life ranges from 10 to 15 years, which is much less than the operation of brick structures;
- Constant changes in temperature can cause depressurization of pipes.
The sandwich pipe has many more advantages than disadvantages:
- the weight of the structure is small, and there is no need to arrange an additional foundation for the stove;
- installation can be done independently, without third-party specialists;
- due to its light weight, the structure is easy to transport;
- there are enough elements to be able to assemble a pipe of any diameter;
- each individual element can be replaced;
- good thermal insulation ensures fire safety, since the outer part of the pipe does not heat up much;
- stagnant zones in the inner part of the pipe will not appear, since the surface is smooth;
- practically does not rust;
- simple operation, only periodic cleaning of the inside of the pipe from soot is required;
- aesthetic appearance, which allows the pipe to be installed both inside and outside.
Disadvantages of brick and ceramic chimneys
Ceramic and brick chimneys have several main disadvantages:
- High cost of the products themselves.
Ceramic is 2-3 times more expensive than the stainless steel version. In the case of brick, choosing red brick (namely, it can meet the high temperature loads of sauna stoves), you must be prepared to pay a decent amount not only for the material itself, but also for the work of the craftsman. Laying out a brick chimney with your own hands is a very risky option, since in reality you may not achieve the desired condition in the steam room, as well as safe passage of the ceilings. The services of a professional in this matter are very expensive on the market.
- DIY assembly difficulty:
– Assembling ceramic chimneys requires the presence of the following tools: angle grinder (grinder), diamond disc, corundum disc, rubber mallet, tape measure, level, trowel, square, bucket (mixer, drill, marker, mounting gun).
– It is necessary to properly dilute the solution for ceramic pipes and separately for concrete or expanded clay blocks.
– It takes time to dry the product, especially with brickwork.
– The service life of the product and the safety of its use directly depend on the quality of the joints of ceramic pipes (or bricks). The joints must be leveled with a damp sponge; excess mortar is removed to make the seams smooth. It should be noted that the greatest risk of depressurization and fire hazard occurs at the joints.
- A chimney made of brick and ceramics must be laid at the design stage of the bathhouse/house. In ready-made buildings, it is sometimes very difficult or completely impossible to implement such systems.
- The high weight of the structures implies the presence of a foundation, which is not possible in the case of a finished structure.
Sandwich pipes for chimneys - luxury or panacea?
Traditional materials for the stove pipe were brickwork, metal, ceramic and modern sandwich stove pipe. The disadvantages of such chimneys are known, but it is worth comparing the advantages and disadvantages of various chimney systems:
- Brick chimney. The reliability and functionality of such a design depends entirely on its weight. Therefore, a reinforced foundation for the furnace is needed. A brick chimney is heavy, which affects its base, and also requires large investments in construction and maintenance. Construction of a brick pipe is a labor-intensive and complex process. Bricks crumble and deform from the effects of temperature changes; over time, the brickwork requires repair. Maintenance of such a pipe is also complicated, due to the unevenness on the inner surface of the chimney, soot and soot begin to accumulate there, which must be periodically cleaned;
- Steel pipe as a stove. Again, due to the high temperature loads on the wall, its sufficient thickness is required, and the thicker the wall, the heavier the product itself. In addition, steel, under the influence of temperature, can burn out, and condensation on its surface can lead to corrosion of the metal, and subsequent failure of the pipe. Installation of such a chimney is also complicated, requiring either the use of a solid product or the use of special joining methods, such as welding. The advantage of such a chimney exhaust device is its price;
- Ceramic pipes, products made from a clay mixture that has undergone heat treatment, have high heat-resistant characteristics and are installed quite well. Durable. The disadvantage is its high weight and, compared to metal, low strength characteristics.
- Chimney pipe sandwich. Lightweight design consisting of separate, easily connected modules. Installation does not require special equipment or experience. The structure can be displayed in any direction, including in a horizontal or inclined position. It should be noted that the device is simple: fasteners and individual modules. The sandwich stove pipe consists of three layers: an internal channel made of heat-resistant steel, a layer of insulation and an external, protective pipe. The chimney itself is quite light, so fixing it will not cause any special problems. The inner surface of the pipe is smooth, made of heat-resistant alloy steel, which greatly facilitates its cleaning. The insulation will protect the steel from condensation and corrosion. The outer, protective shell serves to protect the insulation from the effects of the external environment.
It is clear that stove pipes and chimneys of sandwich construction are a little more expensive than conventional steel ones, but over the course of their service life (which is 25 years), all costs for the composite will be fully recouped, since, unlike steel, these chimneys do not burn out or rust.
Beauty requires weight
Reviews about sandwich pipes for chimneys are also positive. Users appreciated the ease of installation of the structure, its durability and appearance.
Trumpet named after the Earl of Sandwich
Related article:
Sandwich pipe module dimensions
A sandwich pipe for chimneys with a diameter of 115-120 mm is considered the main one for a small country house or cottage. The heating system in such houses rarely exceeds 3.5 kW. For higher power systems (from 5 kW), pipes with a diameter of 180 mm are used; for heating systems with a power over 7 kW, pipes with a diameter of 220 mm or more are used. The range of sandwich pipe sizes for chimneys is wide and you can quickly and easily select the required diameter in accordance with SNiP standards.
When calculating the diameter of the sandwich, do not forget about other elements of the chimney: fasteners, clamps, start sandwich, damper module, transitions through ceilings or walls.
But not only the diameter of the sandwich pipe for the chimney is important, the height of the module is no less important. It is necessary to calculate the length of the chimney, taking into account the pipe exit above the ridge of the house to a height of up to 1.5 meters, the height of the pipe exit depends on a number of factors and it must be selected individually, but on average the length of the exit is 0.5-1 meter above the ridge of the roof. Sandwich pipe modules are supplied in several versions, common: 0.25, 0.5 and 1 meter high.
Metal box for transition
Stainless steel chimneys
Our production
Single wall chimneys
Double wall chimneys
Mounting elements
Today they are the best option. Lightweight and durable structure that does not require a foundation due to its relatively low weight. Metal pipes must be made of stainless steel with a chromium content of 13% or more.
Installation of metal sandwich chimneys
This type is a structure that consists of two pipes of different diameters - external and internal. The space between them is filled with non-flammable heat-insulating material with an operating temperature of up to 600°C - mineral wool made from high-quality basalt fiber.
Using a standard set of elements, you can create a smoke exhaust duct of almost any level of complexity. Each element is connected to the other using a bell-shaped design; they can be used for external and internal installation. The Ferrum company produces elements in the diameter range from 80 to 300 mm.
Design and installation require guidance on the rules for choosing the diameter and height of the chimney pipe, and taking into account the intensity and frequency of operation of the heat-generating apparatus. Sandwich chimneys provide increased fire safety, but they do not guarantee it completely. Therefore, passage through the ceilings requires the mandatory use of additional fire safety elements, namely polyurethane foam produced by Ferrum.
Design features
Sandwich chimneys are made from modular pipes. This is a stainless steel base, wrapped in thermal insulation material, on top of which is a stainless steel protective casing. Stone wool is used as insulation. This material is not flammable and does not emit harmful substances when heated.
Advantages:
- Easy to install. Anyone can perform it without additional training.
- Light weight. Thanks to this, you do not need to use many brackets.
- All the components needed to make a complete chimney are available for sale.
- All parts have a round cross-section. Advantages: no corners where smoke accumulates.
- Sandwich pipes for furnaces are smooth inside. Condensation easily flows down them, and soot grows very slowly on them.
- Resistance to prolonged exposure to acids and water.
In addition to their strengths, sandwich pipes have some disadvantages - short service life (about 15 years), high price.
The sandwich design involves the use of three layers:
- The inner tube is made of durable stainless steel. It is highly heat resistant.
- Thermal insulation material, which is usually represented by basalt or ceramic wool, polyurethane foam (PPU), and sometimes vermiculite.
- Protective outer pipe made of galvanized or stainless steel.
Stainless steel is the most resistant to temperature changes and, in addition, has excellent anti-corrosion properties. Internal stainless steel pipes can withstand operating temperatures up to 850°C and short-term temperatures up to 1200°C.
The best quality characteristics can be seen in two grades of stainless steel - 316 Ti, 310S. The temperature of the working environment for these types reaches 1000 °C. Experts recommend these two options for boilers that run on solid fuel and baths, as they can withstand high heating temperatures. A chimney pipe sandwich made of such steel will serve for a very long time.
The cross-sectional dimensions of a sandwich structure primarily depend on the thickness of the thermal insulation layer. There is also a certain dependence of the diameter of sandwich pipes for a chimney on the location of the structure. The diameter of the inner pipe is also selected in accordance with the power of the heating device.
Let us consider the dependence of the diameter on the power of the heating device in more detail:
- for stoves that run on wood fuel and for gas turbine units (GTU), the cross-section can range from 50 to 600 millimeters;
- for boilers operating on solid fuel, the diameter is from 50 to 700 millimeters;
- for gas piston or diesel generator devices - from 50 to 500 millimeters;
- for microturbine devices - from 50 to 300 millimeters;
- for boilers operating on gas or diesel fuel - up to 200 millimeters.
Pipes with the largest diameter are installed on furnaces and boilers that consume solid fuel
In addition, it is not recommended to use fiberglass as thermal insulation. This material can be used in systems whose operating temperature is no more than 350 °C. In bath structures, the same figure can be 600 °C and higher.
Installation of stainless steel chimneys
The elements are installed from the bottom up from the heat generating apparatus. If there is a mismatch in diameters, the joint is sealed with heat-resistant sealant. During installation, the inner pipe fits inside the previous one, and the outer pipe fits over the previous one. For better sealing of pipes, be sure to use a sealant with an operating temperature of at least 1000°C.
The joints of pipes and other elements (bends, tees, etc.) are fastened with clamps. They must be outside the ceilings. Wall brackets are installed for every two meters of the chimney, and the tee must have a supporting element. The fastening of parts to building structures must also be carried out using consoles and support platforms at least five meters apart. The fastening of connecting pipes must exclude the possibility of deflection.
Installation must be carried out on brackets through the wall or straight through the roof.
When deciding on the installation method, the following points must be taken into account:
- dimensions of the building - if small, then it is logical to make an external structure;
- the premises are old or being built from scratch.
Self-installation
You can assemble sandwich ventilation yourself, without professional help. To do this, you need to prepare all the elements of the pipeline and become familiar with the stages of the work.
Main details of the chimney:
- Knee at 90 degree angle.
- Adapter for connecting pipes to a furnace or boiler.
- A part with a sealed lid through which the system can be cleaned.
- Tee for transition from horizontal to vertical.
- Mechanism for draining condensate.
- Tee with 45 degree angle.
- If you need to get around difficult places, bends at an angle of 45 degrees.
- Plug to protect the pipe insulation from moisture.
- Clamps for strengthening the connections of individual elements.
- Brackets for fixing pipes on walls.
- Main elements (depending on the length and complexity of the pipeline).
- Cone roof.
- The cone that covers the end of the chimney.
After purchasing all the parts, you can start preparing.
Before installing sandwich chimney pipes, preparation must be completed. It includes several actions:
- Draw the finished pipeline on a piece of paper. Consider where it will change direction to bypass other communications.
- Make a hole in the roof, walls, ceiling. In these places the surfaces need to be strengthened.
- Mark the chimney circuit.
- Install support elements.
Types of connection
Often, when installing a chimney, the pipes are connected “into a socket.” To seal the joints, a special heat-resistant sealant is used. To strengthen connections, you can use special couplings.
There are two options for the location of the sandwich pipe:
- Chimney outlet through the roof. A standard method that involves creating holes in ceilings and roofing.
- Exiting the chimney from sandwich pipes through the wall. This allows you to reduce the load on the floors, but requires more materials for the manufacture of the pipeline.
Once a location has been selected, the number of parts required to construct the system can be accurately calculated.
The chimney is brought out through the wall
The procedure for assembling a sandwich chimney:
- When the holes in the ceiling and roof are made, you can begin assembly. First of all, a special adapter is installed between the heating equipment and the pipe.
- The remaining elements are installed up to the ceiling.
- A special adapter is fixed in the hole, which has two plates and a pipe.
- Where the roofing material pipe exits, a conical roof or stainless steel sheet with a hole must be installed.
- All joints, connections, and chimney outlets must be sealed. For greater protection against fire, it is necessary to additionally insulate the ceilings, the place of contact with the roof.
- The extension of pipes above the roof is calculated according to SNiP.
If you need to connect a sandwich pipe to an old brick chimney, you need to buy a special adapter. Upon completion of work, you should check the reliability of holding the integral structure with brackets and tighten the clamps. Perform a system leak test. To do this, just ignite a small amount of fuel and wait 15–20 minutes. Inspect all joints for smoke leaks.
What do you need to know when choosing a stainless steel chimney (sandwich chimney)?
Sandwich pipes are gaining more popularity over time. This is due to their reliability, resistance to atmospheric conditions, and tightness of connections. Simple installation allows you to save on the help of professionals. For the owner of a private house, it is enough to choose the grade of steel, type of insulation, buy all the elements of the pipeline, and carry out the work according to the instructions.
The chimney can be installed both in the stove and in the heat exchange tank. You can place it indoors and take it outside in any way you like: into the side wall and up, directly into the ceiling, etc. The main thing is that there is traction.
In order to use the stove in the bathhouse as economically as possible, a metal pipe runs directly from it, onto which a sandwich is already mounted. The temperature in this pipe is practically no different from the temperature of the stove, so this system is more profitable. To make the radiation softer, but the heat not decrease, a mesh is made on the pipe into which stones are placed. They will also dry out the steam room well after the stove goes out.
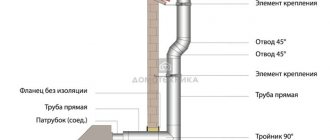
Chimney pipe installation diagrams
Necessary elements included in the chimney kit.
The boiler adapter is the starting pipe component of the future chimney. It is necessary for condensate assembly, as it reorients the turn during installation.
The gate blocks the flow of flue gases if necessary, representing a valve with holes to prevent combustion.
The start sandwich is an intermediate element in the transition from single-wall to double-wall construction.
A ceiling-passage assembly (CPU) with mineralite is a mandatory element when maintaining fire safety at the point of passage through roof and ceiling slabs. PPU contains fireproof insulation material, an air layer and an area for placing an additional layer of thermal insulation.
The groove on the roof insulates the chimney from rain and snow. The increased rigidity of Ferrum structures will protect during snow melting, preventing leaks.
Clamps are used to fix the chimney relative to the installation plane. Steel fasteners are needed to position the system so that it does not rest on the stove or fireplace.
The standard set of modular stainless steel chimney system consists of:
- Adapter.
- Single wall pipe.
- Rotary gate.
- Start sandwich.
- Sandwich pipes (3-4 pcs.).
- Clamps of different lengths.
- Heading. Protects the insulation in the sandwich from precipitation.
- Tee sandwich. Serves to change the direction of movement of flue gases.
Types of stainless steel chimney pipes
Modern smoke exhaust ducts made of stainless steel come in the following types:
- corrugated;
- smooth single-walled;
- smooth double-walled (sandwich chimneys).
Sandwiches and corrugated flexible chimneys are produced only with a round cross-section, while single-wall products are oval and even rectangular.
Note. Rectangular pipes for gas removal are rarely used, for example, for installation inside old brick channels. So it’s not easy to find them ready-made. Typically, rectangular chimneys are made to order.
For the production of chimney pipes, the following grades of stainless steel are used (according to the European classification):
- AISI 304 – has high acid resistance and durability up to a temperature of 250 ºС, and can easily work with mildly aggressive gases up to 600 ºС. Most often it is used on the outer layer of sandwiches or on single-wall chimneys intended for low-temperature boilers;
- AISI 310 is famous for its heat resistance; it can withstand heating up to 1000 ºС for a long time without changing its structure and shape. Although the acid resistance characteristics of this steel grade are not so high, chimney elements made from it are perfect for heating and bath heat generators that burn solid fuel;
- AISI 316 is the optimal solution; any types and sizes of chimneys are made from it, since the steel combines acid resistance and heat resistance (up to 900 ºC). Works successfully with all types of boiler installations.
When making stainless steel chimneys, manufacturers often introduce preliminary thermal insulation of the pipes. This applies not only to double-walled sandwiches, but also to conventional steel flue ducts, as well as corrugated pipes. From the same manufacturer you can purchase both a set of bare pipes and elements with fasteners, as well as those covered with insulation, usually basalt fiber mats.
Installation of a chimney in ceilings for a house and bathhouse
The most fire-hazardous places in a bathhouse/house are passages through ceilings and walls. Below we will look at the passage options in more detail.
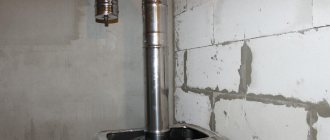
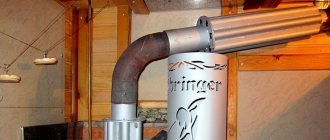
Passage through ceilings
For this task you will need a special unit, which you can make yourself. But it is better to buy a ready-made ceiling-passage assembly from the specialists at feflues.ru (see price list). The Ferrum company offers collapsible and ready-made options - without insulation and with additional insulation (basalt wool or mineralite).
If the passage unit passes dangerously close to the joists and rafters, you need to make it yourself and install a box made of wooden blocks lined with mineralite plates on the inside. And already install the PPU there.
If you purchased a ready-made unit, you must follow the instructions. Factory-made polyurethane foam can be of various configurations: “empty” or with additional insulation. In the first case, it is necessary to cover the base of the unit (stainless steel sheet) with basalt cardboard from the inside, and install the polyurethane foam itself in a box protected by mineralite sheets. We leave the distance between the pipe and the sheet empty. But the assembly itself must be covered with kaolin wool to a depth of 5-7 cm from the attic side; no more is needed to avoid overheating of the pipe.
If you purchased polyurethane foam with mineralite from the Ferrum company, then this unit can be installed without an additional insulated box, as in the first option. In this case, it is also necessary to fill the void inside the unit by 5-7 cm with kaolin wool. This additional insulation increases the fire safety of the passage unit.
The assembly is fastened with self-tapping screws or with a standard fastener if you purchased a factory product. Fixation is carried out to the ceiling from above. The stainless steel platform (the base of the unit) is attached with self-tapping screws to the lining after finishing.
When installing, you need to make sure that the hole coincides with the pipe, since tilting the system is prohibited, the maximum permissible error is 1 mm.
Passage through walls
An adapter is installed on the heat generator pipe to switch from the “smoke” assembly to the “condensate” assembly. Next is a heat exchanger or a single-wall pipe, and then a gate, an elbow and, at the end, a start-sandwich. Sandwich and polyurethane foam are always used in the section where the floor passes. After securing the sandwich tee, which is placed outside the building, a condensate drain is attached below, and there will be a head at the end of the pipe. In this case, the tee must be attached to the installation site, and the chimney trunk is mounted on wall brackets every 2 meters.
Roof passage
Roof cutting is a prerequisite for safe operation and the key to warmth and dryness in the house. Errors when arranging a passage through the roof usually lead to leaks, rotting and destruction of wooden roof structures, and improper fastening can cause a fire.
The sandwich chimney is brought out through the hole in the roof cut pipe, the gaps are treated with heat-resistant sealant with an operating temperature of up to 1000 degrees.
The upper edge of the roof trim apron should be placed under the overlying sheet of slate or metal.
When using a flexible cutting made of silicone or rubber, a hole is cut in the cap 1/5 smaller than its diameter. The cap of the roof cut is pulled over the pipe and the flexible apron is given the shape of a sheet. They are secured with self-tapping screws, having previously been coated with sealant. For a more durable fastening, it is sometimes necessary to strengthen the roof sheathing - this is done at the stage of cutting out a hole in it.
Advantages and disadvantages
The starting or support bracket is made of two strong cantilever structures that are connected at the base by jumpers. To a certain extent, it also carries a power load, since it serves as a support for the entire vertical mass of the chimney and is installed at the point where the chimney exits to the street.
The wall bracket is used to fix the smoke exhaust duct along its entire length, both vertically and horizontally. Able to withstand quite a large weight, create rigid support, and is easy to install.
The disadvantages include the fact that its fastening ring has a certain, unregulated cross-sectional size.
The clamps differ in the form of fastening the chimney ducts in them - instead of a closed ring, two tightening brackets are used.
As a budget option, ordinary clamps are used, attached to the walls with studs.
The main advantage of the telescopic bracket is its sliding design, which allows you to adjust the distance of the fastener from the base to the required amount. You can install it on uneven surfaces, maintaining the vertical position of the chimney. There is no need, as in other options, to cut rods or guides to the required size.
Devices consisting only of cantilever guides, without fixing clamps and ring pads, are easy to install. It is also easy to adjust the installation distance of the chimney outlet to the wall. However, their fastening is less rigid than in ring clamps.
Conditions for normal operation of the chimney
- The length of the channel must be at least 5 meters.
- Lack of many turns. If there are more than three, then you need to change the project.
- If there is a horizontal path, then its length should be no more than one meter.
- The diameter of the pipe should not be narrower than the connecting pipe.
- Ideally, the chimney should be vertical throughout. But sometimes this can be difficult or impossible to achieve. In this case, tees and transitions (elbows) are used. If your channel has at least one transition at 90*, then you need to extend the pipe by 1 m, if there are two transitions (two corners), then by 2 m. If you used a transition at 45*, then two such angles - this is plus 1 m in height.