It is recommended to install heated floors in country houses; apartments have problems connecting to the general heating system. This rule applies not only to houses of old standard designs; many new buildings, especially luxury ones, have such a heating system. Before moving on to considering existing installation schemes, you should briefly dwell on their advantages and disadvantages; this knowledge will help you consciously decide on the advisability of installing heated water floors.
DIY water heated floor
- Advantages. Uniform heating of rooms, increasing living space due to the absence of heating radiators, improving the interior of the room. In addition, heating a room with heated floors is considered the most cost-effective at present; one-time investments can pay off already in the second or third year after commissioning.
- Flaws. Designs that are quite complex from an engineering point of view require expensive additional equipment. A very serious drawback - big problems if repair work is necessary.
If you have made a positive decision and the desire to install warm water floors has not disappeared, then you can move on to considering possible installation schemes.
3D diagram of arranging a heated water floor in a private house
Preparatory stage
Before calculating a water heated floor, decide on the desired temperature for a given room
It is the same for all underfloor heating schemes. You need to start by calculating the power of the system, taking into account the area of the room, the optimal temperature, and actual heat losses. The power of heated floors should be increased for rooms located on the first and last floors, if the facade walls do not have insulation in accordance with the requirements of existing standards, if the finishing coating is made of natural stone or ceramic slabs.
Necessary conditions for high-quality operation of water floors
Old flooring should be removed and the base leveled if necessary. The height difference across the entire area of the room cannot exceed five millimeters, otherwise the load on the pump increases significantly. In addition, there is a high risk of air locks forming and difficulty in removing them.
Wiring systems for two-story houses
Existing wiring diagrams for heating systems:
- with one or two pipes;
- with top or bottom wiring;
- with risers located vertically or horizontally;
- with the movement of water along a highway or along a dead-end branch;
- with natural or forced circulation.
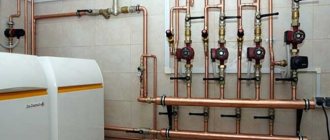
Warm floors in a two-story house will be most productive when choosing wiring with a forced type of coolant circulation. The equipment complex consists of a manifold and pipeline, expansion tank, boiler and heating devices. The pump provides water supply.
Professionals usually make manifold wiring, one-pipe or two-pipe circuits. When choosing a system with one pipe, it will be quite difficult to regulate the heat in different rooms - it is impossible to shut off one radiator separately from the rest.
The two-pipe scheme is universal and will fit perfectly into a two-story house, allowing you to install a circulation pump for the heated floor circuit. The heating power is enough for heated towel rails on each floor and other appliances.
General requirements for wiring diagrams
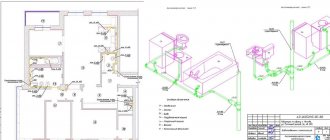
The room should be divided into sections depending on the configuration. Draw a preliminary sketch of the heating circuit on paper. In this case, two conditions must be met: the number of heating pipes in each section should be approximately the same, and sharp turns should be avoided if possible. The maximum area of one section cannot exceed ≈20 m2, the length of the pipes on it is no more than 100 m. Specific values depend on the power of the pump and the technical characteristics of the heating pipes.
Connection diagram for a water heated floor boiler
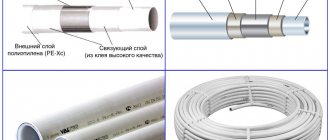
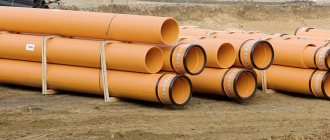
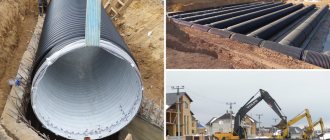
Installation diagrams can be made from plastic (the cheapest and fairly durable option), corrugated stainless steel (in all respects they occupy an average position) and copper (the most expensive and most reliable option) pipes.
Pipes for heated floors
Corrugated stainless steel pipes
Next, you need to draw a pipe layout diagram on paper, taking into account the above conditions. The distance between the pipes is 15–30 cm, depending on the required indoor temperature. It should be borne in mind that floor coverings cannot heat up more than + 30°C.
Important. When drawing a diagram, you should know that pipes have different bending radii, depending on their diameter and material of manufacture. For floor heating, the bending radius must exceed ten diameters.
When drawing up a diagram, one more condition must be fulfilled. In the room, each circuit should have the same length of pipes and approximately the same number of bends. The schemes provide for pipe laying using a spiral method, a zigzag and a snake; it is possible to use several methods in one room, it all depends on the characteristics of the floor configuration. It is recommended to increase the density of heating pipes near windows, otherwise the floor underneath them will be much colder.
Heated floor connection diagram
Pipe flow depending on pitch
The length of each circuit increases by about two meters; they will be required for connecting to the riser. If you can be a little mistaken with plastic pipes, then copper ones are too expensive to cut them into pieces; unproductive waste increases the cost of the heating system. It is possible that you will have to draw several sketches, change the appearance and size of the outline. If you have very little knowledge, and you had problems with geometry at school, then professional experts recommend taking a piece of rope or thin wire and laying out circuit diagrams on the base, changing their location, trying to make the diagram with a coil or spiral.
Pipe laying options
Methods for laying out water heated floor pipes
Having found the optimal solution, the circuit layout can be marked on the base with a felt-tip pen. Further development of the installation depends on the type of base.
Installation of a collector system
In heating residential buildings with two or more floors, a two-pipe collector system is often used, when the direct and reverse supply of coolant to the collector is located in a special cabinet. A supply type collector collects water and transfers it in portions through pipes on the wall to the radiator.
The main advantage of this option is the ability to disguise the installation and not spoil the interior.
Collector-type heating is carried out on one or two floors, but with a two-story option, you will have to make an expansion tank on the 2nd floor. Pipes with hot water are installed under the ceiling or window sill, and control taps are installed on radiators.
Installation involves the use of a beam or collector circuit, in which different temperatures are adjusted in each room of the house. Radiators are connected to collectors, creating forced circulation.
This will minimize the temperature difference between the outlet and inlet and make the heating system compact.
Ball-type valves will allow you to exclude a separate radiator from the general circuit, and the operation of the system remains stable. Installing a manifold type system means that each circuit is independent and can be equipped with a separate pump, automatic equipment and multiple valves.
Installation diagram on a concrete base
Scheme of a water heated floor on a concrete base
Installation of water heated floors with concrete screed
Installing water heating on a concrete base contains several “layers of the cake”.
Thermal insulation layer
It is laid on a cleaned base; if it has large irregularities, then a screed must be made first. It is advisable to use foam concrete, it reduces unproductive heat losses. The thickness of the thermal insulation must be more than three centimeters, the density of the thermal insulation must be at least 35 kg/m3.
Thermal insulation layer
It is recommended to use polystyrene foam or pressed mineral wool of increased physical strength in the design. There are special mats for water floor heating systems; they have installed clamps that make the process of laying pipes much easier. If the room is large, the thickness of the insulation increases.
Pipe laying
Fastening underfloor heating pipes
On average, per square meter of room you will need approximately five linear meters in increments of 20 cm. These figures may vary taking into account the design power of the heating system.
Pipe laying
Practical advice. It is advisable to provide for installation in two streams in the diagram. In this case, the connection should be made in such a way that the hottest pipes of the primary circuit alternate with the cooled pipes of the second circuit. This scheme ensures uniform heating of the entire floor.
After connecting all sections, it is imperative to carry out hydrotests for the tightness of the connection. To do this, plug one end of the pipe and connect a water pump to the other. The water pressure during testing should be twice the operating pressure. Such tests will allow timely detection and elimination of leaks.
Damper tape for heated floors
Damper tape and insulating film
A damper tape is provided along the contour of the room, which compensates for thermal expansion of the upper cement screed. The diagram provides a layer of waterproofing between the pipe contour and the screed. For these purposes, you can use cheap polyethylene film with a thickness of at least 30 microns.
A metal or plastic mesh for reinforcement is laid on top of the waterproofing.
Insulation film and mesh
The thickness of the screed is 3–10 cm above the surface of the pipes. The screed is done in the usual way; you can use wet or semi-dry material. After cooling, the final floor covering is installed.
Screed over water heated floor
The diagram shows all the layers of the heated floor, indicating the materials of manufacture and linear parameters.
Polystyrene scheme
Polystyrene underfloor heating system
A more modern method, there is no need to make a concrete screed. This scheme significantly speeds up installation work and allows the system to be used not only during new construction, but also during major renovations of the building. Due to the minimum thickness of all layers, it is possible to reduce the height loss of the room and minimize the load on the floor.
Polystyrene system
The scheme involves embedding aluminum plates into polystyrene plates in which pipes are fixed. The thickness of the slabs allows you to hide pipes with a diameter of up to 20 mm in them.
Fragments of installation of a polystyrene system
The top of the system is covered with gypsum fiber boards. It is not recommended to use plywood or OSB; they have insufficient thermal conductivity, which will reduce the efficiency of the heating system. Gypsum conducts heat well, and the addition of synthetic fibers makes it quite durable. Finish flooring can be laid on top of these slabs.
The polystyrene system can have a base thickness from 15mm to 70mm
Conditions for installing a water floor
It is recommended to include the installation of an additional heating circuit in the project even before the start of construction - this makes calculations easier.
In a finished new house or building where the radiator system has been in operation for a long time, installing a water floor is also possible, but under certain conditions.
The benefits of water heating have long been appreciated by residents of Europe and Russia: it effectively heats rooms, saves expensive energy, creates the most comfortable environment in bedrooms, bathrooms and children's rooms
If the desire to insulate the floor arose after the construction of the house, you should determine whether the building is suitable for this. One of the main conditions is pre-made thermal insulation of the house, since heat losses above 100 W/m² will make the installation of the floor useless.
Pay attention to the height of the ceilings: the installation “pie” with pipes takes about 15 cm, or even more, from the total height of the room. After implementation of the system, the dimensions of doorways must be maintained, with a height of 210 cm or more.
Special requirements apply to the foundation. It should be strong, smooth, clean. An unstable base will lead to unevenness, and these will lead to deformation of pipes with coolant
If the house is new, then before starting installation it is necessary to completely complete construction - erect walls and ceilings, install windows, and plaster.
Modular scheme on a wooden base
Provides for the use of ready-made OSB boards with sawn grooves for pipes and metal plates. The thickness of the slabs is at least 22 mm; in the diagram, the installation of thermal insulation is provided in the ceiling. The variety of modules in configuration allows them to be placed in the desired sequence according to the developed scheme. Depending on the pitch of the plastic pipe, it is possible to use strips measuring 130–280 mm. They have convenient latches for fixing pipes. Sizes 150 mm, 200 mm and 300 mm. After assembling the pipes and checking them for leaks, the circuit is covered with gypsum fiber boards.
Warm floor on a wooden base
Photo of laying heated floor pipes
Choosing a location for the expansion tank
How to choose the right location for an expansion tank? This question often arises among owners who plan to install warm floors on the second floor with their own hands. If there is an attic and basement, the heating circuit must be made with lower and upper wiring.
Heating expansion tank
Experts recommend taking into account several features:
- The option with lower piping involves installing the tank in the basement. From there, water will flow into the system thanks to the pump;
- With overhead wiring, the boiler is placed in the attic, from where the hot coolant will be supplied through the riser to the radiators and heating equipment.
Rack laying scheme on a wooden base
The diagram is drawn taking into account the use of wooden or OSB slats with a thickness of at least 28 mm. The slats should be laid on the floor joists, the distance between them is slightly larger than the diameter of the pipes. Metal profile plates are used as fasteners; there are latches on top. The system is covered with gypsum fiber boards.
Warm floors on a wooden base
Commissioning
Full maturation of the cement screed occurs after a month, which is when balancing needs to be done using collector flow meters.
Using balancing valves, the coolant flow is regulated; it should become the same in all circuits. If you have no experience with self-balancing, it is better to invite a specialist.
After manipulating with cold water, if the system is working correctly, you can conduct tests with heated coolant. At this point, the installation of the heated floor is considered complete.