What to consider when masking a battery
Before you start masking, you need to know a few important nuances:
- The first thing you need to understand is that with any method there will be heat loss.
- Convection air flows should not be blocked by anything; this is the only way to maintain uniform heating of the room, and the windows will not fog up.
- For various emergencies, it is worth considering in advance free access to threaded connections and the radiator - this could be a window or a removable structure, for example, a door with hinges.
- For repairs, the faucet, thermal head and other elements of the heating system must remain in good accessibility.
Option #2 - box on a frame for the heating main
If you have already installed the heating system, and now want to hide it, you can hide the pipes in a box. It is made of plastic, plasterboard or wooden materials that are attached to a frame. Before sewing pipes into the box, make sure they are intact!
To install the box you will need:
- metallic profile;
- self-tapping screws with dowels;
- cladding material;
- screwdriver;
- cutter;
- knife for cutting sheathing material;
- drill;
- scissors for cutting profiles;
- measuring instruments.
The first step is to build a frame for the box. It is made of a metal profile or wooden blocks, which are secured with self-tapping screws. First, markings are made around the pipes depending on their location on the floor, walls and ceiling. In this case, you need to take into account the width of the profile or bars, the size of the finishing material and the distance from the pipes to the walls of the box.
Heating pipes should not be located close to the duct. Between them leave a free space of at least 3 cm wide.
If the risers located in the corner of the room are closed, it may happen that the walls are not level. In this case, it is more expedient to make the angles formed by the walls and the frame 90°, and align the protruding angle with them. After marking, they begin to install the rack profiles to the walls. Then the guides are attached to the floor and ceiling. The profile is fastened together with a cutter.
The height of the corner frame for vertical pipes is more than 1.5 m. Therefore, for its strength, it is necessary to secure horizontal jumpers. If the distance between the posts is more than 0.25 m, they also need to be strengthened
Next, depending on the design of the future box, one or two corner profiles are installed. If the distance between the posts is more than 0.25 m, you need to make additional jumpers parallel to them. If the racks are higher than one and a half meters, you need to install horizontal jumpers. After constructing the frame, they begin to line it. If plasterboard is used for this purpose, then before closing the heating pipes with it, it is necessary to remove the chamfers from the sheets. This process is skipped if the box is subsequently tiled.
Once all the frame elements have been installed, we begin cutting out the sheathing material. This should be done in such a way that there are fewer joints
First, the side elements are fixed, and then the central ones. After completing the installation work, the final finishing of the box begins. The plasterboard structure can be covered with wallpaper or painted to match the walls. Special corners are placed on the plastic elements so that the joints are not visible. Drywall is reinforced with an angular profile. The box, the front part of which is a stained glass window, looks very interesting. You can enhance the effect by installing lighting inside.
Masking heating pipes can be turned into a real work of art; decorative stained glass with internal lighting looks interesting
Some structural elements can be made removable or small doors can be hung for system maintenance.
In rooms where heating elements occupy a large wall area, it is possible to build a false wall. It is made using the same method as the box. First, the frame is mounted, and then it is sheathed with suitable material. However, keep in mind that a false wall reduces the area of the room. Also, a ready-made box is used to hide heating pipes. On sale you can choose a suitable option for any room design.
To disguise heating elements, you can purchase a ready-made perforated metal box. Thanks to small holes, heat penetrates into the room
The best ways to beautifully hide radiators
There are several ways to hide batteries; in this section we will look at the most popular and effective ones.
Hinged screen
It is by far the most practical and popular method; most often this design is made of metal and has its advantages:
- simple installation;
- heat exchange remains the same;
- can be made with rounded corners, which reduces the risk of injury.
Glass screens
A screen made of glass will be an interesting and stylish solution, especially for those who choose minimalism or a modern style in interior design. Photo printing or various patterns can be applied to the glass, but this method is not a budget option. Installation is carried out on a screw holder, but you will have to drill holes in the wall. However, the heating radiator will be stylishly protected. This option will fit into any interior.
Box screens
Box screens are an excellent option for decorating radiators.
- They will help to completely hide the battery.
- The box can become a piece of furniture.
- Erans are easy to install and easy to care for.
- Protect from burns or other injuries.
The photo shows an original green wooden box in the children's interior.
Curtains to the floor
Let’s not forget about the most popular way to hide batteries - simply hang them with opaque or translucent curtains. Using this method, over time you will even forget that there are pipes and a radiator behind the curtains. The main thing is to choose curtains that will look harmonious and not show everyone that there is something behind them.
Painting the walls in color
How to hide a heating radiator on the wall if other designs are “prohibited”. There is only one way to paint it the same color as the wall.
Wood frame
Wood will create coziness and warmth in the apartment, and the disguise of the battery will be elegant and beautiful. This option is for those who are furnishing their home in eco-style using natural materials. These ways to hide batteries can be used as a stand for home decor.
In the photo, ordinary wooden blocks stylishly hide the radiator in the kitchen.
Built in furniture
Another common way to cover a radiator is custom-made furniture or built-in furniture (shelves, cabinets, folding tables, seating).
Hide the radiator with furniture
Arrange furniture, such as an armchair or desk, so that it covers the radiator. A cast iron radiator is not attractive to many, but pieces of furniture can hide it.
Replace with designer model
For those who don’t want to invent anything, unique designer ways to hide batteries have been developed that already initially have a beautiful appearance and you simply don’t want to hide them.
Original ideas
There are many creative ideas that can turn batteries into a decorative element:
- Forged products
- Hide the radiator with fabric
- Painting and decoupage of batteries
In the photo, with the help of a beautiful painting, the battery has merged with the wall.
Pipes hidden in the wall
This solution to the problem is very common; the heating line is hidden not only in the wall, but also in the floor. These methods are not easy and require careful work.
If you decide to use this option, you will need to calculate everything in great detail and draw a highway layout diagram. It should indicate the exact locations of the network. Then you can begin to create recesses in the wall - the so-called grooves.
The recesses are prepared in two ways:
- The old simple way - using a hammer and chisel, make notches, cut through them, removing pieces of the wall;
- Hammer. This is a very convenient method that is used today. Only when working with this tool there will be a lot of dust, and this complicates the whole process a little.
To prepare the grooves faster and easier, you need to outline the contours of each furrow and make cuts to the required depth with a grinder. It is recommended to carry out further work with an impact drill, simply knocking out the material.
IMPORTANT! The dimensions of the recesses must be calculated taking into account the need to add thermal insulation. You can use special covers that provide heat and water insulation for the heating network in your apartments or private houses.
Before calculating the size, put a cover on a piece of workpiece and measure the resulting diameter. Add another 2 cm to these numbers. When two pipes go side by side, do not forget to take this into account. We also take into account fittings, tees and the rest.
ADVICE. When the installation of the network is completed, you should check whether the fastenings are secure and whether there are any leaks. To do this, connect the network to the pump, fill it with water and make the pressure higher than the working pressure. And after this they carefully inspect the entire highway.
If there are no leaks, then thermal insulation can be performed. On covers of the required size, a cut is made on the side, and they are put on the pipes, and the seams are taped with special tape. Then everything can be bricked up.
IMPORTANT! This method has an important disadvantage. The system needs to be repaired at some point, and with this installation option it is not easy to do.
Video 1. We hide heating pipes in the wall in the apartment.
I embed Apartment Heating into the Walls.
Hide with drywall
Separately, I would like to talk about how you can hide batteries using drywall. It’s worth noting right away that the material has its drawbacks, but plasterboard construction is still very popular for repairs.
- The material is environmentally friendly and is not subject to combustion.
- You can find several varieties of this material on the market.
- This camouflage option is budget-friendly, and installation can be carried out in different ways, in a way that is convenient for you.
- Also, it is drywall that will allow the apartment owner to come up with any design, which will help not only to cover the pipes and radiator, but also to make additional decorative elements.
The downside is that drywall is afraid of external influences; if you do it carelessly, it is quite easy to break or pierce it. And if a breakdown or leak occurs, the entire finish will have to be replaced again, but this material is cheap.
Which pipe elements should not be masked?
This paragraph concerns the camouflage option, in which the pipes are laid in a groove in the wall and tightly walled up in it under a layer of a special solution, and then under facing materials. In this case, you need to be extremely careful. After all, if any damage occurs, in order to eliminate it, you will need to irreversibly damage the walls.
It is not recommended to immediately hide the newly completed installation under cement mortar. Yes, plastic, steel or copper pipes have a very long service life, but if the soldering is done poorly, you may not see it right away. Sometimes a seam may be too thin in one place and leak, and this is not visible immediately, but only the next day.
So, you can sew into the walls:
- Welded steel or copper pipes without threaded connections;
- Brazed plastic pipes without threaded connections.
It is not recommended to mask the following elements without quick access:
- Metal connection fittings having an L-, T- or X-shape. These areas have an increased risk of leakage.
- Connections made using threaded elements;
- Installation locations for meters or filters.
Do-it-yourself installation of a plasterboard box
In order to close the battery, you need to measure it, and then buy metal profiles and other additional products.
- What materials are needed: 12 mm plasterboard sheet, metal profiles 27x28 and 60x27, self-tapping screws for plasterboard and metal, dowel-nails 6x40 in size, construction sickle, perforated corners.
- Tools: screwdriver, hammer drill, metal scissors, craft knife, stapler, pencil, tape measure, building level.
Attention, for the construction of a plasterboard box there is an important requirement: the window sill must extend beyond the radiator by at least 3 centimeters.
Work order:
Installation of the frame. The profile should be mounted on three adjacent sides: floor, wall, window sill. Press the 27x28 metal profile to the base with your hand, drill a hole using a preforator both in the profile and in the wall. Using a screwdriver, screw the dowel-nail into the hole. At the bottom of the window sill, a 27x28 metal profile is mounted on self-tapping screws; the length of the screws should not be greater than the thickness of the window sill. Next, you can install jumpers made of metal profile 60x27.
Selecting the grid size. This hole must be made slightly smaller than the grid size. You can focus on three recommended sizes: 60x120, 60x90 or 60x60.
Installation of drywall. Plasterboard sheets can be cut with a utility knife. Screw it in with a screwdriver.
Installation of corners. They must be secured at the corners with a construction stapler, or attached to gypsum plaster. Serpyanka should be applied to all seams of the plasterboard box and covered with plaster. Before painting or wallpapering, the plasterboard box must be puttied, sanded and coated with primer.
Method 2. Box cover
An existing heating system can be hidden by installing a box structure.
Suitable materials
- drywall;
- plastic,
- wood panels.
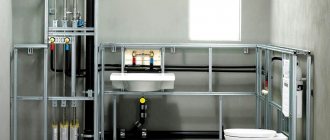
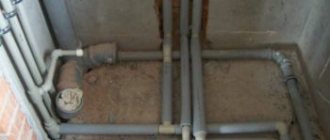
You can see what a heating system mounted under drywall looks like in the photo:
Required tools:
- metal profiles or wood blocks;
- sheathing material;
- drill;
- cutter;
- screwdriver;
- scissors for cutting metal profiles;
- screws, dowels;
- sharp knife;
- roulette;
- level.
Work order
- Markings are drawn around the heating structures, taking into account their distance to the walls of the box, the width of the profile or wooden beam, as well as the width of the cladding material. The distance between the box and the pipe should be 3 cm.
- The frame for the box is assembled from metal profiles or wood blocks. Rack profiles are attached to the walls, the profile elements are mounted with self-tapping screws. To equip the profile with each other, a cutter is used. For racks with a height of more than 1.5 m, horizontal jumpers are installed.
- Sheathing the frame for plasterboard is done with material with chamfers removed from the sheet. If the finished box is planned to be faced with ceramic tiles, there is no need to remove the chamfers. It is better to cut the material with a minimum number of joints.
- The box elements are attached first to the side, then in the center. Strengthen the drywall with a corner profile.
- You can equip the front part of the box with stained glass with lighting installed inside.
- For the convenience of future maintenance of the system, the corresponding areas can be equipped with removable panels or equipped with doors.
To cover heating structures you can also:
- mount the false wall according to a principle similar to assembling a plasterboard box. It should be remembered that this action will reduce the area of the room;
- install a ready-made box with a perforated surface through which heat will flow into the room;
- hide pipes protruding above the floor or walls under the baseboard.
Masking heating pipes
It doesn’t matter whether it’s an apartment or a house, a bedroom or a kitchen, everywhere I would like to have a good renovation. Questions immediately arise: how to beautifully hide heating pipes and how can this be done with minimal cost and maximum efficiency? At the same time, the method of disguise should be truly invisible and unnoticeable, fitting into the room.
The pipe can be hidden inside the wall, or it can also be closed into the floor. Remember that the old heating system should not be hidden in this way; this option is possible after a complete update of all elements.
Box on frame
It is best made from wood, plastic or plasterboard. Do not place the heating pipes close together; there should be at least three centimeters between the box and the pipe.
Hide behind decor
Decoration of pipes in various ways, for example, wrapping them with jute rope. But remember that this reduces heat transfer. Many owners decorate pipes with flowers; this can be done using bamboo with leaves. Only imagination should work here; even an old pipe can look completely different.
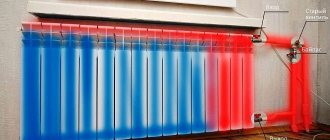
Painting to match the color of the walls
The easiest and most practical method is to paint the radiators or riser in the same color as the walls, but the heat generation will not be reduced.
In the photo in the kitchen interior, the pipes are painted to match the blue walls.
Hide under the floor plinth
A good invention was the floor plinth, in which you can easily hide batteries located horizontally and low to the floor.
How to decorate pipes?
If you don’t want to bother with complex construction procedures, then don’t hide the pipes, but decorate them. But you still have to tinker a little: before covering, the pipe is washed and insulated with plastic film.
Pipe decor options
Painting
It is enough to paint the pipe to match the walls, and it will become less noticeable. Apply a pattern or ornament that is repeatedly repeated in the interior (on tiles, textiles) to the pipe. This will make her friends with the space. If you are ready for bold experiments, make the pipe a bright interior detail by painting it in rich contrasting shades.
Pink pipe in the kitchen
Important: before applying paint, you must exclude the presence of condensation on the pipe and cover the surfaces adjacent to it with a protective film.
To ensure that the paint adheres well and the metal is protected from corrosion, before painting, do not forget to clean the surface of the pipe from dust, sand it a little and coat it with a primer. For pipes through which hot water passes, choose special heat-resistant paints (alkyd enamels) that do not change their color when exposed to heat. Plastic pipes are the most vulnerable to chemicals. Compositions without acetone (acrylic, water-soluble, pentaphthalic based on white spirit) are suitable for them.
Advice: to get the hang of it, paint cold pipes first, since paint dries quickly on hot pipes, and poor-quality application will be immediately noticeable.
Bright trumpet
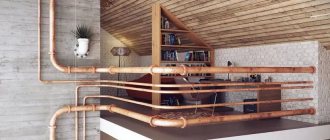
With the participation of polyurethane tubes and stucco decor, vertical pipes can be designed in the form of columns. They will fit perfectly into the classic style of the interior. And fans of eco style can paint the pipes to match the tree trunk and entwine it with artificial vines or leaves.
Imitation of railing
A horizontal section of a gas pipe in the kitchen, running along the apron, can make a good “false rail.” Only lightweight items can be hung on it. Install the real railing parallel to the pipe, but slightly lower. The main secret: the diameters and shades of the pipe and railing should match as much as possible. This life hack is perfect for modern interior styles.
Railing and pipe
Decorative overlays
These include sockets, pipe rings and plugs. They serve to cover sloppy protrusions where pipes enter the ceiling, wall and floor. Such a small decorative touch makes the design more aesthetically pleasing and complete. The main thing is to choose the appropriate texture, diameter, section shape and color of the lining.
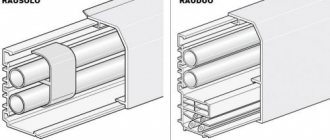
Pipe covers
Rope trim
How to beat pipes in eco-style? Wrap them with hemp rope or jute rope. This is a great idea for decorating interiors with marine and eco themes, especially in children's rooms. Another plus is that the rope around the pipe can become a convenient scratching post for cats.
Pipe wrapped with rope
Pipe-claw
Shelf part
If special boxes and false walls take up a lot of space, try installing a practical shelf or rack on top of or around the pipe. The final touch is to paint the pipe and shelf in the same color for better camouflage.
Pipe under the shelf
Hanging shelves without screws and drills are easy to install using a horizontal heating pipe. Wrap it with a rope and hang small planks from it using hemp ropes. You can store any small items and lightweight trinkets on them.
Hanging shelves
Decoupage
This is a well-known decorating technique characteristic of shabby chic, rustic, Provence and country styles. With its help, you can effectively decorate the pipe, turning it into a charming decorative element.
Decoupage batteries
Knitting
Handicraft lovers will certainly be interested in the idea of knitted covers for pipes. The process of creating them is not fast, but as a result you can get an absolutely unique decor. Children will definitely appreciate colorful products in the shape of funny animals.
Knitted covers for pipes
Photos in the interior of the rooms
Kitchen
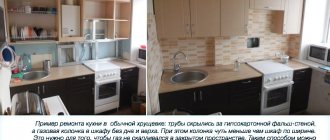
The kitchen is the ideal room in which all ways to hide batteries will become practical and convenient. If the room is small, then you can hide the radiator with the help of a beautiful tabletop or make a folding table, which will fold out when convenient.
Factories of metal-plastic structures offer a large selection of beautiful large-sized window sills that imitate stone, wood and other materials. A modern window sill does not break under weight, is not afraid of external factors, is easy to care for, wipe clean, is not afraid of scratches, and so on. You can hide any type of battery in this way, including cast iron.
In the photo, wooden boxes are used to disguise the radiators.
Living room
If the radiator is in a niche, then a wide window sill will help create a work area.
You can place souvenirs, vases or potted flowers on the constructed wooden box. You can also cover unsightly radiators in the living room with thick curtains.
The photo shows a modern living room. In order to hide the radiators, a wooden structure was installed, which also serves as a place for rest, storage and decoration.
Bedroom and children's room
In the interior of a bedroom and children's room, batteries can be used as another place to relax, a tabletop for decorative elements or a workplace.
Bathroom
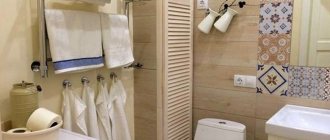
You can hide the pipes in the bathroom using a louvered door, plastic grilles or a cabinet with opening doors.
We hide heating radiators using wooden, glass or plastic screens.
In the photo, the radiators in the bathroom are hidden using a wooden box.
Hallway
For radiators in hallways, glass screens or wooden boxes are suitable. In a small room, covering the battery is only necessary from a practicality point of view. This could be a locker for storing shoes, or the battery will become a small coffee table where keys and other necessary items will be stored.
Using a plasterboard box
The technology for decorating pipes in this way is quite simple. It all starts with the installation of a frame made of profiles. They are attached to the wall using self-tapping screws. Next, the plasterboard walls are fixed. In addition to decorating pipes in rooms, heating risers in the kitchen and bathroom are decorated using this method. However, to decorate using this method, it is necessary to purchase not ordinary, but moisture-resistant drywall. Although the method is distinguished by its simplicity, and the costs of using it are small, it nevertheless has its drawbacks:
- no access to highway;
- prohibition on its use in close proximity to radiators.
Examples in different interior styles
Modern style
For a modern style or a high-tech and minimalist style, any material made of wood, glass (glass panels) or metal is suitable.
Classic style
It is recommended to use natural materials; it is better to opt for a wooden lattice.
Provence
Wood also loves styles such as Provence, country, chalet and eco-style.
Scandinavian
Wooden grilles in light colors will look appropriate in the Scandinavian style.
What you need to know before installation
Each part in any mechanism has its own purpose. In this regard, pipes can also be perceived as elements of a single and well-functioning system. A system that sooner or later may fail, which means that prompt access to pipes is not a wish, but a necessity. There are a number of comments from specialists that you should listen to carefully if you want to handle the operation correctly:
- if there are any threaded connections, taps, etc. on the pipes, then with any chosen type of masking of communications, quick access to them should be provided;
- when installing a mandatory decorative box or covering pipes with plastic panels, provide for the creation of an inspection hatch;
- communications made of metal-plastic have connections - so-called fittings - that are regulated by keys; these areas require constant monitoring on your part and the possibility of prompt intervention in case of leakage;
- do not place pipe inspection hatches in places where there are no connections - the chance of a leak in these areas is so minimal that it should not even be taken into account;
- immediately before installation, you should carefully check all communications - and correct any noticed defects before installing a false wall or box;
- To prevent condensation, it is recommended to insulate water and sewer pipes.
Remember that the functionality of well-established engineering communications in the bathroom should not be sacrificed for decorativeness. A reasonable balance is always somewhere in the middle, and following the simple rules outlined above will help you not only deal with the problem of visible pipes beautifully, but also maintain confidence in their reliable functioning.
What do you need to do before starting work?
You need to start decorating the heating risers in your apartment only after preliminary preparation has been completed. If the communications in your apartment are old, then before installation they must be replaced with new ones. Sheathing involves an insulation device. It is necessary to put a layer of polyethylene on the pipe or a special sleeve instead. Regardless of the chosen decoration method, the pipeline must be washed before decoration. If you decide to paint heating pipes, then serious preparation will be required.
- It is necessary to remove traces of previous finishing from the surface of the pipe.
- The surface must be cleaned with a wire brush.
- It is also necessary to perform priming.
By deciding to decorate the pipes in your home in an original way and using your imagination, you can get an original interior element and achieve an incredible effect in the room.
Under the sewer riser
This riser has so-called “revisions” - special couplings with an outlet/hole closed with a lid. Such inspections are necessary to clear possible blockages. And under no circumstances should they be sewn up tightly.
If the creation of a box is provided for in the design project, it is necessary to provide a window for unhindered access to the revision. Decorative plastic shutters, which can be purchased without any problems at hardware stores, will help to close such a window beautifully.
In addition to access to audits, access to connections and convergences of the internal sewer line with the central riser should be provided. Suddenly you need to replace the elements or again eliminate the resulting blockage.
Kinds
In order to decorate pipes in a room and hide them from those present, you can use several options, these are:
Recessing heating structures directly into the wall, which in itself is very convenient and not so difficult to implement, but in case of any problems the consequences will be very bad
When installing a pipeline, it is important to completely replace it and carefully check all fastening points, soldering points and any joints that may leak. Disguise using furniture, which is most often typical for the kitchen, but can sometimes be found in other rooms. Using a special box where the pipes are placed. You can make such a structure from different materials, these are: plastic lining, brick, plasterboard, wood.
The box for heating pipes can have a varied appearance, which depends on the room in which it is installed.
- A box-cabinet that forms a closed space where you can not only hide pipes, but also place little things you need in everyday life. It is very convenient to use it in the toilet, where space is significantly limited.
- A plinth box is needed to hide pipes with a small diameter; it is very convenient to install sockets near them, especially for the bathroom, where the humidity level is high and you need to choose the right place to turn on electrical appliances.
- A shelf box with a horizontal arrangement. This is convenient for proper installation of heating structures in the room. You can effectively, but at the same time effectively hide all communications, making the area useful.
- A screen box that helps cover large structures. Screens can be very diverse in design and size, but they will have one thing in common: a mesh structure, which allows you to minimize heat loss without depriving the room of its aesthetics.
- Decorative vertical structures are installed in places of common building communications, most often these are risers.
When planning the construction of any of the above options, you need to know that you can build two types of structures that will have radically opposite characteristics:
- Collapsible structures, their installation allows you to easily monitor the condition of the pipeline in any part of the room and control problem areas, if any.
- Stationary structures that are installed for the longest possible service life and are not planned to be disassembled for a long time. Most often, such boxes are made for gas pipes; they would not be the best option for heating.
Any type of structure can be purchased or made independently, which requires an understanding of what exactly will be built and the use of the correct structural elements. If you need to hide the battery, then you cannot do without a screen, and it must be perforated, otherwise it will not be able to cope with the task and the box itself will overheat, while the room will remain cold. The gratings can be either plastic or wooden, but if desired, you can even order forged products.
Any pipes that are in a house or apartment have an entry point and exit point from the room, which obliges them to decorate these areas as well. The best way to deal with this is overlays or plugs. Externally, they can have a varied appearance and even be made of different materials, but they have one task, to hide the pipe and make the interior of the room stylish and beautiful. Most often, it is the rings that are found, but you can also find square and oval options; in addition, they can be designed for one or two pipes.
Modern technologies also require new approaches to the use of materials; for example, when installing suspended ceilings, pipes need to be bypassed, which, in turn, requires making holes in the canvas that need to be closed. Decorative rings are now used for such purposes.
Their design is extremely simple, but still effective, these are two identical halves that have a special lock at the junction that snaps into place and is securely held in place
It is important to choose the right material and color of such plugs so that they fulfill their role
In the event that you cannot hide the entire pipe, but you need to decorate it beautifully, cups are great for this. They can be made in different sizes, shapes and materials. Chrome is most often used, but plastic can also be used, which has a split design.
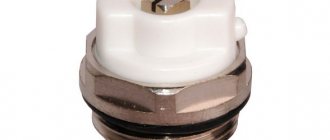
If the design has valves or other moving elements that need to be used from time to time, then you can hide them under a cap that matches the decor of the room, so as to blend in with it and not be noticeable, but if necessary, make it possible to use everything you need.