Modern private houses are equipped with autonomous heating, water supply and sewerage systems. Many city residents are attracted by the ability to independently turn on and off the heating as needed. In addition, living in a private house, people decide for themselves how to heat their home: hang radiators, install a water-heated floor system, or use both heating methods at the same time.
Water heated floor on penoplex
However, the level of comfort in a private home depends, first of all, on the high-quality insulation of walls, ceilings and floors. And given that the main part of heat loss occurs through the floor, it is this floor that requires careful insulation.
Penoplex for heated floors
It is no secret that a water heated floor system is the best option for increasing the level of comfort. However, laying the pipeline without preliminary insulation will make the system ineffective. Despite the variety of materials used for floor insulation under water heating systems, the most effective today is penoplex - extruded polystyrene foam boards. How is a water-heated floor installed on penoplex, and should it be used at all?
Main technical characteristics of penoplex
Penoplex can be used as mono-insulation or in combination with heating pipes
The optimal technology in modern construction is the insulation of surfaces using penoplex. This synthetic insulation has a number of advantages compared to similar materials:
- Withstands intense loads well.
- It is heat and moisture resistant.
- Environmentally friendly material, since no formaldehyde is used in its production.
- High degree of sound insulation.
- Laying with penoplex is one of the most economical options, since no additional costs are required.
The material is made in the form of plates. Its structure consists of air cells, thanks to which the slab is light, but at the same time it does not lose its rigidity. Penoplex is most often used on the following surfaces:
- warm floor;
- priming;
- concrete floors.
Penoplex thickness
When laying penoplex on the ground, its thickness should be greater
Before starting work, it is often asked about density parameters and thickness indicators. It depends on the heat loss that passes through the surface. For a floor on the ground and a concrete slab in a multi-story building, the indicators will be different, even if both objects are located in the same region.
The thickness of the slab will depend on where they plan to make the screed and for what purpose it will be used. If we are talking about laying penoplex under a water-heated floor, the thickness should be maximum. This way it will be possible to reduce heat loss and heating costs will be lower.
Recommended insulation thickness values for screed:
- For a concrete floor in a heated room - from 20 to 40 mm. If the goal is to simultaneously achieve sound insulation, it is better to choose slabs with a thickness of 50 mm.
- Slabs of 100 mm or more are laid on a concrete base on the ground in an unheated room from below.
Advantages and disadvantages
Insulation materials are classified according to their form:
- liquid – cement mortar, polymer penoizol;
- bulk – expanded clay, sawdust, foam crumbs, penoizol, slag;
- block (in the form of slabs and mats) - mineral wool, polystyrene foam, expanded polystyrene, vermiculite, wood concrete;
- rolled - polystyrene, mineral wool of lower density, isolon, penofol.
Liquid materials are good for obtaining seamless screeds. Bulk compounds fill the space very tightly. However, their installation requires a frame, while block and roll insulation can do without them. Liquid solutions take time to dry completely, but have a long service life. The roll has a lower density compared to the block, which is reflected in the difference in thermal conductivity.
The most common types of heat insulators have their pros and cons, which are, to one degree or another, inherent in their analogues:
- Expanded polystyrene and polystyrene foam. These insulation materials are characterized by average mechanical strength and compression resistance. Low density contributes to low water resistance. Under normal conditions, the materials are non-toxic and resist combustion well, but under the influence of high temperatures, polystyrene foam begins to smolder and release toxic substances. Experts note absolute biological stability; rodents, insects and microorganisms will never grow in extruded polystyrene foam.
- Mineral wool, according to users, has a number of advantages, thanks to which it is still the most popular type of insulation. The most important thing is its low cost, due to which it can be used in unlimited quantities. Also especially noted are vapor permeability, noise insulation properties, a high degree of fire resistance and low thermal conductivity. Among the disadvantages, it is worth highlighting hygroscopicity, since when mineral wool gets wet, it loses its remarkable characteristics.
- Expanded clay and other bulk compositions do not leave waste after installation. They are environmentally friendly, vapor permeable, fireproof, and immune to biological agents. Professionals highlight expanded clay as almost the only type of insulation possible for insulating floors on the ground. As for the disadvantages, the main one is low hygroscopicity. The second significant drawback is the thickness of the layer, since at least 15 cm is required to achieve the effect. This means that it cannot be used in places with a lack of height.
What is penoplex?
Penoplex, what is it? Penoplex is a modern material, it is based on polystyrene, which is foamed using technological processing, and unlike its “relative” foam, it consists of a homogeneous structure, and is also more dense and elastic.
This material is in high demand on the building materials market due to its excellent thermal insulation properties. Unlike polystyrene foam, it is more durable, and at the same time also waterproof. Thanks to these properties, it is used for thermal insulation work in any premises.
The structure of penoplex allows it to retain air, so it is always warm, this expands its scope of application in both heated and unheated buildings. Good results in the use of this material have been achieved when insulating the floors of balconies and loggias, as well as bathhouses and the lower floors of houses and apartments. Many experts advise installing penoplex when installing a “warm floor”.
Characteristics of penoplex:
- thickness;
- density;
- flammability.
The use of a heat insulator with certain characteristics depends on the place of application and purpose. When used to increase the thermal insulation properties of the floor, it is better to use penoplex with a greater thickness, and in some cases you can lay one layer of insulation on top of another.
Some cases show that layers of waterproofing can be glued together using special glue. Using these provisions will help create the most effective thermal insulation layer.
Very often, penoplex material is used in the construction of various objects; it is excellent for thermal insulation of floors installed directly on the ground or reinforced concrete slab, then the coating used as a floor is laid directly on it.
Some people use this product as an insulator in the construction of upper floors and various attics, which is not practical, since a material with lower thermal conductivity characteristics and, consequently, a lower price is quite suitable for these purposes.
The most appropriate use of penoplex is in the following cases:
- insulation of the loggia;
- thermal insulation of the balcony;
- installation of bath floor;
- insulation of various types of floors in a private house or cottage;
- installation of "warm floors".
How to insulate a floor with penoplex yourself. Use the following tips.
How to insulate a floor with penoplex?
Recommendations for selection
Experts share some tips to help you choose the right option.
- If your apartment has an uneven or too cold floor, then you should think about installing a screed. For simple leveling, a self-leveling mixture is suitable.
- You can insulate a floor in different ways. In a private house there are more options for installing heated floors than in an apartment. Any redevelopment or similar work will require approval from other owners, housing organizations and regulatory authorities.
- When installing slab insulation on the floor, approval will not be required. Penoplex will be an excellent choice, because it is suitable for both tiles and laminate and other popular coatings. The only requirement is that the screed should not be thinner than 4 cm, otherwise it will soon begin to crack and crumble, which will inevitably lead to deformation of the floor finish.
- The choice of screed for a wooden house depends on the type of foundation. Wooden flooring will not withstand heavy loads, and it is the load resistance indicator that is the main factor when choosing the thickness of the screed. If a reinforced concrete slab is used as a subfloor, the mortar layer may be thicker.
- The thinnest screed in garages is comparable to the thickest screed in buildings. The ground screed cannot be thin. If the rough reinforced concrete floor needs to be leveled, the height of the screed layer can be reduced.
You can learn how to make a screed with your own hands from the video below.
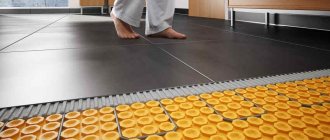
Penoplex for underfloor heating system
An effective heating system - heated floors, which is an alternative to radiator heating - is becoming increasingly widespread. Extruded polystyrene foam, due to its properties, is ideally suited for such a system. Both the pipe heating circuit and the electrical cable are laid on heat insulation slabs.
To lay a heated floor on penoplex, you can use almost the same technology as when insulating the base under a screed. You just have to take into account some of the nuances during the work process.
The electric heated floor is laid directly on the insulation boards, and then the screed is poured. To avoid its expansion when heated, foam boards are installed around the perimeter, acting as a damper tape. The floor covering is laid after the screed has completely dried, after about 28 days.
Water heating is carried out using the same technology, only here a layer of waterproofing is required on top of the insulation boards. Then there is a reinforced mesh to which the pipes are fixed. Before pouring the screed, it is necessary to check the system by releasing water at a pressure exceeding the operating pressure.
Fill the screed without turning off the system. It is advisable not to use cement as a screed material because of its possibility of cracking when heated; instead, it is better to choose compositions specially designed for heated floors.
It is for water heated floors that special aluminum distribution plates are offered, into the grooves of which pipes can be conveniently laid. They can be mounted on top of foam boards, and the decorative coating can be laid directly on the plates without filling the screed. True, the costs of such convenient innovations will be considerable.
Being an excellent heat insulator, easy to install and equally well suited for any surface, penoplex competes with many well-known insulation materials. Having studied the technology of how to insulate a floor with penoplex, you can provide your home with warmth and comfort with your own hands.
Methods of laying heating systems
Warm floors can be equipped with or without a concrete screed. Which method is better to choose depends on the technical features of the room.
Into a concrete screed
For a concrete screed, the building must have reliable floors.
The construction of a concrete system assumes that all heating elements are located under the screed layer. This technology is used for water and electric floors. In the latter case, only a separate heating cable can be covered with a layer of screed. Do not place a layer of concrete on heating mats. They can only be covered with ceramic tiles.
Concrete floors, due to their thickness, cannot be used in buildings with weak floors. The base should be a rough covering or monolithic slabs.
Advantages of concrete screed:
- Possibility of uniform heat distribution over the entire surface. Thanks to this, the room will warm up more efficiently.
- The concrete layer warms up slowly, but at the same time cools down slowly.
The disadvantages of the system are the complexity of the installation work. The concrete structure is made in layers:
- base;
- waterproofing;
- insulation;
- reflective foil;
- reinforcing mesh;
- heated floor pipe;
- pipe-cable.
Finishing materials are laid out as the top layer.
The heated floor screed is floating, so it must be separated from the walls by a gasket. If a semi-dry screed is used, panels with “barrels” are used to secure the pipes.
Into heat distribution plates without the use of concrete screed
Heat distribution plates in penoplex
When it is impossible to make a concrete screed due to its weight, heat distribution plates will help. They are made from aluminum or galvanized. Installed directly on the thermal insulation layer. The structures are equipped with gutters into which pipes are inserted. The plates make it possible to create warm floors in buildings with any ceilings. They perfectly reflect heat and distribute it evenly over the entire surface of the floor covering.
Unlike concrete screed, the plates heat up instantly. After turning off the heat supply, they remain warm for a long time.
Insulation of the subfloor
In wooden houses, double flooring technology is often used. It involves rigidly fastening an unplaned board directly to the beams. This is the subfloor. In this case, the boards are laid as tightly as possible, without gaps, taking into account only the coefficient of thermal linear expansion.
It is on this surface that penoplex is laid. It is fixed using special glue or mechanically. In this case, the joints between the insulation boards are glued especially carefully. A finishing floorboard is laid on top of the subfloor with insulation, and any decorative coating can be laid on top of it.
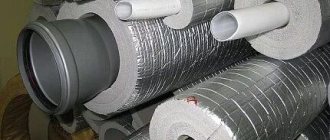
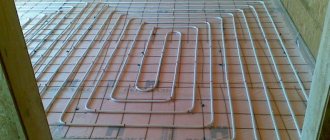
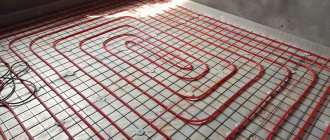
Fastening the pipe to the reinforcing mesh
The pipe is loosely attached to the mesh (a distance of several centimeters) and is fixed using special clamps. The staples are attached one at a time at a distance of one and a half meters from each other, but when the pipe is bent by 90 degrees, the pipe is secured with three staples for a more reliable fixation.
On our second channel, Andrey Elfimov talked about a useful life hack for attaching a heated floor pipe to a reinforcement mesh:
Advantages: All elements of this method of pipe fastening are available in specialized stores or on the market. A simple and reliable way.
Disadvantages: Labor-intensive installation process. The possibility of damage to the pipe cannot be ruled out, since metal-plastic pipes are often used.
What is Penoplex?
"Penoplex" is an insulating material made from extruded polystyrene foam. It is manufactured in several versions, each of which is designed for thermal insulation of various surfaces and elements of the building, that is, the choice of material must be made correctly.
"Penoplex" is one of the best modern insulation materials
This insulation has special markings indicating its most important technical characteristics, on which the area of application of the material depends. “Penoplex” are labeled 31, 31 C. 35, 45 and 45 C. but not all varieties are suitable for floor insulation, but only those that have a sufficiently high density - 35 and 45.
"Penoplex - 35" is essentially universal and is used for thermal insulation of foundations, external walls and floors. This type of insulation has the following characteristics:
- fairly high density - 28 ÷ 38 kg/m³;
- low thermal conductivity: the coefficient is only 0.030 W/m× ° C;
- low hygroscopicity - 0.4% of the total volume in 24 hours, and moisture absorption during the test was noted only during the first 10 hours;
- flammability is designated as G1. This is a very high indicator of fire resistance, and since a heat-resistant concrete screed will be laid on top of the insulation, the material will be completely fireproof;
- The noise absorption rates of this material reach 41 dB;
- the tensile strength of "Penoplex - 35" is 0.4÷0.7 MPa;
- operating temperature range from -50 to +75 degrees.
This type of polystyrene foam is well suited for insulating a concrete floor under a screed. If desired. For insulation, a “warm floor” system can be installed.
"Penoplex - 45" has the highest density of all varieties of this material and is perfect for insulating the floor of a private house on the ground. By the way, it is even used as a heat insulator for runways and road surfaces.
"Penoplex" 45 has the following technical characteristics:
- density 40.1 ÷ 47 kg/m³;
- its hygroscopicity is even lower - only 0.2% of the total volume per day, and all moisture absorption is also limited only to the first 10 hours of the test;
- fire resistance is designated as G4, but if the insulation is installed under a heat-resistant coating, then this no longer matters much;
- the tensile strength of Penoplex - 45 is 0.4 - 0.7 MPa;
Otherwise, the technical characteristics are the same as those indicated above.
There is another gradation of types of “Penoplex” - according to the area of application. This marking is usually indicated on the packaging:
20; 30; 40; 5; 60; 80; 100
20; 30; 40; 50; 60; 80; 100
From this line, three types of heat insulator are suitable for floor insulation:
- “Penoplex Foundation”, which has a density of 29 ÷ 33 kg/m³ and is excellent not only for insulating foundations, but also for floors in residential and basement areas. The heat insulator has high moisture resistance, has good heat and sound insulation qualities, therefore it is suitable for installation on concrete and prepared soil surfaces.
- "Penoplex 45", which was already mentioned in the article, allows you to insulate floors in residential premises, garages, as well as the surfaces of flat roofs.
- “Penoplex Comfort”, whose density is 25 ÷ 35 kg/m³, is widely used for insulating any surfaces in the interior of residential buildings and apartments, and even rooms with high humidity. It is quite possible to insulate floors in a private house with it, if a rigid base is built under it.
Ordinary polystyrene foam may also be suitable for insulating floors. Some home owners choose it because the price is significantly lower than Penoplex. However, we must not forget about the serious difference in the technical characteristics of these materials. To clearly see that extruded polystyrene foam is much more suitable for floor insulation, it is worth comparing the parameters of both materials:
Extruded polystyrene foam (EPS)
It should be noted that despite the fact that the characteristics of these materials differ from each other, the process of insulation with them is absolutely the same.
Technological process
Before starting the main processes, you should examine the working surface for defects and irregularities. If the floor is installed on the ground, then the floor screed with penoplex will have a sand cushion. At the next stage, a waterproofing layer is placed. The best option for waterproofing is the use of polyethylene; it can cope well with high humidity, temperature changes and has a budget price. Synthetic boards are laid end-to-end in the screed.
Screed with insulation
Before gluing penoplex under the floor screed, it is necessary to leave a special temperature gap at the edges of the heat insulator, which allows you to compensate for possible expansion. For these purposes, a deformation tape, for example, foamed polyethylene foam, is attached around the entire perimeter. After installation, the heat insulator is covered with an additional layer of concrete mixture (for example, a solution of cement and expanded clay).
Laying thermal insulation material
What is attractive about penoplex?
Penoplex is a brand of extruded polystyrene foam produced on the Russian market. This material is foamed polystyrene, which, due to its closed cell structure, has excellent thermal insulation properties.
The uniqueness of penoplex is that it is a universal insulation material, suitable for facades, floors, and attic floors. In addition, compared to other heat insulators, it can be used on any base and type of surface, the main thing is to adhere to the installation technology.
In addition, penoplex has a number of positive characteristics:
- Low thermal conductivity;
- Excellent sound insulation properties;
- The highest level of moisture resistance, not susceptible to rotting and mold;
- Long service life;
- Not subject to fire;
- Resistant to a wide range of temperatures;
- Ease;
- Easy to install with your own hands.
The strength and density of the material allows it to be used under a concrete screed, under the weight of which it will not deform or collapse, unlike foam plastic.
Its water-repellent properties make it indispensable when installing a warm water floor system. And warm electric floors can be safely laid on foam boards, since it is fireproof.
However, you should know that when burning, penoplex melts, releasing toxic substances; this is the negative side of this heat insulator. Therefore, in fire hazardous cases, you should choose a brand of penoplex impregnated with antipyrine.
Penoplex slabs for floor insulation are produced with a thickness of 2 to 10 cm. The optimal thickness is selected based on the type of base, floor, room size and climatic characteristics of the region. You can lay a 10-centimeter insulation board in one layer, or a double layer of smaller thickness.
There are various versions of penoplex on the market, which have differences in technical characteristics and are intended for insulation of certain areas.
In residential premises, foam 35, 45, comfort is suitable for thermal insulation of floors in terms of strength and density. The purpose of this or that type of material is indicated on the packaging, so it will not be difficult to navigate when choosing extruded polystyrene foam.
Depending on the type of base (wooden, concrete, on the ground), the technology of floor insulation varies and has its own nuances.
Characteristics of expanded polystyrene
Foamed polystyrene foam looks more advantageous compared to other thermal insulation materials, due to the fact that it allows you to get a fairly dense, durable and rigid base. During its production, the initial mass is foamed by introducing a low-boiling liquid into it, under the influence of which granules are formed that have a waterproof styrene shell. After exposure to hot steam, granules are obtained that have increased in size by 10 to 30 times compared to the original size. After the granules are sintered together, strong, rigid slabs are formed.
Laying pipes on a grid
Extruded polystyrene foam with low thermal conductivity is very popular. The positive qualities of this material include the following:
- Moisture resistance and the ability to not allow steam to pass through ensure that the thermal conductivity of the insulation remains at the same level even when exposed to moisture.
- Environmental friendliness and safety of the material for humans and the environment.
- Biological passivity and the ability of the material to prevent the formation of fungus and mold.
- Resistance of the material to chemical reagents.
- Maintains performance at extremely low (down to –50 degrees) and high (+85 degrees) temperatures.
- The low weight of polystyrene foam boards allows them to be used on any floor without adding weight to their structure.
- The material is easy to process, trim and lay. All work can be done independently, without involving assistants.
- Thanks to its smooth surface, the material interacts well with the base on which it is laid.
- Excellent thermal insulation properties are provided by the bubble structure of the material.
- Expanded polystyrene simultaneously creates a waterproofing layer due to its resistance to moisture.
How and with what to cut polystyrene foam at home?
Laying pipes on a foil layer with markings
An important quality for flooring is its noiselessness. Expanded polystyrene boards have excellent sound insulation properties.
The thickness of the heated floor structure taking into account the pouring of the concrete screed
The safety of the material is no less important - polystyrene foam practically does not burn and even has a self-extinguishing property. However, during the smoldering process it releases harmful toxins.
Installation of insulation on a finished base
Before you begin installing the insulation on a ready-made base, you need to get rid of the old floor. Floorboards, parquet, laminate, tiles or any other floor covering must be completely removed, since if this is not done, then all the defects of the previous floor will smoothly migrate to the new one. After dismantling, you should carefully examine the concrete surface for unevenness, cracks or potholes.
For leveling, you can use a special self-leveling solution. Then we proceed to the actual installation of the insulation. Laying penoplex on the floor to a concrete surface is carried out using a special glue that will not corrode the insulation, then a layer of waterproofing is installed and cement is applied.
Insulating the floor of a loggia or balcony
Carrying out this installation work does not require special tools or special skills; any owner can do this work; you just need to have patience and preparation. Thermal insulation is carried out in the same manner as insulating a concrete floor with penoplex.
First, the old floor covering is removed, then the concrete screed is leveled and after that they begin to install the insulation, in this case penoplex.
It is important to remember that cement screed work is always carried out in warm weather
If your loggia or balcony is not the first from the ground and the loggias of the neighbors living below you are insulated, then you do not need to use thick penoplex. A material with a height of three centimeters is suitable, and the cement screed on the penoplex should also be three centimeters.
If the balcony area is not too large, then sheets of any hard waterproof material can be used as a cement screed.
When the balcony or loggia is completely glazed, then fiberboard sheets can be installed on the concrete floor, and then the insulation and a layer of cement screed can be installed, and then the floor covering.
Penoplex is also successfully used to insulate loggia walls, using a material of small thickness. But when your balcony is the first from the ground, then you need to think about using penoplex with a thickness of five centimeters.
Installation of insulation when installing “warm floors”
If at the same time you want to install a “warm floor”, then penoplex for a warm floor is mounted both directly into a cement screed and into a layer of insulation in which the necessary holes are cut.
After checking the operation of the electrical part of the elements or water pipes, they begin laying the cement screed; after the final hardening of the latter, they begin laying the floor covering.
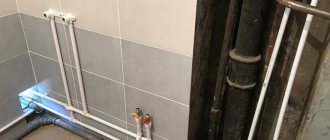
Penoplex is installed under the floor screed. The heated floor is laid on penoplex. Installing a heated floor on penoplex is not difficult. Laying penoplex for water heated floors (water heating) is no different. Place the slabs of material carefully under the warm floor.
Features of installing penoplex on a wooden base
Insulation of a wooden floor with penoplex: here the insulation sheets are laid directly on boards or sheets of plywood, fiberboard, that is, the material that is used as the so-called “subfloor”, but in this case it is important that the surface is flat and the foam sheets are joined without gaps. The insulation is nailed to the surface with special devices that will not allow them to “play” and create air pockets, which in the future will lead to peeling of the foam layer
When the entire surface of the wooden flooring is completely covered, begin installing the floorboards; they are nailed directly to the wooden joists
The insulation is nailed to the surface with special devices that will not allow them to “play” and create air pockets, which in the future will lead to peeling of the foam layer. When the entire surface of the wooden flooring is completely covered, begin installing the floorboards; they are nailed directly to the wooden joists.
This is how the floor is insulated with penoplex (penoplex) if the base is made of wood. Insulating the floor in a wooden house is not difficult.
Method 1
Initial preparation of work
First, you need to inspect the foam sheets; do not use material that has uneven surfaces, otherwise it will not perform the desired function, and the installation itself is difficult. A thirty-centimeter layer of gravel or crushed stone is placed on the ground, compacted and sand up to 10 centimeters thick is poured. This layer is also compacted and a reinforced concrete screed with a thickness of 4 centimeters is constructed. To make it easier to install the floor, expanded clay is added to the ordinary solution if the screed is planned to be thicker than 10 centimeters. Then the floors are allowed to dry for up to two weeks, after which all unevenness is removed; when cracks appear, they are widened and covered again flush with the entire surface. In the next step, waterproofing is placed, you can take polyethylene, it has a low price and is able to perform its functions under high humidity and temperature changes. If necessary, other waterproofing materials are used.
Laying penoplex
The slabs are placed close to each other, the seams are glued together with a special tape or adhesive tape for construction so that moisture from the cement does not pass through the joints. When waterproofing, such actions need not be done. On the sides of the common perimeter, you can make a border with a deformation tape so that moisture from the foundation does not get onto the floors; under load and temperature changes, the tape compresses and expands, which prevents the surface from cracking. Another layer of waterproofing material is placed on top, and then foam sheets are laid out. After laying the penoplex is completed, screed again with a solution of cement and sand; instead, you can use a special construction mixture, do it strictly according to the liner. The thickness should be from 5 centimeters, with more planning, you can add expanded clay, it will lighten the weight of the concrete. At the same time, a mesh of reinforcement is laid to ensure good strength of the material. Then the final decorative covering is placed; it can be laminate, linoleum, parquet or other materials.
What is penoplex, properties and parameters
Penoplex is the trade name for a brand of extruded polystyrene foam. Anyone who has at least once drank coffee from a coffee machine is familiar with polystyrene; it is what cups and disposable tableware are made from. Extruded polystyrene is a foamed mass, and it is formed under the influence of high pressure and temperature. To foam the mass, freon is usually used, which evaporates at the end of the process, and air takes its place in the pores.
The main properties of penoplex include zero water absorption, which is very valuable when in contact with solid wood. Other characteristics of the material will also be useful for insulation:
- Low level of vapor permeability. A layer of penoplex boards can protect wood from evaporation no worse than roofing felt.
- Low thermal conductivity coefficient. This figure is not only record low (0.03 W/m/⁰C), but also stable at high humidity levels, since the material practically does not absorb water.
- Convenient and simple installation.
- The structure of the material is homogeneous, and therefore its density is consistently high, therefore, penoplex has a minimum compression ratio under load and stable linear dimensions.
- Lack of reaction to aggressive environments. Apart from special solvents, not a single substance can have a destructive effect on the foam board. The material can be affected by acetone, toluene, diethyl ether, gasoline and diesel fuel, and oil paint. At the same time, penoplex is resistant to lime, acids, freons, paraffins, cement and concrete, alcohol-based and water-based paints.
We have given detailed characteristics of penoplex insulation boards for walls in the first table:
And in the second - the characteristics of the material for the foundation:
Main advantages of the material
The advantages of insulation include:
- Excellent sound and heat insulating qualities.
- Environmentally friendly. When exposed to temperature, Penoplex does not emit toxic substances.
- Non-hygroscopic. Does not absorb moisture and does not let it pass through.
- Due to its high thermal insulation values, it is used in rooms where it is not possible to raise the floor to a greater height. To insulate the floor, a sheet of 2 cm is enough.
- The material is accessible to many segments of the population, as it has a low cost.
Structure of "Penoplex"
Penoplex floor insulation technologies
Floor insulation with penoplex can be done over a base of sand and gravel, concrete or wooden floors. There are several main types of floors, hence the methods for insulating them:
- Insulation of floors with joists.
- Insulation under the screed.
- Insulation when laying on the ground.
Insulation of a wooden floor with joists
Then you need to fill all the cracks and recesses on the boards with wood putty. At the next stage, the wooden surface is primed and dried.
Penoplex slabs are cut according to the distance between the logs and the length of the room. They are laid on dried boards, the joints between the sheets should be as tight as possible and taped with construction tape.
Next, the insulation is covered with a vapor barrier material, the sheets of which are overlapped. Boards, sheets of plywood or chipboard are attached on top of it. The surface of the selected material must be absolutely flat. Finally, the flooring is laid (linoleum, laminate, parquet).
Wooden floor insulation layers:
- Beams.
- Wooden boards.
- Penoplex.
- Vapor barrier.
- Wooden shield.
- Flooring.
Insulating the floor under the screed
This type of penoplex is designated “Penoplex-F” and has better compression ability. It can withstand loads of up to 27 kg per 1 cm².
More detailed characteristics of this material can be read in the article “Technical characteristics and features of penoplex Foundation”.
At the initial stage of insulation, a layer of primer is applied to the concrete base. After drying, the foam sheets begin to be laid. They are glued to the base using foam, putty or special glue. The floor surface should be as smooth as possible. The joints of the sheets are taped with construction tape.
Next, lay a layer of waterproofing and fix it with reinforcing mesh. Then, at the level of the future floor, a damping tape 0.5 cm thick is glued to the wall. This compensates for the expansion of the screed when the floor temperature fluctuates.
The screed solution is applied to the mesh and leveled along the lighthouse slats. The solution consists of cement and sand in a ratio of 1 to 3 or 1 to 4, depending on the brand of cement. The final stage is laying the flooring.
Layers of insulation structure:
- Concrete slab.
- Penoplex.
- Waterproofing layer.
- Reinforcement mesh.
- Layer of concrete screed
- Flooring.
Insulation of floors with foam splash on the ground
You can also insulate floors in a house that stands on a strip or pile foundation with penoplex. This method is called “laying on the ground”.
The method can be used if certain conditions are met:
- Absence under the basement floor.
- If groundwater lies at a depth of at least 4-5 meters.
- The presence of heating in the room, otherwise freezing of the soil layer can lead to deformation of the insulation structure.
Penoplex sheets are placed on the sand. The slabs begin to be laid out from the corner, pressing one tightly against the other. To avoid the penetration of cold, it is recommended to use slabs with tongue-and-groove edges.
Next, a waterproofing film is laid on the foam sheets as a protective layer and its edges are brought up the wall.
To increase the durability of the floor on the ground, it is reinforced with metal mesh. Next, pour a screed from a mixture of sand and cement. The final stage is laying the flooring on a dried cement layer.
Layers of insulation structure:
- Priming.
- A layer of crushed stone and gravel.
- Sand "pillow".
- Penoplex.
- Waterproofing layer.
- Reinforced screed.
- Cement strainer.
- Flooring.
Method 2
You can insulate the floor with penoplex in another way:
- Gravel is placed on the ground, then crushed stone and sand on top, compacting everything one by one.
- Penoplex slabs are laid out, avoiding any gaps, and the seams are glued together with tape or special tape.
- A layer of waterproofing is spread over the material, and a deformation tape is installed on the sides of the entire perimeter.
- A screed is made on top with a mesh of reinforcement laid. The thickness should be no more than 4 centimeters.
- The filling dries for up to 30 days, then the main material for the floor is placed, you can first lay sheets of plywood.
Warm floors Teplolux
The use of penoplex slabs in buildings with heavy loads.
- It is necessary to make a solid base so that there is no uneven shrinkage at the load points. In this case, the soil should be located one meter below the planned floor surface, it is compacted and a half-meter layer of gravel is laid, you can use crushed stone or make a screed with the addition of a mesh of reinforcement.
- Sand is placed on top at a height of ten centimeters, it is leveled perfectly, for this you can use a level.
- If there is a mechanical load inside, then the penoplex is placed directly on the sand; for this, slabs with grooves are chosen, the seams are glued with special tape. The thickness of the material can be chosen as appropriate; when laying thermal insulation material, up to 5 centimeters are used, otherwise, above this figure.
- Waterproofing is spread on top, and then screed is poured, while reinforcement is used. It is not necessary to take a cement solution; you can use mixtures that level themselves, this will simplify the work.
If it is planned to use thermal insulation material when constructing floors, then it is usually laid on waterproofing.
Installation Tips
A guarantee of the effectiveness of thermal insulation is compliance with all stages and rules of installation work.
- Before installing penoplex, you need to prepare the surface on which the material will be laid. A non-uniform surface with cracks and dents must be sealed with a plaster mixture. If there is debris, loose elements and remnants of old finishing, then the interfering parts are removed.
- If traces of mold and moss are detected, the affected area is cleaned and treated with an antiseptic fungicidal mixture. To improve adhesion to the adhesive composition, treat the surface with a primer.
- Penoplex is a hard, inflexible thermoplastic that is attached to flat surfaces. Therefore, the level of evenness is measured. If the difference exceeds more than 2 cm, then leveling will be required. The technology for installing heat insulators differs slightly depending on the surface design - for the roof, walls or floor.
- Installation of thermal insulation can be carried out at any time of the year, but it is more comfortable if the temperature is above +5 degrees. To fix the slabs, special adhesives based on cement, bitumen, polyurethane or polymers are used. Facade mushroom-shaped dowels with a polymer rod are used as additional fastenings.
- Installation on walls is carried out using the horizontal method of placing slabs. Before installing the penoplex, you need to place a starting strip so that the insulation is in the same plane and the rows do not shift. The bottom row of insulation will rest on the bottom bar. The heat insulator is attached to glue in a checkerboard pattern with the grooves aligned. The adhesive composition can be applied in strips of 30 cm or in a continuous layer. Be sure to coat the connecting edges of the panels with glue.
- Next, holes are drilled to a depth of 8 cm. For one sheet of penoplex, 4-5 dowels are enough. Install dowels with rods, the caps should be in the same plane with the insulation. The last step will be decorative finishing of the facade.
- When insulating the floor, foam plastic is laid on a reinforced concrete floor slab or prepared soil and secured with glue. A waterproofing film is laid on which a thin layer of cement screed is applied. After complete drying, the final floor covering can be installed.
- To insulate the roof, penoplex can be laid on the attic floors above or below the rafters. When constructing a new roof or repairing a roof covering, a thermal insulator is installed on top of the rafter system. The joints are sealed with glue. Longitudinal and transverse slats 2-3 cm thick are attached to the insulation in increments of 0.5 m, forming a frame on which the roofing tiles are attached.
- Additional roof insulation is carried out inside the attic or attic space. A sheathing frame is mounted on the rafters, on which penoplex is placed, secured with dowels. A counter-lattice is installed on top with a gap of up to 4 cm. A layer of vapor barrier is applied, followed by cladding with finishing panels.
- When insulating foundations, you can use the technology of permanent formwork made from foam panels. To do this, assemble the formwork frame using a universal screed and reinforcement. After pouring the foundation with concrete, the insulation remains in the ground.
For an overview of the comparison of penoplex with other materials, see the following video.
Self-installation
Having understood the technology, you can insulate the floor with penoplex under the screed with your own hands. This method is suitable for both a private house and an apartment. The job does not require specific skills.
Before starting insulation, it is necessary to carry out preparatory work:
- The covering is removed from the floor and debris is completely removed.
- The surface is treated with a primer mixture.
- Once the primer has dried, you need to check the floor for unevenness. If they are found, they are filled with the starting mixture.
After preparing the surface, you can begin arranging the pillow. For a cement floor it is made in two layers. The first will consist of gravel, and the second of coarse sand. The thickness of the layers varies from 15 to 35 cm, which is influenced by the climatic conditions of the region.
You cannot pour ASG onto the ground. The sand will absorb moisture from the ground, which will subsequently spoil the properties of the insulation. Therefore, gravel and sand are poured separately from each other.
Experienced builders advise laying geotextile fabric between the layers, which will repel condensation.
The next step is to prepare the reinforcement. It is done as follows:
- Reinforced concrete slabs will require a special reinforcing mesh. It is spread over the surface.
- If the base is rough soil, you need to use metal reinforcement. Drying lasts up to ten days.
A dense polyethylene film is laid on the resulting layer for waterproofing. To ensure that it adheres well to the walls, they are treated with a primer. Then the insulation boards are laid. For the first floor, a thickness of 5 cm is recommended, for the second - 3 cm. A new layer of waterproofing is laid on top of the slabs.
Advantages of using penoplex
In terms of its performance characteristics, penoplex ranks first among similar floor insulation materials. At a fairly reasonable price per square insulation, the manufacturer provides a long warranty on its use (up to 40 years). There are several advantages:
Characteristics of penoplex
- High stability of the coating under intense mechanical loads.
- High moisture resistance.
- Heat resistance (the stove does not ignite).
- The absence of formaldehyde in the production of insulating sheets, which ensures a high environmental class of the material.
- Increased sound insulation properties.
- Laying penoplex does not require additional costs.
Combining the properties of plastic and foam, the material is produced in the form of slabs, with a length of 120 cm, with a standard width of 60 cm. Thanks to the inclusions of air cells formed during pressing of the material, the slab is light, with high surface rigidity. Depending on the assortment, it is used to cover floors (grade 35 “Foundation”), walls, ceilings (grade 31 C “Comfort”). To insulate the floor, the material is most often laid on the following bases:
- priming;
- floor coverings;
- under the system heated floor;
- concrete floor.
Features and Benefits
Thanks to its remarkable design characteristics, the insulation has the following advantages:
- Reduces energy consumption by approximately 20%. Reliably retains heat.
- Excellent strength, which in turn reduces the likelihood of technical deformations and surface destruction when using penoplex for flooring.
- High resistance to chemical influences.
- Duration of operation of insulating products.
- The environmental friendliness of the raw materials from which this insulation is made.
- Availability and reasonable price for the product. Has a middle price segment.
- Convenience during installation work. Laying penoplex on the floor can be done independently.