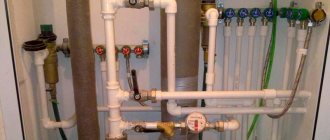
Thanks to the advantages of plastic pipelines, most owners of residential and industrial premises replace pipes in the bathroom and toilet with their own hands. You just need to know the properties of metal-plastic materials, as well as the installation features of the structure.
Most owners replace bathroom pipes with their own hands.
The need to replace the pipeline
Metal products for water and sewerage are no longer popular, and maintaining a steel system is expensive. If the threads rust, then a gas cutting machine is required to dismantle the area. A rotten water supply or sewer riser can collapse at any time, leading to unpleasant consequences.
Metal-plastic eliminates many problems and makes it easier to repair the structure. In this case, a leak can only form at the pipe joints. And it is easier to eliminate it than in metal. If installed correctly, the plastic pipeline will not only last 20-30 years, but will also not spoil the elegance of the bathroom, decorated with tiles.
In addition, metal-plastic parts are flexible. If there is no need to create an acute angle, then the plastic can be bent by hand. Installation and dismantling are much faster and easier.
The pipes themselves do not need to be painted. Plastic can be connected by threading or soldering. Unlike metal, metal-plastic is sawn quickly or easily separated with special scissors.
Approximate cost of work
It is not easy to answer the question of how much it costs to replace communications. It all depends on the wallet and intentions of the homeowner. If it is necessary to change not only the pipes themselves, but also the wiring and riser, then this pleasure will cost a tidy sum. In addition, the material may be different. So, the most expensive option would be a copper water supply, and the most budget-friendly one would be a metal-plastic one.
The quality of the first option is beyond doubt. It will last a long time, it can also be mounted in walls. But the metal-plastic pipe in the bathroom will only be on the outside, it is impossible to hide it. Products made of polypropylene, which are in the price category between copper and metal-plastic, on the contrary, must be hidden in the walls, since they are subject to deformation when heated.
The cost of the work also depends on who will carry it out. Do-it-yourself replacement is, of course, the most cost-effective way. However, before repairing, you need to thoroughly study all the ins and outs of the matter. If this is not the desire, it is better to turn to trusted specialists. Perhaps someone you know has already changed the pipes in the bathroom and can suggest trusted professionals.
Solving organizational issues
It is necessary to provide a pipe laying diagram and make the necessary measurements. You need to draw up a project on paper, it is advisable to write down all the data, and decide on a water supply layout.
To lay pipes, you need to take measurements.
It is necessary to count the number of shut-off valves, lintels, tees, and holding anchors. Then you need to decide on the material of the products, the method of their installation (threaded or soldered).
When replacing a sewer system, special attention is paid to the riser in an apartment building. Here it is necessary to warn neighbors from above not to use the toilet during this period.
This does not need to be done in a private home, but access to the sewer line in the house requires digging a trench to replace the drain.
Preparatory stage
Changing the pipes yourself is a completely doable task, but it requires some skills.
First, you need to draw a marking on a piece of paper, which will indicate all the plumbing and appliances that require water supply. If pipes from the bathroom go to the kitchen, it makes sense to replace the material in two rooms at once.
In addition, you must:
- Draw a wiring diagram;
- Calculate the required amount of material and fittings;
- Prepare the necessary tools for work.
After soldering the pipes, there is not a lot of debris left.
Shutting off the water along the riser is a mandatory procedure before performing the main work. It drains from all heating appliances, including the boiler, heated towel rail, and radiator.
Types of pipes
To change the pipeline, you need to navigate the materials that the construction market offers. The features of the products are taken into account, since the latter have various advantages and disadvantages.
Metal
Metal pipes are reliable and durable. However, they are quite difficult to maintain. Threaded connections require sealing, over time they rust, and a gas cutter is required to dismantle the device.
Metal pipes are the most reliable.
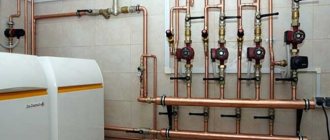
Metal-plastic structures
Metal-plastic combines the positive qualities of metal and plastic. These pipes have high anti-corrosion properties. They are flexible and durable.
The inner layer consists of polyethylene, which is the supporting structure. A layer of aluminum foil is attached to it. The outer shell consists of polyethylene, which has a great protective and decorative function.
Metal-plastic structures have high anti-corrosion properties.
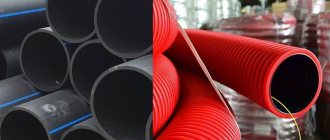
Plastic and polypropylene
Plastic and polypropylene are lightweight, heat-resistant and flexible materials. The latter is a more environmentally friendly option, since the former contains many toxic substances. PVC pipes are mounted with plastic fittings. Polypropylene are connected by soldering.
Plastic pipes are very light.
Ceramic pipes
Such products are mainly used for arranging sewers, drainage systems or chimneys. They are resistant to chemicals, moisture, and high temperatures. Such products are practically not used for arranging home plumbing.
Ceramic pipes are used for sewerage installations.
Pros and cons of different materials
The main advantage of previously used cast iron pipes is their high mechanical strength. Despite a certain fragility (cast iron can be broken with a hammer), cast iron pipes are able to withstand significant loads, which gives them an advantage over pipes made of any polymer materials. Therefore, today, in especially critical areas and when laying street pipes under driveways, cast iron pipes are used.
Cast iron, due to its high percentage of carbon content, does not corrode, that is, in other words, cast iron does not rust, despite the fact that it is an ordinary ferrous metal. The absence of corrosion significantly extends the service life of cast iron pipelines.
The disadvantages include the energy consumption of manufacturing, the lack of smoothness of the internal walls in comparison with plastic pipes, as well as heavy weight, which makes transportation difficult. The advantages of plastic materials include:
- high manufacturability;
- ease of making plastic fittings industrially;
- light weight for easy transportation;
- very long service life;
- chemical inertness to wastewater;
- plastic;
- ease of installation.
In addition, polypropylene pipes are also distinguished by their ability to transport liquid at high temperatures without deforming under thermal influence. Plastic pipes are easily cut with any hacksaw; even a six-meter pipe can be lifted by one person, and its service life meets the requirements of the most stringent modern standards and regulations for internal sewerage systems. You can watch a video about the material of sewer pipes below:
Pipe laying systems
There are several ways to organize a pipeline:
- Centralized system. The connection is made directly to the main line. The tie-in requires an application to the local water authority and obtaining a work permit.
- Decentralized system. The connection is made into an autonomous source of water resources. It can be a well, a well, a reservoir, or a container with imported liquid.
To organize the pipeline, a centralized water supply system is used.
The internal water supply system is divided into 2 types:
- Gravity flow. Water is supplied to a tank installed on the top of the building. Next, according to the laws of physics, the liquid flows into the water supply system.
- Water pump. The internal network is filled using a pump.
Indoor water supply wiring diagrams:
- Consistent. A pipe runs from the riser, then branches are separated into different rooms and devices. Advantages: low cost due to the small amount of material consumed.
- Parallel. Provides separate branches for each device - toilet, sink, washing machine, sink, etc. Each is equipped with a shut-off valve. The advantage is that you can block 1 branch during repairs, and the rest will function. The disadvantage is the high cost due to the large amount of material used.
Depending on the installation method:
- Open gasket. The pipes are being installed outside the wall. The method makes it easy to maintain the system. However, the elegance of the bathroom is lost.
- Closed gasket. Installation is supposed to be inside the wall, and the handles of taps and valves are placed outside. The advantage is that all the pipes are placed in the wall, which makes the bathroom more beautiful. The disadvantage is that it is difficult to maintain due to poor access to the pipeline.
Procedure for dismantling communications
To perform dismantling, a precise algorithm of actions is required. Only by following consistency can the work be completed efficiently.
Water supply shutdown
First you need to turn off the water in the room. If the riser needs to be replaced, then that too.
Cutting and removing pipes
You need to disconnect all network devices - taps, cistern, bathtub, toilet, heating boiler. It will be necessary to disassemble the old communications into separate parts.
To dismantle, you need to disassemble the old communications.
Sewer pipes of large diameters are sealed in adjustable cups. You won’t be able to remove them with a simple tool; you’ll have to cut them with a grinder.
However, more often such parts are already rotten from the inside. Therefore, just hit them with a hammer and the pipe will break off.
Replacing shut-off valves and drain system
Replacing the pipeline involves shutting off the water supply. If you turn off the entire riser, then there will be no water in all apartments of the entrance connected to it.
The shut-off valve that shuts off the water in the room should be changed immediately after dismantling the old system. To do this, you must first close the riser. After installing the valve in the room, you need to turn it off and supply water.
Removing dowels and laying grooves
Before installation, you need to remove the dowels from the wall, which served as holders for the old components. If the gasket is of a closed type, then it will be necessary to lay grooves. Moreover, it does not matter what type of water supply scheme is parallel or sequential. It is necessary to provide access to the shut-off valve so that the water can be turned off.
Before installation, you will have to lay grooves.
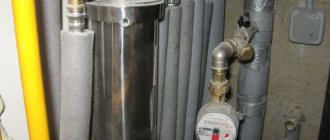
How to replace the coil?
Even a beginner can do this. To replace a worn-out water heater, you need to follow a number of steps:
- Shut off the water - turn off the valves on the stopcocks of the risers or use the manifold to turn off the coil.
Shut off water - Using an adjustable wrench, disconnect the union nuts securing the product to the system and carefully remove the coil.
Unscrewing the heated towel rail - Install the new product in the same place using adapters (if necessary). Seal the threads with fulente or flax.
- Gradually increase the pressure to the nominal pressure and check for leaks.
Tip: it is recommended to purchase products with a minimum of welds. They are considered more durable.
Installation of a new pipeline
The choice of the type of pipeline installation is made exclusively by the homeowner himself.
Selection of pipe laying system
Each type of wiring has different features, advantages and disadvantages, but does not in any way determine the type of room. You can choose any layout scheme.
Necessary tools and consumables
When solving the problem of how to replace pipes with your own hands, prepare the following tool:
- hacksaw for metal;
- special scissors for metal-plastic products;
- open-end wrenches, gas, adjustable;
- a hammer drill or drill for drilling holes for anchor holders;
- sealant - tow, fum tape, plumbing flax, sealant (paste or glue);
- silicone gaskets;
- special soldering iron for soldering pipes;
- marker;
- tape measure for measurements.
To replace pipes, you need a hacksaw.
There are 3 types of consumables: straight, angled and tees. They may have the same or different type of thread - external or internal. The first one is needed for installing valves. The second is for connecting parts together.
Pipe installation instructions
To install the pipeline correctly, you need to follow simple rules and carry out the work consistently. It is easy to connect pipes, but it is difficult to ensure that there are no leaks at the joints.
It is recommended to perform installation according to the following algorithm:
- Markers are placed on the walls, which are the approximate locations for placing faucets and other water sources.
- Pieces of products are measured with a tape measure. Then the material is cut with scissors or sawed with a hacksaw.
- Depending on the type of wiring, soldering or connection with fittings is carried out.
- There is a connection to the consumer system - cistern, toilet, bathtub, sink, etc.
- The reliability of connections and sealing of the structure is checked by supplying water to it.
- The pipeline is attached to the walls using anchor holders.
- An additional check is carried out, because During installation, parts are subjected to physical stress.
Pipeline pressure testing
Air pressure testing means supplying it to a closed water supply system. It is carried out with the aim of applying pressure several times higher than natural during operation. If the system passes this test, then it is considered suitable for further use. The procedure allows you to identify areas that may soon develop leaks and eliminate holes or cracks.
Pressure testing of the pipeline is carried out in order to supply high pressure.
To do this, use a special pump or a circulation pump, which is part of the autonomous heating system. Pressure testing is carried out with both air and water. More often - the first, since liquid can get outside the system.
The procedure must be performed by a certified employee. Completion of pressure testing by a specialist is accompanied by the preparation and signing of a water supply testing report.
Crimping is necessary in the following cases:
- at enterprises where a complex water supply system is installed;
- before first commissioning;
- after repairing the system or replacing its part;
- after idle time without use.
Also, crimping is part of a routine inspection of some pipelines and sewers consisting of polymer parts. It is also carried out after flushing the system if aggressive chemicals were used. They can weaken the walls of plastic products and cause leaks at the joints.
Cleaning with chemicals also poses the risk of leaks. Therefore, pressure testing should be carried out as planned for sewage drains.
System health check
Functional testing without pressure testing is carried out from the riser to the end of the system. In this case, you should pay attention to checking:
- Joints on pipelines and sewers.
- Tightness when supplying hot water.
- Correct and reliable installation of plumbing fixtures - sinks, toilets, hoses, metering devices.
- Pressure in the system - whether it became clogged during installation.
The system's functionality is checked from the riser to the end of the system.
At first, it is recommended to keep the taps closed to determine the tightness at the joints, and then open them one by one.
It is worth making sure that the sewerage and pipeline are designed in accordance with the project. Each element of the system must be in the place indicated in the plan.
Installed devices must be cleaned of debris. There should be no deflections or subsidence in the places where metering equipment is installed or in the spans between joints.
It is better to use pressure testing with water, since the high pressure liquid will wash away the remaining construction debris in the system. This is especially true for high vertical areas. If you find a leak or weak seal, fix the problem and recheck.
Sewer design
At the initial stage of creating a sewer system, marking work is carried out. A diagram of the location of all the plumbing that is connected to the sewer is drawn on paper. The location of the pipes is determined and the need for material is calculated.
When performing measurements and calculations, the following features must be taken into account:
- The pipes are connected using tees with different outlets or funnel-shaped adapters.
- Laying pipes under the bathroom will be especially difficult. In order not to waste time removing the bathtub, the pipes are connected from several elements.
- If you plan to simultaneously connect a sink and a bathtub, then the sewer wiring is performed using a tee. The third outlet can be tilted 45º or 90º from the axis of the pipes.
- To connect the siphon to the sewer pipe, a branch pipe with a rotation angle of 90º is used.
If the installation of some kind of plumbing that requires drainage is planned in the future, then a drain for it must be created. It is easier to close the pipe with a temporary plug (although this is not attractive) than to re-install the sewer system.
Errors when replacing a pipeline
During the renovation process, errors in plumbing installation occur frequently. Especially when a person does the job for the first time.
The most common mistakes:
- Choice of material. No need to save. Low quality material does not meet standards. Even if the system does not leak, its service life will be reduced.
- Lack of access to pipes. Closed wiring is beautiful and elegant. But few people plan to have access to pipes before problems arise. It doesn’t matter whether the pipes are hidden under plasterboard or cement, you will have to either dismantle the sheets or break the brick wall. It is better to close the pipes, but leave as much access to them as possible, especially to the joints, meter and inlet valve. You can even leave the hole open, but block it with a decorative cabinet, water tank, washing machine, etc.
- The riser has not been replaced. The sewer or water supply accessory is made of steel. It is located inside the wall and is constantly in contact with water. This often leads to his breakthrough. Therefore, you can replace the old pipe with a plastic one in your apartment without touching your neighbors’ riser.
Choosing low-quality materials is a common mistake when replacing a pipeline.
The tightness of the system should be carefully checked, since pipes can leak even at night. And this will lead to flooding of neighbors, who will then demand compensation for repairs after the flood. Inspection is the most important point when replacing a pipeline. Therefore, it is necessary to be guided by reliable sources of information and not install sewer systems, learning from mistakes. It's better to take the time and prepare in advance. This will save you from mistakes.
Advice from professionals
Let's take a break from the step-by-step instructions for a moment and focus on one extremely important point that should be thought through in advance - we are talking about masking pipes. There are several methods of disguise, so we will choose the most suitable one:
- under the bathtub, washbasin;
- in special boxes that are made to hide pipes, as well as to facilitate access to them;
- behind the toilet (or bidet);
- for a special faience element.
A few other recommendations from experts
- It is advisable to place as few pipes under the floor as possible.
- It is not recommended to bend the lines (if this is impossible, then use special adapters at the corners).
- It is better to groove walls only if absolutely necessary.