- home
- Construction and renovation
- Plumbing
>
>
⬎
With this publication we are opening a series of articles on “piping in the bathroom”, where the issue of installing rough plumbing in the bathroom and toilet will be addressed. The first stage is the design and installation of the sewer system.
Why sewer? Yes, because all subsequent wiring depends on it. If water supply pipes are usually not difficult to extend to any point in the bathroom, then with sewer pipes it is a little more difficult. The presence or absence of boxes depends on the drain pipes; due to the need to maintain a slope towards the riser, you need to take into account all the little things, including the height and location of the bathtub. In other words, the entire layout of rough plumbing directly depends on the sewer pipes.
Important preparatory stage
Pipes in the bathroom are usually changed in two cases:
- if communications are out of order, clogged or leaking;
- when a significant remodeling of the bathroom is performed.
Sometimes a breakdown becomes a good reason to make a major overhaul and completely transform the look of your bathroom. In any case, high-quality preparatory work should be carried out. First, you should draw up a plan for the new environment, think about the location of plumbing and furniture.
Based on this plan, another plan is developed, which reflects the layout of new pipes.
A common mistake during bathroom renovations is the lack of easy access to the pipes. Small holes can be hidden behind neat doors with beautiful decor. Such openings are needed to provide free access to shut-off valves, meters, and connection points where leaks are most likely to occur.
In addition, you should consider the location of metering devices so that readings can be taken from them freely.
Sometimes, in an effort to improve the aesthetics of their bathroom, home owners install counters too low or high. Another problem is related to the fact that access to metering devices is blocked by plumbing fixtures or furniture. Needless to say, you should not place counters under the bathtub.
By the way, you cannot install meters below the level of the toilet, in which case they may not be registered.
Access to water and sewer pipes in the bathroom can be provided using a hinged door decorated with ceramic tiles
A bathroom hidden behind a decorative screen looks very attractive, but you need to provide access to the communications hidden underneath. If the screen consists of decorative panels, one of them can be turned into a neat hinged door.
If ceramic tiles are used to decorate the bathtub, one of the elements can easily be converted into a hatch, which is attached above the hole with magnets.
It looks impressive, but this solution is not always practical. Sometimes such tiles fall off at the slightest touch; over time, they may simply crack. If there is a possibility of such an outcome, it is better to install the door on hinges. It can also be decorated with tiles, but this is a rather labor-intensive installation option.
It is easier and more convenient to use decorative plastic doors for technical hatches.
The lack of a clear plan for carrying out repair work is a common mistake when replacing water and sewer pipes. Sometimes the owners of a house or apartment connect the plumbing before all the preliminary work has been completed. This can lead to accidents or negatively affect the quality of repairs.
You can agree with your neighbors to use their bathroom during the renovation, purchase or rent a compact dry closet, install an outdoor shower on your property, etc. Inconveniences can become an additional incentive to reduce repair time.
Before starting work, you should draw up a plan for the placement of plumbing fixtures and furniture, a pipe routing diagram and think through the procedure for performing pipe replacement operations
You should also not try to carry out complex stages of work yourself in order to save money if you do not have the necessary experience.
It is better to contact a professional master for advice or completely entrust the implementation of some stages to specialists. Remodeling will cost significantly more.
What are the dangers of incorrect installation and connection?
The bathroom smells like sewage - why is this happening? Residents of apartments in which the bathtub or washbasin has recently been replaced often turn to plumbers with this question. And the answer is simple - errors when installing the siphon.
If the bathroom stinks, it only means one thing:
- Either the hydraulic valve does not cope with its duties;
- Or there is a leaky connection between the siphon and the receiving tee, through which sewer odors penetrate into the room.
According to experienced plumbers, the bathroom often stinks due to the reduced radius of the drain pipe made from the corrugated hose from which the siphon is formed.
For reference: The volume of water contained in it is not enough to withstand the atmospheric pressure of the public sewer system. And it “presses through” the water plug, and unpleasant odors penetrate the room.
Types of connection
There are several types of toilet designs:
- With direct vertical drain. Here the drain hole is located at the bottom of the toilet;
- With straight horizontal type. A very common type of connection in which the drain is located on the rear side surface of the plumbing fixture;
- With oblique drain hole. This type of toilet is used if it is not possible to use any of the others described above. Most often it is installed in rooms where the sewer drain hole is located at the bottom of the wall.
To connect each of the described devices, various adapters are used, also called couplings or cuffs.
Cuffs are:
- Eccentric or with offset pipe. In them, the hole for connecting the toilet outlet and the sewer pipe inlet are not aligned with each other. The angle is selected based on the parameters for connecting the taps (30 degrees is considered standard);
- Direct. The holes of these adapters are completely aligned. To maintain a certain angle, such cuffs are made of hard plastic. Their size is often small, and such couplings are used to connect horizontal branches;
- Flexible. These are elastic corrugated couplings that can change their position. They are universal because they can be used to connect any type of toilet.
When choosing a specific type of adapter, it is important to pay attention to the following features. Thread – can be internal, external, left and right
At the connection points it should be the same, but if the sewer pipe has an internal thread, then the adapter, accordingly, must be external.
The length of the connected cuff is very important. With flexible adapters, this problem is not terrible, but if a rigid adapter is used in the work, then its length must strictly correspond to the distance between the toilet and the sewer hole. Otherwise, the conductor simply will not work.
Flexible connection for drain tank
A liner is used to connect the toilet and water supply. It is selected based on the design of the tank of the plumbing fixture. It can be bottom (silent) and side (more common). Among the materials, preference should be given to metal flexible tubes - they are affordable and quite durable.
Rigid liner for the tank
Connecting the bath to the sewer
To connect the bathtub to the pipes, it is better to use a siphon with an overflow. Its installation requires compliance with two requirements:
- Creating an optimal difference in height between the outlet and drain pipe. The specific size of the drop depends on the height of the siphon outlet.
- Providing access to the siphon, which is necessary for periodic cleaning of the drainage unit.
As for the pipe that will connect the bathtub to the sewer, the best option is hard plastic products. They should have two elbows that will ensure optimal rotation of the elements. If it is not possible to connect the drainage units using rigid pipes, then corrugated pipes are used. When joining pipes of different diameters, adapters are used.
Connecting a bathtub to the sewer consists of the following sequential steps:
- all rubber gaskets are put in place;
- the siphon is assembled and the overflow pipe is connected to the bathtub;
- fastening elements are screwed in;
- using a pipe and a pipe, the siphon is connected to the drain hole;
- The joints are sealed where the bathtub comes into contact with the wall.
All plastic elements are connected without the use of open-end or gas wrenches. The work is done manually. Otherwise, there is a risk of damage to the plastic thread.
After completion of installation work, preliminary testing of the sewer system is carried out. It is necessary to turn on all plumbing fixtures and stock up on 2-3 buckets of water. When the plumbing begins to drain waste water into the system, buckets of water are poured into the sink, bathtub and toilet. If there are leaks, you will have to redo the fastening of the sewerage elements in such places.
Dead-end and closed circuit: pros and cons
The sequential and collector-beam circuits discussed above belong to the so-called blind (dead-end) methods of water supply wiring. In them, each water supply branch ends at a discharge point (dead end). This network configuration is good in terms of saving materials and space, but it loses in comfort when it comes to hot water supply. The water in the main will constantly cool down, so before you can take advantage of all the benefits of the hot water supply, you will have to pour several liters of liquid down the drain each time. It would seem that not such a big expense over the year will result in several wasted cubic meters. In addition, delaying the supply of water at the appropriate temperature wastes time and causes discomfort.
A water supply system with constant circulation of hot liquid will save several cubic meters of water per year
A way out of this situation can be found in the installation of closed-type wiring. A characteristic feature of this scheme is the constant circulation of hot water in a circle. Since it has a constant temperature at each point in the main, the consumer will receive hot water as soon as the valve is opened
The obvious advantage of this method is complemented by another advantage - the absence of sudden temperature changes, which is important specifically for hot water supply systems. It has a closed circulation circuit and disadvantages. A more intricate design complicates installation and requires additional costs of materials and equipment
So, when arranging it, you will need almost twice as many pipes, and in addition, you will have to install a separate circulation pump, which will ensure forced movement of liquid through the system
A more intricate design complicates installation and requires additional costs of materials and equipment. So, when arranging it, you will need almost twice as many pipes, and in addition, you will have to install a separate circulation pump, which will ensure forced movement of liquid through the system.
Bathroom plumbing installation
Materials and tools
Reinforced polypropylene pipe
To supply cold water from the main to the bathrooms, boiler or boiler, the instructions allow the use of a polypropylene (eco-plastic) pipe with a monolithic wall, and if we talk about domestic use (private house or apartment), then a material with an outer section of 20 mm is used. However, most craftsmen in this case are inclined to use reinforced eco-plastic, which is intended for hot water supply.
PP solder fittings and taps
The pipes are reinforced with fiberglass or aluminum foil - this layer is placed in the middle, as shown in the schematic diagram above. This measure prevents deformation of the material when heated, therefore, similar products are also used for heating. Despite the fact that the price of reinforced pipes is higher, they are used for cold water supply for the purpose of reinsurance - in most cases, the system is made of a hidden type, covering it with plaster, putty, drywall, and so on.
Soldering iron for PP pipes with a set of nozzles
To weld PP, a special soldering iron is used, complete with nozzles of different diameters. The quality of this tool is determined by the presence of a temperature regulator, as well as whether the tips are Teflon coated (this directly affects how much the soldering iron costs). The fact is that polypropylene does not burn on Teflon, therefore, during operation there is no sticking of material and soot.
PVC for sewerage – pipes, brackets, fittings
In addition, the pipe layout in the bathroom and toilet also includes sewerage, for which products with a diameter of 10 mm are used. 50 mm, 32 mm, as well as connecting, rotating and decoupling fittings for them. Currently, both at the domestic and industrial levels, polyvinyl chloride is used for manufacturing, although steel, cast iron and bronze are still found. However, PVC is much cheaper and lighter, and for low-pressure pipes it is perhaps the most cost-effective and practical.
Sewage installation
Approximate sewerage installation diagram
As we have already said, installing pipes in the bathroom with your own hands also affects the toilet and the kitchen, because the drain will occur from the kitchen through the bathtub and end in the toilet riser, regardless of whether you have a joint unit or a separate one.
Let's start with the toilet - if you left the old cast-iron riser there, then you will still install a tee there with one 100 mm outlet for the toilet and a 50 mm outlet for all other bathrooms. To install a plastic fitting into a cast iron socket, a rubber reduction is used, which serves both as an adapter and a seal.
A 50-mm outlet is made towards the kitchen and passes through the bathroom, and tees are cut along its length to drain from the sink, bathtub and kitchen sink.
An automatic washing machine can be connected to a special siphon, which you can use under the bathtub, sink or sink, but you can also make a branch - a reduction for a 32 mm pipe is inserted into the socket of a 50 mm tee, which you lay in the desired direction.
Installation of water supply
Laying water pipes in grooves
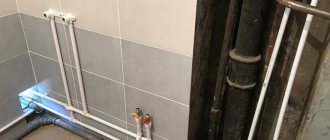
Now let's see how to properly install pipes in the bathroom, toilet and kitchen with external and internal installation. You can make grooves under the polypropylene and hide it in them, as shown in the top photo (after this the water supply is sealed with a solution), but you can also put it on top, fixing it in metal brackets or plastic clips.
When marking, try to ensure that all threaded fittings for connecting to taps are in the most advantageous position and are firmly fixed.
Soldering work
We are looking at how to install pipes in a bathroom, and now we will pay attention to the soldering work with which polypropylene is joined through fittings of different configurations. A pipe is applied to the nozzle of a soldering iron, heated to 280-290⁰C, on one side, and a fitting on the other and held there for 5-6 seconds (make sure that the pipe is not immersed in the nozzle deeper than 15-20 mm), then simultaneously removed and dock
After docking, it is also advisable to hold them for 5-6 seconds so that they turn into a homogeneous mass.
A pipe is applied to the nozzle of a soldering iron, heated to 280-290⁰C, on one side, and a fitting on the other and held there for 5-6 seconds (make sure that the pipe does not sink deeper than 15-20 mm into the nozzle), then simultaneously removed and dock. After docking, it is also advisable to hold them for 5-6 seconds so that they turn into a homogeneous mass.
Design and installation
The whole point of the design part of a drainage system for a bathroom, be it a private house or a city apartment, lies in the exact observance of dimensions. An important parameter is the location of sanitary and technical devices. As a rule, you have to find a compromise between the desire to place everything as compactly as possible and ease of use.
An experienced specialist will install the water drainage line with an inclination towards the riser, and be sure to use high-quality fittings with tight sealing collars.
Errors when replacing drain pipes
Almost always, old metal pipes are replaced with new plastic structures. They are more convenient to work with, they are lighter in weight, easier to install and cheaper.
The most common mistake made is related to calculations. Experienced craftsmen recommend taking pipes with a small margin in length, so that during the repair process you do not have to throw everything away and run to a plumbing store.
It is better to take pipes, fittings and other related elements not only from the same material, but also from the same company. Minor differences in the composition of the plastic affect the heating of parts of the structure. When connecting PVC elements with the same composition, a more durable connection can be achieved.
Sewer pipes are usually hidden from view, but this does not mean that their installation can be inattentive. When installing a sewer system, you should adhere to a number of rules:
- The diameter of the existing sewer drain and the new pipe must match.
- You should not make a sewer system from available sections of PVC pipes, especially if they are of different diameters or made of different material compositions.
- Narrowing of sewer pipes in any area should be avoided to reduce the likelihood of blockages.
- The number of elbows, turns, corners and other similar elements should be kept to a minimum.
- The slope required by the technology must be ensured.
If you plan to lower the floor level in a bathroom or toilet, you must take into account that the angle of inclination of the drain pipe may change significantly. To properly install plumbing and comply with existing standards, the toilet and bathtub are placed on a small pedestal.
Then the floor can be made a little lower, and the operation of the sewer system will remain correct.
When replacing sewer pipes, it is important to maintain the correct slope, otherwise you will face frequent blockages and the likelihood of breakdowns will increase.
When replacing sewer system pipes in a bathroom, the procedure for caulking the tee socket on the house riser requires special attention. Cast iron structures rust over time and become significantly dirty; pipes “stick” at the joints.
When dismantling old structures, you should never damage the tee, so remove old pipes with extreme caution. If the tee is damaged, you will have to disassemble the entire riser and replace part of it completely
The caulking of the sewer riser tee should be carried out very carefully. If it is damaged, you will have to replace the riser completely or a significant part of it. Inexperienced craftsmen are advised to seek help from professional plumbers to complete this stage of work.
After dismantling the old sewer lines, the tee should be thoroughly cleaned of various types of contaminants
Inexperienced craftsmen are advised to seek the help of professional plumbers to complete this stage of work. After dismantling the old sewer lines, the tee should be thoroughly cleaned of various types of contaminants.
These may be remnants of sealing materials, pieces of old cement mortar, etc. A rubber cuff is usually used as an adapter between the sewer riser and plastic pipes. If the joint is not properly cleaned, the sealing of the joint will be insufficient and the likelihood of leaks will increase.
When replacing sewer pipes, it is logical to choose plastic. However, it should be noted that plastic structures transmit noise much better than metal. To prevent this problem, it is recommended to plan additional sound insulation for sewer pipes.
If the sewer riser in your house requires replacement, it makes sense to negotiate with your neighbors about repairs. It is extremely unpleasant when a sudden leak spoils the results of a fresh finish in the bathroom.
Connecting the bathtub to the sewer yourself
Many of us believe that the most difficult process is installing a purchased bathtub. But in fact, the main difficulties are caused by connecting the bathtub to the sewer, since the safety of the room from leaks depends on the quality of the work.
Indeed, a dripping faucet will not cause as much harm as a leaking siphon under the bathtub or a fistula on the sewer riser. And the situation that causes particular trouble for residents is when the bathroom smells like sewage. Let's deal with these and other problems together.
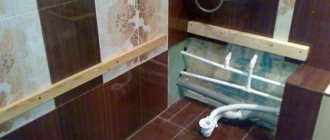
Frame for a plasterboard box
The bathroom is a room in which there is constantly high air humidity. This means that the drywall for creating the box should be selected as moisture-resistant. As a rule, it is available for sale in the format of green sheets. Drywall itself has many advantages as a reliable and environmentally friendly finishing material:
- easy to cut;
- forms an aesthetically attractive and durable surface;
- allows you to create a reliable and safe false wall or partition;
- goes well with plaster or ceramic tiles.
What will you need?
- profiles;
- moisture-resistant drywall;
- silicone sealant;
- screws;
- dowels;
- knife;
- hammer drill
What is the secret to successfully installing a plasterboard masking box in the bathroom? Strictly following the detailed installation diagram presented below will help you quickly and efficiently hide pipes in the bathroom without installing them into the wall:
- think in advance about how the box will look, make sketches on paper, give your notes the appearance of a clear and well-thought-out diagram;
- take the necessary measurements to find out how much material you will need;
- calculations are made to determine the required amount of materials;
- in the places where the pipes come into contact with the wall, use a hammer drill and dowels with screws to secure the guide profiles - this way you will establish the boundaries of the frame of your future structure;
- attach the same profiles to the floor and ceiling - for perfect fixation of the upper and lower parts of the box;
- install the corner outer profile and secure it with stiffening ribs for stability, they can be made from the same guide profiles, connecting the corner profile with the resulting fragments to what is fixed on the wall;
- cover the frame with plasterboard, cutting out the necessary fragments with a knife and inserting them between the profiles;
- After covering, treat all joints with sealant;
- All that remains is to finish the surface of the box - paint, plaster, cover with ceramic tiles.
If your bathroom walls are covered with tiles, then you can finish the box in the same way. This way the resulting design will look organically in the bathroom interior and will not visually take up a lot of space. By the way, plasterboard sheets in the bathroom can be successfully replaced with plastic panels. True, the strength of the material speaks in favor of the former. Plastic, for all its advantages, is still a much more fragile material.
Consistent implementation of all installation steps will lead you to a good result
.For better clarity, here are several videos from professionals.
And a small selection of photos with drywall boxes in the bathroom.
(marked GKLV). Most often, such sheets are green, but some manufacturers produce it in other colors.
1. Plasterboard sheets, cut to size, are attached to the frame with self-tapping screws in increments of 30 cm. So that they do not interfere with further gluing of the tiles, they are recessed into the plasterboard a couple of millimeters.
Drywall is attached to the profile using self-tapping screws
Advice. In order to detect a leak in time, you should not mount the box close to the floor. You should step back from it at least a few millimeters. You should also leave a small space at the top of the box to remove condensate that accumulates on the pipes.
2. The door for the inspection hatch is made as follows. First, a frame made of aluminum profiles or wooden blocks is attached around its perimeter. The door frame is also made from profiles and hung on the frame using small hinges. Then the door is covered with plasterboard (later you can stick tiles on it). To prevent it from being too conspicuous, the inspection hatch can be installed on the side of the box.
A ready-made inspection hatch can also be purchased at a hardware store.
3. If the hatch will not be used often, the seams between the joints can be sealed with putty - this way they will be less noticeable.
4. You can also cover the sewer riser with plasterboard. To prevent the sound of flowing water from disturbing residents, you can fill it with soundproofing material.
5. The box covering the sewer riser can also be designed in the form of a cabinet with shelves. In this case, it will be possible to store supplies of powder, soap, etc.
6. When installing the box under the ceiling, you can install lamps inside it. To do this, holes for wiring are pre-cut in the drywall.
Important! Before gluing the tiles, the drywall is coated with a primer. It will help ensure reliable adhesion of the tiles to the surface. https://www.youtube.com/embed/UA6tld9tIuY
Plasterboard box in the bathroom
Piping to heated towel rail
The supply pipes can be extended to the heated towel rail from the heating riser or from the hot water supply line. It is worth considering that when operating from a central heating system, the radiator will function only during the heating season. Also, inserting taps into the heating system will require temporarily shutting off the supply to the riser, which housing and communal services representatives do for a fee. In winter, such work is not carried out at all due to the risk of freezing the pipe.
Therefore, it would be more rational to connect from a hot pipeline. At the same time, for convenience and saving hot water, we recommend installing a bypass jumper between the main line and the heated towel rail. It connects the forward and return pipes, and ball valves before and after the coil will allow you to cut off the heated towel rail in case it is replaced or to preserve heat.
When laying supply pipes, you need to accurately maintain 2 dimensions: the center-to-center distance of the pipes for connecting the radiator and the minimum distance from the bathroom wall. For radiators with pipe diameters up to 23 mm, it is 35 mm, for pipes with a diameter over 25 mm – 50 mm. In general, to connect a heated towel rail you will need 2-3 taps for the bypass jumper, 2 tees for the main pipe and outlets from it, 2 tees for the bypass and 2 adapter couplings for connecting the coil.
Recommended pipe diameters for sewage drainage
| Device | Diameter |
| Wash basin | From 40 mm |
| shower drain | 50-75 mm (depending on throughput) |
| Bath and shower | From 50 mm |
| Washing machine | Separate drain route - from 32 mm (open siphon), 40 mm (hidden siphon) |
| Toilet | 110 mm. |
An air valve is installed at the top point of the vertical riser, or a drain pipe is installed - after this, the sewerage installation in the bathroom is considered complete.
Metal-plastic pipes
Laying pipes made of metal-plastic, as mentioned above, is the most suitable option for people who want to do all the work themselves. Metal-plastic parts consist of 3 layers: outer polymer, middle metal (usually an aluminum layer) and inner polymer.
Metal-plastic pipes, rolled into small coils, are very convenient for transportation and storage, which cannot be said about steel products
Metal-plastic communications are installed in two ways:
- Using threaded connectors that include sealing gaskets. The seal is necessary to achieve the required tightness in the system.
- Using compression fittings.
Products made of metal-plastic have resistance to the destructive effects of corrosion, and due to their smooth internal walls they are characterized by high throughput. And thanks to the smooth walls, such products do not accumulate salt deposits inside themselves, which can, over time, lead to a narrowing of the lumen of the pipe and its complete blockage.
How to lay out metal-plastic pipes with your own hands? To lay out metal-plastic pipes with your own hands, you need a pipe cutter, pressing pliers and reamers. It is strictly not recommended to carry out hidden wiring of metal-plastic water supply in the walls. This is due to the fact that sealing elements lose their useful properties over time and connecting units may leak, so it is necessary to provide quick access to the pipeline for repair work.
Layout of pipes in the bathroom
Technical diagram of the water supply wiring in the bathroom
After you have decided on the amount of equipment and the location of their approximate installation, before making the wiring in the bathroom, you need to purchase all this equipment, study their connection instructions in detail and write down the overall dimensions. Next, make notes in the bathroom and roughly indicate the locations of these items for clarity.
At the next stage, a diagram of the pipe layout in the bathroom is created on a regular sheet of paper. When creating a preliminary plan, in order to avoid various mistakes and not complicate the installation process, it is recommended to use special wiring rules. These rules recommend:
- piping in the bathroom (if possible) should have as few intersecting lines as possible;
- in the case of open installation, try to lay the water supply system together with the sewerage pipes as close as possible, this will reduce the volume of the concealing box;
- when drawing up a plan, the wiring in the bathroom should provide easy access to all connections with installed flexible hoses;
- try to lay the main pipes on the floor, and direct the outlet lines to consumers vertically upward, avoiding oblique lines.
If you do all the work yourself, then try to make sure that the installation of plumbing in the bathroom is as simple as possible and with a minimum number of connections.
Visual wiring diagram
Once the diagram has been drawn up and all consumer installation locations have been determined, you can begin making grooves in the walls and laying water mains. Water distribution in the bathroom using PVC pipes can be carried out in both directions, from the end consumer to the riser or from the main riser to the consumer. For a high-quality connection, we will need a special soldering iron for hot pressing; if we do not install pipes in the bathroom on a commercial basis, then it is not at all necessary to buy such a tool, you can simply rent it.
https://youtube.com/watch?v=8jOI8k-KkUk
Below is a photo of a modern and expensive and reliable method of installing plumbing with REHAU Stabil (Pink) and copper pipes, using a collector system, cleaning filters, KFRD, instantaneous water heater and leakage protection system.
Plumbing installation using Rehau pipes
Water heated floor
It is possible to connect the circuits of a water heated floor to the central heating line only in one case - if the apartment has only one riser for this purpose, from which the supply and return lines are extended to all registers in the premises. In other options, for a warm water floor, either a separate boiler is installed, or a heat exchanger is used that heats the water using the thermal energy of the centralized heating system.
For TP circuits, a collector wiring diagram is always used. Pipes are installed before pouring the screed, only in walk-through areas of the bathroom. They have no effect under the bathtub, cabinets, shower stall, or washing machine.
Heat exchanger for water TP.
Due to the bulkiness of collector units with heat exchangers, most users use electric-type heated floors (IR, heating cable, cassette modifications).
Types of utility wiring
The most popular types of water supply pipes in the bathroom and toilet are:
- sequential;
- collector
The first option is best suited for housing with a short length of water supply and a small number of connection points. The second is used in apartments with a large living area and many plumbing fixtures; it is characterized by a large length of water supply networks.
Here is a detailed description of each of them.
Serial type wiring
The sequential distribution of polypropylene pipes in the bathroom and toilet consists of one branch of the pipeline, starting at the outlet of the riser, and connecting the input to the first consumer. From the first user the pipeline goes to the second and so on until the last point. All consumers are connected through tees installed in water distribution points.
If the length of the network is large and there are many consumers on it, then when they are connected simultaneously, the pressure will be weak.
The operating principle of sequential wiring does not allow turning off the water on one device. To repair or replace individual elements, you will need to turn off the entire branch using an emergency valve at the input. Despite this disadvantage, series wiring continues to be widely used.
Its advantage is ease of assembly - the elements are mounted along one pipeline line.
The collector wiring diagram is more complex.
Collector type of wiring
The complexity of the collector wiring is associated with the need to lay pipes from the riser inlet to each water collection point. This connection is provided by a collector - a device designed to distribute water simultaneously in several directions. This feature ensures the same pressure at each water point. Some manifold models are sold with shut-off valves already installed.
If there are none on the device, you need to install them there yourself - this will make using this type of wiring more convenient. Thanks to shut-off valves, it becomes possible to turn off only the required direction, while others remain in operation. In addition to emergency situations, water supply is regulated in this way when the pressure in the city pipeline decreases.
Direct connection to the collector allows the use of a single pipe without joints made to connect other consumers.
This means that a leak can only occur on the collector and on plumbing fixtures, where it can be easily eliminated. Therefore, pipes laid according to radial routing can be installed using a hidden method.
Disadvantages of this wiring include: complexity and significant costs for more pipes than for a series circuit.
Construction of a sewer system
To lay a sewer network, you do not need a soldering iron.
Pipes are either inserted into one another or using fittings. They can be quickly separated and remade if necessary.
In this case, you need to remember the following:
- Sewer pipes must be laid at a slope directed from the device to the main riser. Its size should be 3 centimeters for every meter of pipeline.
- For bathtubs, shower stalls and washing machines, pipe products with a diameter of 50 millimeters are installed, and for toilet flushing - 110 millimeters.
- When assembling a sewer system, a product with a smaller diameter is inserted into a pipe or fitting of a larger diameter.
The main thing is that the sewer network does not have an overly complex configuration.
All plumbing equipment must be connected one by one, avoiding overlap during simultaneous drainage, which usually leads to blockages.
To facilitate future cleaning, a tee fitting should be installed on the sewer pipe. Its upper hole is always closed with a special plug. Through this fitting it is necessary to clear the sewerage structure from blockages.
When connecting sewer elements, it is necessary to use a rubber gasket at each joint, otherwise the pipeline will smell unpleasant.
Features of dismantling a dilapidated system
Before installing a new sewer system, it may be useful to remove old pipes. During the work, you may encounter serious difficulties. For example, it is not easy to work with sections of pipes that are tightly embedded in cement walls.
Advice! Before dismantling, make preparations so that the pause between the removal of the old sewer system and the launch of a new one is not too long. Since now no one will be able to use the toilet and sink, which is very uncomfortable.
Remember that apartment buildings are equipped with a non-specialized drainage system. When dismantling the riser, proceed with caution, so as not to damage the equipment of your neighbors.
Determining the installation method
Practice shows that the wiring of communications in the bathroom can be organized in three ways.
Method #1: Open
Involves laying pipelines over walls and floors. Used when it is not desirable or impossible to lay pipes in the walls. The main advantage is the ability to constantly monitor the condition of the pipeline and easy access to it in the event of an emergency. In addition, the cost of such a design is an order of magnitude lower and installation is much simpler.
However, the appearance of a pipeline installed in an open way leaves much to be desired. Unaesthetic communications spoil the interior of the bathroom. Therefore, whenever possible, they try to disguise them with all kinds of screens and boxes made of plasterboard or plastic and place them in the most inconspicuous areas of the room.
In addition, open communications can be inadvertently damaged. Communications laid in an open way do not have the most aesthetic appearance; if possible, they should be covered with decorative elements
Communications laid in an open way do not have the most aesthetic appearance; if possible, they should be covered with decorative elements
Method #2: Closed
Pipes and connections are laid inside the walls, only fittings are brought outside, and plumbing equipment is connected to them. The method is prohibited for use on load-bearing walls that cannot be tapped. The closed installation method does not interfere with the design of the room, since utility lines are hidden under the cladding.
In addition, it is impossible to damage such a line through negligence. However, the process of installation and preparation for it is much more complicated than when carrying out open installation
According to building codes, before installation, the system elements are placed in a special casing pipe, after which they are laid in pre-prepared channels cut inside the walls. After the main is laid, the walls are sealed and leveled, maintaining plane.
A significant disadvantage of closed installation can be considered the lack of control over the condition of the pipes and the need in the event of an accident to dismantle the lining over a section of the pipeline that has become unusable.
The holes in the wall after laying the pipes are carefully sealed, the plane is completely leveled for finishing
Method #3: Combined
The mains are laid on top of the walls, after which they are masked using boxes or false panels. The difficulty of such finishing is to lay the sewer and water pipes close enough, which will later allow them to be covered with decor.
In addition, you need to think carefully about the type of finish, which should fit into the design of the bathroom and not clutter it up. To disguise pipes, profiled plasterboard boxes, all kinds of plastic decorative elements or tiles are most often used.
How to connect a bathtub to the water supply
After installing the sewer connection, the mixer is installed. With its help, the bath will be connected to the water supply. Water outlets are holes in the wall to which outlets from the central riser are connected.
The best way to check is to turn on the water and run half a bath. With such pressure, all weak connections will immediately show themselves. Detected leaky fasteners are tightened and treated with sealants.
After completing the main stage of renovation work in the bathroom and purchasing plumbing fixtures, all that remains is to connect the bathroom to the sewer and connect to the water supply.
Choosing a location, installing a bowl.
Siphon assembly.
Connection to the sewer pipe outlet.
Connection to water supply.
Checking correct installation and tightness.
Carrying out calculations
The calculation stage in drawing up a sewerage layout diagram is paramount. It is worth knowing that the slightest error in calculations can play a cruel joke on the owners of apartments both in a new building and in a secondary building. Therefore, you should be especially careful.
The pipe laying plan should include the following data:
- The location of the central riser in the apartment and its length in meters.
- Entry points for sewer/water pipes from the kitchen and bath into the riser.
- The dimensions of the bathroom, kitchen and other auxiliary areas in which plumbing fixtures will be installed.
- Locations of all instruments and equipment working with water. Here you need to indicate their distance to the walls and the dimensions of the equipment themselves.
- The lengths of all pipes from each of the devices and the installation location of the connecting fittings.
- Place of installation of a vacuum valve (hydraulic seal) for reliable ventilation of the sewer system.
- The diagram must also indicate the diameters of all collector pipes in each section.
The nuances of laying plastic pipes
The connection of two adjacent pipes occurs using a fitting. More precisely, the pipe is hermetically sealed in the elastic band of the fitting. The pipe must be inserted all the way
It is very important that the fitting and pipes are clean. Otherwise, over time, the sealing of the connection will be broken.
To improve the tightness of the connections, the ends of the pipes are treated with a soap solution.
The most difficult process is installing the riser. Therefore, it is from this site that the installation of the sewer system begins. First, the tee is installed. To do this, a rubber cuff, which is pre-lubricated with sealant, is placed in the lower socket and connected to the tee. Clamps are used to secure the pipes and riser to the wall.
After assembling the riser, the pipes are led to the places where the plumbing fixtures will be located. Immediately you need to provide for the presence of a slope towards the riser. It should be within 2 cm per 1 m of pipe. If sewer pipes are laid in wall grooves, then clamps are used to securely fasten them.
After installation work, all connections are carefully checked. The plumbing drain elements are connected to the pipes. This procedure is not complicated. The only problem that can arise is connecting the bathtub to the sewer.