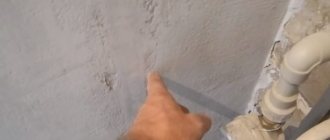
Constructing a pipe box in the bathroom is the best way to disguise plumbing and sewerage systems. This design does not require the transfer of communications. During its production, a minimal amount of construction waste remains. If you have the appropriate skills, you can do all the work yourself.
It is very convenient to install a pipe box in the bathroom.
Advantages of hiding communications under a box
When decorating bathrooms, boxes are now often used to hide several or all pipes. Such elements not only allow you to create a beautiful design, but also have a number of advantages.
These include:
- Attractive appearance. When made from high-quality materials, a cabinet for masking pipes will not stand out against the general background or spoil the interior.
- Easy to assemble. The structure can be assembled not only at the rough finishing stage. Often pipes are sewn up during a bathroom refurbishment. Frame and sheathing elements can be installed on top of the cladding.
- Possibility of pipeline maintenance or repair. If the box is equipped with a hatch, you can find out the readings of metering devices and monitor the condition of the pipes. If necessary, water supply or sewerage elements are replaced.
- Possibility of combination with shelves, installations and other interior details. This allows you to effectively use the space of a small bathroom.
Hatches
No less important components than the boxes themselves are the hatches that are placed in the fences for access to pipelines, fittings and metering devices.
During installation, the following types of hatches are most often used:
Factory made for tiles. They are sold in standard sizes with an opening system and a lid, the surface of which is designed for gluing and holding ceramic tiles. Typically, such hatches have a rigid hinge system that allows them to hold a high weight of ceramics and cover large areas; almost all designs are designed to be torn off by pressure.
Factory made from PVC. These are lightweight hatches, usually white with a frame and doors, great for plastic panels; they are often installed in plasterboard lined with tiles. They are usually opened by turning the doors while pressing from the side.
Rice. 10 PVC and painted steel hatches
Factory made from steel. In everyday life, hatches made of painted steel are not used very often due to their low decorative value and heavy weight (not suitable for installation in a PVC panel); they are opened through recesses in the doors.
Homemade for drywall. The most popular option for installing hatches is to make them yourself from a profile frame and a piece of drywall, onto which tiles are then glued. The tile maker can make a handle in the hatch by drilling a through hole in the tile, or they can purchase a special vacuum suction cup to open it.
From tiles. In a tiled plasterboard covering, openings can be covered directly with tiles by gluing them onto a sheet of dense material (plywood, chipboard, gypsum fiberboard) along with magnets. When installed in a profile niche, the magnets will stick to the metal frame.
You can do the opposite - if the frame is made of wooden beams, steel plates are glued to the tiles, and magnets are screwed to the sheathing. You will have to use suction cups to open tile hatches with magnetic fasteners.
Rice. 11 Homemade hatches
Options for materials for manufacturing the structure
When making a box in the bathroom, first install the frame. It is sheathed and then veneered. Galvanized profiles are used to construct the base.
Materials with the following properties are selected as coatings:
- Resistant to moisture. The structure is installed in a room with high humidity, so the material should not be destroyed when condensation forms.
- Small thickness, lightness. The ease of installation and the size of the finished box depend on these parameters. Walls that are too thick take up useful space.
- Environmental Safety. The material should not emit toxic or allergenic substances.
- Attractive appearance. The walls should be in harmony with the interior or allow for cladding with any materials.
Moisture-resistant drywall
Moisture-resistant drywall.
Standard gypsum boards are not suitable for decorating the interior of a bathroom or toilet. The moisture-resistant type of material is resistant to water. This type of drywall is distinguished by the green color of the sheets. It is suitable for creating rectangular, semicircular or polyhedral designs. The sheet is impregnated with an antifungal compound that protects against mold.
When choosing a material, you need to take into account its features, which include the following points:
- Installing sheets requires more steps than installing plastic or MDF panels.
- It is impossible to build a collapsible box from drywall. During manufacture, a hatch is provided that provides access to communication systems.
- GCRs are not considered a finishing material. After assembling the structure, cladding is required. Bathrooms are often tiled, but other finishing methods can be used: plastering, gluing waterproof wallpaper, painting.
Waterproof plywood
Waterproof plywood differs from simple plywood by its special impregnation . The sheet has a thickness of 6-40 mm. The material has good performance qualities. Despite the moisture resistance of plywood, it must be treated with hydrophobic compounds. The main disadvantage of the material is its high price, due to which it is rarely used.
PVC plastic panels
A box made of plastic panels does not require additional finishing. The large number of colors offered allows you to choose products that are in harmony with the color scheme of the room.
In addition to good aesthetic qualities, the material has the following advantages:
- Resistant to moisture. The material does not deform when water drops enter or condensation settles.
- Long service life. Durable plastic does not lose its qualities for 5-7 years.
- Easy to care for. Remove dirt with a damp cloth or soap solution.
- Easy to install. A person who does not have construction skills and special equipment can work with the material.
- Acceptable price. PVC panels are a budget cladding product that helps reduce finishing costs.
- Possibility of repair. Damaged parts can be removed without destroying the entire structure.
- Compact sizes. Due to the small thickness of the panels, the box does not take up useful space in the bathroom.
OSB boards
Oriented strand boards help quickly disguise the pipeline. They are multilayer sheets impregnated with resins, artificial wax and other substances.
There are several types of such material. To repair rooms with high humidity, sheets with additional impregnation are used. For a box made of OSB boards, a wooden frame is more suitable.
OSB boards.
MDF and HDF boards
Assembling a cabinet to mask pipes from MDF panels is not the most suitable option for a bathroom. The material quickly absorbs moisture, collapsing under its influence. HDF sheets have a higher density. They are resistant to moisture. Structures assembled from HDF panels last more than 10 years.
Recommendations
Installing a box in a bathroom requires caution and compliance with the following recommendations:
- Before installing the box, they check not only the tightness of the joints and the stability of the valves and meters, but also the correct functioning of communications, for example, a sufficient slope of the pipes.
- If the frame of the box is made of wooden beams, it is worth additionally impregnating it with a protective composition. The same procedure will be useful for wood boards.
- At the measurement stage, it is useful to take into account the location of household appliances in order to avoid unnecessary problems in the future.
Toilet with a box system Source mykaleidoscope.ru
Design selection
You can sew up pipes in the bathroom in different ways.
The most commonly used types of structures are:
- Cabinets. This option is suitable for hiding sewer risers or other vertical pipelines. The design provides full access to engineering systems. It can be equipped with shelves and other elements that allow you to make good use of the space.
- Partitions. They have the width and height of the room. Despite the fact that the area of the room is reduced, the bathroom looks neat. All engineering systems are hidden. This option is suitable for spacious combined bathrooms. The partition is installed when there is a wall-hung toilet; it hides not only the pipes, but also the installation. Behind the partition there are shelves for storing household chemicals.
- Horizontal. Used to hide water supply or sewer lines laid close to the floor.
- Compact. Small structures are used exclusively to camouflage pipes. They do not take up useful space, giving the room a neat look. Compact boxes can be horizontal or vertical.
Why don't builders hide pipes?
The bathroom is rich in all kinds of communications. Sewage pipes, hot and cold water supply, as well as additions in the form of a heated towel rail or heating system are on public display here.
This “openness” is not accidental. Even if the room is spacious enough and the layout allows, builders leave most of the pipes in sight. The reason lies in building codes that directly prohibit the hidden installation of pipes connected by certain types of fittings. For such devices, easy access in case of problems occurs.
Another reason for open installation is the formation of condensation on metal pipes with cold water. Only air constantly circulating around the pipe can effectively remove condensate.
That is why in the bathroom you can see pipes anywhere on the wall, in a corner or in a niche. They can be vertical or horizontal, running under the ceiling or near the floor. A separate class of pipes that need to be hidden are products of different diameters coming from plumbing equipment, as well as toilets with installation.
Not every pipe needs to be hidden Source izhevsk.ru
Preparing to install a masking box
At the preparatory stage the following actions are performed:
- Assess the condition of pipes, fittings, metering devices, and other communication elements. When laying a new pipeline, make as few connections as possible. All joints must be treated with sealant.
- Drawing up a diagram. You need to choose the option that is most suitable for the bathroom. They take the necessary measurements and make a drawing. At the same time, they provide for the presence of a hatch in the places where plumbing fixtures are installed - meters, valves.
- Calculation of the quantity of materials. Determine the dimensions of the future structure by counting the number of frame elements, sheathing and cladding.
Required materials and tools
Construction knife.
After drawing up the project, they proceed to the purchase of the following materials and devices:
- construction knife with spare blades;
- roulette;
- building level;
- screwdriver with different attachments;
- scissors for cutting metal;
- fasteners (dowels, screws, self-tapping screws);
- drill;
- profiles made of stainless metal;
- sealing compound;
- sheathing sheets (plasterboard, chipboard or plastic panels);
- plastic skirting boards;
- tiles or other facing material.
Frame construction
The frame is built like this:
- Install the guide, attaching it with dowels. The distance between fasteners is 0.2-0.3 m.
- Mount the guides on the floor and ceiling. This allows you to make the angle of the frame required for installing the rack. To ensure that the sharp parts of the structure lie in the same plane, the profile is attached to the ceiling at an angle of 90°. A plumb line is lowered from it and the location of the underside of the stand is marked. The latter is screwed to the horizontal guides with self-tapping screws.
- Install reinforcing elements. In this case, the location of future inspection holes or doors is taken into account.
- A profile is attached to the wall and floor, which determines the dimensions of the structure. Using jumpers, the front frame parts are installed. At the same time, the location of plumbing fixtures, sewer outlets, and meters is also taken into account.
Finishing
It is necessary to properly prepare the box for lining.
They do it like this:
- Use a knife to stitch the joints between the sheets of drywall. The resulting gaps and corners are cleaned with abrasive paper.
- The cracks are filled with putty and glued with reinforcing tape. All corners of the box must be processed.
- After the solution has dried, the surfaces are primed, applying the composition in 2 layers.
The plasterboard box is decorated with tiles. The wrong side of the material is treated with glue, which is smoothed with a wavy spatula. The facing is applied to the surface and pressed. The remaining elements are installed in the same way. The seams of the tiled product are treated with grout. The corners are covered with additional elements of a suitable color.
How to make a plastic box with your own hands
A structure made of PVC panels is assembled if the room is sheathed with plastic. It does not require finishing.
Frame assembly
The base is assembled in the same way as when constructing a plasterboard box.
Plastic box for pipes.
To do this, perform the following actions:
- Fix the guides to the wall using dowels.
- An outer corner is formed, securing the profile with jumpers. All frame parts are fixed using metal screws.
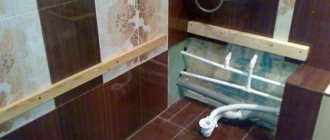
If there is a large distance between the pipe and the wall, install a wooden shelf. The design includes an additional hatch. This allows you to use free space for storing household chemicals and equipment.
Frame covering
The frame is covered with simple PVC panels. The width of the strip is selected in accordance with the size of the structure.
Sewing is done like this:
- An initial profile is installed near the wall, and the edge of the lamella is inserted into it. The second edge of the product is attached to the jumpers with self-tapping screws.
- The next panel is joined to the previous one. The free edge is cut along the frame post. It is also secured with self-tapping screws.
.If some of the pipes cannot be masked, they are bypassed in this way:
- install a starting profile near the wall;
- holes are formed in the panel with a size equal to half the cross-section of the pipe;
- the panel is cut to width and inserted into the space behind the pipeline;
- in the next lamella the same cutout is made, the sheathing elements are connected to each other;
- the remaining gaps are filled with sealant.
The locations of the hatches are marked on the surfaces of the plastic panels.
Final stage
The assembly process ends with the installation of the hatch, which is carried out as follows:
- Use a jigsaw to cut holes. Install a tilting or rotating hatch of the appropriate size. The plastic product is fixed using sealant.
- Press the hatch to the surface and remove excess sealant. If the hatch does not have a handle, the fittings must be purchased separately.
- The outer corner is covered with a polymer plinth, which is secured with sealant. While the composition dries, the part is secured with masking tape.
Work order
For clarity, let’s imagine an ordinary bathroom in a house, rectangular in shape, the lengths of the sides of which do not coincide with the length of the bathroom, or rather, exceed it by 10-15 cm. This means that it is necessary to make a technological connection to the bathroom in the form of a shelf on one of the sides. In addition, in such a bathroom you may need to install a screen, a box to hide the riser, a box to hide sewer and water pipes running along the wall, a box for the washing machine, and an installation for a wall-mounted toilet. Let's touch on each named task separately, let's go in order.
Bathroom shelf
The craftsmen are first required to level the walls with plaster. As mentioned earlier, they must set all internal corners of the room to 90 degrees so that when installing the bathroom, no gaps will form between it and the walls.
- Next, the bathroom is brought into the room and pre-installed in its place. From the free edge from two corners, the distance to the wall is measured. It is important to take into account the thickness of the subsequent wall finishing, so the bathroom is initially moved close, and the thickness of the tiles with adhesive on one wall is subtracted from the obtained measurement results. The average thickness of the tile is 6 mm; together with glue, this value increases to 8-9 mm. We add another 3-4 mm here for the error.
- Then we measure the height of the bathroom when assembled. To this value you need to add the thickness of the floor finish, so all measurements must be taken either after it is completely covered or after pouring the screed. Since the shelf should be several millimeters below the level of the side of the bathroom, we subtract 3-4 mm from the obtained value and the thickness of the plasterboard sheet is 12 mm. Thus, we find the top point of the frame.
- We measure the width of the bathroom from the wall, also subtract 8-9 mm for finishing the adjoining wall, the same amount for finishing the outer part of the screen and the thickness of the plasterboard sheet. The resulting value will be the depth of the shelf.
Advice! When taking measurements, the bathroom must be leveled in order to minimize the error in your calculations. In general, it is safer to assemble shelves and install screens after finishing the entire room, but not many people want to do this because of the expediency of saving building materials.
- We take the bathroom out of the room and begin marking and installing the frame. On the inner corner we plot the width of the frame (the first value obtained) at the top and bottom points, and its height on both adjacent walls. Similarly, on one of the walls the depth of the shelf is marked above and below. Place a level between the obtained points and check how accurate your measurements are. Make adjustments if necessary. Then the points must be connected with straight lines.
- We cut off two pieces of profile corresponding in length to the width and depth of the shelf. We apply them to the wall according to the markings, drill them to the required depth and fasten them with dowel screws, following the lines.
- We measure the distance from the floor to the fixed profiles, similarly cut a piece of the required size and fasten it vertically along the outer edge of the box.
- Now comes the most difficult part of the work - assembling the free-standing part of the frame. First of all, a short section of the profile from the screen side is attached to the floor. We cut off a piece of the profile that immediately corresponds to the length and height of the shelf - that is, we will make a solid element with a bend. At the required distance, we cut through the side walls and bend the part at an angle of 90 degrees, install it in the guides, accurately double-check the shelf geometry with a level and fix it with self-tapping screws.
- Lastly, a long jumper is made, also with a bend, but by 7-10 centimeters, so that it can be properly attached with screws to the stand that was installed before.
This design will have sufficient strength to support its own weight, decoration and bathroom accessories. If desired, you can make an additional support in the middle using the same principle and install several jumpers.
Screen in front of the bathroom
The screen can be structurally combined with a shelf. It is not difficult to make, but installation is carried out after the final installation of the bathroom and connection of the sewerage system. It should be understood that such a screen will not be removable, at best, with an inspection door, so it is important to connect communications securely and hermetically.
The base of the rear part of the frame is already there; the craftsman just needs to install a vertical guide on the opposite wall, and insert horizontal guides from above and below. The upper element passes behind the edge of the bathtub side. If it is acrylic, you can safely screw it to the bathtub using short self-tapping screws in special places indicated in the manufacturer’s instructions. You can’t do this with a metal bathtub, so you need to think about ways to strengthen the frame on site.
It is not recommended to make the screen straight. It is better to make the area where the user will most often approach it with a bevel to create a comfortable space for the feet. The slopes are formed according to a principle similar to the shelf; there are many options for assembly, and it is difficult to describe them without seeing a specific object. Working with drywall is partly creative and requires the master to be able to think in space, outside the box and critically.
A PP 27*60 profile is added to the design, from which reliable racks are formed, placed in increments of 50-60 cm, proportionally along the length of the structure.
Boxes and installation for a wall-mounted toilet
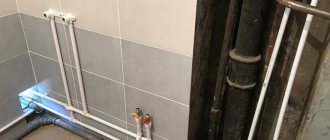
The design principle of such elements is not much different from that described earlier. Let's look at the procedure using the example of a vertical box hiding a sewer and water riser.
Wide corner box with additional stand
- We mark vertical lines along which the outer border of the frame will pass without taking into account drywall and finishing. These lines should be moved away from the corner so much that the profile fits, and there is a distance from it to the most protruding parts. Since every square centimeter counts in the bathroom, this indentation is made as small as possible.
- The most reliable way to mark is using a plumb line, but other devices can also be used.
- Solid profiles of slightly shorter length than the height of the ceiling are screwed along the lines. If the wall is uneven and you see that when you press the profile it bends, cut the side walls of the product at the point of curvature to avoid these deformations. Dowel screws should be installed every 40-50 cm, at least. The profile is fastened securely, especially in the places of notches, so that not a single part of it bends when pressed from the side.
- The outline of the box is marked on the ceiling - use a tape measure and a pencil. It is advisable to complete this step before installing the side guides to avoid mistakes. Since the walls may not be located at right angles to each other, and may even slope upward towards the room or protrude into it from below, it will be a mistake to focus only on them. When marking, you need to adjust the angle so that it is closest to 90 degrees, trying to maintain distances from the walls.
- So you draw two perpendicular intersecting lines. From the point of their intersection, a plumb line is lowered, a mark is placed on the floor, along which the same lines are drawn.
- Then short sections of the profile are attached according to the markings - on the ceiling and floor.
- Two profiles, 5-7 mm long less than the height of the room, are paired with self-tapping screws into the figure shown in the next photo.
Twin profile
- It is positioned exactly on the outer corner of the box. Such a structure will allow you to conveniently insert jumpers and fix them.
- Jumpers are placed every 50 cm. If you plan to install an inspection hatch, they are added along its borders for reliable fastening. When fixing the jumpers, constantly monitor the position of the paired rack with a level, as it is easy to move it by pressing it inward, or vice versa, by pushing it out too far.
Working with plasterboard sheets
Assembling the frame is the most time-consuming and difficult part of working with drywall. The sheathing process is quick, since the sheets have a large area and are easy to process. The craftsman is required to be able to cut sheets correctly and know the simple rules for screwing in self-tapping screws.
As mentioned above, the sheets are cut in a straight line with a stationery knife. If you need to make a complex cut, use a file or jigsaw. To cut a sheet in a straight line, lay it on a flat surface, make markings, attach a guide from the same PPN profile or rule and cut through the top layer of paper. Then the sheet is broken along the slot, after which the second layer of paper is cut off with a knife. Quite a labor-intensive task, considering the dimensions of the sheets. In many cases, the task can be simplified if the sheet is first screwed to the frame. This cannot be done everywhere, but the same vertical box will do.
The sheet is attached to the frame and secured with 5-10 screws - it needs to be raised above the floor by 3-5 mm. Next, a layer of paper is cut directly along the profile, as if along a guide, the sheet is broken and cut off on the reverse side. The resulting edge may have protruding irregularities that will interfere with the installation of the adjacent sheet, so it is carefully leveled with a rasp or knife.
To fasten the sheet, you will need a special drywall bit with a limiter that will not allow you to screw in the fasteners deeper than they should be.
PH2 bit with limiter
When attaching the sheet, you need to remember the following rules:
- The maximum distance between screws is 18-20 cm;
- Place the fasteners as far as possible from the intersection points of the profiles fastened with self-tapping screws to avoid crumbling of the sheet;
- The distance from the edge should be at least 1 cm;
- If you miss the profile, unscrew the screw and screw in a new one, retreating 3-4 cm. Such a screw will be very reluctant to come out of the sheet - press it under the head with the tip of a stationery knife to create a grip for the thread, and it will come out easily.
- Make sure that on the back side of the sheet no debris sticks to it, which could get onto the profile and cause bending.
- Screw the sheet to all profiles passing under it.
Installation of an invisible hatch
This hatch opens by pressing the middle part. The magnetic lock slides, releasing the door from the frame.
The hatch is constructed as follows:
- At the preparatory stage, the location of the part is marked. Most often, the hatch is installed in the middle part of the front wall of the box. This allows you to preserve the tile pattern.
- When installing the frame, a niche is formed, the parameters of which coincide with the dimensions of the hatch. The frame is secured with long self-tapping screws. This part is supplied with a door and fittings.
- The frame is sheathed with sheets of plasterboard, laid overlapping. The frame is also covered.
- Drywall is treated with a primer. After the composition has dried, the tiles are laid. The seams are covered with sealant and the structure is allowed to dry.
- Use a construction knife to cut through the hatch, holding the tool at an angle.
Advice from professionals
Plumbers and builders give the following recommendations for masking pipes:
- When hiding the risers, markings begin from the floor.
- Installing a door or forming an inspection hole is mandatory.
- Any material used for cladding is impregnated with an antifungal solution. This will prevent mold from forming.
- Wooden structures are not recommended for installation in the bathroom. This frame is suitable for a toilet.
- The cabinet for pipes cannot be assembled from chipboard, which absorbs moisture. The material swells and begins to crumble.
- Vertical parts are installed at a distance of no more than 30 cm. This gives the structure rigidity.
- Closely located pipes are not sutured separately. It is recommended to build a single structure.
The walls should not come into contact with communications. The minimum distance is 3 cm.
The simplest way is decor
When the budget does not include repair costs, and the pipes in the toilet are quite annoying, you can get by with minimal expenses. We are talking about decorating visible parts of the pipeline.
This method can be a real salvation when the head of the family, instead of repairing, chooses other ways to spend his leisure time - for example, fishing or basketball with friends. Moreover, both women and men can handle decoration. The main thing is to have inspiration.
Depending on preferences and mood, the pipeline can be disguised as anything - turned into a tree, into an animal, or decorated with beautiful decorative elements.
Main types of decoration:
- stick a film with a suitable pattern over the pipes;
- paint with waterproof paint to match the color of the walls in the toilet room;
- depict a unique pattern or reproduce a birch trunk, oak bark or other material using paints;
- use decorative stones, beads, chains, twine and other elements used for needlework.
The simplest and most convenient option is to paint the pipes with paint that harmoniously matches the color of the walls. Or stick a film with a pattern.
It is important here that the material can withstand a humid environment and high temperature if hot water enters the apartment through one of the pipes.
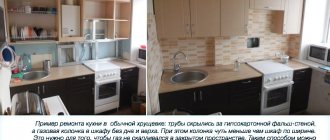
The decorating method is also great for hiding pipes in the kitchen or bathroom. In addition to decorating pipes in these rooms, you can use other methods of covering communications.
We also recommend that you familiarize yourself with the best options for masking gas pipes, used by resourceful owners.