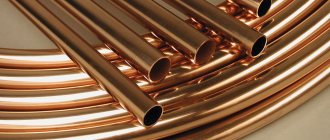
Welding of copper pipes for pipeline construction is most often done by capillary soldering.
This method of permanently connecting copper pipes is quite easy to learn even for a non-professional welder, and at the same time provides an excellent result (in terms of strength and reliability of the connection).
This method of connecting pipes is based on the capillary effect - due to the phenomenon of adhesion, molten solder fills the weld, regardless of the position of the pipe. The use of capillary soldering allows you to solder even vertically installed copper pipes by supplying solder from below.
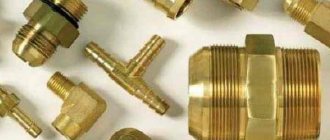
Equipment and materials for connecting pipes
Reliable connection of copper pipes requires compliance with certain conditions.
So, for effective soldering of copper, the temperature must exceed 425 degrees, but at the same time it should not exceed the melting point of the pipes being connected.
In addition, the distance between the surfaces to be joined must be minimal - this is a prerequisite for the occurrence of capillary forces, due to which the solder is distributed in the soldered joint.
All of the above applies to soldering copper pipes using hard solders. But if soft solder is used when connecting pipes, then the welding temperature should be below 425 degrees.
As you can see, the final result largely depends on the type and quality of solders. That is why we will try to figure out what solders are used when connecting copper pipes.
- Standard solder is most often used. It is suitable for soldering copper, brass and tinplate, and can also be used for tinning if necessary. However, this solder is not suitable for soldering pipes in drinking water pipelines.
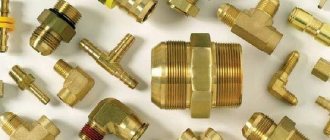
- Soft solders for fittings are used to connect copper pipes to similar copper pipes or to pipes made of red bronze, but their main use is to connect copper pipes to brass fittings.
- Rothenberger ROLOT hard solder is the optimal solder for such a task as the installation of copper pipelines using the capillary-slot soldering technique.
This solder is used in cases where pipes are installed in pipelines of closed and open heating systems, in hot and cold water supply systems.
In addition to the quite obvious application, systems of copper pipes connected with Rothenberger ROLOT solder are widely used for gas supply (working with liquefied and natural gas), for completing refrigeration units, for air conditioning systems and oil pipelines.
For installation of copper pipelines using Rothenberger ROLOT series solders, fittings are not required.
These solders belong to the group of silver-containing copper-phosphorus solders and, due to their high mechanical characteristics (resistance to irreversible deformation), are widely used for welding pipes where pipes are subject to high mechanical and temperature loads.
Solder Rothenberger ROLOT
- Copper-phosphorus solders when soldering copper pipes are self-fluxing (unlike the situation with soldering brass or bronze - here flux is used to prevent oxidation).
Copper-phosphorus solders have a certain fragility (this is due to the phosphorus component), which is why they should not be used if the pipe material contains more than 10% nickel, and also for soldering aluminum bronze.
When soldering brass or bronze, flux is used to prevent the formation of an oxide coating on the base metals. When soldering copper and copper joints, copper-phosphorus solders are self-fluxing.
- Silver solders are similar in their performance characteristics to the previous ones, however, the reduced phosphorus content removes the restriction on their use when soldering non-ferrous metals.
How to solder copper-based elements
In addition to the metal itself, you need to purchase standard cheap devices and components. To protect the elements, a paste-like mineral is useful. A brush to apply it. Hard alloy for soldering (soft alloy is acceptable, depending on the welding option).
When choosing an alloy for hard welding, study the composition; it should not contain lead. When purchasing an alloy for soldering soft welding, in addition to the components tin and lead, it may also contain silver.
Regardless of the task, there is an alloy on sale for soldering a three-millimeter copper bypass.
Among the devices you will need a device for cutting metal; you can use it to cut pipes. Please note that the pipe cutter must be of good quality so that it does not bend the metal when cutting or wrinkle the edges.
You also need a tool to remove the pasty mineral and a brush to clean the bypass inside. You will also need a tool to expand the pipes.
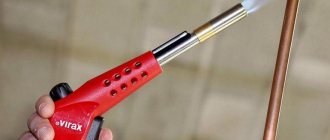
It is important to remember about the most necessary device - the burner. The flame must be adjusted to a narrow direction.
If you cannot work with open fire, but have the financial means, then buy a soldering iron for copper pipes. It can be connected to a regular outlet.
Such a device can work with any solder. It can be taken as a replacement for other tools, but you will need to buy a high-quality device.
Tools for soldering copper pipes
Effective installation of copper pipes with your own hands is impossible without a certain set of tools.
When working with copper pipes, including their welding and installation, the following are used:
- Pipe cutter – a special tool for cutting pipes. The choice of pipe cutter model is determined by the diameter of the pipes you plan to work with, as well as specific conditions of use (for example, the need to cut pipes in hard-to-reach places). The larger the diameter of the pipe cutter, the higher its cost.
Pipe cutter - Chamfer - as the name of the tool suggests, it is used to remove chamfers and burrs from the edge of a cut copper pipe (to avoid the formation of scoring and burrs). Chamfer removers come in two modifications: in the form of a pencil or in a round case.
The latter modification is much more convenient to use, but the maximum pipe diameter for such bevel removers is 36 mm.
- A pipe expander is a special device that is used to expand the ends of a copper pipe during installation without the use of expensive fittings. The choice of expander also depends on the maximum diameter of the pipes used.
Note! In order for you to use a pipe expander effectively, the pipes must be either sufficiently soft or pre-annealed.
Pipe expander
- To prepare pipe surfaces for joining, either special sponges (“ROFLYZE”) or pipe cleaners and pipe cleaning brushes are used..
- Gas-burners . Different types of pipe connections and solder used require the use of different types of torches.
There are burners operating from stationary, rechargeable, reusable cylinders, as well as more compact burners using disposable gas cylinders. The burners use either propane or an acetylene-oxygen mixture as a fuel gas.
Welding with consumable and non-consumable electrodes
When using consumable electrode welding, electrodes with a copper rod and a coating are used, which protects the weld pool from exposure to ambient air. Welding is performed with direct current of reverse polarity on the shortest possible arc. The welding current is selected depending on the thickness of the pipe wall and the diameter of the electrode.
When using copper gas shielded welding with a non-consumable electrode, pulsed welding is most suitable. This reduces the risk of metal burn-through, ensures a stable welding process and good weld structure.
Welding is carried out with direct current of straight polarity. A filler rod made of pure copper is used. Argon is mainly used as a shielding gas, but if necessary, helium, nitrogen, or mixtures thereof can be used as a shielding gas.
When using a carbon or graphite electrode, pure copper is used as a filler rod. Welding is carried out with direct current of direct polarity, the arc length should be about 10 mm. To protect the weld pool, flux is used, applied to the edges, as well as to the filler rod.
When using automatic welding, shielding gases or powder flux are used to protect the molten weld metal. Welding modes and speed are selected based on the thickness of the walls being welded. Constant current of straight polarity. The welding wire is made of pure copper. When welding thick-walled pipes, preheating is required.
Copper pipe connection technology
So, the solder has been selected, all the necessary tools have been selected. It's time to move on directly to soldering the pipes.
Let's try to figure out what technology is used to connect and, if necessary, repair copper pipes?
- In order for the weld to be as strong and uniform as possible, it is necessary to prepare the surfaces. The main factor in such preparation is their cleaning. To clean the surface of a copper pipe before welding, use a ROFLAYZ sponge or a special brush.
Also, the surfaces to be welded must be protected from the possible entry of dust, dirt or grease into the weld - they will prevent the penetration of solder into the joint.
Note! It is strictly prohibited to use substances or tools containing abrasive particles to clean copper pipes before soldering!
- If we are going to install copper pipes in a cold or hot water supply system, as well as in a heating system with a maximum coolant temperature of no higher than 110 degrees, then we can do without the use of fittings to connect the pipes to each other.
To do this, expand the end of one of the connected pipes using a pipe expander to a diameter sufficient to fit into the hole of the second pipe, creating a space sufficient to fill it with solder.
- After the pipe is expanded, we insert another pipe into it (the depth of the entrance should be no less than the diameter of the pipe itself). The gap between the inner and outer pipes should be 0.025-0.125 mm.
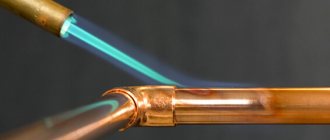
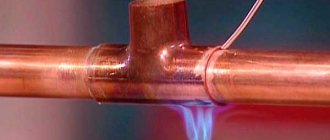
Warming up the connection - We heat the connected pipes evenly along the entire length of the connection using a gas burner. The heat from the burner should be distributed evenly over the entire circumference of the connected pipes.
In this case, the solder does not need to be heated, and in no case should the connection itself be heated until signs of metal melting appear - this will negatively affect the service life and reliability of the weld in the future.
- Pipes for connection are considered to be heated to a sufficient temperature if the solder rod attached to them begins to melt upon contact with the pipe wall. To improve the result of connecting pipes, before starting soldering, we heat the solder rod in the flame of the burner, without, however, allowing it to melt.
The process of filling a seam with solder - If the metal surface is sufficiently cleaned, then the solder applied to the joint, under the influence of high temperature in the burner flame and capillary forces, begins to penetrate into the gap between the surfaces of the pipes. Since the molten solder moves towards the heat source, the pipes must be sufficiently heated.
- After all the connections have been soldered, the pipes are laid on a flat surface, avoiding sagging and deformation. The use of pipes is allowed no earlier than an hour after completion of the entire pipe welding technology.
Copper welding
Copper materials are used in conditions with increased requirements for ductility and corrosion resistance.
Copper welding is carried out when used in various areas of production, decorative parts due to their increased aesthetic properties.
The thermal conductivity of the material is twice as high as that of aluminum alloys; there are many ways to join copper products. Modern technologies make it possible to avoid hot cracks, porous formations and other non-compliances with standards during operation.
Copper welding
Welding technology of copper and its alloys
Copper alloys, in contrast to the pure metal, have reduced thermal conductivity, as a result of which elevated temperatures are not required.
There are several types of alloys, the best option being oxygen-free copper. Copper welding technology involves the use of pre-prepared products.
Before welding, parts of the appropriate size are made; for components up to 18 mm in length, chamfer edges are prepared.
When dealing with large volumes, processing speed is achieved using a chamfer, which is capable of processing the part in the desired shape.
In addition, the joints are thoroughly cleaned of dirt and oxidation to avoid the formation of defects. Welding of copper takes place in an oxygen-protected environment; for this purpose, wire made of aluminum alloys with the addition of phosphorus is used.
The part cleared of impurities requires preheating, otherwise the flux layer will spread unevenly over the seams.
Arc welding
High-quality production is carried out using electrodes, the arc length is no more than 5 mm. The pulse-arc connection allows for the production of various seams and the use of thin metal. In difficult situations, in order to avoid breaking and cracking, a stop is placed, which helps to securely fasten the parts.
How to cook copper
A guaranteed connection is obtained by using various methods of connecting nodes. For docking the following is used:
- gas apparatus;
- inverter;
- semi-automatic;
- tool for manual arc welding.
The connection is made with consumable and non-consumable wire electrodes, automatically or manually using flux. When working with materials of large diameter, the electroslag method is used.
Gas welding of copper
The inverter connection method implies the presence of a high-quality metal melting device. The construction trade aisles offer a wide range of products, allowing you to choose the right tool for the appropriate site. Among others, it is worth noting graphite electrodes, which allow the production of crafts at different temperature conditions.
Welding difficulties
It is necessary to follow the recommendations of the masters, because... metal has different characteristics from other components. Main difficulties and issues arising in the process:
- Liquid fluidity complicates the connection of seams in a vertical position. In the lower position, welding is carried out using a gasket; vertical works are available in short-term mode.
- The high degree of thermal conductivity of the material will require the use of methods to remove heat from the joining area.
- Linear expansion during heating affects an increased tendency to deformation and crack formation.
You should also remember about the ability to absorb oxygen and hydrogen when exposed to high temperatures. The tendency to oxidation requires the use of special gels consisting of silicon, phosphorus or manganese.
, please select a piece of text and press Ctrl+Enter.
Rules for welding copper pipes
In order for welding and installation of copper pipes to be successful, it is necessary to adhere to the following rules during the work process.
So:
- For maximum welding efficiency, the gas torch flame should be slightly reduced. Such a flame creates maximum heating of the surfaces being joined, and at the same time cleans the joint.
- Before welding, all metal surfaces must be pre-cleaned (without compromising their integrity) and degreased. Welding of non-greased or contaminated surfaces is not permitted.
- Before heating, it is necessary to check the relative position of the parts, their size and the required clearances. If the gap between the parts is less than required by technology, we use a pipe expander with a nozzle of the appropriate diameter.
- When connecting copper pipes to copper pipes using capillary soldering, no flux is required when using copper-phosphorus solder (the solder is self-fluxing). When soldering copper pipes with pipes or fittings made of other metals (brass, bronze) or using other solder, apply a minimal amount of flux to the outside of the joint.
Excess flux must be removed after completion of pipe welding and before installing pipes during pipeline installation.
Connection via fitting
- When soldering, parts are heated evenly to the required temperature. Heating the parts being connected to their melting temperature is not allowed. In case of overheating and deformation, the part is rejected.
- The heating cycle of soldered parts should be as short as possible. Reheating cooled parts is undesirable - this leads to a decrease in strength characteristics.
- When soldering pipes, apply solder directly to the seam between the pipes, checking that it is evenly distributed in the weld. To distribute the solder evenly, heat the seam using a gas torch.
Progress
Welding of copper pipes proceeds as follows:
- Cut the part to the required length. The best way to deal with this is with a pipe cutter that rotates around the reinforcement several times, tightening the clamping bolt a little each time. With this cutting method, the cut will be smooth, and burrs will only be on the inner surface. It is better to purchase a high-quality tool so that the edges are perfectly smooth, this will save time and effort when further working with the part;
- The result of cutting should be a perfect cut without jagged edges, so you will then need to use a chamfer remover to remove excess metal shavings from the walls. After this, the inner surface must be degreased and the same manipulations must be done with the next part.
- A pipe expander is used, which easily increases the connector of one of the parts, so that when connecting several, you get a cast structure.
- Next, you should apply flux for soldering copper pipes. It is better to do this with special care, since excess flux can lead to violations of the technology and the tightness of the surfaces being soldered. Take a special brush and soldering paste, which is applied to the inserted part. Excess must be removed immediately.
- If the connection is made using fittings, then you need to connect the parts as quickly as possible. Speed is required to prevent dust and dirt from getting onto the flux. After connecting, you need to tighten the fittings until they stop. During the rolling process, the flux is evenly distributed between the joint surfaces.
- After all the manipulations have been carried out, they proceed directly to welding. Take the burner, turn it on and warm up. Next, the flame is directed to the junction of copper products. The surface is heated over the entire joint area so that the surface is heated evenly. Then a wire is brought to the heated surface, which begins to melt upon touching the heated surface.
In the process of low-temperature welding, it is important not to melt the tin wire (or other soldering compound used), but to heat the surfaces of the pipes being welded. Various metals with a melting point lower than that of copper can be used as solder (melting point of copper is 1083.4 °C). - After cooling, the resulting structure will be ready for use.
Important! If the use of open flame is limited, it is better to use a soldering iron.
How to solder water pipes
Advantages of copper structures for water supply systems over analogues made of plastic and other types of steel:
- withstands heating temperatures up to 600 degrees;
- operating pressure reaches 100 bar;
- the maximum load exceeds 550 atmospheres;
- resistance to pressure and temperature changes;
- easy replacement in case of accidents - only the area where the accident occurred will need to be replaced;
- the use of copper pipes specifically for water supply increases the service life by several decades. This is due to the fact that chlorine from tap water oxidizes the internal walls, resulting in the formation of a thin film of a protective layer;
- at high temperatures, the plastic begins to evaporate, and over time, low molecular weight organic matter forms on the walls. Copper products are resistant to any temperature and have antibacterial properties.
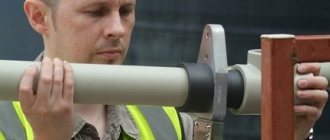
For plumbing, you can solder copper pipes, as well as heating and cooling structures, at home using ordinary tools that every craftsman often has at home.
Important! When soldering water pipes, it is better to choose solder for copper pipes that does not contain cadmium or lead, since these materials are toxic.
Features of soldering for air conditioners
Soldering copper tubes, as a rule, can be done in several stages:
- Marking of the future cooling system.
- Wall chipping.
- Direct welding of copper fittings.
Soldering copper pipes for air conditioning has the following features:
- cutting with a hacksaw is not recommended - the remaining notches inside the cut part can create difficulties in the passage of gas and liquids, and can also cause the development of corrosion;
- pay special attention to the drainage pipe, which is installed at a certain angle, otherwise there will be problems with condensate drainage;
- startup and cooling testing are carried out only after the solder has completely solidified and the copper structures have cooled.
In the wall, copper structures must be in a special foam or plastic coat.
Important! When soldering copper fittings for air conditioning, compliance with all safety rules is of great importance.
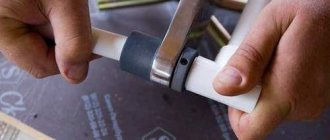
How to solder copper tubes at home
Soldering copper fittings with your own hands has many advantages, among which the main ones will be the efficiency and reliability of the soldered system, because every master tries to do everything for himself with high quality.
For soldering at home, you will need the usual tools (torch, stripping brushes, sandpaper, expander, adjustable wrench, etc.). The technology of welding on an industrial scale and soldering at home differs only in the tools used.
Installing pipes with your own hands will not only please you with the money you save, but also with the process itself.
Safety precautions when welding copper pipes
When performing work on welding copper pipes, as well as when welding pipes using electric welding, it is necessary to strictly follow all safety regulations.
All work associated with the release of toxic gases and smoke (soldering using solders containing cadmium, soldering with fluxes containing fluoride compounds) must be performed in rooms that provide the proper level of ventilation.
In addition, precautions must be taken when working with gas heating pads - both those equipped with disposable cylinders and standard acetylene-oxygen ones.
You should also not forget about the use of protective clothing and personal protective equipment - a respirator, goggles and gloves.
How to solder copper pipes with your own hands
In private households and in production, only two methods are used for soldering products made of copper and alloys:
- Soldering at high temperatures, the so-called “hard soldering”, when the solder melts in the range of 600C-900C. To solder a copper part, use refractory solder, and you will get a strong, reliable seam that can withstand heavy mechanical loads;
- Low-temperature “soft” soldering (≤ 450C) is used in everyday life. Low-melting solder is used to connect tubes or seal cracks.
To get a reliable result, use the following tool for soldering copper pipes:
- Pipe cutter, grinder, jigsaw, hacksaw;
- A chamfer, which is used to clean the cut ends of copper pipes;
- Soldering iron - electric of varying power, gas, or an old design, heated over an open fire. Also, sometimes soldering is carried out with a gasoline blowtorch or a gas welding torch. Electric soldering irons are suitable for soldering with hard and soft solder; gas soldering irons are better suited for working with hard solders and corresponding additives such as borax;
- Expander - a device that expands the end of one product so that it can be inserted into the edge of the second;
- Solder is selected for each mode. For hard soldering of the heating line, copper wire with phosphorus admixtures is suitable, for low-temperature connections - tin solder with lead additives;
- Additives (flux) can be liquid or solid, acidic or alkaline, and are designed to clean solder surfaces from oxides. The most common flux in everyday life for soldering copper products is rosin and borax.
If a large area is being repaired, then to regulate the melting temperature of the solder, use a construction industrial hair dryer with nozzles of different designs that allow you to regulate the flow and direction of hot air. Tools and accessories also include sandpaper, a wire brush, rags, and brushes.
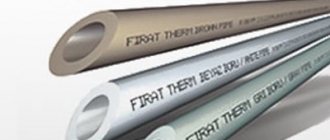
Types of copper pipes and their uses
There are two types of copper pipes on the market: annealed and non-annealed. After formation, annealed ones undergo additional heat treatment - they are heated to 600-700 °C. This procedure returns elasticity to the material, which is lost during molding. Therefore, annealed pipes are more expensive, but also more flexible - they can even withstand freezing of water. The disadvantages of these products include lower strength - it decreases due to heating.
There are different types of copper pipes
Unannealed copper pipes are stronger, but practically do not bend. When installing plumbing or heating, they are cut into pieces, and all bends are made using appropriate fittings.
There are copper pipes with different wall thicknesses, sold annealed in coils of 25 and 50 meters, unannealed in runs of 3 meters. If we talk about the purity of the material, then according to GOST 859-2001, at least 99% copper must be present in products.
The soldering process from a theoretical point of view
Soldering of many pipes, including copper ones, is carried out in compliance with the principle of overlapping two parts. As a result, it is possible to achieve sufficient structural strength regardless of the solder used, when even its soft types, which are characterized by insufficient durability, guarantee a reliable connection.
To obtain acceptable strength of joints by soldering, it is necessary that the products at the point of contact overlap each other by at least 5 mm. In fact, a much larger overlap is created, which provides a noticeable margin of safety.
It will be possible to achieve the required overlap of structures during pipeline assembly by carrying out operations with cylindrical products such as expansion and flanging, as well as by using special fittings.
When installing the connecting elements, a gap of about 0.2 mm is formed, which ensures the occurrence of capillary forces, the presence of which is mandatory for a high-quality soldering process. This has the effect of heated solder flowing into the gap, ensuring the required level of sealing at the contact point. Thanks to the action of capillary forces, it becomes possible to supply solder from below.
Soldering technology for copper products
After preparing the tools and materials, the pipes are soldered, consisting of the following steps:
- cutting workpieces into pieces;
- degreasing and removal of oxides;
- joining of elements;
- applying solder to the joint line.
Cut the part to the required length
Welding copper tubes begins with marking the pipeline, which is then cut into elements of the required length. When marking, it is necessary to take into account the length reserve required to connect the tubes after expanding the end. A hand-held cutting tool allows the pipe to be clamped and then a carbide roller is rolled around the outer surface of the workpiece. As the body of the pipe is cut, the roller is tightened by the adjusting bolt, which allows for an even cut.
It is possible to cut workpieces using a hacksaw for metal and a special template that ensures the perpendicularity of the cut. When cutting, compression of the pipe is not allowed, since the ovality of the outer surface impairs the tightness of the joint (due to a change in the gap, which will not be filled with solder). The resulting flash is removed with sandpaper and a metal brush. Then one of the edges is treated with an expander, which will create a sealed joint with increased strength.
Apply flux to the surface of the pipe
Welding copper pipes with your own hands requires removing oxides from the surface of the parts being joined. The workpieces are wiped with a degreasing compound (for example, acetone), and then a reagent is applied to the edges to be joined. It is not recommended to use an increased dose of flux; the active substance is evenly applied in a thin layer to the joint area. To apply the reagent, use a paint brush that does not leave fibers on the surface.
Connecting parts before soldering
After applying flux, the tubes are joined; it is recommended to join the elements immediately after lubricating the surface (to reduce the risk of dust settling). When connected, the parts rotate relative to each other, which allows the flux to be distributed and ensures a tight fit. The reagent squeezed out from the joint is removed with a dry cloth; it is prohibited to store flux on elements made of non-ferrous metals, since the destruction of the material begins.
Joint formation during low-temperature soldering
Low-temperature technology uses a flux designed for reduced heating of the structure during connection. Soldering copper tubes with a gas torch involves supplying a torch to the joint area, the torch moves along the joint, ensuring uniform heating of the parts. Then a bar of solder is taken in hand and fed into the gap between the pipes. The molten metal begins to spread over the surfaces, the burner is moved to the side, and solder fills the joint due to the temperature of the heated pipe.
Seam formation during high-temperature soldering
When using refractory solders, the pipes are heated with a burner to an elevated temperature. The burner moves along the joint area until the pipe is heated to a cherry-red hue (corresponding to a temperature of 750°C). Then solder, preheated by a burner flame, is supplied to the joint.
Solder melts upon contact with heated pipes, uniformly filling the installation gap. There is no need to apply excess solder since the material will remain on the outside of the pipeline. After completing the procedure, you must wait 2-3 minutes; after the temperature of the joint has decreased and the solder has crystallized, the flux residues are removed. No additional machining of the connection is required.