Wanting to make their bathroom more neat and convenient, many people decide to hide the water and sewer pipes when carrying out renovations. The best way to do this without transferring communications and with a minimum of dust is to build a box for pipes in the bathroom. You can assemble a plumbing box with your own hands; there are several options available for this.
Plasterboard box
The most common option for hiding pipes is to assemble a box from moisture-resistant plasterboard. This is due to the fact that ceramic tiles, which are most often used to decorate bathrooms, can then be glued onto the drywall. Let's consider the main stages of constructing a gypsum plasterboard box.
Stage 1: marking
Before starting to assemble the frame, markings are made at the installation site of the box. The initial mark is placed at a distance of 30–50 mm from the most protruding element of communications.
The frame stand is located at a distance of at least 3 cm from pipes and other communication units.
Next, using a level, a vertical line is drawn along the surface of the wall, indicating the line of fastening of the frame. A similar mark is placed on the other wall, as well as in areas where horizontal pipes are closed.
Note! It is advisable to select the size of the box for tiling in such a way that whole tiles are used to cover all protruding parts. In addition to saving tiles, this allows you to create a neat and complete cladding.
Stage 2: frame construction
Assembly of the frame begins with the installation of a guide profile, which is attached to the walls with dowels along the marking lines. The step between the attachment points is 20–30 cm. The guide profile is also attached to the ceiling and floor to form the angle of the frame and install the front pillar. To ensure that the corners of the frame below and above are located in the same plane, first the guide profile is attached at right angles to the ceiling. Then a plumb line is tied to it and a point is marked on the floor where the lower corner of the frame should be located.
A rack profile is screwed to the guide profiles located on the floor and ceiling with self-tapping screws, which is fixed with 3-4 horizontal jumpers for additional mounting rigidity.
Note! Reinforcing jumpers are mounted taking into account the future location of inspection hatches that provide access to valves and meters.
After assembling the vertical part of the frame, if there are horizontal pipes for them, the frame is assembled according to a similar scheme:
- A guide profile is attached to the wall and floor, which sets the dimensions of the future box.
- The front frame element is attached to the guides using jumpers cut from the rack profile.
All jumpers are also installed taking into account the location of the sewer outlet for connecting the toilet, inspection hatches and shut-off valves.
Stage 3: framing the frame
The finished frame is sheathed with moisture-resistant plasterboard, cut into pieces of the required size. GKLV is cut with a sharp knife: first, the cardboard is cut along the line on one side (with a slight penetration into the gypsum core), then the sheet is broken along the cut line and the cardboard is cut on the second side. The sheathing is fastened to the frame using black self-tapping screws in increments of 15–20 cm. The place where the inspection hatch will be installed is not covered with plasterboard or a hole is then cut out.
Note! It is advisable that at this stage the inspection hatch has already been selected by type and size and purchased so that you can immediately try it on for a tight fit.
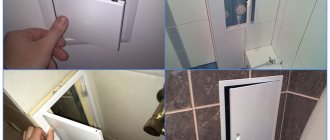
Types of hatches used for plasterboard boxes:
- Plastic hatches. They can be hinged, folding or sliding.
Plastic flap. - Push-type invisible hatches are installed before the cladding is completed and are fastened with self-tapping screws to the metal frame of the box.
Hidden push hatch. - A tile hatch with magnets is a popular design, which, if made independently, is cheaper than self-extending models.
Magnetic tiles are one of the types of hidden hatches
Stage 4: finishing
Before finishing the box, it is necessary to prepare it, this is done in the following sequence:
- All seams between the drywall are opened with a knife, then, along with the corners and other edges, they are sanded.
- The seams are filled with putty, and sickle tape is glued on top.
- The corners are also treated with a putty mixture and glued with sickle tape.
- After the putty has dried, the box is treated with a primer in two passes, with a break for each layer to dry.
A plasterboard box is most often faced with ceramic tiles: a continuous layer of tile adhesive is applied to the back side of the tile, which is smoothed with a notched trowel. The tile is applied to the drywall and pressed, then the next one is glued. Having completed the installation, the seams are rubbed using the usual technology, and the corners are covered with decorative elements of a color suitable for the finish.
Read more about laying tiles on drywall here.
How and from what to beautifully make a box for pipes in the bathroom
Wanting to make their bathroom more neat and convenient, many people decide to hide the water and sewer pipes when carrying out renovations. The best way to do this without transferring communications and with a minimum of dust is to build a box for pipes in the bathroom. You can assemble a plumbing box with your own hands; there are several options available for this.
Plasterboard box
The most common option for hiding pipes is to assemble a box from moisture-resistant plasterboard. This is due to the fact that ceramic tiles, which are most often used to decorate bathrooms, can then be glued onto the drywall. Let's consider the main stages of constructing a gypsum plasterboard box.
Stage 1: marking
Before starting to assemble the frame, markings are made at the installation site of the box. The initial mark is placed at a distance of 30–50 mm from the most protruding element of communications.
The frame stand is located at a distance of at least 3 cm from pipes and other communication units.
Next, using a level, a vertical line is drawn along the surface of the wall, indicating the line of fastening of the frame. A similar mark is placed on the other wall, as well as in areas where horizontal pipes are closed.
Note! It is advisable to select the size of the box for tiling in such a way that whole tiles are used to cover all protruding parts. In addition to saving tiles, this allows you to create a neat and complete cladding.
Stage 2: frame construction
Assembly of the frame begins with the installation of a guide profile, which is attached to the walls with dowels along the marking lines. The step between the attachment points is 20–30 cm. The guide profile is also attached to the ceiling and floor to form the angle of the frame and install the front pillar. To ensure that the corners of the frame below and above are located in the same plane, first the guide profile is attached at right angles to the ceiling. Then a plumb line is tied to it and a point is marked on the floor where the lower corner of the frame should be located.
A rack profile is screwed to the guide profiles located on the floor and ceiling with self-tapping screws, which is fixed with 3-4 horizontal jumpers for additional mounting rigidity.
Note! Reinforcing jumpers are mounted taking into account the future location of inspection hatches that provide access to valves and meters.
After assembling the vertical part of the frame, if there are horizontal pipes for them, the frame is assembled according to a similar scheme:
- A guide profile is attached to the wall and floor, which sets the dimensions of the future box.
- The front frame element is attached to the guides using jumpers cut from the rack profile.
All jumpers are also installed taking into account the location of the sewer outlet for connecting the toilet, inspection hatches and shut-off valves.
Stage 3: framing the frame
The finished frame is sheathed with moisture-resistant plasterboard, cut into pieces of the required size. GKLV is cut with a sharp knife: first, the cardboard is cut along the line on one side (with a slight penetration into the gypsum core), then the sheet is broken along the cut line and the cardboard is cut on the second side. The sheathing is fastened to the frame using black self-tapping screws in increments of 15–20 cm. The place where the inspection hatch will be installed is not covered with plasterboard or a hole is then cut out.
Note! It is advisable that at this stage the inspection hatch has already been selected by type and size and purchased so that you can immediately try it on for a tight fit.
Types of hatches used for plasterboard boxes:
- Plastic hatches. They can be hinged, folding or sliding.
Plastic flap. Push-type invisible hatches are installed before the cladding is completed and are fastened with self-tapping screws to the metal frame of the box. Hidden push hatch. A tile hatch with magnets is a popular design, which, if made independently, is cheaper than self-extending models.
Magnetic tiles are one of the types of hidden hatches
Stage 4: finishing
Before finishing the box, it is necessary to prepare it, this is done in the following sequence:
- All seams between the drywall are opened with a knife, then, along with the corners and other edges, they are sanded.
- The seams are filled with putty, and sickle tape is glued on top.
- The corners are also treated with a putty mixture and glued with sickle tape.
- After the putty has dried, the box is treated with a primer in two passes, with a break for each layer to dry.
A plasterboard box is most often faced with ceramic tiles: a continuous layer of tile adhesive is applied to the back side of the tile, which is smoothed with a notched trowel. The tile is applied to the drywall and pressed, then the next one is glued. Having completed the installation, the seams are rubbed using the usual technology, and the corners are covered with decorative elements of a color suitable for the finish.
Read more about laying tiles on drywall here.
Options for hiding pipes
There are other ways to hide utility lines of this type from the eyes of residents and their guests.
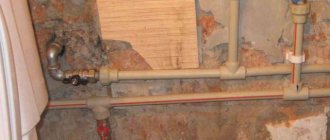
Wall up all the heating circuits running through the apartment. It would seem that everything is very simple: just make grooves, lay pipes in them, and then seal them with mortar and plaster. But before starting work, it is necessary to eliminate even the most minor communication errors and provide for possible scenarios for the development of events. This especially applies to plastic pipes that are connected with fittings. Yes, and steel ones can also leak if the welding technology is not followed.
Disguise communications with furniture. This is how things usually happen in the kitchen. But in rooms with a minimum of furniture (such as, for example, an open studio), this is almost impossible to do.
Taking into account the above, decorative boxes for heating pipes are the most reliable way to hide such elements of utility lines. The right approach will not only disguise the heating system, but also add interesting accents to the interior design.
The easiest way is to hide heating communications behind pieces of furniture
Today boxes are made mainly from the following materials:
- plastic lining. It is fixed to a metal or wooden frame;
- brickwork. It is not always possible to implement this method of masking unsightly pipes, since it is characterized by great labor intensity;
- drywall. Today, decorative boxes made from this material are most widespread;
- ready-made plastic boxes. They are simply placed around the pipes and attached to the wall on a metal frame.
Plastic box
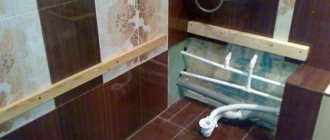
Another frequently used material for hiding communications is PVC panels. A plastic box for pipes in the bathroom is most often constructed if the walls and/or ceiling are covered or planned to be covered with plastic. Let's look at how to properly make a plastic box with your own hands when hiding a sewer riser in a Khrushchev building.
Frame assembly
The frame, as for a gypsum plasterboard box, is assembled from guides and rack profiles according to a similar scheme:
- The guides are attached to the wall using dowels.
- The outer corner is formed using a profile secured with jumpers. Fastening of all elements of the metal frame is carried out with so-called bugs or fleas - metal screws 13 or 16 mm long.
Advice! If there is free space behind the pipes, you can use any corners to secure a wooden shelf, and then install an additional hatch in the casing. This simple method will provide a convenient place to store household chemicals or other items.
Frame covering
Conventional plastic panels are used to cover the frame. Depending on the size of the frame, you can choose a strip width of 10 or 25 cm. The frame is sewn in the following order:
- Near the wall, a starting profile is attached to the frame, into which the edge of the panel fits.
Starting profile for plastic. One edge of the plastic panel is inserted into the profile, and the free edge is screwed to the metal jumpers with self-tapping screws.
Fastening the first panel. The next panel is connected to the first and cut along the edge of the frame post. The cut edge is also attached to the profile with self-tapping screws.
Installation and fastening of the edge strip.
If pipes pass through the box that are not planned to be closed (for example, heating pipes or a heated towel rail), then to carefully handle them proceed as follows:
- The starting profile is attached to the frame close to the wall.
- Cutouts are made in the plastic panel at one edge for approximately half the diameter of the pipe.
- The panel is cut to width and inserted into the space behind the pipe.
- A cutout is also made in the next panel for the remaining diameter, and the panels are connected to each other.
This method allows you to make a neat outline of the pipe, and the remaining gap is subsequently filled with sealant.
Note! During the covering, marks are made on the plastic panels where the hole for the hatch will be located and its size.
Final stage
When the box is completely sheathed, according to the marks made in advance, holes for hatches are cut using a jigsaw with fine teeth.
For installation on plastic boxes, plastic folding or rotating hatches are used, which are selected according to size. The hatch is secured using silicone sealant, which is applied along the edges of the product. Then the hatch is pressed against the plastic sheathing, and the protruding sealant is removed.
If there is no handle in the opening hatch cover, opening it is not very convenient. For convenience, you can use a regular self-tapping screw to screw on a plastic furniture handle that matches the color.
To make it more convenient to open the hatch, a handle is screwed onto the door.
The outer corner is covered with a plastic plinth, which is fixed with silicone sealant.
Advice! It is recommended to secure the outer corner with masking tape while the sealant is setting so that it does not come off.
The final touch is to fill the gaps between the pipe and the plastic lining with white sealant.
Application of decorative linings for heating pipes
When carrying out major repairs, neat polypropylene or metal-plastic pipes are installed in place of old, outdated steel utility lines. But, even having an attractive appearance, they are not always able to fit harmoniously into the interior of a modern living space. And here, in order to make them less noticeable or, conversely, to give them the missing notes of sophistication and leave them in plain sight, you can use decorative linings on heating pipes.
Decorative rosettes are made from a variety of materials, but wood looks best
Currently, there are several varieties of products of this type on sale. However, many home craftsmen opt for so-called sockets. And there are reasons for this.
When laying flooring, it is necessary to solve the problem of the gap that occurs where it meets the pipe. Such a gap doesn’t seem to interfere, but it doesn’t look the best either.
If laminate is used as a floor covering, leaving a gap of up to 10 mm is simply necessary. Thus, you will create a space whose volume will be sufficient to accommodate this material during its thermal expansion. Therefore, it is recommended to close the gap using a special device that can hide a cosmetic defect without compromising the functionality of the floor covering. In this case, the optimal and universal solution will be decorative rings for heating pipes, commonly referred to as sockets. This product is simply put on the pipe, after which it is inserted into the slot and snapped into place.
Decorative overlays need to be installed so that the entry point of communications into the ceiling looks aesthetically pleasing.
The main advantages of decorative sockets for heating pipes include:
- aesthetic appeal;
- ease of installation;
- acceptable price;
- wide variety of standard sizes;
- a variety of textures imitating the surface of natural wood and colors;
- versatility. Sockets can be used with various types of coatings.
The relevance of using decorative plugs for heating pipes deserves no less attention. This is due to the peculiarities of the coolant transportation scheme through utilities, which directly determines the method of connecting radiators. Most of these products in modern design are designed for 4 options: one-sided, diagonal, saddle and bottom connection. That is, at each corner of the batteries there is one hole, but not all 4 are used, but only 2 - one for the coolant input, and the other for its output. Obviously, the two remaining “unemployed” need to be closed. In this case, decorative plugs will come to the rescue. These products differ not only in color, but also in shape. The metal plug can be the simplest spherical or even with a protruding part reminiscent of an autumn oak leaf. But corks made of polymer materials can only be called decor with a big stretch. Such plugs are for the most part strictly functional.
By closing the heating pipes, you will improve your home and get a harmonious interior.
Home | With your own hands | How to mount a decorative pipe box
Collapsible box options
In conclusion, we will look at four ways to make a collapsible box in the bathroom, so that in case of emergencies or replacement of risers, you can provide access to them and do not have to break the entire structure.
Method 1
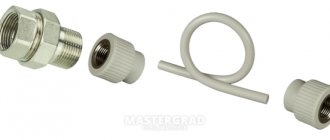
The plasterboard box is assembled on an independent frame structure that is not attached to the wall. The box itself is glued to the already laid tiles with one-component polyurethane adhesive. To remove the box in the pipes that come out of it, quick-release connections of the “American” type are provided. If full access to the riser is necessary, the glue is carefully cut with a knife or other sharp object, and the box is carefully set aside.
Advantages and disadvantages of masking pipes
In the realities of domestic construction and repair, boxes made of plasterboard or plastic have become an alternative to special plastic boxes. They are installed, as a rule, at the repair stage and immediately cover the unsightly appearance of pipelines. The advantages of this method of masking pipelines:
- Organic design - your guests or visitors will not be able to distinguish a decorative structure from a technological channel for laying heating systems.
- Relatively inexpensive cost - the internal area of the room, which is planned for finishing with plasterboard, will not require much more material for organizing decorative steps or thresholds.
Flaws:
- Once you have installed such boxes, you will not be able to inspect and diagnose the condition of the pipeline. Moreover, in cases where a leak occurs or a pipe breaks, it will not be possible to quickly respond to the leak. Elimination will require dismantling of a significant area.
- When installing plinths, there is a risk of damage to pipelines, communications and other engineering systems, since the builder or installer cannot know what is behind the wall.
- Boxes mounted in this way will not allow you to modernize or partially replace the heating or water supply system.
How to make a pipe box in the bathroom
Speaking about pipes in the bathroom, it should be noted that they do not look very attractive.
Therefore, the question of how to make a pipe box in the bathroom worries many people. After all, hidden pipes have a more aesthetic appearance. Installing a box is the most common method. Just before installation, it is necessary to calculate everything so that there is unhindered access to the main line distribution.
Otherwise, it will not be possible to carry out repair work without dismantling the box.
Decorative box and linings for heating pipes, the better to close communications
Our contemporaries will not be surprised by the presence of various pipes in the living space. Their network often prevents the implementation of design projects aimed at creating comfort, beauty and lightness in individual rooms. However, in order to improve the interior of the room, the pipes can be hidden in the original design. Of course, to make a decorative box for heating pipes you will have to spend time and money, but the result can exceed even your wildest expectations.
Using a decorative box you can not only hide all heating communications, but also add a stylish touch to the interior
First you need to make a frame
Regardless of the cladding material and the location of the box, the frame is always made the same way. Let's consider this using the example of a box located vertically.
Work begins with the installation of two guide profiles. If the box is placed in a corner, then they are mounted on one and the other side of the corner. And in areas where the main line runs straight, it must be installed on both sides of the pipe.
The guides must be strengthened using a level, and they should be secured with dowels or self-tapping screws.
IMPORTANT! In order not to lose a lot of space in the bathroom, you need to ensure that the profiles are located as close to the pipes as possible.
Next, they move on to installing guide profiles in the bathroom on the ceiling and floor.
From the edge of the wall profile on the wall, lines are drawn parallel to the wall. Where the lines intersect will indicate the length and direction for mounting the guides. The necessary blanks are cut (two for the floor and two for the ceiling).
Then they are secured with dowels and the direction indicated by the lines is maintained. This is necessary in order not to disturb the vertical angle that is formed later.
First, you need to install it on the ceiling, and then, using a plumb line, transfer the joining point to the floor. This is where the floor profiles are assembled.
Next comes the turn of making one corner element. To do this, you will need to fold two guide profiles so that the recesses are directed at right angles to each other.
They must be fastened with self-tapping screws with a diameter of 3.5 mm and a length of 9 mm (tex).
This corner element is cut according to the height of the room and inserted into the guides on the ceiling and floor. The entire structure is then secured with tex.
The next stage of work will be connecting the wall and corner guides with blanks of supporting profiles.
They are placed every 5 cm, otherwise the frame will not have the necessary rigidity. And now you can move on to the casing.
Plasterboard box
The easiest way to hide all the pipes of the heating system is in gypsum plaster structures. Ease of manufacture and relatively low cost are what determine the high demand for this material.
Helpful information! Gyprok is nothing more than the drywall we are used to. It received this name “thanks to” the Russification of the English name of its most popular brand – Gyproc.
To make a plasterboard box you will need:
- wooden beams or metal profile;
- the drywall itself. If you are going to decorate pipes in the bathroom, it is better to purchase a moisture-resistant one, while for all other rooms, a standard one will do;
- fastening elements - screws and dowels;
- materials for putty and finishing;
- accessories that allow you to cover the joints of the structure with the floor and walls. In this case we are talking about decorative sockets for heating pipes, linings, plugs, and rings.
You can build a pipe box from the most popular material for such purposes - plasterboard.
Installation of a plasterboard box includes the following steps:
- First you need to determine its dimensions. In this case, it is necessary to prevent the heating pipes from touching the walls and frame elements;
- cut wooden beams or profile strips in accordance with the selected dimensions;
- We fix the starting profile on the floor. Then the frame is assembled on this base. To connect the elements, it is enough to use self-tapping screws and tighten them with a screwdriver;
- We cut off the necessary fragments from the plasterboard board, taking into account the dimensions of the frame. Having processed the edges with a gypsum board plane, we apply them to the sheathing. Fixation is done with self-tapping screws;
- to protect the edges of the slab from damage, a special overlay made of perforated metal must be glued to the corners of the structure;
- We treat the joints between the plates and the entry points of screws into the material with putty.
- We prime the box and begin finishing.
The final stage of creating a decorative structure is the installation of a plinth at the junction of the box with the wall and floor.
Which material is better to choose
Before covering, it is recommended to fill the free space inside with mineral wool. This reduces the intensity of water noise.
Most often, plastic or plasterboard is used for cladding. The main difference between these materials is that the plastic design is more convenient.
If necessary, it can be easily and quickly disassembled. And it folds up very easily too. A box made of plastic panels does not need additional finishing, but drywall does.
Installation features
Before starting work, check the condition of the pipes. The main attention is paid to connections, especially if they are threaded; detected defects are eliminated.
Then the dimensions of the future structure are measured, taking into account that the distance between the pipes and the walls of the box cannot be made less than 3 cm. The pipe box is installed in the following sequence:
- A metal profile (wooden slats) is fixed to the walls. If wooden blocks are used, they are treated with a moisture-repellent compound.
- The front face stand is mounted.
- The metal structure is attached to the floor and ceiling. If the frame is high (exceeds 1.5 m), additional horizontal lintels are provided.
- The selected material is cut to size. The parts are secured to the frame with small self-tapping screws.
- It is highly desirable that the box has a technical hole for a hatch. If a leak occurs, you can easily fix it.
- If necessary, finishing work is carried out. Drywall, MDF and plywood can be painted or tiled. Plastic panels are beautiful in themselves and do not need additional finishing.
Making the frame Source design-homes.ru
Sheathing with plasterboard
It is not difficult to make a box in a bathroom from plasterboard. Sequence of work:
- Drywall sheets are cut into pieces of the required size.
- These pieces are then screwed to a metal profile. To do this, use 27 mm self-tapping screws. Fastenings are made at intervals of 30 cm using a screwdriver or screwdriver.
- A small chamfer needs to be removed from the joint of the drywall sheets, and the resulting gap is sealed with putty.
The final finishing of this material is done in the same way as finishing the walls. To do this, use plastic panels, paint, wallpaper, or ceramic tiles.
Plastic decorative boxes for heating pipes
- the most affordable boxes and decorative screens (grids),
- practical to maintain,
- do not need painting,
- universal for gas, sewer and cold water pipes.
Due to the popularity of such boxes, manufacturers often use low-quality plastic. Cannot withstand prolonged exposure to high temperatures (hot water supply, heating pipes). As a result, the decorative box:
- deformed,
- changes color
- become fragile.
The plastic box in the form of a plinth deserves special attention. But it already belongs to a different, higher price category.
Access to communications is an important detail when installing a box
It should be borne in mind that the network will someday need to be repaired, so you need to provide convenient and quick access to it. For such purposes, a hole must be made in the structure.
The small dimensions of such a hole make it difficult to access, so take this point into account in advance.
The hole is closed with a special hatch. Construction stores have a wide selection of these designs. Buyers can choose any color, size and model modification. The device is secured with magnets.
Blinds are also used for the opening. Not everyone likes this solution, but you can get to the pipes in a couple of minutes.
Removable box made of plasterboard and tiles
A removable box for pipes in the bathroom is suitable in cases where it is necessary to sew up pipes inexpensively and neatly. In this case, the advantage is that if a pipeline breaks, it is easy to gain access to the problem area.
For a removable structure, moisture-resistant plasterboard and metal guides are used. The entire structure is made of attached parts that are installed one on top of the other.
All sections are corner elements and are attached to the wall using simple hinges, which are used for hanging shelves.
The structure is hung with screws, and it simultaneously rests on the floor. This design is resistant to shear. As an additional fastener, a metal corner is used from its inner part.
Access to communications becomes possible through the hatch even after the upper part is removed. Handles are attached to the sections from the inside. This is done for easy movement during installation.
It is better to make the final lining of the removable box from a tiled mosaic, which is glued with liquid nails. A hatch is installed in the middle section for access to ventilation and meters.
The seam between the sections does not need to be rubbed, but a rubber seal or silicone can be used.
Removable pipe boxes are not light in weight, but they can be easily and quickly disassembled, which makes them very convenient to use.
Box finishing with plastic panels
This design is considered a good alternative. This material is not particularly inferior to tiles, which occupy a leading place among finishing materials.
Plastic is easy to care for, it can be easily cleaned of dirt and grease stains.
This material is not afraid of temperature changes, and for a bathroom this is very important. The popularity of this material is also based on the fact that its installation is a simple process that does not require a lot of time and money.
If you decide to make a box from plastic panels in the bathroom, then you don’t have to think about leveling the walls. Plastic panels are mounted like laminate (using a puzzle method).
The installation process itself takes a couple of hours. A distinctive feature of this material is its resistance to deformation.
If the box is tiled in a new house, it may shrink over time. In this case, the tiles are destroyed, but this does not happen with panels.
Plastic panels have another advantage. They are much cheaper when compared to tiles. In addition to its high cost, to the costs of its installation you need to add the costs of glue, grout, corners, and leveling the walls.
Installation and maintenance
Plastic boxes, despite the fact that they have less decorative appeal, can be more versatile.
They are easy to install on any type of surface, including horizontal and vertical areas. A different section of the box will allow you to place the required amount of pipeline and make allowances for future changes or reconstruction. If there is a leak of coolant from the heating circuit or water from pipelines, the emergency area can be found and repaired very quickly, since most often the boxes have a collapsible structure. Plastic boxes are used both in commercial enterprises and to protect pipelines in private homes or apartments. For example, if you are planning another renovation or change in interior design, you can get rid of the unsightly appearance of pipelines by installing decorative elements or ducts.
Pipe box diagram
For the housewife, another critical issue will be keeping the pipeline clean. The cylindrical shape, the presence of additional fittings, turns and structural elements can make it difficult to clean the pipe from dirt, dust or other contaminants. Boxes for heating pipes are usually rectangular in shape, which will greatly please your office cleaner or housewife. If you don’t like the color and would like to brighten up the interior, you can always paint the boxes. This is not always possible with a pipeline, since, for example, to plastic pipes or worn steel pipes, the paint adheres reluctantly and is applied unevenly.
A rational way of heating remains the purchase and installation of plastic boxes. They can be easily installed by almost every construction-savvy craftsman with his own hands. It's no more difficult than installing baseboards or decorative boxes for electrical wiring.
There are plenty of options to hide and reliably protect heating pipes, ranging from plasterboard frames to galvanized and plastic profiles. In each case, you should approach this issue responsibly, since their operational period depends on the attitude towards heating pipes.
Why do you need to install a box in a bathroom or toilet?
When we renovate our bathroom or bathroom, we undoubtedly encounter the problem of open pipes. This can be solved by installing the box.
Open pipes will cause aesthetic dissatisfaction in any normal person. It's simply not pretty. Therefore, we come to the question of how to close these pipes. To do this you need to use a pipe box. Today on the market you will find two ways to cover unsightly pipes: using plasterboard or plastic. To do this, a special structure is created around the pipes, which blocks access to them.
Installing a pipe box in the bathroom is necessary both for aesthetic appearance and for ease of access to them
The structure consists of: walls and a hatch. Walls are usually made of plasterboard or plastic. The material of the hatch can be any.
The walls are ordinary partitions on a frame, which are needed to hide the pipes. They are laid around and you get a beautiful wall. But to access the pipes you need to make a separate window, that is, a hatch. At the same time, when creating a box design, it is necessary to take into account the free space for future repairs. If you need it, of course. But this possibility must be taken into account. To do this, leave enough space between the pipes and the walls. Therefore, the plumber will not have problems accessing the pipes for their maintenance and repair. Therefore, a bathroom or toilet box should be installed in every home.
Plasterboard box
The easiest way to hide all the pipes of the heating system is in gypsum plaster structures. Ease of manufacture and relatively low cost are what determine the high demand for this material.
Helpful information! Gyprok is nothing more than the drywall we are used to. It received this name “thanks to” the Russification of the English name of its most popular brand – Gyproc.
To make a plasterboard box you will need:
- wooden beams or metal profile;
- the drywall itself. If you are going to decorate pipes in the bathroom, it is better to purchase a moisture-resistant one, while for all other rooms, a standard one will do;
- fastening elements - screws and dowels;
- materials for putty and finishing;
- accessories that allow you to cover the joints of the structure with the floor and walls. In this case we are talking about decorative sockets for heating pipes, linings, plugs, and rings.
You can build a pipe box from the most popular material for such purposes - plasterboard.
Installation of a plasterboard box includes the following steps:
- First you need to determine its dimensions. In this case, it is necessary to prevent the heating pipes from touching the walls and frame elements;
- cut wooden beams or profile strips in accordance with the selected dimensions;
- We fix the starting profile on the floor. Then the frame is assembled on this base. To connect the elements, it is enough to use self-tapping screws and tighten them with a screwdriver;
- We cut off the necessary fragments from the plasterboard board, taking into account the dimensions of the frame. Having processed the edges with a gypsum board plane, we apply them to the sheathing. Fixation is done with self-tapping screws;
- to protect the edges of the slab from damage, a special overlay made of perforated metal must be glued to the corners of the structure;
- We treat the joints between the plates and the entry points of screws into the material with putty.
- We prime the box and begin finishing.
The final stage of creating a decorative structure is the installation of a plinth at the junction of the box with the wall and floor.
Deciding how to make a pipe box
The box is a decorative element that enhances the pipes in the bathroom. This way you close the ugly parts of communications. Therefore, you need to know how to make a box correctly so that later there are no problems in the toilet or bathroom.
The box can be made in three ways:
- Use drywall that is moisture resistant;
- Use wall panels. They are usually made from PVC;
- Use a plastic channel box.
The main feature of each material is increased moisture resistance
There will be high humidity in the bathroom, so it is important that the material does not lose its properties over time.
The box must be made in such a way that it completely covers all the pipes. At the same time, it is important to leave free space. This is necessary for repair work. If something happens to the pipe, the plumber should have easy access to the pipes without any problems.
Options for hiding pipes
There are other ways to hide utility lines of this type from the eyes of residents and their guests.
Wall up all the heating circuits running through the apartment. It would seem that everything is very simple: just make grooves, lay pipes in them, and then seal them with mortar and plaster. But before starting work, it is necessary to eliminate even the most minor communication errors and provide for possible scenarios for the development of events. This especially applies to plastic pipes that are connected with fittings. Yes, and steel ones can also leak if the welding technology is not followed.
Disguise communications with furniture. This is how things usually happen in the kitchen. But in rooms with a minimum of furniture (such as, for example, an open studio), this is almost impossible to do.
Taking into account the above, decorative boxes for heating pipes are the most reliable way to hide such elements of utility lines. The right approach will not only disguise the heating system, but also add interesting accents to the interior design.
The easiest way is to hide heating communications behind pieces of furniture
Today boxes are made mainly from the following materials:
- plastic lining. It is fixed to a metal or wooden frame;
- brickwork. It is not always possible to implement this method of masking unsightly pipes, since it is characterized by great labor intensity;
- drywall. Today, decorative boxes made from this material are most widespread;
- ready-made plastic boxes. They are simply placed around the pipes and attached to the wall on a metal frame.
Decorating a bathroom: how to make a plasterboard box for pipes
One of the options for decorating a bathroom is to make a plasterboard box for pipes. Drywall is inexpensive, which is why it is popular among people.
In order to make a box, you will need:
- Metal profiles are also galvanized;
- Fasteners;
- Silicone sealant;
- Serpyanka and putty;
- Inspection hatch.
Profiles must be metal and galvanized. The frame will be assembled from them. Fasteners are self-tapping screws, dowels and nails. Sometimes you may need a plumbing tool, but this is necessary in rare cases. With their help, it is necessary to connect the supporting structure, attach it to the floor and walls. Fasteners are also needed to secure the drywall sheets. We will use serpyanka with putty to cover up the unsightly parts of the sheets - the joints. An inspection hatch or opening door is needed for pipe maintenance.
The plasterboard version of the pipe box is good because it is the cheapest
How to make a box:
- We mark the walls. We check the level of its inclination using a level. We avoid markings where the box will interfere with the opening of furniture or doors;
- We assemble the frame. We cut metal profiles using special scissors.
- We place parts of the frame on the floor, part of the tiles and walls. We must start with them;
- We install the vertical parts of the frame;
- We install the top guide. It will connect all the elements into a single structure;
- We install auxiliary guides. They are needed for situations where you need to have access to the box. This is necessary for pipe maintenance and repair.
- We fix the inspection hatch.
Check that each part of the metal profile is firmly fixed and does not wobble from side to side.
Each profile must be connected with self-tapping screws. People call them seeds. To do this, you need to make a notch on the metal. This will stop the tip of the screw from slipping. They will easily include the components of the entire structure.
If you don’t want to spend money on a specialist, then you can make the box yourself. There's nothing complicated about it. All you need is basic metal carving skills and intelligence. So, go for it!
Features of application
The main prerequisite for the use of plastic, metal or any other boxes is the linear expansion of the materials from which the pipeline is made under the influence of elevated temperature. This means that rigid fixation inside a wall, ceiling or in a monolithic floor is simply unacceptable. Such an oversight will lead to deformation of the material surrounding the pipe (most often concrete) or to destruction of the surface of the pipe itself. Linear expansion is not typical only for metal-plastic pipelines; in other cases it can reach from 5 mm to several centimeters for every 10 m of pipeline. This problem can be partially eliminated by using pipe insulation, however, with large expansion coefficients and large horizontal sections, such a measure will not fundamentally affect the risks of pipe deformation.
The box should allow the pipe to expand slightly, ensure freedom of air circulation, and prevent the pipes from possible mechanical damage or negative influences, such as moisture. The most affordable and versatile can be considered plastic boxes, which perform both a decorative and protective function. They are not susceptible to corrosion, fungus or moisture, are easy and quick to install, and have an attractive price. Such a perforated profile can not only provide air circulation to improve the safety of heating pipes, but will also allow for convection and heat exchange with the main volume of the room.
We install a box for the sewer pipe
The sewer pipe box is installed in almost all bathrooms and toilets. It is needed to hide ugly sewer pipes. Therefore, its necessity is out of the question. It needs to be installed.
The sewer riser can be hidden in two ways:
- A box made of plasterboard;
- Box made of plastic profile.
Plastic removable panels are more durable than drywall
A plasterboard box is a budget-friendly, collapsible option that will serve you for decades. It is by far the most popular for hiding unsightly pipes. The box made of plastic panels is also reliable. However, its installation takes longer than the installation of a plasterboard structure.
To install a box for a sewer pipe, you need to make markings and measurements of your bathroom or bathroom. Next, calculate the necessary materials for the box, decide on the choice of material from which your box will be made. Then we mark the location of the control elements. We attach the wall profile, then we make a frame and attach plasterboard or plastic panels. The last stage is to install the hatch. That's it, the pipe box is ready.
Hatches
Plumbing hatches on the box provide access to equipment. Their size and number depend on the dimensions of the structure and the number of devices being serviced. Based on the method of opening, hatches can be classified as those that swing open, tilt, move to the side, or slide out in response to pressure.
The hatch can stand out from the surrounding background or blend into it. Camouflage is possible by using the same material for the box and the manhole cover.
A homemade hatch is made from plasterboard sheet. The basis is a profile frame on which a piece of drywall is fixed; The selected finishing material is glued on top. Use a vacuum handle, with suction cups, or a regular one, for which a hole is drilled.
If a plasterboard box is covered with tiles, this practical material is also used for the inspection hatch, gluing it to a sheet of chipboard or plywood. Magnets are attached to the inside, which are attracted to the metal frame and ensure the correct position of the door. There are factory steel hatches, but they do not fit into every interior. In addition, due to their weight, they are not suitable for installation on a box made of PVC panels.
Disguised inspection hatch Source remont-ekspert.ru
How to make a box and hide pipes in the bathroom: examples of work and useful tips
You cannot do without communication systems in the bathroom. However, water and sewer pipes are unlikely to give your premises an aesthetic appearance. Therefore, most residents, during the renovation process, try to hide all communications. There are several ways to implement your plan: hide the pipes using furniture, boxes, roller shutters, or wall them up in the wall. When choosing a camouflage option, it is worth considering the possibility of maintaining communications. So that in case of a breakdown you don’t have to destroy the decor of the room. By installing a pipe box in the bathroom, you can make a collapsible structure or build small doors for access to communications.
Depending on the location of the pipes, the box can be installed in two ways: covering only the pipes or the entire wall on which they are located. In the first option, by covering only those areas where there are pipes, you save on material. Sewing up the entire plane on which the lines are located looks more aesthetically pleasing, but reduces the usable area of the bathroom. In order to somehow use the space in the box not occupied by pipes, small storage facilities are built there for various things.
Types of designs
There are many ways to disguise unsightly communications. Making a box that simultaneously performs a protective and decorative function is the most sound solution. The task is implemented in different ways; The most common configurations are:
- In the form of a cabinet. It is chosen if it is necessary to hide a riser or other vertical system and leave free access to communications. Shelves help to rationally use the interior space.
- In the form of a partition. A convenient option for a large bathroom, all communications of which are located on one wall; Also suitable for wall-hung toilets. The pipes are separated by a wall-sized partition; The area of the room is slightly reduced. The bathroom looks neat, and behind the partition there is enough space to organize the storage of a variety of things.
- In a compact design. The box is constructed directly around the pipes. This option is used more often than others, as it does not clutter up the space, looks neat and is quickly made. Suitable for all types of systems, including those adjacent to the ceiling (floor).
Corner design with inspection hatch Source cleanipedia.com
What is the best way to make a box?
Before closing unsightly communications, you need to choose the right material for the box, behind which the pipes in the bathroom will be hidden. It must meet several requirements:
- have sufficient resistance to moisture;
- have low weight and thickness;
- made from environmentally friendly ingredients that do not emit harmful substances.
According to these criteria, from the commercially available materials for making a box in the bathroom, you can use: MDF, moisture-resistant plywood, moisture-resistant plasterboard or plastic.
Plastic decorative boxes for heating pipes
- the most affordable boxes and decorative screens (grids),
- practical to maintain,
- do not need painting,
- universal for gas, sewer and cold water pipes.
Due to the popularity of such boxes, manufacturers often use low-quality plastic. Cannot withstand prolonged exposure to high temperatures (hot water supply, heating pipes). As a result, the decorative box:
- deformed,
- changes color
- become fragile.
The plastic box in the form of a plinth deserves special attention. But it already belongs to a different, higher price category.
Preparatory stage
Most often, pipeline problems occur at the joints. Therefore, the fewer there are, the better. If the box is installed after laying new pipes, care must be taken to ensure that the main has as few connections as possible. If replacing the pipeline is not part of your plans, before hiding the pipes in the bathroom, you need to conduct a thorough inspection of them. Inspect all lines for defects and, if any, repair them.
It is believed that soldered and welded joints can be closed without fear of leaks. But fittings with threaded connections must have easy access. It is necessary to periodically inspect them. Therefore, threaded connections cannot be bricked up. It is also necessary to ensure free access to valves, sewer inspections, meters, and filters.
Roller shutters in the toilet
The easiest way to close the pipes in the toilet is to install plumbing shutters (roller blinds, roller blinds). This option is ideal if you need to cover the entire back wall. Guides are installed on the sides, a reel with strips is attached to the top, that’s all, the installation is completed, you can use it.
Roller shutters in the toilet can only cover part of the wall
The disadvantage of this option is the price of roller shutters. She bites. But at any time you can raise the roller shutter that covers the pipes, and you can repair it. There is another way to reduce the price - install roller shutters not from floor to ceiling, but cover only the central part, where all the connections are located.
You can hide the pipes in the toilet behind roller shutters
Even if you do not need to cover the entire wall, but only part of it, you can build a wall from gypsum plasterboard or wall foam blocks and attach roller shutters to this wall.
Making a box step by step
Installation of a box in a bathroom consists of several stages. Let's look at each of them in more detail.
Measurements and sizing of structures
Before sealing the pipes, you need to take the necessary measurements and clarify the location of the box. In places of unreliable connections, to meters and valves, it is necessary to provide a removable part or door. It wouldn't hurt to have a scale plan of the room on which all the structural details will be marked. When measuring, do not forget about the thickness of the finishing material.
It is necessary to calculate the amount of material for manufacturing. The markings for the frame of the box covering the vertical pipes start from the floor. The distance from the pipes to the box should not be less than 3 cm.
Having determined the outline of the future structure on the floor, use a plumb line to transfer it to the ceiling, and then make markings on the walls.
Installation of the frame for subsequent cladding
Before sewing communications into the box, it is necessary to install a frame around the pipes. It is best to make it from a galvanized profile. Since the air in the bathroom is constantly humid, the use of wooden blocks is undesirable. If you do decide to use them, choose bars made from rot-resistant rocks. Before use, treat all wooden parts with an antiseptic.
The frame elements are connected to each other using self-tapping screws or using a cutter. To secure the profile to the wall, dowels and European screws are used.
It is necessary to mount profiles to the wall, taking into account that the finishing material does not subsequently adhere closely to the pipes
The first step is to mount the profile on the walls. Then the racks forming the front edge are installed.
Depending on the design of the future box, there may be several or only one front pillars. They are attached using their own curved edge or hangers
Then the guides are mounted on the ceiling and floor.
It is convenient to fasten vertical and horizontal profiles together using a cutter
If the length of the racks is more than 1.5 m, it is necessary to make jumpers between them. They will also be needed for a frame whose width is more than 0.25 m. The distance between the jumpers is no more than a meter.
For structural strength, jumpers are attached to racks with a height of more than 1.5 m
When using a wooden frame, treat the cut areas with construction mastic. This will protect the box from damage and prevent its deformation during temperature and humidity fluctuations.
Sheathing the box frame with sheet material
When cutting out parts for the box, try to make solid elements and not from pieces. First, cut the side parts. They are cut in such a way that the edges do not protrude beyond the frame profiles, but are flush with them. After this, cut out the front part of the box. It should cover the side elements.
After cutting the material, it is mounted to the racks. This is done with self-tapping screws (3.5-4.5 cm). The distance between them should be no more than 2.5 cm. Such a box will have sufficient strength, so it is not necessary to attach the material to the jumpers. To monitor weak points in the pipeline, inspection holes with doors are left.
It is necessary to leave a hole in the box for free access to valves, meters and filters. It can be buried with a door purchased from a hardware store.
You can build them yourself or purchase ready-made ones. To make your own access points to the pipes, make a door from the material that is used for the box itself. To prevent it from opening, furniture magnets are attached to them.
The door for the control hole can be finished with the same material as the entire box. This way it will be less noticeable
You can make a completely collapsible box. To do this, sheets of finishing material are attached to the very edge with self-tapping screws. When performing the final finishing, they are not covered with tiles.
Finally, plastic corners or plinths are fixed. When it is necessary to dismantle the box, remove the baseboard, unscrew the screws and remove the finishing material.
Self-tapping screws, covered with a plastic corner, can be easily unscrewed to dismantle the box in emergency cases. After this, the box remains intact and can be mounted in place
Final decorative finishing
The final stage of box installation is its finishing. It depends on the material from which the structure is made. Plywood, drywall and MDF can be faced with ceramic tiles or painted. Plastic panels do not require further finishing. They look quite attractive on their own. Unlike drywall, plastic does not reduce the area of the room.
To decorate the bathtub, a frame is built from a profile
In the same way, the pipes under the bathroom itself are closed. First, the frame is mounted, and then it is sheathed, leaving control doors.
Moisture-resistant plasterboard is mounted on top of the profile frame and tiles are placed on it. Be sure to leave a door for pipe maintenance
Now knowing how to install a box, you can decorate any pipes in the bathroom and make the room more attractive from an aesthetic point of view. Hiding communications in the bathroom improves the design of the room. In addition, after covering the pipes with a box, the noise level emanating from them is reduced.
Material requirements
The bathroom is a specific room with high humidity and high air temperatures. Based on these factors, the following requirements are imposed on the materials of the boxes:
- Water resistance. The main criterion when using a material in wet rooms is that it should not change its physical and chemical properties when exposed to water or from prolonged exposure to wet steam.
- Corrosion resistance. It is desirable that not only the covering of the box is not afraid of moisture, but also other elements of its design, for example the frame or fasteners.
- Environmentally friendly. During or during long-term operation, materials should not decompose or change their chemical characteristics with the release of harmful substances. It is desirable that the finishing coating does not contribute to the formation of fungus, mold and bacterial colonies.
- Decorative. The box should not stand out and spoil the aesthetic appearance of the bathroom; the main option for its manufacture is for imitation or the same coating as the walls. Considering that the traditional decoration of bathroom walls is ceramic tiles, the surface of most boxes should be suitable for cladding.
- Small volume. The materials from which the bathroom box is made should not take up too much space in a small room.
- Ease of care. The covering of the box should be easily and quickly washed from dirt and water stains with minimal expenditure of detergents and useful time.
- Convenient access to pipes. Almost every box is equipped with a hatch for access to the pipeline, under which an inspection, shut-off valves, metering devices, and other equipment or fittings are placed.
- Strength and reliability. The box must be durable and resistant to normal physical influences; its service life should be for any period at the owner’s discretion, and not depend on age-related changes in the material.
- Affordable price. When considering the price of engineering implementation of closing pipes, they take into account not only the materials, but also the complexity of the work performed. In many cases, it is quite possible to make a pipe box with your own hands without using special expensive tools; to implement some options you will need the help of hired specialists. It is clear that carrying out work by invited workers will cost the owner a much larger amount than installing it yourself.
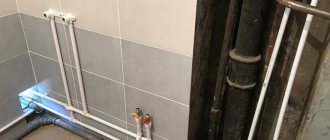
Rice. 2 Plasterboard boxes of complex shape with tiled finishing
Decorative protective boxes for home communications made of MDF and natural wood
Products made from MDF are very popular when carrying out designer renovations of premises, thanks to the huge number of colors and imitation textures of almost any material. A modern material that does not change its qualities (color, strength, shape) when temperatures change. Natural wood is an excellent solution for stylish design.
The disadvantage of wooden and MDF boxes is their high cost. Moreover, for boxes and screens made of natural wood, the price is indeed very high. Both materials are sensitive to external mechanical influences.
Installation of a decorative box
Regardless of the material from which the box is made, it consists of two parts:
- A guide chute with fastening holes into which pipes are laid.
- The cover closes the gutter using side latches.
- Installation of the box is carried out as follows:
- Pencil markings of the passage of pipes are made on the floor (wall, ceiling).
- A gutter is applied to the area marked with a line and the holes for its fastenings are marked on the wall (from 25 to 50 centimeters between each other).
- Using a hammer drill with a Pobedit drill, holes of the required diameter, depth and quantity are drilled.
- Using dowel nails, the gutter is attached along the entire length of the route.
- The pipes are laid inside the gutter.
- Both parts of the box (cover-gutter) are connected to each other.
We hope that our article will help you make the right choice of decorative box for home communications pipes, based on their technical characteristics by type of material.
Types of hidden bathroom hatches
There is a large selection of hidden hatches available, not only of different sizes and materials, but also of different operating principles. In order to make the right choice in a particular case, it is recommended to briefly familiarize yourself with the characteristics of various types of devices.
| Device type | Short description |
Swing | The most common type, universal use. The door hangs on the frame on hinges; modern models allow the door position to be adjusted vertically and horizontally. For opening, manufacturers can equip products with suction cups. But they are effective only on smooth, glossy ceramic tiles; if the surface has a different structure, then the suction cups do not work. |
Push | A hatch with a more complex engineering design. It has a special mechanism for opening/closing the door, which is activated after pressing the lid. Requires precise installation and adjustment. Advantages - quick opening of the door without additional devices. Disadvantages - difficulties in sealing seams between moving and fixed tiles. The fact is that sealing causes additional resistance; the opening spring cannot always overcome them. You have to use improvised means. |
Sliding | The most complex type of hatches. When pressed, the door extends slightly and moves along the guides to the side parallel to the wall. It is used only in cases where the use of other types is impossible. Disadvantages: the design is very complex; it requires a lot of free space on the wall to move the door. Due to the fact that pipelines, in most cases, are located inside vertical boxes with small dimensions, the use of this type of hatches is very limited. |
Folding | When torn off, the door swings down and is completely removed from the frame. It is used in cramped places, facilitating access to water supply fittings. |
Based on materials of manufacture, they can be steel, aluminum or a combination. The maximum load capacity, reliability and, of course, cost depend on the material of manufacture. Bathroom hatches can be installed both under masonry materials and under wall finishing with plasterboard or wood chipboards.
Inspection hatch under tiles
Hatch design