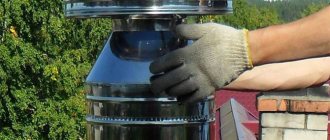
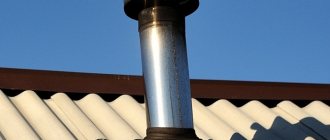
Autonomous heating, be it a multi-story house or a small bathhouse, requires a properly installed chimney pipe. The safety and efficiency of the entire heating system depends on how correctly it is installed.
One of the most important components of a complex smoke exhaust design is the chimney box. You can install it yourself when the roof is ready or provide for this possibility at the construction stage.
Purpose and design features
The chimney pipe box provides thermal and waterproofing of the chimney section on the roof.
The presence of a protective and decorative casing helps to level out the risk of destruction of a brick or asbestos flue under the influence of atmospheric loads. This eliminates the possibility of roof elements catching fire due to high surface temperatures of the chimney. The functionality is also designed to provide an aesthetic appearance of the chimney section protruding on the roof to support the façade and architectural style of the house. Structurally, the box follows the shape of the chimney, can be square, rectangular or round in configuration, and is made of various materials. The finished casing is placed on the chimney and securely fixed to the base.
The chimney box is an additional thermal protection for the pipe
Installation stages
Installation of the chimney box begins from the bottom, before the pipe itself is laid. The process is divided into stages:
- A frame is created for the opening in the ceiling. To do this, U-shaped elements are installed alternately on opposite walls. The rectangular halves are overlapped, forming a continuous metal insulation. Then screw the bottom to the ceiling with self-tapping screws.
- After this part of the casing is assembled, the chimney is passed into it and fixed on 4 clamps bent in the central part of the rectangle.
- The upper parts are installed and secured, thereby reaching the top of the pipe.
- At the end, the empty space is filled with expanded clay, dry earth or other insulating material. The end is covered with a metal lid.
Before installing the facing covering on the roof, the place where the chimney comes into contact with the passages must be insulated with roofing felt or plastic film. Install it overlapping the casing and the overlap plane. To prevent the waterproofing from being visible, it is covered with a decorative corner around the entire perimeter.
Passage through the roof of a round pipe
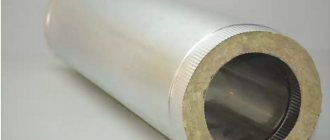
To pass the chimney through wooden structures, you can use a ready-made ceiling-passage assembly (see photo). It is selected based on the outer diameter of the pipe. Before installation, this ceiling passage unit must be prepared: all surfaces that will come into contact with the wood of the ceiling sheathing, and all internal surfaces of the passage box, are lined with thermal insulation.
Factory-made ceiling passage unit. Before use, it must be covered on all sides except the front with heat-insulating material.
Usually basalt wool serves as thermal insulation, but it must be special: it can withstand high temperatures. When purchasing material, make sure that it is designed for use at temperatures of 800-1000°C. These materials have a higher cost, but it is unwise to skimp on safety. Cheaper options contain binders that sinter at high temperatures, causing the thermal insulation to lose all its properties, and this can lead to a fire. In addition, it is advisable to use foil heat insulator - this will make the structure even safer.
Having insulated the passage unit, prepare a place for its installation. Mark on the ceiling where the chimney will be located. Draw a hole of a suitable size: slightly smaller than the size of the front panel of the pass-through unit in such a way that it is convenient to attach it to the ceiling trim with self-tapping screws. Having cut a hole, cover its edges with the same heat insulator as the pass-through unit, or any other with similar properties.
To increase the level of fire safety, metal strips can be strengthened on top of the heat insulator. Insert the prepared passage unit into the finished hole. It can be put on the pipe and installed with it. Having installed this structure in place, secure the panel of the passage unit with self-tapping screws (the holes can be pre-drilled).
Preparation and installation of ceiling penetrations
After checking the vertical installation of the chimney pipe, proceed to complete this stage. The voids remaining in the passage unit are filled with thermal insulation. You can use pieces of the same basalt wool or fill the voids with expanded clay. In theory, you can use sand, but you shouldn’t. It is inferior in terms of thermal insulation properties to both expanded clay and basalt wool, in addition, sooner or later it will end up at the bottom, since there are cracks, and through them grains of sand will fall onto the stove.
Further actions depend on where you led the chimney: to the second floor or to the attic. But the main difference is in aesthetics and the availability of finishing. If you led the chimney pipe into the attic, the passage through the ceiling can be considered complete. If you brought the chimney to the second floor or into the attic, you put a protective metal screen on the pipe, which is now attached to the floor with the same self-tapping screws.
This is what the finished ceiling penetration looks like
The chimney passage through the ceiling may also look like this. This is a ready-to-use option that consists of two boxes. The inner box is made of metal, the outer one is made of heat-resistant material (in this case, mineralite).
Minerite roof passage assembly. It is completely ready to use
There is an air gap between them, ensuring fire safety. According to the manufacturers, the remaining free space between the sandwich pipe and the cutting box does not require filling with a heat insulator. You can leave everything as is, or you can, for greater reliability, still add heat-resistant thermal insulation. In such a case, such as a chimney passing through a wooden ceiling, it is better to be on the safe side than to put out a fire later.
This is how a mineralite assembly for passing through the roof is installed. Just put it on the pipe and inserted it into the prepared method
The passage through the ceiling can be like this (see photo). In this case, sealing the edges of the hole in the ceiling is mandatory (remember, there is thermal insulation around the edge first, metal on top).
The factory aisle assembly may look different. Depending on the shape, the installation method varies slightly
Brick itself is a good heat insulator; however, for a brick stove, compliance with the rules for passage through flammable materials is also required: there must be a distance of at least 25 cm from the edge of the chimney duct to this material. To ensure this, stove makers make a special penetration on the pipe (see picture) increasing the thickness of the wall of the brick chimney at the point of passage through the ceiling.
Roof passage with brick chimney
If for some reason it is impossible to make such a penetration, you can cut a hole in the ceiling that will be 10 centimeters larger than the size of the chimney on each side. And then repeat the penetration of the round stove through the ceiling:
- seal the edges with heat-resistant thermal insulation material;
- cover it with strips of metal (minerite is also suitable if someone has it);
- sew up the side of the room with a metal sheet;
- Fill the resulting voids on the attic/second floor side with heat-resistant thermal insulation material;
- if necessary, cover the ceiling cutout from the attic/second floor side with a sheet of metal.
With this option, the brick pipe is quite reliably insulated (just use heat-resistant heat-insulating materials with a use temperature of 800-1000 ° C).
You can bring a brick pipe through the ceiling without special penetration
The passage of a chimney through the roof must simultaneously solve two not so simple problems: ensure fire safety and tightness. According to fire safety rules, in places where the chimney comes into contact with flammable materials, the temperature of the chimney walls should not be higher than 50°C. For brick chimneys this is solved by increasing the wall thickness.
When a brick pipe passes through the roof, it is surrounded on all sides by a box of additional rafters and cross beams
How is the question resolved then? They simply make a square or rectangular pipe, which is placed between the rafter legs, and transverse beams are installed above and below the pipe. The distance between the pipe and the wooden structural elements is 13-25 cm. If the distance between the rafters is greater, additional ones are installed.
We suggest you familiarize yourself with: Chimney passage through the wall
In this way, we minimize the damage that we will certainly cause to the hydro- and vapor barrier of the roof: in order to remove the pipe, we will have to violate the integrity of the films and membranes. When installing the chimney, it ends up in a separate box. The films and membranes inside this box are carefully cut. The cut geometry is similar to the geometry of a pipe or box, but smaller than the dimensions of the rafter box.
In the corners, the films are cut at an angle (envelope), the edges of the films are folded and fixed with staples or clamping strips to the elements of the rafter system. The edges and entry points of fasteners are sealed with adhesive tapes or sealants. This operation should be carried out carefully - the durability and reliability of the roof depends on it.
There is another option. This is possible if the temperature of the pipe in the roof area is not higher than 50°C. In this case, the edges of the films can be glued to the pipe with sealants or the same adhesive tapes (trying to seal everything as best as possible). Now there is free space between the rafters and the brick pipe. It is laid with a heat-resistant heat insulator.
It is most difficult to seal the joint between a brick pipe and a roof if a rigid roofing material is used.
When venting the chimney through the roof, you need to solve the problem of waterproofing. To do this, use a system of two aprons: a lower one and a decorative one.
First, a lower apron is installed around the pipe. It is usually made of tin and consists of four elements: two sides, a top and a bottom. How to do it, see the next video. Everything is told in detail.
A so-called “tie” must be placed under the lower apron. This is a section of roofing material, a sheet of tin or galvanized metal, which will drain water to the drain (the tie should be this long - extend slightly into the drain) if the chimney is located low or into the valley, if it is closer.
We suggest you read: Pipe passage through the roof - All about roofing
In general, as many materials as there are, there are as many ways to install a pass-through unit. Another video that demonstrates another technique for waterproofing a brick pipe. They use modern materials that are produced here.
It is much easier to waterproof the joint between the chimney pipe and the roof if soft tiles or other soft flexible roofing material is used. On a plastered pipe, coated with impregnation for better adhesion, this material is simply bent and trimmed. You can apply a layer of sealant along the edge of the curved roofing material and secure everything using a pressure strip.
The passage unit for round pipes through the roof can be either metal or soft - rubber or silicone. Metal roof penetrations are made of galvanized iron; sometimes they are coated with a protective coating, similar in color and composition to the coating of metal tiles.
Often, metal tile manufacturers offer special penetrations: this is the same sheet of roofing material to which an elastic rubber cap is attached, which serves as an excellent insulator.
For other roofing materials, flexible penetrations can be used as a roof penetration unit. There are many of them on the market today. Different colors, compositions, for different roof angles, straight penetrations, with different types of fastening (for self-tapping screws, with an adhesive composition, etc.).
Chimney height and placement
All calculations performed are based on the requirements of SNiP 41-01-2003 and SP (building rules) 7.13130.2009, as well as on recommendations received from manufacturers of heating devices.
When constructing a flat roof, it is assumed to leave a margin of at least 50 cm. For a pitched roof, the following rules from the craftsmen apply, based on the distance between the chimney and the ridge and their location:
- Up to one and a half meters. In this case, the height of the pipe must be at least 50 cm (relative to the last or enclosing parapet).
- Within 1.5-3 meters. Here the height cannot be lower than the ridge.
- If you want to place elements further than 3 meters, then the minimum height will be determined by drawing a line at an angle of 10 degrees relative to the horizon.
Types of boxes
There are several types of protective devices for smoke exhaust:
- metal - structures in this category are used most often, made of galvanized steel or stainless steel;
- wooden - found in the installation of brick chimney systems; when installed according to the regulations, they are equipped with a metal or polymer lining;
- plasterboard - protective elements made of fire-resistant plasterboard are installed on both brick and asbestos-cement or steel flues exclusively in internal areas - in the attic, indoors;
- plaster – protective plastering is suitable for installing brick chimneys in horizontal sections of the attic. The outer part of the brick shaft on the roof is decorated with a decorative metal casing.
Manufacturers of metal profiles offer ready-made solutions made of galvanized steel with a plastic protective coating in variable colors. This allows you to select the optimal product option in accordance with the stylistic features of the roof and facade being installed. In addition, galvanized devices complete with plastic elements are sold in a relatively affordable segment.
To make the casing, corrugated stainless steel material with a thickness of 0.45-1 mm is also used, which is considered a convenient basis for work. Galvanized and corrugated models of chimney protection devices are relevant in the design of gas outlets of any configuration. Complete with basalt insulation, boxes made of metal profiles are positioned as a universal option for thermal protection of chimney pipes of all categories.
Metal casing for chimney pipe
Despite the fact that ready-made offers are presented in a relatively affordable segment and a wide variety of modifications both in Moscow and in the regions, craftsmen often prefer to make a box for a chimney pipe with their own hands.
To build a homemade protective device for a metal gas exhaust pipe, you need to prepare the following set of tools, devices and materials:
- metal scissors;
- pliers;
- hammer;
- riveter
You will also need galvanized sheets in consumable quantities and rivets.
Installation of a ceiling-passage unit
Drawings and diagrams
In the preparation process, it is necessary to make drawing sketches, on the basis of which a full-size diagram is made. For independent work you need to prepare:
- diagram of the device for ceiling cutting;
- model of ceiling passage box;
- ceiling mounting diagram;
- smoke exhaust outlet through the ceiling-passage device;
- passage to the roof.
We invite you to read: How to make door frames in a wooden house
The calculation of dimensions is carried out according to regulatory rules, taking into account that in order to attach to the ceiling, the sides of the casing must be 5 cm larger than the size of the groove.
Blanks are cut from galvanized steel:
- the side sections of the protective device are made of four sheets;
- structural elements are fastened using a riveter, using at least 4 rivets for each connecting seam;
- to fix the metal casing to the base, first bend the lower perimeter to a width of 5 cm;
- diagonals are drawn at the bottom, the central point is marked;
- make a hole - use a nail to punch a hole, draw a circle of the required size.
Ready-to-install metal box
Next, a hole for the pipe is cut through the hole with scissors along the marked line.
The metal casing is installed in a designated place:
- a support structure made of metal profiles or a wooden frame is constructed on the rafter connections;
- install the finished body of the protective device on the supports;
- The upper segment of the chimney pipe is inserted into the hole in the bottom and joined to the previous chimney element.
The internal cavity of the housing is filled with a non-flammable insulating composition with a low thermal conductivity coefficient. The most commonly used mineral insulation is basalt wool or expanded clay. The final stage of work involves covering the box with a coating that matches the style of the roof and facade.
Installation of the duct on the chimney tube
Video material: tightness of a pipe on a roof made of ondulin
Extraction through a soft roof
A distinctive feature of the material is that it belongs to the category of combustible building materials. Therefore, it is necessary to leave space between the coating and the hole for the chimney (approximately 13-25 mm). Waterproofing is done identically to other options. The difference is the use of a valley carpet or the installation of the coating itself on the pipe.
Pipe passage through a chimney without a factory passage unit
It is possible to remove the chimney without a passage device. In this case, the edges of the hole in the ceiling are also sealed with a fire-resistant heat insulator, and metal strips are placed on top of it. A protective plate made of non-flammable material is put on the sandwich coming from the oven, in which a hole of a suitable diameter is cut, and holes are drilled along the edges for fasteners.
Traditionally this is a sheet of metal. Next, the sandwich is passed into a hole in the ceiling and fixed there using some non-flammable guides. For example, you can use drywall profiles or something similar. The main thing is to securely fasten the pipe and observe the basic rule of fire safety: there must be a distance of at least 36 cm from the edge of the pipe to the flammable material.
You can make a passage through the ceiling with your own hands
Important! When installing and securing the chimney, keep in mind that the pipe changes its size due to thermal expansion. It must be secured so that it can move relative to the roof.
Then the pipe is lined with non-flammable material from below (from the ceiling). From the attic or second floor side, the voids formed in the groove are filled with a heat insulator. The requirements for it are still the same: tolerance to high temperatures. Expanded clay may be the most budget-friendly. Actually, this completes the exit of the chimney pipe through the ceiling.
Video material: tightness of a brick chimney through a metal tile
Corrugated roofing
This is a relevant material, often used in construction work. However, when using it, there is a risk of leakage, especially if technical rules are not followed. To prevent this outcome, it is recommended to place it in a vertical position. The roof hole is made with a grinder, but it is necessary to ensure that the resulting corrugated sheet does not have nicks or other irregularities.
How to remove a rectangular chimney pipe
In this situation, professionals recommend using galvanized sheet:
- Cutting four strips for further mounting on each side.
- Laying from the bottom edge to the cornice.
- Attach the strips and bottom fastening to the sheathing.
- Ensure tightness.
Exhaust of a chimney with a cross-section in the shape of a circle
In this case, installing a chimney through the roof requires rolled bitumen insulation or foil tape of the same name. After this, a penetration is installed, glued to the sheathing, and sealed with a heat-resistant sealant. If it is made of a rubber base, there is an increased risk of melting, so it is worth placing a clamp and gasket underneath that can withstand relatively high temperatures.
Advantages and disadvantages
The use of a chimney pipe box helps improve the operational and decorative characteristics of the device:
- the formation of condensate on the walls of the gas outlet is leveled out;
- the intensity of soot and soot deposits is reduced;
- the possibility of large thermal differences between the temperature of the flow of combustion products and the internal surfaces of the flue is neutralized, since the heat capacity coefficient of the smoke channel material is improved;
- deterioration of traction is eliminated;
- provides reliable protection from aggressive atmospheric influences;
- the fire hazard level of the chimney structure is reduced.
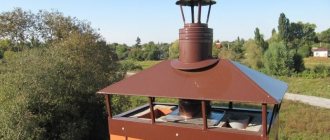
A big plus is the presentable appearance of the chimney on the roof, which is equipped with a protective and decorative box in the same style of the facade.
The disadvantages of the device include the need for drawing work when making the box with your own hands and serious safety requirements for installation on the roof.
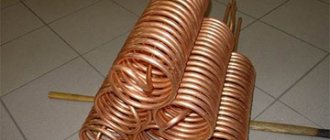
Insulation of a chimney pipe with basalt wool
The technology and mechanism for installing the casing is influenced by many factors, including the material from which the pipe is made, its diameter and others.
Basic rules for high-quality thermal insulation
Compliance with the following standards is mandatory when lining a chimney with a heat insulator:
- for a wooden covering, the layer of wool should be no less than 50mm and no more than 100mm;
- in passages through wood this layer should reach at least 5 cm;
- if mats of material are laid in several layers, then their joints must be covered with upper layers;
- for heat insulators in a cylindrical release form, when they are applied in several layers, each subsequent one must be laid with an offset of 180°;
- for boilers with liquid fuel or gas heating technology, it is advisable to use high-temperature cladding materials with a range of up to 300°;
- a protective screen is a mandatory insulation measure if materials without a foil layer were used during the work.
Insulation of a ceramic or asbestos chimney
For asbestos chimneys, the outer cladding procedure is carried out, and the layers of material are secured with special staples. To simplify and speed up the work, you can use basalt cylinders, the thickness of which should not exceed 5 cm.
Methods for insulating a steel chimney
The mechanism for carrying out the procedure is almost completely similar to the method for a ceramic chimney, and looks like this:
- 2 pipes of different diameters are used: a large one for the external surface, and a smaller one for interior decoration.
- One pipe is inserted into another.
- The resulting gap between the products is filled with the selected non-combustible insulation to insulate the chimney.
- If the material has a foil layer, it is not necessary to install a protective casing.
- The structure at the end must be additionally insulated.
The instructions themselves are quite simple, but they can be simplified by using ready-made sandwich pipes that replace the first 3 points of the manual. Such ready-made consumables for insulation have high heat resistance and help achieve high insulation characteristics.
Brick pipe insulation technology
Insulating a brick pipe is not an easy task.
To carry out the procedure, 2 methods are used:
- plastering;
- lining with mineral wool.
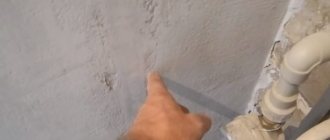
To plaster a pipe you need:
- a special reinforced mesh is installed on its outer surface;
- the first layer is applied directly to it in a small amount;
- after drying, make a thicker mixture and lay it on a mesh in several layers;
- To achieve an aesthetic appearance, after the substance has dried, it is rubbed, leveled, whitened or painted over.
For the second method - sheathing - use basalt wool in rolls or mats:
- the required amount of material is cut depending on the size of the insulated surface.
- the resulting layers of material are attached to the chimney using thick tape.
- A protective casing made of brick or slabs (optional) is mounted on top of the wool.
- The surface can be plastered or painted to achieve the desired external characteristics.
Basalt wool is the best option for insulating chimneys. It can be used for any premises: residential and industrial. It also has the necessary characteristics for these purposes - it is fireproof, resistant to moisture and vibration, and easily tolerates high and low temperatures.
Common installation errors
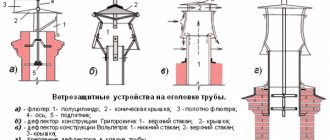
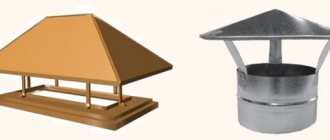
As experts note, the main mistake is the incorrect installation of the casing in the ceiling opening, bypassing the standard dimensions of the placement, which is fraught with dangerous consequences in the form of a fire. Also among the common violations is the excessively large size of the umbrella on the head of the chimney.
The following errors are also common:
- the penetration is used without filling with thermal insulation material, which eliminates the protective capabilities of the structure;
- a wide gap is left between the penetration and the chimney pipe, as a result of which the filler in the form of fine expanded clay falls down.
Experts recommend equipping the passage box on top with a metal sheet with a hole for the chimney.
A chimney protective casing installed according to standards can significantly increase the safety of the chimney and the heating system as a whole. Also, this measure determines the high potential of the heat generator, its operating efficiency at low fuel costs. If during the construction of the structure the work on equipping the duct for the chimney pipe was not completed, it is worth choosing a ready-made model or making the structure yourself and installing it taking into account regulatory requirements.
Tags: chimney, duct, passage
« Previous entry
How to insulate an iron chimney pipe
To insulate a metal pipe outdoors, use basalt insulation and metal clamps - the rolled insulation must be wrapped around the pipe and secured with clamps after 30-40 cm. A tool that is useful for insulation:
- Hammer, pliers, screwdriver, clamp, and other plumbing tools;
- Tape measure, metal ruler or square, building level, pencil or marker;
- A cutter or scissors to cut the insulation for chimney pipes to size;
- A device for riveting and rivets that connect the casing. Instead of rivets, short press washers can be used;
- Screwdriver or electric drill, drills Ø 3-4 mm for rivets;
- If the chimney is being plastered, you will need: a spatula and a bucket for mortar;
- To seal cracks and joints - a construction gun and bitumen mastic.
Advantages and disadvantages of sandwich chimneys
Advantages and disadvantages of sandwich chimneys
The undoubted advantages of chimneys of this type include the following properties:
- light weight;
- compatibility with all heating devices;
- the possibility of condensation is minimized;
- aesthetics;
- compactness;
- versatility, which manifests itself in the possibility of both indoor and outdoor installation;
- slight contamination with soot during operation;
- corrosion resistance;
- mobility - the chimney does not have to be straight;
- fire safety;
- no need to install an additional base.
As for the disadvantages, sandwich chimneys have few of them, more precisely, only two - the possibility of loss of tightness and high cost. If everything is clear with the cost, then the loss of tightness requires some explanation. The fact is that it occurs only after a long operational period, because all sections of the pipe permanently expand and contract under the influence of temperature changes.
Due to the lightness of the sandwich chimney, it can be installed without preliminary installation of the base, which is considered another advantage of the design.
Sandwich chimney dimensions
What will be required at work
In addition to standard components, take care of the necessary materials and tools:
- wall brackets;
- fasteners;
- clamps;
- couplings;
- stub;
- marker;
- fireproof sealant.
Now - directly to the installation.
Third stage. Chimney assembly procedure
Let's look at the installation technology using the example of the most popular heating system - double-circuit.
Step one. To begin, connect the sandwich pipe to the corresponding hole in the heating device (in most cases, the boiler), then secure it with a plug. Remember that a small section of the pipe near the boiler itself should be left uninsulated due to the too high temperature. No matter how high the quality of the pipe you use in constructing the chimney, the section near the boiler will exhaust its resources in a short time, or, in other words, will burn out.
Step two. Insert each new inner tube into the previous one. Then put on the outer channel
Pay special attention to ensuring that the pipes are joined to the previous ones on the narrower side, otherwise during operation the condensate that inevitably forms will flow into the seams rather than flow freely downwards
DIY chimney installation from sandwich pipes
Step three. After installing all chimney segments, secure the tees with pre-prepared brackets. Then seal all connections with iron clamps and additionally secure with nuts.
Step four. If you wish, you can install special sealed couplings. They are often recommended to be installed if the system constantly operates at high pressure.
Applying heat-resistant sealant to the chimney
Step five. Upon completion of installation, peel off the protective film from the parts and apply fire-resistant sealant to them. This sealant must retain all its properties even at a temperature of 100ᵒC.
Chimney exit to the facade of the house
Metal chimneys
Chimneys made from sandwich pipes (see Sandwich pipe for chimney) have gained well-deserved popularity:
- Convenient and quick installation.
- Lightweight structures do not require a separate foundation and do not require a foundation.
- Filling with mineral (basalt) wool of the required thickness provides the necessary thermal insulation.
- The smoothness of the inner walls does not allow soot to accumulate and does not disrupt the draft air flow.
- The pipe has a complex structure; an acid-resistant grade of stainless steel is used for the internal channel, this guarantees the durability and safety of the smoke removal system.
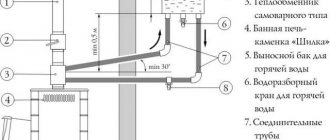
Scheme of a sandwich pipe.
When choosing a chimney, you should not forget about the flue gas temperatures shown in Table 1.
Therefore, the thickness of the internal stainless wall of the pipe should be:
- from 0.5 mm for gas, diesel and pellet boilers;
- from 0.8 to 1.0 mm for stoves, sauna stoves and fireplaces;
- from 1.0 mm for coal boilers.
The thickness of the thermal insulation layer should be up to 100 mm in the case of stoves, fireplaces and coal boilers, and in the case of automated boilers the layer thickness should be up to 50 mm.
Overlap
I repeat once again that an undoubted convenience is the availability of ready-made elements for all occasions. If one supplier does not have it, then we can easily find another supplier who can supply all the necessary kit.
- In the case of interfloor slabs, we take ready-made factory-made cutting.
- This cutting is called attic or interfloor.
- The inner diameter must match the outer diameter of the sandwich pipe.
- We cut out a square hole between the beams, corresponding to the size of the square part of the cutting; you can make a reserve to wrap the metal with another 1-2 layers of non-flammable basalt cloth.
- We pass the chimney through the round hole.
- Filling the space with basalt wool
Factory cutting.
Mounted cutting. The space between the pipe and the metal wall is also filled with mineral wool.
Roof
The problem of how to install a chimney through the roof is solved in much the same way as in the case of overlapping. We take ready-made elements, in particular ready-made roof trim, some call it roof trim. They come in different sizes and with different slope angles.
Roof cutting.
- Installing a roof passage unit is still much more difficult than installing a floor passage unit.
- The distance from the pipe to the tree must be at least 250 mm on each side. The hole and chimney are covered from above with a special element - a roof.
- This roof is inserted from above under slate or tiles, and from below is placed on top of the tiles.
- On top of the roof, a kopinik is put on the chimney pipe and clamped with a clamp. This provides protection from precipitation.
- The space between the chimney and the rafters is filled with non-flammable mineral (basalt) wool and covered from below with a metal reflector.
Passage through the roof.
Passage through the wall
Often, sandwich-style pipes are led outside the house and run along the outer wall. This has its positive aspects in that there is no need to carry out labor-intensive passages through the floors and roof. And the fire hazard is reduced. In this case, a horizontal passage is added through a vertical wall (see How to route a chimney through a wall).
External chimney.
From the point of view of thermal insulation, this node for passing through the wall is no different from the node for passing through the interfloor ceiling. The installation is complicated only by the fact that the log wall can shrink. And here there should be a sliding fit of the cutting.
Box for brick chimney
For a brick pipe, you can choose a standard galvanized steel cover or another option. For example, plastering a brick chimney over a heat insulator. Let's look at this process step by step:
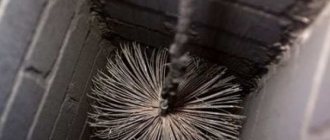
- First you need to clean the brickwork of the pipe from dirt and dust.
- Next, you need to install metal profiles on the chimney. For this, ordinary dowels are used. First of all, you need to fix the upper and lower profiles, and then insert the racks into them. The racks are fixed using self-tapping screws.
- At the third stage, the installation of thermal insulation material is carried out. It must be placed between the gratings and secured with special dowels with “skirts”. The heat insulator must completely cover the surface of the brick chimney.
- Then the thermal insulation material must be covered with a vapor barrier material, which is represented by a special film.
- At this stage, it is necessary to fix the plaster mesh over the vapor barrier film. The mesh must fit tightly to the surface, so the use of dowels with “skirts” is recommended.
- The chimney is plastered with pre-prepared cement mortar. The plaster must be applied in an even layer over the entire surface of the structure.
After the layer of plaster has dried, you can line the chimney with decorative tiles or galvanized sheets.
For the box, you can use wooden, plywood panels, fiberboard or chipboard, but they must be protected from moisture by an external coating