Advantages and disadvantages of a homemade boiler
The main advantage of a device made from scrap materials is its low cost. An out-of-use gas cylinder, metal barrel and other available materials can be used for the main part of the device.
There may be costs associated with purchasing pipe or sheet steel for housing assembly, fasteners or finished doors, but their total cost is still less than the price of a factory model. Non-ore building materials, cement and brick for constructing a base plate or lining the combustion chamber are required in small quantities and usually remain on the site after the construction of the bathhouse building.
The advantages of a homemade device include its individual dimensions. The layout and small area of the bathhouse may not allow the installation of ready-made factory equipment, but a homemade small boiler will fit well into any small room.
The disadvantages of such a device are:
- Inability to accumulate and retain heat for a long time. The metal body heats up quickly and gives off heat, but immediately cools down as soon as the fuel burns in it.
- The need to install a high pipe to remove smoke and ensure a sufficient level of draft.
- The need for regular cleaning of all departments, and especially often the chimney pipe.
Preparing to make a sauna boiler
Before starting work on assembling the boiler, check what materials and tools you have available, so that all that remains is to purchase the missing ones.
Decide: what fuel the boiler will operate on, where you will place it, calculate the optimal size of the boiler based on the area of the bathhouse, and other points. Then make a preliminary design (i.e., what the boiler looks like externally and where it is located inside the bathhouse), draw sketches of each part, and then create a detailed drawing with exact dimensions.
An example of a drawing of a metal sauna boiler with dimensions in all projections
It is more convenient to draw up a project and develop a drawing yourself. But you can find all this data on the Internet: then you will need to carefully link the dimensions of the boiler to the area of the steam room.
Boiler structure
The boiler design must include the following components:
- The firebox is a thick-walled metal chamber where the fuel combustion process occurs. The bottom of the firebox is a grate through which the ash is poured into the ash pit.
- The ash pan is the space under the combustion chamber. It is used to collect and conveniently remove ash waste, as well as to draw air into the furnace necessary for fuel combustion.
- Kamenka is a special container filled with stones. Carries out redistribution and removal of heat.
- The water heating tank is located just above the firebox.
- A heat exchanger is a small container designed to transfer the energy of burning fuel to a coolant.
- Chimney is a channel necessary for removing smoke. It starts from the combustion chamber, then passes through the tank or heater, heating them and ends with a chimney. To adjust the draft it is equipped with a valve or gate.
Rectangular boilers
Before making a boiler for a rectangular bath, you need to select sheet metal in the required quantity. Its thickness should be at least 4 mm, but it is better to find alloyed heat-resistant steel. If you don’t have it, you can take a regular one, 5-6 mm thick. To heat a steam room with a volume of 20 m3, the dimensions of the combustion chamber should be approximately 450 x 450 with a height of 600 mm. In this case, we consider a firebox standing vertically. Orientation in space does not play a special role; it all depends on the availability of free space.
Rectangular sauna boiler
Further instructions on how to weld a sauna boiler with your own hands:
- Mark the steel sheet and cut it using a grinder. Cut strip metal into stiffeners, pipes for the air damper and chimney.
- Weld the firebox body. Cut a hole at the bottom of the front for the door, and in the lid for the chimney pipe. Weld the pipe as shown in the figure, as well as the remote channel for loading firewood.
- Weld stiffening ribs from a strip 4 mm thick to all walls of the combustion chamber. In addition to strengthening the structure, the ribs improve heat exchange between the firebox and the room air.
- Fabricate and install a loading door with adjustable hinges and a locking mechanism. A pipe with an air damper can be cut into the body of the door, which will regulate the supply of combustion air.
- Attach the sides for the installation of the upper heater. This design is not mandatory; often the entire boiler is fenced with a net and the space between it and the body is filled to the top with stones.
The principle of assembling a horizontal stove is not much different; it can be implemented by studying the drawing for a boiler in a bathhouse:
Drawing for a boiler in a bathhouse
In this design, the heater is immersed inside the firebox due to a recess on top of the body. The stones will warm up perfectly, but the volume of the combustion chamber is reduced. The installation of a grate and an ash pan door is provided here; in this case, there is no need to embed an air damper into the loading door.
Types of boilers for baths
Depending on the fuel used, a sauna boiler can be gas, electric, liquid fuel, pyrolysis and solid fuel.
Gas
A gas-powered device is more compact and economical. During operation, it does not emit fumes or unpleasant odors; it does not require storing fuel for the whole year. However, installing such a boiler is advisable only in areas where it is possible to connect to centralized gas supply communications.
Electric
An electric boiler is the most environmentally friendly device. It is easy to install and operate, as it does not require a chimney or additional ventilation system. But it is convenient to use such a device only in places where the power supply is constant and has no interruptions. And it’s difficult to call this type of boiler economical, since the cost of electricity is increasing all the time.
Heating using liquid fuel
A device that uses diesel fuel, kerosene or waste to operate is practically no different from a gas boiler in terms of ease of operation. This is largely influenced by the fact that liquid fuel can be stored in any small container, for example, in a canister or barrel. Such a device must be installed in a separate room not used for bathing procedures, since when burning, petroleum products emit toxic fumes with a very unpleasant odor.
Pyrolysis
The pyrolysis boiler has the highest performance due to complete combustion of fuel. Wood gas, formed during the combustion of wood or coal in a firebox, does not evaporate into the atmosphere, but enters the second chamber - afterburning, where it burns out, producing additional thermal energy. For their manufacture, complex circuits and technologies are used, so not everyone can assemble such a device on their own.
Solid fuel
The boiler, which uses wood, coal and other types of solid fuel for heating, is universal, its reliability has been tested by time. The device heats up perfectly and maintains the optimal temperature level for a long time. The disadvantages of this type of stove include the need to timely load a new batch of fuel, which needs to be stored for future use.
Types and features of sauna boilers
In general terms, a sauna boiler is similar to a traditional heating device installed inside a living space. When made at home, the design resembles a potbelly stove. For a large bath, a boiler is welded with a heat exchanger, to which the heating system is connected.
The main difference in design depends on the type of fuel on which the heating device in the bathhouse will operate:
- Electric boilers are convenient due to the absence of a chimney. Heating is carried out by heating elements. The high power of the heating elements requires a separate electrical wiring line.
- Gas models are convenient to use. Automatic combustion control maintains the set temperature. However, the explosiveness of gas does not make this type of boiler the best choice for a sauna.
- Solid fuel boilers are the most popular heating devices for baths. You can burn anything that burns inside the firebox.
- Liquid fuel models usually run on diesel fuel. Boilers are fire hazardous. In addition, the pungent smell of diesel fuel will not make your stay inside the bathhouse comfortable.
- Pyrolysis boilers are economical. In one chamber the firewood smolders, and the combustion itself takes place in the second firebox.
Of all the options for a bathhouse, only a solid fuel heating device is ideal. You can even weld the boiler yourself from metal. Gas models are inconvenient in terms of connection due to the need to obtain permits. Pyrolysis boilers are long-burning boilers. They must work constantly, which is only beneficial for residential premises.
The video shows the operation of a solid fuel boiler:
Types of heat exchangers for boilers
A heat exchanger is a device that performs the function of heating water. The higher its efficiency, the better the boiler heats the room. The level of heat transfer of the heat exchanger is influenced by the material of manufacture and the total area of the device.
Copper has the highest heat transfer coefficient, but it is a very expensive metal. To manufacture an effective heat exchanger, a large amount of thick-walled copper pipe will be required, the cost of which can be equal to the cost of a factory-made heating device. In addition, its welding is possible only in an environment of inert gases; it is unrealistic to organize this process in domestic conditions, and solder joints at high temperatures have too low strength indicators.
The best option would be to use carbon steel pipes or sheets with a thickness of at least 2.5 mm for the heat exchanger. You can make a tank with flat walls from sheet steel and weld two pipes to it, one at the bottom and the other at the top. The pipes of the coolant circulation system will be connected to them.
In order for the boiler to work for heating efficiently enough, the volume of such a container will have to be increased as much as possible, which will also affect the linear parameters of the firebox. Installing a large heating device is not always possible in bathhouses and is too expensive in terms of material consumption.
It is possible to increase the area of the heat exchanger, and, accordingly, the rate of heating of water, if you use pipes made of durable steel or copper for its manufacture. Such a device will be more compact in size, simple to manufacture, long-lasting and capable of operating under pressure.
Tubular heat exchanger
The design of a tubular heat exchanger can have different shapes (coil, spiral, pipe-in-pipe type, etc.), but for making it yourself, it is better to choose a simpler option. For example, bend two pipes in accordance with the internal diameter of the firebox and connect them into a single frame structure with vertical elements. Plug the pipe at one end, and weld fittings to the other end to connect the heating system, place one at the bottom for the cold water inlet, the second at the top for the hot water outlet.
Types of sauna heaters
Depending on the type of fuel used, equipment is divided into several types.
Gas
The coolant heats up when the gas mixture burns. The devices are compact and economical. Frequent cleaning is not required and is easy to maintain. They operate on main gas, in which case a connection is required, or on liquefied gas. The last option is the most expensive. However, gas is considered a potentially dangerous substance, so devices must be certified and installed only by specialists. Homemade variations can be very dangerous.
Electrical
The most environmentally friendly option. Heating is carried out by converting electrical energy into thermal energy. In this case, combustion does not occur, so ventilation and smoke removal are not needed. The equipment is compact and easy to install. It is difficult to make it yourself. The disadvantages include the need for uninterrupted power supply and a fairly high price, which is constantly increasing.
Solid fuel
Works on different types of solid fuel: coal, peat, firewood, briquettes, etc. There are varieties of “long burning”. A standard solid fuel stove heats up quickly and retains heat well. The main disadvantage is the need to constantly load new batches of fuel. You also have to clean it regularly to remove ash. We will look at the instructions for making this type of boiler.
Instagram dom56ru
- Baths, saunas, swimming pools
Wood-burning sauna stoves: which one to choose?
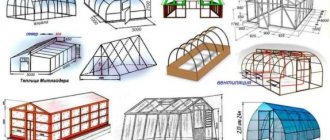
Types of structures
Sauna boilers usually have the shape of a metal cylinder or rectangle. In front they have a furnace and blower door, in the back there are heating circuit outlets, and on the side there is a heater door located on the protruding neck.
Cylindrical shape
To make a cylindrical boiler, you can use metal pipes with a diameter of at least 50 cm, barrels with a volume of up to 200 liters, 50-liter cylinders for transporting propane. These products are seamless and already have a cylindrical shape, which is more preferable than rectangular in terms of aerodynamics (air flow) and heat transfer. The orientation of cylindrical boilers can be either vertical or horizontal.
Rectangular
Devices of this shape have a large number of seams, and the cutting of their parts must be carried out with extreme precision. For a person without welding skills, assembling such a structure will be problematic. The orientation of a rectangular boiler does not play a significant role. For greater stability, it can be placed horizontally, if the area allows, of course. A vertical arrangement will save space, but will require additional measures for securing.
How to properly weld a boiler
Before starting work, it is necessary to cut out the sheet blanks of the combustion chamber body, as well as the heater and chimney. All parts of the sauna stove must be adjusted to the nearest millimeter.
The easiest way to weld a sheet steel body involves the use of an auxiliary frame:
- Initially, you will need to make corners from strips of stainless steel 20x800 mm, from which the frame or frame of the future case is assembled using rivets;
- Individual parts - the side walls, bottom and top shelf of the heater - are laid and secured to the frame using clamps;
- The elements of the combustion chamber laid on the frame are connected by cooking points, after which the seams can be welded using argon welding or a carbon dioxide semi-automatic machine.
This method simplifies the assembly of the boiler and at the same time strengthens the most vulnerable part of the structure - the welding seams. Frame elements and stainless steel corners remaining inside the combustion chamber serve as screens for welding seams. Therefore, according to many craftsmen, joints can be welded semi-automatically using ordinary 0.8 mm carbon wire.
What materials to make the boiler from?
During operation, the structural elements of the boiler are exposed to high temperatures, so thick metal must be used to assemble it to prevent burnout.
If a suitable pipe or container could not be found, then such a device can be made according to the drawing from sheet iron.
Metal sheets
For the walls of the unit, sheet steel grade St3 with a thickness of 5 mm is suitable, the bottom should be even thicker - at least 10 mm.
Material selection
For the manufacture of sauna boilers, steel sheets with a thickness of 4–8 mm and pipe cuttings with a diameter of 420 to 820 mm are most often used. You can, of course, even use a metal barrel, but such a product will not be durable - its metal has insufficient wall thickness.
Horizontal sauna boiler made of pipe
Stove specialists consider a horizontally located boiler to be convenient and efficient to operate due to the length of the lower compartment and air flow around the body, and, consequently, the higher efficiency of the device.
The easiest and fastest way to assemble a horizontal boiler is to make it from a pipe
A horizontal boiler has a number of advantages over a vertical one:
- the shape of the stove makes it easy to load firewood into the firebox and place it on the grate;
- low location of the heater;
- placing the fuel in a thin layer ensures complete, uniform combustion;
- The material used to make pipes is durable and welds well, since it was originally designed for welding. The longitudinal seam on the pipe is not dangerous - its strength is several times higher than the main wall.
To assemble such a boiler, in addition to the pipe, you will need steel sheets. The length of the pipe with a diameter of 530 mm is 0.9–1.2 m, and longer ones are suitable for a boiler with a closed heater. The wall thickness of standard pipes is 8–12 mm, but it is better to choose one with a wall of 8 mm.
For the front and rear parts of the boiler, you will need carbon sheet steel grades st. 3 - st. 20 with a thickness of 6–8 mm. The ash collection tray is made of sheet metal 1.5–2.0 mm thick with a wall height of 15–25 mm. It is located in the opening of the blower.
Grate bars are used either solid or separate. Solid cast iron grate is sold in hardware stores. And you can weld a separate one yourself from fittings. To fasten the grate along the walls of the boiler, guides from a corner are welded, the size of which is determined by the height of the grate.
Sheet steel boiler
It uses steel sheets 6–8 mm thick made of low-carbon material. The volume of the combustion chamber should not be less than the volume of the heater. In practice, the ratio is used when the volume of the firebox is 30–50% larger. A suitable location for the container for stones is in the high temperature zone - at the top at the back wall of the furnace. The combustion products are also cooled here, so the process of metal burnout slows down.
A sketch of a boiler made of sheet steel in three projections and with exact dimensions helps to navigate the choice of materials and examine the design nuances in detail
It is impossible to maintain the temperature of the boiler walls within 60 °C: overheating is inevitable. Due to high temperatures, intense ultraviolet radiation occurs, which does not add pleasant sensations in the steam room. To protect the walls of a metal sauna boiler from overheating and increase its service life, two methods of thermal protection are used in construction:
- sauna boiler lining;
- brick lining on the outside.
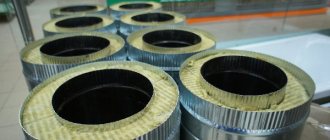
Lining - insulation of the furnace walls from the inside with brickwork. The firebox is lined with refractory bricks (fireclay mortar is used only to hold the bricks together), and a gap must be left between the metal and the masonry so that the lining does not crack when heated. The gap is sealed with basalt wool. When placing bricks on edge, the thickness of the lining will be 6 cm, and if you manage to purchase a thin brick of 3 cm, then it will be half as much.
You need to plan the lining in advance, taking into account the size of the firebox when drawing up the project. The disadvantage of this option is the high temperature of the flue gases. The heat extraction from the heater is insufficient, so a water heating tank is installed on the chimney. Additionally, a heating panel with a labyrinth chimney is installed. Having passed through its winding channel, the flue gases lose their temperature to 100 ° C, which is considered safe in terms of fire.
The lining of the combustion compartment is used not only as a fire safety measure, but also for the durability of the structure
Lining the outside with brick is the construction of a sarcophagus around a cauldron. Lay the red finishing brick on the standard mortar, leaving a gap between the metal and the brickwork. The disadvantage of this method is overheating of the boiler metal with rapid burnout. Heat-resistant metal can be used, but it is expensive and requires special welding skills; or use thicker structural steel if you can get it.
A brick sarcophagus for a sauna boiler helps to retain heat inside for a long time and protects people from burns if they accidentally touch it in the steam room
Tools for assembling a sauna boiler
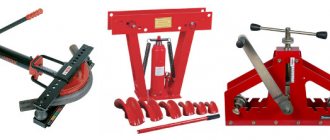
In the process of making a boiler and cutting out component parts, use special tools:
- cutting equipment or kerosene cutter - for cutting sheet and profile metal into rough blanks;
- manual grinder (grinder) - for fine-tuning the dimensions of parts, cleaning gas cuts, removing sharp edges, making technological chamfers on parts for welding and cutting sheet metal up to 3 mm thick;
- abrasive wheels for grinders;
- welding machine - for assembling the device;
- electrodes for welding - selected depending on the thickness of the parts and grade of material;
- measuring tool - to control dimensions.
Metalworking tools are also used: files, hammers, etc. Clamps are used to secure parts during assembly; for painting the boiler - heat-resistant paint and a paint brush; For lining or outer lining, stock up on mason's tools.
Making and assembling a homemade boiler
The cheapest and most accessible fuel is wood, so installing a solid fuel boiler is the most common option for choosing a sauna heater. The dimensions of such a unit depend on the dimensions of the room. On average, a workpiece in the form of a piece of pipe with a diameter of 50 cm and a length of 70 cm to 1 m or a ready-made 200-liter barrel for storing gasoline or diesel fuel is suitable for a heater for a bathhouse with an area of 12 m².
Required tools and materials
To make your own boiler, you must have the following tools:
- Welding equipment.
- Grinder with cleaning and cutting discs.
- Electric drill.
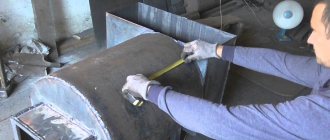
- Equipment for measuring and marking: tape measure, corner, level and chalk.
- Pliers.
- Hammer.
- Protective clothing: canvas suit, closed boots, mittens, welder's shield and goggles.
In addition to metal, for the manufacture of the boiler body you will need:
- Steel pipe for heat exchanger.
- A metal sheet with a thickness of at least 50 mm for making the bottom of the boiler.
- Stove fittings: combustion and blower doors, chimney damper.
- Tap for hot water tank.
- Metal pipe for a chimney.
- Fittings or corner for making grate bars.
- Channel for the supporting structure and partition between the heater and the combustion chamber.
- Fire brick for laying the screen around the device.
- Clay or cement mortar.
Drawings and diagrams
Diagram 1. Sectional view of a vertical metal boiler
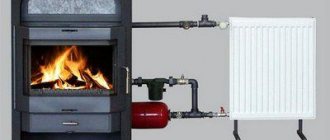
Scheme 2. Single-pipe bypass heating system
Welding of structural supports
First, the inside of the pipe needs to be marked from bottom to top into 4 compartments in height:
- 100 mm - under the ash pan.
- 350 - 400 mm - for the firebox.
- 400 mm - under the heater.
- 400 - 600 mm - for the tank.
In the future, each sector of the boiler will be separated by a round metal partition, cut along the inner diameter of the pipe. To install partitions, you will need limiters in the housing cavity. They can be made from 12 mm reinforcement, then inserted into the pipe and welded at the appropriate level.
From below, the bottom should be hermetically welded around the entire perimeter and immediately support structures made from channel scraps should be welded to it.
Making a heat shield
In small family steam rooms, where every centimeter of space is important, installing the boiler at a safe distance from the nearest wall surfaces of 0.3 - 1 m is impractical. In this case, the side planes of the heater are covered with insulating shields - metal or brick screens. Factory-produced steel or cast iron screens are equipped with legs that are bolted to the floor. Brick screens can be folded in two ways:
- Cover the device body completely.
- Enclose with walls separating it and flammable surfaces.
At the bottom of the masonry, openings should be left for air convection between the brick wall and the unit.
Wall cladding can be protected from fires with fireproof material - polished aluminum or stainless steel, which reflect heat well; minirite slabs, superisol sheets or foil mats made of basalt fiber are also suitable.
We make a blower and a furnace
In the lower three compartments you need to cut openings for installing doors under the ash pan, a firebox on one side of the body and a heater on the side of the boiler or on the opposite side. The blower and combustion doors can be purchased in advance or you can adapt cut out fragments of the pipe wall by welding hinges and handles to it, making it convenient to close and open the boiler sections. It is advisable to weld the door for the heater with a neck that can be inserted into the wall of the steam room. This way you can heat the boiler separately and pour water on the stones through the hatch in the steam room.
We install grate bars on the support rings between the ash pit and the combustion chamber - a round metal sheet with holes or a welded cellular structure made of reinforcement. They should not be welded, they should just lie there. We fix the heat exchanger in the firebox.
To make a blower, you can use a thick-walled pipe by cutting it lengthwise. It should be able to move along the metal slats, but not be completely removed.
We build a water tank
In the dividing metal circle, which will be the bottom of the tank, you need to cut a hole for the chimney, insert it and thoroughly weld the joints along the entire length of the circumference. To make the lid, we use the same metal plate with a hole for the chimney, only one fragment of it is made to open for pouring water.
How to connect radiators
In a bathhouse, a maximum of two rooms require heating: a shower room and a relaxation room. It can be organized using a single-pipe bypass system with diagonal connection of batteries (Scheme 2). It is easy to install and efficient in operation. For assembly you will need 2 - 3 radiators, shut-off valves that allow you to regulate the heating temperature of each element and a closed expansion tank to protect the coolant from evaporation.
If it is necessary to turn off one of the radiators, the coolant will flow to the second one through the bypass. The heating system assembled in this way must be connected to the boiler: connect the lower outlet with a slope of 2-3 degrees and the upper outlet at an angle of 20 degrees and connect it to the end switches of the heat exchanger through threaded fittings.
How to make a boiler for a bathhouse
Assembling a bath boiler with your own hands will not be difficult if you know how to use a grinder and a welding machine. The structure is welded according to a finished drawing or your own design is developed. It is only important to know what components a heating device for a bath consists of.
Construction of homemade boilers
Homemade products differ in shape, which depends on the material of manufacture (pipe or sheet steel). The design of a heating device for a bath consists of the following components:
- The combustion chamber. Firewood is loaded into the firebox, and this is where it is burned.
- Chimney. The pipe is connected to the firebox and led through the roof of the bathhouse to the street to remove combustion products.
- Ash pit. The chamber is located under the firebox and is divided by grates. The coals of burnt firewood spill through the cracks into the ash pit. This chamber is also called a ash pan, since air enters the firebox through the ash pan to maintain combustion.
- The heater is installed above the firebox. The compartment is made in the form of a chamber with stones loaded inside.
- The water heating tank is located above the heater. There is a metal chimney running inside. It heats the water.
Now it’s worth considering the nuances of the design. The boiler is made slightly elongated so that the doors of the firebox and ash pan open into the dressing room. The building itself enters the steam room through the wall. The heater is not a mandatory unit. The steam room can be heated from the body and boiling water in the tank.
Advice! The heater is an integral attribute of the bathhouse. It's nice to take a steam bath in a steam room where you can splash some water on the hot stones.
When making a boiler, it is not advisable to save on the heater.
If the bathhouse is large and there are many rooms, a full heating system will be required. The heating device is equipped with another unit - a heat exchanger. The tank or coil is located in the firebox. A pipeline with radiators is connected to the heat exchanger. The system is filled with coolant, most often water or antifreeze.
Cylindrical boiler
A cylindrical boiler is easier to manufacture due to fewer welded joints. The material will be a barrel or pipe with a diameter of at least 50 cm. It is advisable to select thick metal - about 6 mm. The service life depends on this.
To make a cylindrical model, cut a piece of pipe 1 m long. The ends are sealed with a plug. Where the bottom will be, 4 small legs are welded. At a height of 5 cm from the bottom, a rectangular ash pan window is cut in the pipe with a grinder. A door is made from a cut out piece of metal and attached to the pipe with hinges near the vent.
Grate bars are welded inside the pipe 10 cm above the ash pan. They can be made removable. The plates are welded to the pipe, and cast iron grates are laid on them. Another hole for the firebox is cut 10 cm higher from the grate. The door is similarly secured with hinges.
For the heater, another piece of pipe is cut. The length is calculated individually so that the end extends into the steam room of the bath. The blank for the heater is welded over the firebox. At the same time, the chimney pipe is welded. The end of the heater facing the steam room can be equipped with a door. A water tank is installed above the heater.
Advice! It is better to make all components in contact with water (tank and chimney) from stainless steel.
Rectangular boiler
The manufacturing scheme of a rectangular heating device for a bath is similar to a cylindrical design. The only difference is that the pipe forms a finished body, where all that remains is to cut out the firebox and ash pan. The rectangular body will have to be welded from separate pieces of sheet steel.
Another important point is the cylinder’s resistance to deformation when heated. To ensure that the rectangular walls remain smooth, stiffening ribs are welded inside the body on the firebox side.
The video shows an example of making a boiler:
Do-it-yourself boiler for a bathhouse: drawings
Gas and solid fuel boilers can be made according to one drawing. The nodes are almost the same, but there are nuances. In a gas boiler, burners are installed instead of a grate. The firebox is reduced, and due to it the size of the heater is increased. An ash pan is also not needed, but a small blower is made to supply air to the combustion chamber.
Attention! The design of a gas boiler for a bathhouse is designed so that the automation and all connections to the burner are located in the dressing room. The control unit is covered with a protective casing.
The drawing of a diesel fuel boiler for a bath is similar to its gas counterpart. The difference is the installation of a different type of burner.
Tools and materials
When making a boiler, you cannot do without the following tools:
- apparatus for electric or gas welding;
- grinder with cutting discs for metal;
- hammer, chisel, pliers.
The materials needed for the boiler are metal (pipe, barrel or sheet steel). You will also need a tap for the water tank and hinges to hang the doors. Consumables for welding work depend on the type of apparatus (electrodes, carbide, oxygen, wire).
Boiler installation rules
Even before starting to prepare the boiler, a place is prepared for it in the bathhouse. Due to the heavy weight of the metal structure, a foundation of concrete or brick is provided. A hole in the ceiling and roof of the bathhouse is cut strictly above the chimney exit from the boiler to avoid bends. The knees become clogged with soot faster, and traction worsens.
Advice! It is better to make the passage of the chimney through the ceiling of the bathhouse from a two-layer “sandwich” pipe.
Due to the thermal insulation of the internal channel, the outer casing does not heat up. The chimney is safe even when touching flammable roofing materials of the bathhouse.
Boiler installation rules
For the construction of a bathhouse, a flammable material is usually used - wood, so compliance with the following fire safety rules is the main requirement when installing a heating device:
- The boiler cannot be placed directly on a wooden floor; it needs a support made of non-combustible material - a brick base, a concrete slab or a thick sheet of metal.
- The room where the boiler is installed must have good ventilation to prevent combustion products from accumulating inside the room.
- To protect the boiler chimney from condensation, it is recommended to carry out thermal insulation measures using mineral insulation.
Installation recommendations
Due to the heavy weight of the metal structure, it is not recommended to install the boiler on the floor. For this purpose, you should first build a concrete or brick foundation of the appropriate size and height.
It is important! Wooden surfaces located close to the boiler must be reliably insulated from high temperature exposure. This can be done using brick or other refractory material.
It is also recommended to determine the location of the chimney outlet in advance, so as not to have to deal with the tedious installation of turns later.
In addition, the pipe can burn out quite quickly at the bend. It is better to use special two-layer sandwich pipes. This will help limit direct contact of wooden roofing and ceiling elements with an iron pipe, which can heat up to very high temperatures under the influence of flue gases.
Despite high temperatures, the boiler can be painted. For these purposes, there are special heat-resistant polymer paints, which are freely sold in construction stores.
Installation and assembly work
To make a boiler for heating and heating a bath, you will need a blank of high-pressure steel water pipe, measuring 50 cm in diameter and 1200 cm in length. The first step is to cut out mounting windows in the wall of the future boiler body. In total, you will need to cut four openings with a grinder:
- The largest window, 60x40 cm, is used to install an auxiliary water tank;
- The second largest window is intended for the combustion chamber measuring 40x22 cm;
- The loading opening for laying stones in the second compartment has parameters of 21x20 cm;
- The smallest is a hatch for cleaning the ash pan, size - 10x20 cm.
The next step is to weld round transverse partition walls into the body. To cut the bottom, sheet metal 4-5 mm thick is used. Inserts into the body are welded by electric welding immediately after cutting the windows.
Sawn fireclay brick blocks are laid inside the future combustion chamber. For normal operation of the boiler in the bathhouse, it is enough that the firebox volume is at least 10 liters. One load of firewood into the boiler heats the bathhouse for 40 minutes.
The next step is to weld a chimney pipe into the upper wall of the combustion chamber. This is not easy to do, but it is necessary to weld the chimney immediately and completely along the entire length of the joint, otherwise the flue gases will enter the bathhouse through the heater.
At the last stage, the doors are hung on the firebox and ash pan, the lid is installed on the top of the boiling water container, and the base of the boiler is welded. Experts recommend installing the stove on a brick-lined area, but in steam rooms and high humidity, chamotte and dinas baths quickly collapse. Therefore, bathhouse owners weld a cut-off half of a truck wheel rim to the lower end of the boiler and embed the entire structure in concrete.
After the body has been finally assembled, all seams have been additionally welded by electric welding, and an auxiliary tank with hot water can be installed. It is best to buy a storage tank for a bath ready-made, for example, choose a $50 stainless steel model. Such a tank will not burn out or rust, even if water sits in it all winter and summer.
Vertical oven - step by step
- prepare the base - a pipe fragment up to approximately 0.9 meters;
- Weld a circle of metal sheet to the bottom of the pipe - it should be equal to the diameter of the pipe;
- cut a hole for the ash pan, its maximum width is no more than 0.2 meters;
- weld a round plate with a pipe diameter, cut out the middle and weld rods onto the hole - this will be the grate;
- decorate the combustion chamber by cutting out a small rectangle above the grate and seal it with a metal door;
- Again, cut a hole above the firebox, weld rods for the grate and hang the door;
- weld the body with a round piece of metal, do not forget about the holes for the chimney and ash pan;
- The traditional finale is sequential sanding of the entire body and painting.
To help you, there are drawings and photos that will help you make your own stove for a bathhouse from a pipe in full compliance with all safety standards. By the way, don’t forget to do the first warm-up in the fresh air - this way you will avoid fumes from the paint you used getting into your respiratory tract. After all, many polymer compounds are frankly harmful to your health. Remember that an iron stove made of pipe is best lined with brick. This way it will be better to retain heat in the steam room, and the air will be protected from those substances that are released into it when the iron warms up.
General information
Before you make a boiler for a bathhouse with your own hands, you need to study its structure and operating principle in detail. In addition to the knowledge gained, you will need to take into account all the advantages and disadvantages of the equipment. All these factors will help you complete the job as quickly and efficiently as possible.
First you need to study the boiler, how it works
Types of boilers
The first step is to choose the type of homemade boiler for the bath that is most suitable for a particular construction. There are several main ones, and they are divided according to the type of fuel used. The following types are considered the most popular:
- Carbide. These devices use a device that runs on wood, peat, coal and other available materials. This is the cheapest type of equipment, and you can make it yourself in the shortest possible time.
- Electric boilers. They are distinguished by their relative compactness, which allows them to be used even in the smallest spaces. The main advantage is environmental friendliness and the absence of emissions of harmful combustion products.
- Gas boilers. These devices are widely used throughout the world, as they use a minimal amount of fuel to operate. For each specific bath, you can buy or make a boiler of the required power. This type is considered one of the most profitable from an economic point of view.
- Boilers running on liquid fuel. The main material for such boilers is cheap diesel fuel, kerosene or waste oil. Such heating equipment is used only in cases where it is not possible to use better and more expensive options.
In this video you will learn how to make a stove for a sauna:
In addition to the fuel used, homemade boilers are divided according to the material from which they are made . Among them it is worth highlighting the following:
- iron;
- brick;
- mixed (made of iron, but lined with brick);
- cast iron
The last option is used very rarely, since cast iron boilers are prohibited from being placed in a steam room. They require a separate room, which not everyone has.
Advantages and disadvantages
A do-it-yourself sauna boiler made from a pipe or any other source material has several positive and negative sides. Their manifestation to one degree or another depends on the type of device chosen. When making a boiler yourself, it is important to take into account all the advantages and try to minimize the manifestations of shortcomings.
These boilers have pros and cons
Among the advantages are the following:
- Low price. Any homemade equipment will be much cheaper than factory equipment. This is due to the use of inexpensive materials that can be found in stores in the city or any other locality. In addition, the price is affected by the lack of costs for carrying out the work.
- Possibility to choose the size and shape of the equipment. This feature will help to perfectly fit the manufactured equipment into the existing room. By varying various parameters, you can make a boiler that will take up a minimum of space and leave a lot of free space in the steam room.
- Operational simplicity of the equipment. Any homemade sauna boilers are very easy to use. For them, you don’t need to select certain parameters for a long time, but rather basic skills that appear immediately after the first launch.
- Ease of installation. A sauna boiler is quite easy to install in a steam room. This will require a minimum of effort and time.
- Durability. A properly made heating device does not require special care and can last for quite a long period.
In addition to a large number of advantages, there are also several disadvantages. They must be taken into account before starting to create a homemade boiler. All negative aspects are characteristic only of one of the species, but not inherent in the others. These include the following:
- Fast cooling. Homemade equipment does not retain heat well and distributes it unevenly throughout the steam room. This negative feature only applies to rooms with a large area.
- All types of boilers, except electric ones, emit harmful substances into the atmosphere. This has a negative impact on the environment and air quality.
- Devices operating on solid fuel require constant cleaning of ash.
- Electric heating devices increase energy costs.
- Gas boilers require increased safety measures. Otherwise, an explosion may occur with ensuing negative consequences for the building and human health.
This boiler may emit harmful substances
Components
At the equipment design stage, drawings of the boiler for the bath are made. They must contain all the components of the boiler. Their standard set is typical for devices of any type and includes the following:
- Firebox. The selected type of fuel burns in it. It is made of thick and durable metal, as it can withstand a large thermal load. Thin material will quickly burn out and damage the homemade device. For different fuels, it is equipped with additional elements that make work more efficient.
- Chimney. This part is installed in the device and removes smoke or exhaust gas. In this case, it is important to accurately calculate the dimensions of the chimney and determine its optimal shape. Otherwise, you may encounter the problem of smoke accumulation in the room and poor removal. The chimney must have a valve that will help maintain the required draft level.
- Ash pit. This part of the structure is designed to accumulate waste. Depending on the type of fuel used, it may have a certain shape and size. This part is located under the firebox, which allows it to also serve as an air supply. When making a boiler yourself, it is important to accurately calculate the dimensions of the ash pan in order to avoid frequent cleaning.
- Kamenka. This structural element redistributes and removes thermal energy. It is made in the form of a hanging or built-in container filled with densely packed stones. Dimensions and volume depend on the dimensions of the boiler and the room. During design, it is important to choose the right dimensions of the heater. If it is small, it will not be able to fully warm up the steam room, and if it is large, it will take a very long time to heat up to the desired temperature. If there is an error in the calculations, the steam room will quickly fill with water vapor and become uncomfortable.
- Container for water. This part of the heat exchange system is designed to store liquid and bring it to the desired temperature. It is made from any materials that hold heat well and warm up quickly.
Wood-burning sauna boiler made from a metal barrel.
This is perhaps the best and most economical way to make a boiler for a wood-fired sauna. The basis for that boiler should be an old metal barrel. Modern barrels are not suitable for this purpose - they are made of very thin metal - almost foil.
In an old barrel, use a chisel or an ax to cut out the top lid. Then we cut off a piece of metal pipe approximately 15 centimeters long - this will be the base of the chimney.
Boiler for sauna from a barrel
Then we take another large barrel, approximately 200 liters in volume. You will cut out the lid located at the bottom. In the center of the cut out lid we will punch a hole for the chimney pipe with a diameter of about 10 centimeters. The chimney pipe itself will have a cross-section of 10 centimeters and a height slightly greater than the height of the barrel.
We weld a chimney pipe to the cut off lid of the barrel, and on the back side - four sections from the channels.
wood boiler installation
We cut out the boiler lid from a metal sheet, which is placed on top. We cut a round hole in it for a pipe with a diameter of 10 centimeters. Then we attach the assembled boiler to the chimney pipe, having previously insulated it with non-combustible materials, such as asbestos.
A normal load for testing such a stove will be approximately a third of the volume. A lid with a pipe is placed on top of the firewood. It can move along the height of the barrel. The structure is closed from above with a top cover.
Installation of a chimney in a bathhouse
There are basic recommendations for installing a chimney. The temperature of the flue gases reaches 450-550°C. An ordinary metal pipe heats up red hot.
Safety standards stipulate that it is not enough just to isolate the stove from a wooden wall; it is necessary to protect the surface in places of contact with the chimney.
Fireproof cutting is required where the chimney passes through the floor slabs and roof.
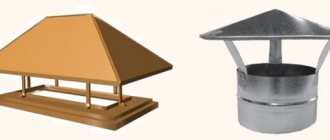
Choosing a chimney type
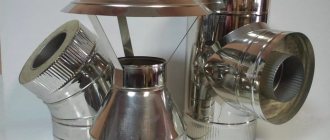
Ceramic and insulated stainless steel sandwich pipes are used to connect the sauna stove. Each option has its own advantages and purpose:
- Ceramic chimney is used for internal connection. The pipe passes through the floor slab and roof. The advantage of ceramics is durability, resistance to aggressive and acidic environments, and the almost complete absence of condensation.
- Sandwich chimney - both internal and external installation are provided. In the second case, the pipe is led out into the street through the side wall.
The sandwich chimney and ceramics are assembled like a construction set. Self-installation is not difficult. To facilitate installation, manufacturers provide step-by-step instructions with a detailed description of the work.
All component materials used when installing chimneys must comply with existing SNiP and PPB. It is not recommended to use galvanized and asbestos-cement pipes, and do-it-yourself fasteners.
all videos on oven installation