Consequences of an unsealed joint
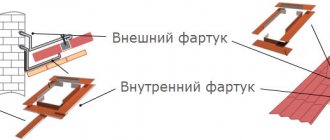
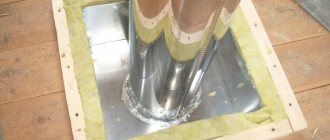
To bring the chimney through the roof, a larger diameter is cut out into it, so that a gap remains between the walls of the chimney and the roofing material. Regardless of the width of the gap, it is a big problem faced by homeowners and builders. To eliminate this defect and protect the under-roof space from the penetration of atmospheric moisture, use seals, aprons, collars, made by yourself or purchased. An unsealed gap between the roof and the chimney pipe is fraught with the following consequences:
- Increased wear of roofing material. Most roof waterproofing materials offer better protection against moisture penetration from the outside. Moisture penetrating through an unsealed gap gets onto the inner surface of the roof and eventually destroys it.
- Reducing the service life of the rafter frame. The pouring water hits the elements of the rafter frame, which are made of wood. This leads to rotting and premature destruction of the rafters.
- Reduced insulation efficiency. Roof insulation materials lose their properties when wet, becoming less effective.
- Increased humidity in the attic. Increased dampness in the attic causes heavy, stale air and negatively affects the interior decoration of the room.
Important! The method of sealing the gap between the chimney and the roof depends on its size, the type of roofing material used and the shape of the chimney. If the distance is less than 5 mm, it is quite possible to get by with a heat-resistant silicone-based sealant. You can close a gap whose width is 1 cm or more using cement mortar, an apron, or a special sealant.
For slate roof
This material does not have accompanying nozzles for the ability to close gaps. For slate roofing, other sealing options are possible. For a brick pipe, you can make an “otter” with your own hands - this is also an apron, only from a mortar based on cement and sand. For round chimneys there is a nozzle called “Master-Flash”. It is made of rubber or silicone and is shaped like a stepped pyramid. Such nozzles perfectly protect chimneys and are suitable for all roofing materials, even for corrugated roofs. After installing such a nozzle, all joints are firmly sealed with sealant.
Important! The silicone nozzle serves at a temperature of -70 +250 degrees, and the Master-Flash made of rubber can withstand temperatures of -50+ 130 degrees.
Sealing with mortar
To seal the gap between the chimney pipe and the slate or tile roof, use moisture-resistant cement mortar and a decorative collar. This is the most affordable way to insulate the attic and rafters from moisture with your own hands. This requires dry mortar, water, a mixing container, steel corners and a collar. Installation work is carried out in the following order:
- The gap between the roof and the outer wall of the pipe is lined with stainless steel corners. If the chimney is oval or round in shape, you can use a rubber seal with an adhesive backing.
- A decorative collar made of galvanized steel is put over the chimney head and secured with self-tapping screws.
- A pre-mixed viscous solution is poured into the gap between the collar and the pipe and allowed to harden for 1 day.
- After a day, check the quality of the filling and the degree of hardening of the solution. A surface for liquid drainage is made from a sheet of sheet steel. To do this, a hole is cut out in it, the diameter of which corresponds to the size of the collar, put on the head and fixed with self-tapping screws.
Important! To ensure that the structure is reliable and does not collapse during the first serious downpour, high-quality waterproof cement is used. Otherwise, cracks will appear on it, through which water will leak into the rafter frame.
Types of sealing agents
The presence of ready-made sets of additional elements for sealing seams greatly simplifies the task of the roofer, so waterproofing the chimney can be done with your own hands, subject to safety precautions and work technology. There are the following types of means for sealing the passage of a stove or fireplace pipe through the roof:
It is believed that the most reliable waterproofing is achieved by constructing a multi-layer structure consisting of a rubber seal, an internal apron and an external decorative edging.
Sealing with a steel apron
To seal the gap between the chimney pipe and the roofing material with your own hands on roofs made of metal tiles and corrugated sheets, use special aprons. They are made of galvanized steel in the color of the roof in the form of additional elements. With their help, you can reliably and aesthetically isolate the gap; to do this, proceed in the following order:
- Along the perimeter of the pipe, strips of waterproofing 30 cm wide are laid, bringing the edges up, fixing them on the wall with sealant or adhesive tape.
- To close the gap at the chimney outlet, metal wall profiles are used. The lower fastening flange is tucked under the roofing material and fixed to the rafters with silicone sealant with a moisture-resistant composition. The top shelf is attached to the pipe wall.
- Decorative textures are installed from galvanized steel with a polymer coating. It is a set of additional elements that are overlapped with each other and secured with self-tapping screws to the pipe and roofing material.
Important! You can make your own apron from sheet steel. However, factory products look more aesthetically pleasing and presentable. When working on the roof, special roofing screws are used as fasteners, equipped with a rubber headband, which, when twisted, flattens, closing the hole from water penetration. If there are no such screws at hand, gaskets are cut out of rubber using them with ordinary self-tapping screws.
Special attention
Previously, all brick chimneys had an extension at their base; it protected the junction of the pipe from the accumulation of snow and water, although it had a very bulky appearance and created a lot of pressure on the roof. Nowadays, few people use this method; other insulation methods have been invented for brick pipes. It is no secret to everyone that corrugated sheeting cannot tightly surround a chimney, no matter whether it is old or the most modern. There are always gaps, water flows into them, and debris gets in, and this is not a positive thing at all. I had a specific goal - sealing. In addition, it is important not only for protection against leakage. The efficient operation of the heating system also depends on the quality of waterproofing. Condensation may appear on an unprotected brick pipe, which will flow into the chimney, and then, as it evaporates, the draft will decrease and the quality of heating in the house will deteriorate.
Sealing a pipe on a roof made of corrugated sheets with your own hands
An important point is the shape of the chimney, which needs insulation. Previously, all chimneys were made of brick, but their modern appearance can be radically different from their predecessors.
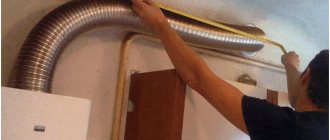
Sealing with rubber aprons
Construction stores suggest using Master Flash rubber aprons or Wakaflex sealing tapes to seal gaps where pipes pass through a roof made of any material:
- Master Flash is an elastic penetration on a rubber base in the form of a stepped funnel, reinforced with aluminum mesh inside. It is suitable for roofs with any slope and any roofing material. The rubber apron reliably protects the gap from liquid penetration. To adjust the apron to the size of the pipe, it is cut to the required diameter. The apron is fixed to the slope with self-tapping screws, and to the pipe using a steel clamp.
Note! To eliminate large gaps, a fiber sealant is first compacted into them, and then filled with bitumen mastic or filled with foam. After this, the passage area is decorated with a decorative collar. Please note that collars are produced with a standard angle, which is selected in accordance with the slope of the roof slope and the diameter of the chimney.
The main condition for long-term operation of the roof is maximum tightness, which is achieved by isolating even minor gaps. Whatever sealing method you choose, remember that reliable protection against moisture penetration is more important than an attractive appearance.
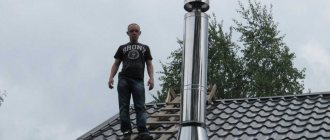
Installing a chimney cap yourself
Let's look at an example of how to install a chimney umbrella on an asbestos-cement pipe with a diameter of 120 mm with your own hands.
- Using M6 bolts and nuts ( pos. 7, 8
), it is necessary to secure the racks (
pos. 4
) to the lower cylinder (
pos. 9
). - Using a clamp ( pos. 5
), it is necessary to attach the upper cylinder (
pos. 3
), which expands towards the bottom, to the lower cylinder. - Assemble the reverse cone on the folds ( item 2
). - Install the cone-shaped cap ( item 6
) using rivets.
The cap, reverse cone and top cylinder can be assembled by hand using a riveter using aluminum rivets or welded by resistance welding.
Note! The patterns of the parts that make up the chimney umbrella directly depend on the diameter of the chimney pipe and the ratio of the sizes of the elements of the weather vane must be strictly adhered to.
This table shows the dimensions of the chimney cap in accordance with the dimensions of the chimney pipes.
Is it possible to put a cap on a chimney pipe and how to do it correctly
Such a simple thing as a cap on a chimney pipe raises many questions: what should it be like, how to make a cap with your own hands, and in general, is it necessary to install it? Discussions and disputes on this topic occupy more than one page of the popular forum, but you will not find a definite answer there. Let's try to solve these problems ourselves, starting with the need to install a protective cap.
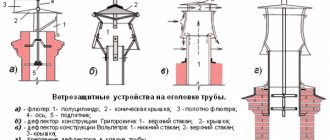
Chimney umbrella - pros and cons
The following arguments speak in favor of installing various caps (other names: fungus, umbrella, weather vane, chimney) on chimney heads:
- the umbrella partially covers the mouth from being blown in by the wind and thus reduces the likelihood of the draft overturning;
- the chimney serves as protection against the ingress of debris and moisture in the form of precipitation;
- if you use a mesh structure, then birds will not be able to nest inside the chimney;
- the product extends the service life of the head of a brick pipe, which is destroyed by wind, rain and snow;
- fungus with decorative elements complements the architectural style of the building.
The hood is equipped with a mesh on the sides to protect the chimney from birds
. Note. When compiling the list, we did not take into account false information from advertisers. Claims that umbrellas increase draft in chimneys and increase the efficiency of boilers are pure fiction.
Now let's look at the counterarguments. The main negative point is that the chimney cap in the form of a fungus stands in the way of combustion products. That is, it prevents the free escape of gases, creating noticeable aerodynamic resistance. This means that the chimney umbrella does not increase draft, but, on the contrary, reduces it.
The second disadvantage of using attachments has been repeatedly confirmed by sad statistics. The fact is that one of the products of combustion of hydrocarbons is water vapor, which escapes into the atmosphere along with smoke. Diesel and gas domestic boilers with high efficiency emit gases with low temperatures (up to 120 ° C). As they rise through the pipe, they cool and then come into contact with the metal of the cap.
Examples of icing on chimneys equipped with nozzles
The water vapor immediately condenses and freezes at sub-zero temperatures, causing icicles to form on the umbrella, blocking the cross-section of the chimney, as shown in the photo. As a result, fumes enter the room and poison the residents of the house. There are other arguments against installing fungi:
- In modern round chimneys there is no place for birds to live, so there is no need to cover them with a net.
- A properly constructed flue channel has a condensate collector at the bottom with a drain, where water that has entered the pipe in the form of precipitation will safely drain.
- Thin galvanized caps installed on the chimneys of solid fuel boilers and stoves burn out in 3-5 years due to constant contact with high-temperature gases (150-200 °C). It is necessary to install a stainless steel reflector, which increases the price of the product.
How to seal the passage of a rectangular pipe - sealing
Rectangular pipes are often used to organize the chimney and ventilation. They are usually constructed from heat-resistant bricks or special ceramic blocks. To finish the areas where the corrugated sheeting meets the chimney, a ready-made shaped product in the form of an apron is usually used. The material for the manufacture of such an apron is usually galvanized steel. After installation, it can be painted to match the roof.
To decorate the joint with an apron, you will need to perform the following steps:
- Waterproofing and insulation damaged during the installation of the chimney outlet are glued to the outer walls of the pipe. To do this, use construction tape.
- The perimeter of the pipe is formed with a shallow groove: the upper junction bar is placed in it.
- After installing the upper part of the junction strip into the groove, it is additionally fixed with heat-resistant silicone sealant.
- When placing the lower part of the apron, an overlap of 10-15 cm is observed.
- Before covering the roof pipe from rain, the lower part of the apron is equipped with a tie made of waterproofing film: it serves as protection against leaks.
It is best that the additional elements for decorating the area where the roof meets the rectangular chimney are made of the same material as the roofing. Manufacturers of profiled sheets produce protective aprons specifically for these purposes.
Is it necessary to install a cap - recommendations
Regarding the installation of umbrellas on chimneys, the regulatory documents of different countries put forward different requirements. For example, in European countries it is allowed to install nozzles only on ventilation ducts, but on chimneys it is strictly prohibited. In Ukraine, caps cannot be placed on pipes connected to gas boilers. In the Russian Federation and Belarus there is no direct ban, but the wording of SNiP is very vague:
“Deflectors, umbrellas and other attachments on chimneys should not interfere with the free exit of combustion products.”
In this chimney, emissions pass through a through pipe and do not encounter obstacles
We suggest approaching the issue from the point of view of safety and practicality, and only then thinking about beauty. Before making and installing a cap on the chimney, consider the following recommendations:
- Round steel pipes that remove smoke from highly efficient boilers with an efficiency of more than 85% cannot be covered with traditional fungus. Use a conical nozzle in the form of an open nozzle, which will not freeze up in any frost.
- A brick chimney without inserts, connected to a high-efficiency heat generator, can be protected with a cap-shaped nozzle with a pipe passing through, as is done in the photo.
- It is allowed to install umbrellas on vertical ducts from stoves and TT boilers. To ensure that the iron hood performs a protective function on the chimney for a long time, provide a stainless steel plate inside.
- It is highly advisable to install gable or hip hoods on smoke exhaust blocks made of brick and equipped with side vents. The goal is to protect the upper part of the masonry from precipitation and wind, without touching the flue openings on the sides.
It is noticeable here that the cap does not prevent smoke from escaping through the side vents, but over 15 years of operation, the iron above the flue has become covered with rust.
To protect the brick block, where the exhaust and chimney pipes are open at the top, order or make a box with several through pipes inserted into these channels. Place regular mushrooms on top of the ventilation terminals, and conical nozzles on the gas terminals, as shown in the photo.
Exhaust and smoke ducts are equipped with different nozzles
How to make a chimney canopy
First of all, you need to find out the external dimensions of the head where you plan to attach the umbrella, and then sketch out a hand-drawn sketch depicting the future structure. To develop it, use simple rules:
- the dimensions or diameter of the product must be 10 cm larger than the dimensions of the pipe, so that the edges protrude 50 mm on all sides;
- slope angle of the slopes – from 30 to 45°;
- the minimum height from the chimney cut to the fungus is 100 mm, as shown in the drawing.
In addition to the traditional umbrella, there are other design options - a deflector and a rotating weather vane - “sycophant”. The first allows you to actually increase traction due to wind pressure, which creates a vacuum inside the cylindrical body, where the smoke channel exits. But in calm weather, this device not only loses its advantages, but also worsens the traction force in the pipe, creating increased resistance at the exit of combustion products.
Diagram of the deflector operation - the wind creates a vacuum inside the hood
For reference. The same effect is created by rotating spherical nozzles, an example of which is shown in the picture.
The attachment is beautiful, but not very effective or reliable
A semi-cylindrical weather vane, assembled from several segments and rotating on a special bearing, was called a “sycophant” due to its ability to turn with the wind. If it were not for the high price and dubious reliability of the bearing, it would be an ideal cap for any round chimney, since it successfully protects the mouth from blowing and precipitation.
The weather vane helps well against being blown by the wind, but it can break due to strong gusts
Various materials are used to make chimney canopies - thin sheet steel with zinc and polymer coating, stainless steel and even copper. To make a pipe cap with your own hands, we recommend the first 2 options - galvanized or painted metal with a thickness of at least 0.5 mm.
Making a simple round mushroom
To perform this work, you will need the usual tools - metal scissors, a drill, a hammer and a device for setting rivets. Having determined the required size of the fungus, proceed in this order:
- Screw 2 screws into the wooden strip at a distance equal to the radius of the product plus 15 mm. Get an improvised compass, with whose help mark the center of the circle on the metal and draw its outline.
- Cut the workpiece with scissors, and then draw a sector with an arc length of approximately 120 mm (the figure resembles the first piece of a round cake).
- Cut out this wedge, then forcefully align the outer edges of the circle and secure them in a vice.
- Drill 3 holes along the resulting seam and connect the ends of the part with rivets or M4 screws with nuts. The upper part of the weather vane is ready.
Drawing a circle on a galvanized sheet (left) and joining the edges of the fungus (photo on the right)
The legs for the fungus and the clamp surrounding the pipe are made of steel strips made by bending a thin sheet 2-3 times. These parts are also attached to the umbrella with rivets, which is clearly demonstrated by the master in the video:
Main functions of the hood
A special metal product called a chimney pipe cap is designed to protect the outlet from the negative effects of atmospheric conditions. It should not interfere with traction or distort the conditions of movement of air masses. The presence or absence of such an element is provided for at the initial stages of designing the heating system. Installation is carried out in accordance with GOST and industry documents.
The cap performs the following functions:
- Closing the outlet from blowing wind. The direction of air masses is constantly changing, therefore, to prevent the occurrence of reverse draft, a protective visor is installed.
- Protection from rain and snow, mechanical pollution, birds. The visor itself protects from precipitation. To prevent birds from getting inside, a net is installed. Over time, frozen condensation may form on it, which reduces traction. In addition, in winter, icicles form on the mesh. It is necessary to select in advance a material on which moisture will not form.
- Increased service life of the head. Since the cap protects the pipe from debris and dirt, its interior will not be damaged. This will extend the operating time.
- Decor. Original caps can improve the appearance of the house and emphasize the style of the building.
When installing a hood, it is important to think through the system in such a way that the element does not interfere with the free exit of smoke. Otherwise, the decorative canopy will only cause harm and pose a threat to fire safety.
Despite all the functions of the hood, some experts are against their installation. This is due to the fact that the fungus interferes with the release of combustion products. The pipe umbrella in this case reduces the draft. Also, during combustion, water vapor is released, which settles on the metal. In cold weather, icicles form that block the cross-section of the chimney. As a result, fumes can enter the house and poison the residents.
Modern round chimneys do not provide nesting areas for birds. For such models, installation of a protective copper mesh is not required. Properly constructed chimney channels have a condensate collector at the bottom. Atmospheric precipitation enters it in the form of water, which can then be removed.
Hood design
On sale you can find a large number of different models that differ in functionality, size, type of material used, and external data. But they all have mandatory elements in their design.
- An umbrella or a cap itself. In essence, this is a chimney roof that performs a protective function.
- Drip apron. This element is present on brick chimneys. Necessary for draining condensate away from the pipe. Keeps the structure dry for a long time.
- Bracket. Necessary for lifting and holding the cap over the chimney. The number of fasteners depends on the size of the shelter, its weight and design solution.
- Stingrays. Installed only on complex structures. Allows you to increase the size of the product and complement its appearance.
All caps differ in appearance. Each specialist can design a pipe canopy himself, but it is recommended to start manufacturing by creating the simplest design. Only after calculating all parameters and operational characteristics can changes be made to the finished device.
Selecting a pipe outlet location
The roofing pie will be airtight and reliable if you choose the right location for the ventilation ducts and chimney through the roof. The finishing of the joint will depend on the location of the passage. For a roof made of corrugated sheets, the pipe outlet is made in the following places:
- At a certain distance from the roof ridge (50-70 cm). This arrangement of the pipe outlet prevents roof leaks and reduces the likelihood of snow pockets. Also, with this arrangement of the pipe outlet, there is no need to disrupt the rafter system. To protect the joint between the roofing and the pipe, elastic penetrations are used, as well as additional elements necessary for assembling the apron.
- On the roof ridge. This pipe outlet location is considered the most suitable. This arrangement eliminates the possibility of snow pockets, condensation and leaks. But there is one significant drawback - a violation of the integrity of the ridge beam. In this case, when waterproofing a chimney on the roof, the joint between the roofing material and the pipe is filled with silicone sealant, and then covered with a decorative apron.
Types of protective elements
Products for protecting the chimney from precipitation and debris vary in appearance.
According to the cross-section of the pipe there are:
The most common designs include:
- Models in the form of houses. They have a hipped roof.
- Houses with gable roofs.
- Chimneys with semicircular and cone-shaped roofs.
- Flat umbrellas.
Additional elements can be attached to the chimney cap. This could be a spark arrester, a weather vane, ornaments, figurines (skates, birds) and other decorative details.
Metal apron
Connecting a chimney to a metal tile roof
The connection of a chimney to a roof can be covered with a metal apron. This option looks great on roofs covered with corrugated sheets, metal tiles, and also on seam roofs. The apron elements must rise above the top points of the coating wave by at least 150 mm. You can “cut” the apron from sheet metal yourself, or you can buy a ready-made prefabricated structure.
Recommendations for selection
The main function of the cap is to protect the chimney, so the appearance and shape can be any. It is important that the product matches the size of the pipe. The fungus should not interfere with ventilation and smoke removal from the room.
Typically, caps with four slopes are installed on brick pipes. It is better to install chimneys with a cone on round chimneys.
The umbrella overhangs should protrude a few centimeters on each side of the pipe. This will additionally protect the chimney from rain and leaves. To protect against birds, a net is placed under the umbrella. Its functions can be performed by openwork forging, which will decorate the appearance.
If your home uses a wood stove, it is best not to choose a painted chimney. The paint on it quickly fades under the influence of smoke. It is better to take heads with a sealed double lid. For ease of cleaning, they are equipped with heads with a hinged lid. When installing a gas boiler in your home, you can install painted caps.
How to seal the joint between a roof and an oval and round pipe
To organize the passage of a pipe through a corrugated roof, a galvanized steel pipe with a round cross-section can be used. In this case, sealing the abutment joints is not very difficult. It is for these purposes that elastic funnel-type penetrations are intended. The material for their manufacture is usually latex and synthetic rubber. They are usually included with pitched and flat roofs.
The process of sealing a joint using elastic penetration looks like this:
- Selection of suitable elastic penetration.
- Cutting the narrow part to ensure a tight fit around the pipe.
- Removing the protective umbrella and deflector from the pipe, followed by carefully tightening the elastic penetration. The product must cover the entire pipe section.
- Fixing the base of the penetration to the roof surface is facilitated by the presence of a self-adhesive base. You can also use silicone sealant or roofing screws.
- At the final stage, a decorative apron is installed. It looks like a cap and is tinted to match the color of the roof. The apron is designed to protect the elastic penetration from solar radiation and mechanical influences.
Selecting the size of the elastic penetration plays a key role in ensuring reliable sealing of the joint. When the product does not lie tightly on the pipe, you have to additionally use sealant and a steel clamp. Penetrations of small diameter may rupture when trying to put them on a chimney.
kryshadoma.com
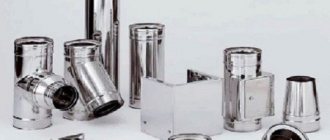
Basic materials
Different metals are used to create protection for the pipe. They must be reliable, strong, not react to external environmental influences and not reduce the traction force. These materials include galvanized steel, stainless steel and copper.
Protection made of galvanized steel withstands aggressive environmental influences well and is distinguished by its practicality. Galvanized steel does not lose color when exposed to direct sunlight. It can additionally be coated with a colored polymer – polyester. If a cap made of galvanized steel with a small thickness is installed, it can burn out after 3-5 years of constant use. High temperature gases destroy it, so it is recommended to install a stainless steel reflector. The cost of the device will be higher, but the service life will increase by several decades.
Higher grade materials include stainless steel. It is durable and highly durable. Its cost is higher than galvanized steel. Can be used as an additional protective element of the cap.
Copper caps are considered the most profitable. They have a long service life that reaches 100 years. Copper goes well with gutters and other elements, and also does not lose its attractive appearance over time. Making a cap for a chimney from copper sheets is easier and more convenient. For work, a copper sheet with a thickness of 0.5 mm is selected. They are harder to work with than thin ones, but the stability of the assembled structure will be higher.
Advantages
I have come across many people who do not prefer high-quality sealing of joints on the roof. Everyone got by with rather primitive methods, making the excuse that such small gaps would not lead to serious consequences. But for myself, I have identified the main and most important advantages of chimneys with waterproofing:
- Using the heating system becomes safer
- Heat transfer increases
- Decent appearance from outside
- The chimney heats up evenly, at the same time the condensate evaporates and does not impair draft, and also protects against smoke entering the room
Making your own cap
Assembling a canopy for a chimney pipe begins with the selection of materials.
You can use galvanized steel, but it is better to use copper. It quickly becomes covered with a protective film of oxides, after which it stops responding to the harmful effects of aggressive chemicals that are in the smoke. Recommended thickness is 0.6 mm. A thinner sheet does not have sufficient mechanical strength and is subject to deformation. You also need to prepare a square, an awl, metal scissors and a metal ruler. Then you can begin creating a drawing, cutting out parts and final assembly. But before you make an umbrella for a pipe with your own hands, you should calculate the size and diameter of the chimney.
Preparing parts
First of all, it is necessary to take measurements of the head on which the visor will be attached. The dimensions of the product should be 10 cm larger than the diameter of the pipe. There should be a 50 mm overhang on all sides. The angle of inclination of the slopes varies from 30° to 45°. The minimum height from the cut to the visor should be 100 mm.
After measuring the dimensions, you can begin creating a sketch. It must be drawn on a piece of paper. It is better to take the simplest basic model and make corrections to it according to linear dimensions.
Next, the details of the canopy for the chimney pipe are transferred to the copper sheet. When transferring contours, you need to leave 0.5 cm for the loop. For ease of work, a copper sheet can be cut into several parts and your details can be drawn on each. You can draw on copper with a special felt-tip pen or an awl. It is better to use the second option, since in this case the lines will be thinner and you will not have to remove traces of the marker.
The outlined parts can be easily cut out with metal scissors. If you have special equipment, you can cut using plasma cutting.
Bending parts and assembling the cap
To bend the parts correctly, it is recommended to practice on unnecessary sheets of metal. If you have experience and skills, it is not necessary to perform the training; you can immediately assemble the cap on the chimney pipe.
Bending parts begins with looping the edges. This can be done manually or using special equipment. The quality on the machine will be better, the execution speed will be higher, but not everyone has the opportunity to purchase professional tools.
After looping, the first part of the base is made. An additional bottom bend will provide high strength. The corners must be bent according to the dimensions indicated in the drawing and controlled with a protractor. If the work is done on a machine, you can select specific templates. In this case, the bending technology will not affect the operation algorithm. The base should be rolled, which will add stability to the structure.
Next, the base of the cap is assembled onto the brick pipe. You will need special pliers for the job. With their help, you need to move the fastening parts in different directions and assemble the elements into a single structure.
The cut and bent workpieces should be laid out on a flat surface. All dimensions, bends and angles need to be double-checked. Using pliers, you need to bend the end switches and assemble all the parts. It is important to perform the work carefully without damaging the front part. There is no need to close the locks yet, they just need to be prepared.
After a thorough check, you can close the locks with blows of a mallet. Now that the assembly of the base is complete, you can begin to create an umbrella for the chimney.
Making a hood roof for a chimney pipe
The algorithm for creating a hood roof is similar to the work on preparing the base. In a similar way, all details from the template are transferred to the metal. Each element must have a hem end. Its length is selected based on convenience. It is important to remember that the length of the upper hem should be twice as long as the lower fixing one. The dimensions must be selected in such a way that as little metal as possible goes into waste. Recommended releases on triangular slopes are 30 mm, on trapezoidal slopes 15 mm.
The blanks are cut with metal scissors. For small elements, depending on the side of the fold, a different tool is selected - left or right.
After cutting, the parts are bent. When they are ready to be connected, you should lay out the elements on the table and double-check the dimensions and angles. You should roll the stiffeners in the middle of the plane of the copper profiled sheet and make a bend at the bottom. It will improve the strength and stability of the cap.
Next, the final assembly of the umbrella is performed. All connecting elements must be aligned with each other along the lines. Triangular ones are installed on trapezoidal slopes and connected into a rebate. Bending must be done with maximum effort so that the elements do not move after installation. Next you need to make and attach the legs. They can be made from leftover copper sheets.
The width of the legs should be approximately 110-150 mm, leaving 25 mm for looping. Dimensions may vary depending on the parameters of the segments. The outlined parts are cut out and bent. You need to drill holes for the rivets, which will be made through two layers of copper.
The roof, base and legs are assembled together. If bird protection is provided, copper mesh should be installed. It is fixed on special corners. The roof is attached with rivets.
Prices
Ready-made caps can be purchased if the pipe has a standard cross-section. For example, umbrellas made of galvanized sheet for an asbestos-cement pipe with a diameter of 100 mm can cost from 800 rubles with external fastening in the form of a clamp, to 1200 rubles with internal fastening.
A modest hipped cap on a 2×2 brick pipe can cost from 1,500 rubles apiece.
It is not always possible to select a standard pommel.
If your stove heating system is installed by a private stove builder, the pipe will probably turn out to be non-standard and you will have to make a special project.
In addition, the price of the cap depends on the material from which it is made. The most expensive ones will be finials made of copper or zinc-titanium alloy. The price of such heads can range from 20 to 30 thousand rubles.
Parts of an artistic weathervane system have an unpredictable price depending on the imagination of the artist and the manufacturing method. Elements with artistic forging are especially expensive.
How and what to use to fix a leak on the roof near the pipe?
A situation where a pipe on the roof is leaking, or there are leaks in the roof near it, requires immediate intervention. Otherwise, such damage to the roof can lead to harmful consequences. Fortunately, fixing such a defect with your own hands is quite simple. The main thing is to decide how to seal the gap between the pipe and the roof. To do this, you need to choose the right method to eliminate the cause of the leak, determining the location of the leak and preparing the required materials, which must be selected taking into account the type of pipe and roof.
Why waterproof a chimney?
The chimney design is almost entirely dependent on the fire safety of the passage. For this purpose, various passage designs are used, and a system of tolerances and requirements has been developed. The main goal of all actions is to cut off the chimney material from the wooden rafters as much as possible
, ensure the absence of sparks and prevent any contact of hot metal with flammable materials.
Such requirements are met using a system for passing pipes through the roof, the so-called. roof passage protecting the rafter system from fire. Waterproofing a ventilation pipe on a roof is no different from waterproofing a chimney, except that in the second case fire-resistant materials are required.
NOTE!
All fire safety measures create cracks and gaps that threaten a lot of leaks and condensate accumulations.
A large number of metal parts causes abundant moisture condensation, and the necessary gaps threaten the leakage of rain or snow water into the room. Therefore, waterproofing the chimney is absolutely necessary; there are no options to somehow do without this process.
Repairing pipe leaks on the roof
Before answering the question of what and how to fix a leak on the roof near the pipe, you need to decide what material it is made of. It is very important. This is the starting point for repair work.
The chimney duct can be mounted from the following materials:
When eliminating a leak, you need to follow a certain sequence of actions, which can differ significantly for each chimney material. Therefore, the technology for eliminating such defects for each type of pipe should be considered in detail.
Fixing brick chimney leaks
If a pipe made of red brick is leaking on a roof, then to fix the problem you will need the following materials and tools:
- cement grade M 400 or M 500;
- sand, preferably river or sea, but quarry sand is also suitable;
- water;
- Master OK.
How to seal the gap between the pipe and the roof, having all of the above? You must adhere to the following sequence of actions:
- A cement mortar is made from the prepared materials by mixing 3-4 parts of sand and one part of cement;
- the detected leak site is thoroughly cleaned of dirt and remnants of destroyed bricks;
- The prepared mixture is applied using a trowel to the damaged areas.
It is better to repair a roof pipe in sunny, dry weather. This way the cement mortar will harden much faster.
Repairing metal chimney leaks
If a metal chimney is leaking, then to correct the current situation you will need:
- special clamps with a rubber gasket that can be secured to the pipe where the gap occurs. The diameter of the clamp should be approximately equal to the thickness of the pipe. Its width should be slightly larger than the size of the crack;
- in addition, small cracks can be eliminated using cold welding, instructions for use of which can be found on the packaging.
The specified materials for eliminating metal pipe leaks can only be used as a temporary measure. As soon as possible, the damaged section of the chimney must be replaced with a new one.
Repairing asbestos chimney leaks
If water flows through an asbestos pipe, then you can eliminate the leak by performing a number of the following actions:
- First of all, you need to stock up on cotton fabric and “Iron Lead” paint. You can buy such materials at any hardware store;
- then the chimney, namely the damaged area, should be cleaned of dirt and dust;
- the paint is applied in a thick layer;
- fabric is tightly wrapped over it;
- Then the paint and varnish material is reapplied.
For the most part, such repairs are also a temporary measure that allows you to postpone the replacement of the chimney pipe for a certain period. You should not delay replacing a damaged asbestos chimney.
Why do leaks happen?
A roof made of profiled sheets must be equipped with several openings for the exit of the chimney pipe and ventilation ducts. As a result, the integrity of the waterproofing is compromised and there is a real threat of leaks. It is especially difficult to solve the problem of how to seal a pipe on a roof made of corrugated sheets if the pipe is routed through an already finished roof. In order to properly seal the areas where the corrugated sheet meets the chimney walls, you will need to make every effort.
If the ventilation passage through a corrugated roof is poorly designed, the following problems may arise:
- Water is leaking . This happens in cases where the sealing of the joint between the profiled sheet and the chimney is done poorly (read: “What is the best way to seal a pipe on a roof made of corrugated sheets, what material and method to choose”).
- The rafter system begins to rot . Water that gets inside the roofing structure through the joint of the corrugated sheet and the chimney causes wetting of the wood, from which the elements of the roofing pie are mainly made. Subsequently, they begin to rot and become deformed.
- The roof covering begins to rust . The corrugated sheeting on the bottom side is not as well protected from corrosion as on the top. To protect the outer part of the material, a polymer film is used, while the bottom of the sheet is treated only with varnish. Therefore, when the level of humidity under the roof increases, it begins to corrode.
- Thermal insulation is becoming obsolete . Insufficient sealing of the chimney on a corrugated roof causes the insulation to become wet, which significantly reduces its effectiveness.
Repairing leaks near a pipe
If water flows through the chimney during snow melting or rain, the reason for this is a violation of the tightness in the place where the pipe and the roof are connected. If there is a roof leak near a pipe, there are a number of ways to fix the existing problem:
- apply bitumen tape;
- install rubber cuffs;
- make and install a metal apron.
All of the above methods allow you to close the leak, so they should be considered in more detail.
Using bitumen tape
If a chimney leaks due to rain or melting snow, then the simplest and cheapest way to eliminate the leak is to make an apron from bitumen tape. To perform such work you need to use the following materials and tools:
- bitumen tape;
- scissors;
- metal brush;
- gas burner.
The cracks are sealed by taking the following measures:
- first you need to use a metal brush, which is used to clean the roof around the chimney and its outer lower part;
- Remove any remaining dust and dirt with a damp cloth;
- At the junction of the pipe and the roofing material, pieces of bitumen tape are glued. It doesn't matter which side the gaps are on. You should create a full apron around the entire pipe;
- the glued tape is heated with a gas burner, which is pressed as tightly as possible to the roof and pipe;
- to seal the joint more reliably, the tape can be additionally secured with a wooden block or board (this cannot always be done, it all depends on the roofing material).
Bitumen tape is a universal material. It can be used if a pipe or roof made of any materials is leaking. The tape is capable of performing its functions efficiently for 2-3 years (depending on the amount of precipitation and other factors).
Using the rubber cuff
If the roof is leaking near the chimney duct, then this situation can be corrected by using a rubber cuff, which can be purchased at almost any hardware store. It is installed as follows:
- a cutout is made in the upper part of the cuff, the diameter of which is slightly less than the thickness of the pipe;
- the prepared cuff is put on the outer part of the chimney duct and lowered to the roof level;
- To avoid the possibility of repeated leakage, it is necessary to use sealant at the point where the roof comes into contact with the lower part of the cuff.
Some types of cuffs are not easily glued to the roof. Some models can be screwed to the roof with self-tapping screws, but this is only possible in cases where the roof is not made of tiles or slate.
The main disadvantage of the rubber collar is that it cannot be installed on a square or rectangular pipe. What to do in such a situation? Use any other leak repair method described above and below.
Arranging a metal apron
A chimney leak at the junction of the pipe and the roof can be eliminated by installing a metal apron. This is done as follows:
- An apron is made from a thin sheet of tin, the dimensions of which must match the dimensions of the pipe. A similar product can be purchased at a hardware store;
- the upper part of the apron is attached to the pipe and crimped using a clamp. The crimping process must be carried out carefully. Gaps are not allowed;
- The lower part of the apron is installed on the roof and secured with self-tapping screws. To ensure that the damaged area of the roof does not leak, in the future the lower part of the plate should be secured on top of the roofing material, and the upper part should be removed under the sheathing.
At this point, the manufacture and installation of the metal apron can be considered complete. The sealed area will no longer cause problems. For additional sealing, the metal apron can be equipped with a rubber lining, and the contact point between the cone-shaped part and the chimney duct can be sealed with sealant.
A leaking roof near a chimney can be repaired in many ways. Such cracks are closed in 5-10 minutes, but it is worth understanding that such repairs cannot be considered high-quality. The sealed joints between the roof and vertical elements will certainly make themselves felt in a few years. Thus, such local repairs are a temporary measure. It is designed to protect against moisture entering the room until a full roofing repair is completed.
Work plan
Sealing a pipe on the roof
- The first thing I did was purchase the abutment strips. The apron consists of two parts and is installed using L-shaped strips at the bottom of the chimney.
- Next, placing the bar on the pipe, I marked a line for the groove - then the bends of the junctions are inserted into it
- Using a grinder, I made grooves by walking along the previously marked lines
- Next, I installed the lower apron - we insert the edge of the strip into the groove
- The remaining parts are assembled with an overlap of no less than 150 mm
- After finishing installing the apron, I covered all the grooves with sealant
Important! There are many options for sealants on the market. It is important to use sealants that can withstand high temperatures. You should use heat-resistant and heat-resistant ones; according to the characteristics of each of them, you can choose the appropriate sealant option.
- Next I made a “tie” that is placed under the lower part of the apron. This is a sheet of waterproofing, thanks to which water does not linger, but flows away.
- Once the bottom of the splashback and tie were completed, I covered the sheathing with corrugated sheets and continued installing the exterior.
- The actions take place according to the same principle as before, only I did not hide the upper edge of the bar in the groove, but pressed it around the chimney
If your roof pipe is made of brick, you do not need to make any umbrella roofs, since brick absorbs moisture well. For other chimney pipes, it is customary to install such canopies to prevent water from entering the home.