To carry out bath procedures according to all the rules, you must solve the issue of heating water for washing. Owners who remain true to traditions do not think much about this and, even at the design stage of the bathhouse, include a heater in it. However, you can avoid the labor-intensive work of heating it if you choose a modern solution - an electric boiler. True, there are difficulties here too.
You will have to choose a suitable heater model with a heat exchanger. But you can save money if you decide to make it yourself. But in order for this device to perform its functions well, it would not hurt you to first learn about the purpose of the heat exchanger and the rules for its installation.
Mechanism of operation
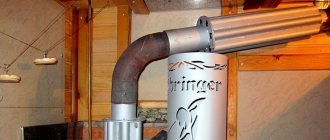
A metal stove placed in a house, garage or bathhouse must be equipped with a chimney to remove carbon monoxide and organize draft. During the process of heating the furnace, this pipe can reach very high temperatures, about 200-500 ℃, which is unsafe for people in the room.
If you install a heat exchanger on the chimney, you can significantly increase the efficiency of the stove, and also protect yourself from direct contact with a hot surface. In a tank or coil installed on the chimney, the coolant will be water, however, you can also install an air heat exchanger on the chimney pipe. Due to the direct contact of the chimney with the coolant, their temperature indicators are balanced, that is, the water or air gradually heats up, and the walls of the pipe cool down.
As the temperature of the water inside the register rises onto the pipe, it rises upward, where it enters the water tank through a special fitting. Through the inlet fitting located at the bottom of the heat exchanger, cold water enters it, replacing warm water. This circulation continues constantly, and the water can heat up to very high values.
An air radiator on a chimney pipe has a similar operating principle. Cold air enters the heat exchanger from below, and after heating it rises up and is supplied through the pipeline to the heated rooms. In addition, the radiator fins also give off heat. An air heat exchanger is optimal for heating attics in a country house or dressing rooms of a bathhouse, if such rooms are heated only from time to time. It is not advisable to organize water heating in them, since you will have to constantly fill and drain water from the system.
Video
Sources
- https://vsegdanarybalke.ru/raznoye/palatka/teploobmennik-dlya-zimney-ryibalki/
- https://househill.ru/kommunikacii/otoplenie/element/ustrojstva/teploobmenniki.html
- https://CatFishing.ru/poleznoe/teploobmennik-dlya-palatki/
- https://housetronic.ru/otoplenie/element/device/teploobmenniki-svoimi-rukami.html
- https://ogon.guru/otoplenie/komponenti-sistemi/teploobmennik-svoimi-rukami.html
- https://wlooks.ru/palatki/teploobmennik-svoimi-rukami/
- https://remont-system.ru/pechi-i-kaminy/chto-predstavlyaet-soboy-teploobmennik-dlya-palatki-i-kak-ego-sobrat
Instructions for making a tank
Often in stores you can buy a heat exchanger for a heating pipe with an already made water circuit. All that remains is to mount it on the new factory stove and you can use it. However, if you wish, you can make a heat exchanger for the chimney pipe with your own hands.
The following materials will be required:
- sheets of steel and pieces of stainless steel pipes of different sections with walls 1.5-2 mm thick;
- 1″ or 3/4″ fittings to connect the water circuit to the heating system;
- large water tank made of galvanized or stainless steel with a volume of 50-100 liters;
- flexible hoses or pipes made of copper or steel for hot water;
- tap for draining water from the system.
Work on assembling a heat exchanger with a tank consists of the following steps:
- Drawing development. Based on the type of stove and the diameter of the chimney, the dimensions of the tank are determined. In simple metal stoves with a direct chimney at the outlet, the gases are very hot, so the heat exchanger can be quite large - about 50 cm high.
- The inner diameter of the walls of the storage tank must be selected so that it fits tightly onto the chimney pipe. The outer diameter of the tank should be 1.5-2.5 times larger than the internal cross-section. Such parameters allow you to quickly heat the coolant and ensure its free circulation. If the gases coming out of the furnace are not very hot, then it is better to install a heat exchanger on the chimney pipe for heating of smaller sizes, so that condensation does not accumulate and there is good draft.
- You need to use a welding machine to fasten all the structural elements together, making sure that the seams are airtight. Fittings for water circulation are welded at the top and bottom of the tank.
- The water boiler is seated very tightly on the smoke fitting, additionally treating the seams with heat-resistant sealant. In the upper part of the tank, an adapter is attached in the same way to an insulated pipe, which is led outside through the ceiling or wall.
- The heating circuit with coolant is connected to the storage tank. The incoming pipe with cold water is led through a fitting to the tank with an inclination of 1-2 degrees. The hot water pipe, connected to the tank through the upper fitting, has an inclination of 30 degrees. In this case, the storage device itself is mounted above the heat exchanger.
- A tap is installed at the lowest point of the tank to drain the water. In the steam room it can be combined with a tap for drawing hot water.
- Before heating the stove, water is poured into the system so that the metal elements do not overheat and the seams do not burst.
- Filling the heat exchanger with water can be either manual or automatic. If you fill the water manually, you need to install a transparent tube on the outer wall to monitor the water level.
It is worth noting that the distance from the circuit to the tank should not be more than 3 meters, and it is better to take the pipe diameter no narrower than 3/4″.
Main advantages
The undoubted advantages of using a heat exchanger in the furnace design are:
- Simultaneous implementation of several functions: heating water, air in several rooms, as well as steam generation;
- Options for installing the tank at a considerable distance from the stove (even in another room);
- Durability. When using modern materials and following installation technology, the service life reaches 20 years.
- Aesthetic appearance
- Availability of care;
- Easy installation;
- High efficiency;
- Possibility of installation both in a Russian traditional bath and in a modern Finnish sauna;
- Space saving due to compact dimensions;
- High power and, as a result, fast heating to the required temperature;
- Absence (or insignificance) of deformation during heating
We invite you to familiarize yourself with: Bathhouse shed toilet under one roof
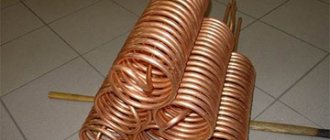
Heat exchanger in the form of a coil
If the installation of the previous type of heating from a chimney pipe requires the ability to operate a welding machine, then the design of a heat exchanger in the form of a coil is much simpler. You just need to wrap a few rings of flexible aluminum or copper pipe around the chimney. These metals have a high level of thermal conductivity and are not destroyed due to corrosion.
The diameter of the tube should be convenient for connecting to the fitting of the storage tank. It is optimal to choose a pipe with a cross-section of no more than 28 mm for bending. The length of such a circuit should not exceed 3 meters in order for the water circulation to be correct. Using a flexible connection, you can connect the tank to the coil.
As a rule, coils are used to heat water, although sometimes for heating small rooms. Coils mounted on the chimneys of a metal furnace with a very high temperature of carbon monoxide perform best.
Step-by-step instructions on how to install a heat exchanger with your own hands
The Kuznetsov heat exchanger is installed instead of one of the chimney sections - for this part of the chimney will have to be dismantled. If a chimney is installed from one long pipe, you will have to cut out part of the chimney and install the structure using welding.
Installation methods
The heat exchanger is installed at a certain distance from the heating unit - 200-500 mm, more is possible.
If the chimney is prefabricated, then it is necessary to disassemble part of the chimney. The heat exchanger pipes are cut so that the length of the heat exchanger structure is equal to the dismantled chimney section. The heat exchanger is mounted in the chimney and sealed using heat-resistant sealant. The top of the heat exchanger is painted with heat-resistant paint.
Coil installation method
You can install a coil heat exchanger on the chimney of a sauna stove or potbelly stove in a garage or shed. It will serve for heating or for heating water.
To work you will need:
- aluminum or copper tube up to 3 m long;
- 2 3/4″ fittings and a flexible hose for hot water;
- boiler with a float valve for filling with water and a valve for its use;
- tap for draining coolant from the system.
The system installation technology looks like this:
- The first step is to bend the tube so that its cross-section remains unchanged. For copper pipes less than 28mm in diameter, you can use a pipe bender without heating them. But steel, aluminum and products with large diameters require preheating with a blowtorch.
- For bending, you can use dry sand, filling the pipe with it and closing it with plugs on both sides. A spiral bend is made according to the sample, after which sand is poured in and the pipe is washed under water pressure.
- At the end parts of the tube, threads are cut for adapters for fittings, and then connected to the system.
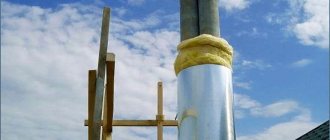
- The resulting coil is mounted on the chimney. If you solder it with tin to the pipe, the heat transfer will be better. Preliminary degreasing is carried out with orthophosphoric acid.
- A storage tank is hung on a support or on the wall a little above the coil. Connect it to the heat exchanger with a flexible connection and install a tap at the bottom of the tank.
Note that for safe and long-term use of a heating coil, you need to install a pump that circulates water in the system and prevents overheating.
Water
The device has two sectors that heat each other. Water circulation at high power occurs in a closed circuit in the heating system tank, where it heats up to 180 degrees. After flowing around the installed tubes, the water is directed to the main system, where the heating temperature increases.
To make a water heat exchanger, prepare:
- Container in the form of a steel tank. Install it to the beginning of the system. For water circulation, 2 pipe branches are needed, the lower one for cold water inlet, the upper one for hot water inlet.
- Check the tank for leaks.
- Place copper tubular spirals inside the tank; 4 meters of pipe per 100 liters of tank is enough.
- Connect the power regulator to the copper tube.
- To prevent pressure and temperature changes from destroying the container, install the anode closer to the heating element.
- Seal the tank hermetically.
- Fill with water.
- Check the system in operation.
Negative points
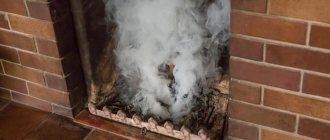
Along with the benefits of a heat exchanger on a chimney, it is worth noting a number of negative factors. Firstly, due to this design, the temperature of the exhaust gases is significantly reduced. This can provoke excessive soot accumulation, condensation formation and poor traction.
An important point in arranging such a heating system is to calculate how much water is needed for its full functioning. If there is not enough of it, the system may overheat, the water in it will boil, and the pipes may burst. In addition, it is important to ensure the tightness of the seams.
In any case, installing a heat exchanger allows you to increase the efficiency of any furnace. For safety reasons, at least twice a year, visual diagnostics of the system and its maintenance should be carried out - cleaning soot, replacing defective elements, and so on. Then it will be possible to confidently use the heat exchanger for heating the house and heating water in the bathhouse.
Installation and connection
The heat exchanger in the firebox is supported by the brickwork of the stove; in the chimney, the device is supported by bends. It is advisable to make the bends as short as possible. The main rule for installing such a system: no horizontal sections.
Before connecting, the system must be checked with cold water. To do this, the system is filled with water and each section of the pipeline is inspected. Any hole will eventually turn into a serious leak, so it is better to eliminate all problems at the installation stage. If financial capabilities allow, it is advisable to install a circulation pump with simple automation to turn the circulation on and off.
As you can see, there is nothing complicated in creating a heat exchanger for a bathhouse with your own hands. The main thing is to choose the right heat exchanger for each specific case, based on the dimensions of the room and the financial budget of the construction site.