After completing the construction of the roofing structure and the installation of the covering, it is time to file the roof overhangs, which are sometimes simply called the frame. The appearance of the entire building depends on the method of filing and choice of material. The box under the roof is the final touch that gives the entire structure a finished look.
The design of the box also includes elements of the ventilation system of the under-roof space. Don't forget about fixing the gutters.
To hem overhangs, you can use a variety of materials and a variety of designs.
How to make roof overhangs with your own hands - options and methods for lining the eaves
After the installation of the roof covering is completed, the covering of the roof overhang begins. This is done in order to protect the finishing of the walls and facade, to give the building a complete architectural appearance and to ensure ventilation of the under-roof space. If you are lining the roof overhangs yourself, the home craftsman needs to pay attention to some important points.
The protrusion of the rafters beyond the perimeter of the walls of the building is called the eaves overhang. It can be simple or take-out. There are two types of overhang, namely side and front.
What is a roof overhang?
An overhang is a structure protruding a certain length beyond the line of the load-bearing walls of a building, the main function of which is to protect the building and its load-bearing structures from snow, rain, and melt water flowing down the roof.
The length of the overhangs is on average 500 - 600 cm, but it can be increased if desired.
Usually, overhangs are created using the rafter system, but sometimes it is not possible to create such overhangs as a continuation of the rafters. In such cases, the so-called forced continuation of the rafter structure is used. The elements forming the elongated rafters are called “fillies”.
Do you know how to install the rafter system of a hipped roof?
You can learn how to build a roof with your own hands by following the link.
Since the gable of a building is also an unprotected part of the house or roof, it also needs protection from the destructive effects of rain and snow. The width of the front overhangs should be 500 mm or more, and such a structure is constructed using cornice-type boards.
The bottom of the overhangs must be sheathed to extend the service life and improve the exterior of the building.
Front overhang
The functional purpose of such an overhang is to protect the facade of the building. It consists of the side edges of roof slopes located at an angle. This means that a hip roof does not have a front-type cornice.
On a gable roof, such a cornice is installed by releasing load-bearing elements that are fixed to the rafters. It can also be formed by sheathing boards laid under the roofing material on a layer of vapor barrier. A cornice board is mounted on the wooden elements, then it is sheathed, for example, with corrugated board or soffit.
Side cornice
All sloping roofs have a side overhang. It is formed by rafters placed outside the walls of buildings. The distance to which they protrude depends on the height of the building and the width of the blind area, usually it is from 50 to 70 centimeters.
Not so often, but you can find narrower overhangs, but then the outer wall of the house must have high-quality wind protection, since under obliquely falling rain it will become wet and subsequently become damp.
There is another option on how to make the eaves of a house of the required size - this is to install fillies and in this way increase the length of the rafters. But since this process is labor-intensive, when the roof is built, few people decide to redo the roof structure. For this reason, the necessary overhang parameters should be provided for at the construction planning stage.
The rafters along the entire length of the cornice are connected with boards, and later they are covered with facing materials.
How to hem roof overhangs
But there are other ways, let’s consider them in more detail. How to hem roof overhangs, choice of materials, technology for performing work, how to avoid mistakes and save money.
Both the eaves and gable lower parts of the roof, protruding 30-70 cm beyond the facade, are subject to hemming. When protecting and decorating eaves, the emphasis is on ensuring sufficient ventilation of the covered areas of the under-roof space; when hemming gables, on the contrary, all efforts are directed towards improving tightness indicators.
Accordingly, in the first case, the materials used are necessarily perforated or laid with small ventilation gaps; in the second, preference is given to solid soffits and tightly laid panels or strips.
Optimal results are achieved by using soffits - specialized solid, perforated and combined panels of the required size with convenient connection systems. In their absence, overhangs are hemmed with siding, corrugated sheets, lining and other sheet and molding materials based on plastic, wood or metal that can withstand wind loads and atmospheric influences.
Arrangement of roof ventilation using cornices
The main purpose of the eaves of a gable roof is protection from atmospheric loads. At the same time, it should not be an obstacle to the natural ventilation of the space under the roof, which is important for both attics and cold attics.
Warmer air masses coming from the ground should freely penetrate through the cornice and then, passing between the vapor barrier and roofing material, be discharged through the ridge to the outside.
That is why the use of sealants and polyurethane foam when covering the roof is not allowed, otherwise the formation of condensation and wetting of the roof insulation cannot be avoided.
Materials for filing roof overhangs
Today there is a large selection of materials on sale that are used for roofing eaves. They differ in their advantages and disadvantages, but their installation will protect the roof from moisture, ensure its thermal insulation and ventilation. When choosing materials, you should be guided by their appearance and performance characteristics.
For filing overhangs the following is often used:
- corrugated sheeting;
- soffits;
- thin cladding or edged board.
Common mistakes when working with spotlights
- If the work is carried out by professionals, then the filing should be neat and beautiful .
- Separate attention should be paid to the reliability of the fastening of soffit panels; fastening materials and fittings should never be saved, otherwise a strong wind can undermine the entire structure.
- the design of the external walls before filing .
Another important note: for filing overhangs, you should definitely get stainless fittings so that later rust does not spoil the appearance of the building.
Sheathing of overhangs, made in the same style as the façade of the cottage Source interistroy.ru
Corrugated sheet
It is made of galvanized steel and coated with a colored polymer layer. It is resistant to mechanical damage and temperature changes, has the required degree of rigidity and is not susceptible to wind loads.
To ensure ventilation, a gap is left between the corrugated sheets and the wall of the house, which is equal to the height of the wave.
Roofers often prefer to cover the eaves with soffit, which is a popular material intended for finishing overhangs. It consists of plastic panels, externally
How to make the correct lining of the roof eaves with your own hands and lining with soffits?
Hemmed neat cornice
After you have completed the construction of the roof, laid and selected the flooring, such a crucial moment comes as filing the roof eaves.
It requires the correct choice of material, because very often the box design contains fasteners for drainage and ventilation system laying.
The eaves are hemmed after the rafters are installed, but before the sheathing for the roof covering is built.
First you need to saw off the protruding parts of the rafters along one line that is parallel to the house.
If the filing is done with a board, then if there is a different distance between the wall of the house and the ends of the rafters, the work will not look aesthetically pleasing.
After filing the rafters, they begin to lay the first board or other sheathing material.
Remember, among other things, such an important element as internal roof insulation. The insulation must be laid before work on the roofing begins.
Cornice and pediment overhangs and their purpose
Depending on the shape of the roof of the house, roof outlets can be implemented both in the eaves area (hip and hipped structures) and on the gable side (gable roofs).
The eaves overhang is formed by a rafter system that protrudes relative to the walls of the house at a certain distance. Its value is determined by the project or can be set at the request of the developer. If there are additional vertical supports, the eaves outlet can serve as a canopy over the porch or a small veranda.
The gable overhang is made from the end (side) side of the building. Its optimal width is 60-70 cm, the minimum is 30, the maximum is no more than 100 cm. The carrier for the outlet is the roof sheathing, so it is not recommended to make it too wide.
Roof extension options: on the left - cornice, on the right - pediment
In both cases, overhangs serve not only as a decorative finishing element for finishing the house, but also protect the walls, base and foundation of the building from excessive wetting. This point is especially important when using plaster as a façade material, which is more sensitive to moisture. Therefore, it is necessary to hem the gables and cornices under the roof. Otherwise, the protruding part of the roofing “pie” becomes vulnerable to rain and wind. Exposed wood construction and insulation may deteriorate. Strong gusts of wind in an unprotected place can weaken the roofing fasteners or completely tear off the material. Proper finishing of the overhanging part of the roof does not require further maintenance over a long period of operation.
What material is best to choose for hemming?
The selection of lining material is determined by the planned amount and the intended appearance that is planned to be given to the building.
Plus, you need to take into account the width of the area that needs to be hemmed.
For a narrow cornice, the best option is siding, and for a wide cornice, lining or board.
Nowadays materials such as:
Wooden lining. This material must be chosen especially carefully, because it will be exposed to the influence of the external environment and will have to last for many years. In view of this, it is necessary to choose a fairly thick lining, with a humidity that is approximately equal to the humidity of the surrounding air.
This moisture level is achieved by storing the wood outside for at least 4 weeks. Plus, the material must be treated with antifungal agents and solutions that prevent rotting.
Important: Every 1.5 m you need to install ventilation holes, which are covered with special grilles, and it is better to install the grilles right away, because later it will be difficult to carry out this work due to the lack of forest.
Edged board. The board must be one and a half to two centimeters thick. This is the best thickness for roofing.
When filling the boards, the joints must be made with a gap of one to one and a half centimeters, this will allow air to circulate freely, prevent the accumulation of excess moisture in the roof box and guarantee excellent ventilation.
The disadvantage of boards and lining is that this material is exposed to the influence of the environment and must be constantly treated with special solutions and cared for.
To give the required shade, the cornice will need to be painted all the time, which entails almost annual material costs.
Lining the roof eaves with soffit is a very common method among developers.
Mostly there are two types of soffit: aluminum and vinyl. This material has many advantages; it is perforated, which guarantees excellent ventilation, it does not rot and is not affected by fungi and mold, it is durable and strong.
A wide color palette makes it possible to choose a material that ideally matches the overall shade of the roof or walls; therefore, lining the roof eaves does not entail further costs and is profitable.
Lining eaves with siding is not very popular, because vinyl siding is not very durable, and metal siding is subject to corrosion under the influence of precipitation.
Stage V. Important subtleties of using fasteners
Let's look at which mount is best suited for this task. So, to install soffits you need anti-corrosion screws or nails (but only anti-corrosion ones). The fact is that the spotlights will have direct contact with the open atmosphere 365 days a year. And on particularly rainy days, the air humidity is quite high.
The diameter of the head of nails and screws should be no narrower than 8 mm, and the stem – 3 mm. The movement of the panel during the installation process must be free. Whether you did everything correctly can be checked by using an ordinary penny coin, which, if done correctly, will fit between the cap and the panel. And leave at least 1 mm between the fasteners and the surface of the panel:
Try not to drive the nail deep - you need to leave 1 mm between the siding and the bottom of the nail head. It is better to nail the nails at a distance of 40-60 cm from each other - so that the panels can move freely.
Hammer them right in the center of the slot, and never at the end, otherwise you will ruin the trim panel. At all joints and stops at the end of the profiles, be sure to leave a minimum gap of 5 mm, and if you work in cold weather, then all 6 mm.
Hemming the cornice step by step:
Scheme of how to make a cornice
To do this, you need to know the structure of the roof box.
Each house has an individual project, and when carrying out roofing work, it is necessary to take into account certain nuances and features. However, some points are mandatory and common to everyone.
You can do the filing of the roof eaves yourself using 2 main methods:
- Right up to the rafters. Moreover, the angle of inclination of the slope is equal to the angle of the hem. This option is more suitable for slightly sloping and flat roofs. The lower part of the rafters is hewn down so that the surface is flat, because the board or lining is nailed directly to them. You can level the surface yourself; to do this, pieces of boards ten centimeters wide and four centimeters thick are attached to the rafters.
- Roof lining by preliminary production of a horizontal box or frame. This method is relevant for a hip roof, which has a very large angle of inclination. The frame is made of thin boards and attached end-to-end. This joint must pass exactly between the convergence of the slopes and the walls. This design does not depend on the condition of the roof and wall and is very reliable. This structure is attached with screws, but with the use of metal corners it becomes much stronger.
After making the frame, they begin to sheathe the roof eaves with clapboard or other material.
Covering the roof with siding, which is profiled along its entire length, is best used for roofs that do not have ventilation gaps.
Soffit panels are beautiful in appearance, easy to process and cut, which makes it possible to finish complex configurations of eaves overhangs.
Solid soffit panels can also be used to decorate the facade of a house.
Vinyl soffit weighs little, is characterized by resistance to corrosion, ease of installation, durability and low price.
Aluminum soffit is made from a single sheet and covered with a protective decorative layer.
Its advantage compared to vinyl soffit is its resistance to temperature changes, wide color palette, durability, and resistance to sunlight.
Some features of installation of the filing and frame for it
As already mentioned, after installing the roof structure, you need to move on to covering the overhangs. There are two main methods of filing.
With the first method, it is carried out directly along the rafters. This option is suitable for roofs with a slight slope or when there is a need to increase the height of the building.
With this method, the lower part of the rafters is located in a single plane. If this condition is not met, then a flat plane can be achieved by using additional boards: they should be overlapped on the rafters.
Then you need to align and screw the first and last strips of sheathing material, then tighten the threads to maintain the level and attach the remaining strips.
When roofing boards converge on both sides, rafter boards are installed on both sides. The usual length of overhangs is 600 mm.
The second method is more popular. All rafters should be trimmed horizontally and vertically. A board is fixed at the bottom of the rafters, and a beam is attached to the wall. It is located 1 cm above the frontal board in order to allow moisture to drain away.
If the overhang width is more than 450 mm, an additional board should be installed in the middle. When the roof slopes converge in one place, the board must be nailed from the corner of the roof to the corner of the building.
Detailed instructions on how to properly cover a roof with metal tiles are on our website.
For information on where the bottom valley strip is located, follow the link
All about corrugated sheets https://rooffs.ru/metallicheskaya/profnastil/kak-sdelat-svoimi-rukami.html
Regardless of the cladding method, the roof overhang box is installed in the same way: along the length of the wall along the gable, a board is stuffed onto the sheathing, from which the distance corresponding to the length of the overhangs is measured, after which the board is nailed parallel to the gable wall.
The result is a rigid structure independent of the wall. We must ensure that all fastenings are reliable - with screws, or better yet, with metal plates and corners.
After completing the installation of the frame, you need to start covering.
Cladding with clapboard or board
Since wind, rain, snow, cold air, etc. will penetrate into this place, the fastenings of the overhang sheathing must be very reliable.
The best choice is fastening with screws.
You must use at least two screws at each mounting point.
Along the length of the boards, they are joined in a checkerboard pattern to prevent two joints from being located next to each other. The exception is corners where sawing is done at an angle of 45 degrees (in some cases at a different angle).
The board or lining is treated on both sides with an antiseptic. The composition is applied twice: the first time before installation (both surfaces and ends are treated), and the second time after installation. In this case, it is necessary to cover all fasteners, cutting points, etc. with the composition.
To complete the work, ventilation grilles must be installed. When using linings, they are cut into the box. It's better to do this in advance.
How to install corrugated sheeting?
The filing of overhangs made of this material is carried out in the following sequence:
- Sheets of corrugated sheets are screwed along the cornice and wall to the frame, using self-tapping screws;
- At the junction points of the wall and the material, a frontal strip is mounted, as well as an internal corner. The frontal strip is screwed to the frontal board, and the inner corner is screwed to the corrugated sheet;
- The outer corner is fastened at the points of external joints of the profiled sheets;
- Profiled sheets are screwed along the pediment along the outer edge of the overhangs and along the wall;
- After this, the corners and end strip are fastened;
- To facilitate the installation process and ensure ventilation, the width of the profiled sheets should be 2 cm less than the width of the overhangs.
Making a box for the roof overhangs
To process the siding roof, a box is arranged. The frame is made of aluminum profiles or wooden blocks.
If you are going to flash the roof eaves with clapboard, then, naturally, the frame is made of wood, which must first be treated with antiseptic agents.
For roofs with a slight slope, you can hem directly along the rafters.
To do this, leveling bars with a section size of ten by four centimeters are packed on the underside of the rafters, so that in the future a horizontal plane will be obtained. Before this, a cord is pulled between the outer bars, along which all the other bars are stuffed.
For roof slopes with a large slope, a box is made of 2 boards, one of them is nailed to the rafters from below. The second board is attached to the wall of the building, where the rafters extend beyond the wall.
The bottom surface of the boards should be located at the same horizontal level.
Then transverse bars are stuffed onto these boards, to which the roofing will be later lined with clapboard.
Soffit installation instructions. Two ways + video
Before starting work, you need to familiarize yourself with the components for the spotlights. Some additional elements are used when installing siding. For example, an external corner or a final (finishing) profile. Typically the corner size is 50x50 mm, the length of the elements is 3 m.
External corner and finishing profile
There are also specialized accessories for installing spotlights: a J-chamfer (“jay” or “ji”) is used for the end finishing, and a J-profile is used to fasten the panel in the corner of the wall.
J-chamfer and J-profile
Depending on preferences and conditions, the end technology can be made in three combinations.
In the first option, we use a combined J-chamfer and finishing profile.
1st method: finishing the end using a j-chamfer
It must be taken into account that the J-bevel is usually produced in a width of 200 mm. This value should be sufficient. Otherwise, you need to use the methods below. If the width of the end is smaller, cut off the excess part from the strip and insert it into the originally installed finishing strip.
If the end is too wide, you can use an alternative option using an external corner. And also install a soffit on the vertical area.
2nd option using an external corner
And finally, another combination in which we replace the outer corner with a J-profile. The method is the most cost-effective, because The j-bar is 4 times lower than the cost of the angle.
3rd option: installation with J-profile
For corner connections between the spotlights, you can use an H-profile or two J-profiles.
Soffit corner connections
Installation of horizontal roof outlet using a box
We will step by step consider the installation of soffits with an extension located perpendicular to the wall. To do this, you need to prepare a special box that will support the entire structure of the binder. We fix the block to the wall so that its edge is flush with the bottom point of the rafter.
Box installation diagram
Next, we nail a front board or several, depending on the width, to the end of the rafters. We measure the distance from the wall to the front board: this is exactly the size that the soffits need to be cut. We perform hemming according to the instructions outlined above.
Installation of spotlights
Eaves lining without frame
To decorate the roof with plastic elements, you will need the following tools: level, pencil, tape measure, corner, screwdriver, knife, hammer, hacksaw and cord.
Step-by-step example of filing with siding or soffit. The work is carried out from the inside of the rafters, without installing a box. Materials used: siding and soffit with central perforation and white color, outer corner, J-profile, self-tapping screw with press washer 4.2*16 galvanized sharp (for wood), nails, edged board 25*120 mm.
Before installation, make sure that the rafters are cut at the same distance and parallel to the plane of the house wall.
To begin with, we pull the cord along the bottom from the first to the last rafter leg. This will show us at what level it is better to install the front board. In this case, the width was two boards with a small gap. We fix them with nails to the ends of the rafters. Now you need to install the outer corner for further installation of siding. We fix the bar with self-tapping screws and a press washer. Correct installation is easier to control with a stretched cord. A combined chamfer is not suitable for this option, because designed for soffit installation at 90 degrees relative to the end.
Installing an outside corner for siding and soffit
When the corner is installed, you can start installing the siding panels at the end. Cut it to the required length. As a rule, the length is equal to the width of the rafter cut. It is better to prepare two or three pieces at a time, as the sizes may vary slightly. When installing vertically, ensure that it is secured with a lock. We also fasten each panel with self-tapping screws. The lower part will “fit” into the corner, and the upper part can be placed under the cornice strip or a finishing profile can be installed.
We attach siding panels to the end of the rafter system
To decorate the lower overhang, it is better to use soffits (in this case, triple ones with central perforation). It is installed similarly to siding. One end is inserted into the outer corner, and the other into the J-profile. The panels are snapped together using a locking connection. They are attached to the sheathing with PSh self-tapping screws. It is convenient to cut the panels using ordinary metal scissors or a hacksaw.
Soffit from the eaves side
Installation of roof ends
Hemming on the pediment side, unlike the cornice, is carried out at a right angle to the wall of the house. Therefore, the installation of the ends can be done using a J-chamfer or an external corner. Which option to choose is up to the developer to decide. Sometimes such an element can be a roof wind strip, provided that the width of the bottom shelf is sufficient.
Wind strip and chamfer from the end of the house
Types of overhangs
A cornice refers to rafters that protrude beyond the boundaries of the building's façade. This cornice is:
Let's look at each of them.
Front overhang
The main function of the front overhang is to protect the facade. Essentially, these are the side edges of the roof slopes; therefore, a hip roof, which has 4 slopes, does not have such edges.
If we are talking about a gable roof (and in most houses this is exactly what it is), then the supporting beams installed on the rafters extend outward. You can also often see an overhang of sheathing boards laid under the roof on top of a vapor barrier. The main cornice board is attached to them, which is subsequently sheathed (more on this later).
Side overhang
Every sloping type roof has such an overhang. It is created by rafters extending beyond the walls of the building. The length of the projection depends on the blind area and the height of the building, but in most cases it ranges from 60 to 70 cm.
Despite the norms, sometimes narrower cornices are found. This can be fixed in two ways:
- reliably protect the wall from the wind, since in slanting rain it will get very wet;
- installing fillies to increase the length of the rafters is a more labor-intensive procedure that few people want to perform (after all, you will have to open the roof that has already been made).
Therefore, the required length of the cornice should be considered at the design stage.
Along the entire cornice, the rafters are fastened with boards - in the future they need to be covered with facing material.
Dimensions according to standards
The dimensions of the overhangs are quite clearly specified in GOST. According to these standards, as well as SNiP, the optimal overhang size is 40-60 cm, but practice shows that sometimes these rules have to be neglected.
We are talking primarily about buildings belonging to certain architectural styles. For example, for an Alpine chalet it is appropriate to place the overhang at a distance of one and a half to three meters, and for a modern high-tech house it is appropriate to abandon any overhang at all.
As for materials, there are no mandatory requirements, however, there are recommended sizes, the ease of use of which has been confirmed in practice
When choosing planed boards, look for samples that are at least 20mm thick. These are the ones that are best suited for hemming, as they do not sag, do not suffer from the wind, and do not warp.
The length can be any, but it is best if it is equal to the length of the overhang itself (or its width when fastened transversely). This will avoid many joints, and the filing will be correspondingly stronger.
There are no standard sizes even for soffits, although they are specially produced for filing overhangs. However, each of the major manufacturers considers it their duty to offer different sizes than those offered by its competitor, so buyers have the opportunity to choose exactly what they need. Thus, the width of the panels ranges from 30 to 80 cm, length - from 3 to 4 m. The most popular are soffits with indicators of 3.6x0.3 m. As for aluminum soffits, their thickness can be from 0.3 to 0.6 mm. Vinyl thickness is from 1 to 1.2 mm.
How to ventilate a roof through a sheathing
How to ventilate a roof through a sheathing
As already mentioned, eaves protect the roof and facade of the structure from precipitation. But at the same time, they should not become an obstacle to the natural ventilation of the space under the roof. And this applies not only to attics, but also to ordinary “cold” roofs.
The heated air, rising from below, must freely overcome the eaves, pass between the roof and the vapor barrier and exit through the ridge. That is why during installation of the overhang you cannot use foam or sealant, otherwise condensation will occur and, as a result, the insulation will get wet.
Note! Only the side cornices should be ventilated, while the front ones must be sealed tightly.
Types of spotlights for different tasks
By and large, soffits are the same siding, only for decorating the ceiling. Hence the name, because “soffit” means “ceiling” in Italian.
Soffits are produced in a variety of types. They are:
- double and triple;
- solid and perforated.
Perforated soffits provide excellent ventilation and air flow into the under-roof space.
At the same time, triple ones can be combined: solid at the edges and perforated in the center. Completely solid ones are often used for lining gable overhangs that do not need ventilation:
And, more as an exception, an additional ventilation hole is cut in solid soffits, often after installation:
By the way, GrandLine presents unusual soffits (GL Estetic), in which the perforation is hidden. It is applied to the stiffening ribs, so it is not visible. This geometry is called Ω-geometry, which also masks the joint of the soffit itself.
About the choice of materials for the overhang
Today there are quite a lot of materials for cornices, each with its own pros and cons. Nevertheless, they all very effectively provide ventilation and protect the roof from moisture. When choosing one or another of the materials, pay attention not only to its appearance, but also to its service life.
Corrugated sheeting
This material is galvanized steel coated with polymer spraying. Corrugated sheeting is resistant to heavy loads, temperature changes, and has suitable rigidity. Between the layer of corrugated sheeting and the surface of the wall, you need to leave a gap that would be equal to the height of the waves of the material.
Corrugated sheeting
Soffit lining
A more popular material used in the construction of roof eaves, which is nothing more than siding, but with ventilation holes. Another difference between the material is the use in production of special ultraviolet stabilizers that protect the cornice from the harmful effects of sunlight.
Soffit lining
Soffits are divided into several types depending on the material used in manufacturing.
- A characteristic feature of copper soffits is durability and presentability, but at the same time high cost. Such spotlights are very durable and non-flammable.
A characteristic feature of copper soffits is durability and presentability
Metal soffit is a sheet of high-quality galvanized steel coated with a polymer coating.
Lining made of lining
No matter what new materials appear, and even today, overhangs made of real wood are quite common. In this case, you need to select the material very carefully, because the cornice will be located on the street and, therefore, exposed to aggressive environmental influences. There is no need to save money and buy thinner lining - try to keep the thickness of the material at least 2 centimeters. The humidity of the lining should be at an average level.
Lining made of lining
Note! A lining that is too wet is absolutely not suitable, because it will definitely “lead”.
The boards need to be nailed two centimeters from the wall to ensure good ventilation.
Natural wood materials
Wooden clapboard is still used for sheathing under the roof. Since the eaves overhang is located on the outside of the house, it is exposed to aggressive environmental influences. For this reason, the choice of materials should be approached as responsibly as possible.
Experts do not recommend saving on price and purchasing too thin lining; its thickness should not be less than 2 centimeters. Material that is too wet will not work, but dry material is not a good option either. To ensure ventilation, the boards must be nailed, maintaining a 2-centimeter distance from the wall.
Methods for filing cornices
You can hem the overhang using one of two available methods:
- along the rafters;
- on a wooden box.
Methods for filing cornices
An overhang along the rafters is only advisable for roofs with a slight slope. This method is complicated in that as a result the edges of the rafters must form a flat plane. This is not always possible, so the only solution may be small planks, length from the edge of the canopy to the wall, attached to the rafters. To nail them evenly, you first need to pull the twine and align it. For fastening, use iron corners or screws.
A cornice on a wooden frame is perfect for roofs with a significant slope. To construct this box, you need to take a 40 mm thick board and secure it between the rafters and the wall surface. If one edge of the board is attached to the rafter leg, then additional installation of a second board, vertical, will be required.
The box is finished, now you can start attaching the sheathing.
Note! The sheathing should be secured with screws, but not nails - this will provide the necessary rigidity.
Decorating a box for filing
The steps to create boxes on the roof with your own hands are carried out in strict order:
Cut and pre-treat the material with antiseptics and paints and varnishes. Install and secure the board along the underside of the rafters. Nail the beam to the wall one centimeter higher than the front board. Arrange all the parts of the filing sequentially: fasten one edge to a beam mounted to the wall, the other to a board located on the side of the rafters. Alternate panels with ventilation grilles at equal distances or leave a gap of 2 cm or more between the parts of the filing. Fasten products with profile plates, screws, corners
We advise you to study - Which mattress is better to choose - features that need to be taken into account
Note! If the boards are long, at least three fastenings are necessary to avoid deformation. To form corners, mount the panels on both sides of the rafters or flat.
Plywood and OSB boards
To finish roofs, only waterproof grades of plywood are needed. The slabs are mounted in large pieces, so the work will take very little time. The plywood is attached to a pre-made wooden box made from blocks. The role of ventilation is played by ready-made grilles embedded in plywood or OSB. Since these materials look rather unsightly without treatment, they must be painted to match the walls of the facade or roof.
Sheathing the roof with sheets of waterproof plywood
Soffit finishing
Soffits are strips that are produced specifically for covering eaves. The material can be different - PVC or metal. Soffit cladding looks quite aesthetically pleasing; the slats are available in different colors and textures, so they will suit the exterior decoration of any home. What is included:
- soffits;
- chamfers;
- profiles with grooves for installing planks;
- finishing strips.
Soffits are available for the pediment - double, triple and solid. For cornices, a special perforated version of this finishing material is provided. Soffits are easy to install, so you can easily finish the overhangs yourself, without the help of professionals. The planks are cut to the width of the overhang and attached to profiles pre-installed on a wooden lattice.
Soffit lining technology
Soffit lining technology
The installation procedure consists of the following steps.
First stage . It is necessary to equip the soffits with a pair of special strips in the form of the Latin letters F and L. The first needs to be secured on the side of the cornice, the second - on a special strip attached to the wall. All fastenings are made using self-tapping screws. It is advisable to pre-mark everything so that the planks lie evenly.
Second phase . Then you need to measure the cornice and subtract 6 millimeters from the resulting figure - this will allow you to create a gap to compensate for thermal expansion. Next, you need to cut the soffits into strips of the required length.
Third stage. The soffits need to be slightly bent and inserted into the installed profiles. Self-tapping screws are also used to secure them.
What you need to know when installing soffits
- It is undesirable to carry out work at temperatures below 15°C, even though manufacturers insist on the possibility of installation even in winter.
- Soffits need to be installed only at an angle of 90°C.
- Soffits should be stored only on a flat surface, in stacks of 15-20 pieces.
- You should always leave the gap mentioned above.
- To cut soffits, you need to use a “circular saw” with reverse teeth (you can also use special metal scissors).
- The length of the screws must be at least 3 millimeters.
- The step between the fasteners should be a maximum of 40 centimeters.
Stage III. Fixing chamfers and profiles
Now we proceed directly to the installation of spotlights. Let's look at what tasks require special profiles and chamfers, which are always included:
- J-profile is the main hanging element. They frame the eaves overhang and join two panels of soffits along the length.
- The L-shaped panel is needed for the front trim. Available in sizes 15, 20 or 25 cm, less often - 45 cm. This strip allows you to hem the roof at an angle.
- A J-bevel is a windshield with a J-profile. It allows you to hem the overhang perpendicular to the wall, and is available in sizes 15, 20 and 25 cm, sometimes 40 cm.
Here's how to work the J-bar. It needs to be installed parallel to the wall of the house, and to do this, measure the distance between these planks and subtract 6 mm for temperature changes in the size of the panels. Next, install the cut panel into the grooves and nail the strip so that later the fasteners do not interfere with the free expansion of the material. Connect the panels together in a lock.
Lay the panels in a horizontal or inclined position. Keep the distance between the fastening points at 30 cm. And at rotation angles of 45°, install two J-bars, which will be connected by the rear walls and H-profiles.
Here's where all these elements are specifically recorded:
The J-bevel method is more aesthetically pleasing, because all the fasteners are hidden so well. Here's how to work with it:
- Step 1. From the wall side, install the J-profile directly on the board using self-tapping screws in increments of 50-60 cm.
- Step 2. Next, fix the finishing strip along the top line of the front board. If necessary, trim off the excess by adjusting the length of the flat part.
- Step 3. The J-bevel should then be inserted into the finishing strip and secured. This will avoid waviness of the chamfer itself.
As for the finishing strip, you can do without it if you use short gutter hooks. Such hooks are attached directly to the front board, and the J-chamfer is fixed with self-tapping screws. If the end or front board will remain open for decorative purposes, then use two J-profiles.
Also, if the J-bevel needs to be rotated, then follow these instructions:
- Step 1. Start installing the soffits on the roof eaves from the corner, and to do this, mark the fold line in advance where the strip will be bent at the turn where 150 mm remains from the edge.
- Step 2. Now cut the groove to the fold and leave only the folding at the bottom shelf.
- Step 3. Make a 45° cut on the bottom shelf. Now bend the chamfer so that the edge of the bottom shelf is on the outside. Now the short edge of the plank does not need to be attached to the sheathing, because it will be pressed to the front board by the next bar.
If you will then additionally run holders or cables, then in such casing you need to leave a hole 5 mm larger than needed for the drill. This is also necessary for contraction and expansion.
Corrugated sheeting technology
First stage . First, a block should be nailed to the wall in a horizontal position, strictly at the level of the overhang. In parallel, a second block is attached at the same level, this time along the rafters.
Second phase . Then you need to cut strips of corrugated board (not forgetting about the same thermal expansion) and attach them with self-tapping screws to the bars.
Third stage. The joints are decorated with strips of the outer and inner corners.
Actually, the installation of corrugated board is completed.
Rafters
To prepare the rafters, you need to decide on the method of cutting the wood and installing the frame for the construction of the projections.
Sequence of activities when preparing rafters:
- Provide for their length to be 30-50 cm longer than planned.
- Form a protrusion that would correspond to the specified size.
- Cut the material and process the edges of the rafters: - vertical cut - for the purpose of filing along the rafters; - vertical and horizontal sections - during the creation of the box. It should be noted that if there is an unexpected increase in the width of the overhang before installation, the rafters must be lengthened using beams - “fillies”.
- Achieve a straight overhang line.
Clapboard hemming technology
Scheme of filing an overhang with clapboard
It is advisable to carry out this procedure from below, using a stepladder or scaffolding.
Note! The cornice can be hemmed only after completion of external insulation, installation of moisture insulation and cladding.
First you need to check if all the rafters are the same length and if they are installed parallel to the wall. Then you need to attach the wind boards to them and only then proceed with installation.
First stage . Screw the board to the wall in a vertical position. The bottom edge of the board should be flush with the rafters.
Second phase . Secure the next board between the previous one and the rafters, aligning along the bottom edge. The result will be a base - and you need to install the sheathing on it.
Third stage. The frame is covered with boards. Traditionally, a slight gap should be left between them and the surface. The boards should be smooth, approximately 20 millimeters thick.
Note! To ensure ventilation, it is advisable to install special grilles every one and a half meters.
Although it is worth noting: few builders do this, relying on the fact that wood has the ability to “breathe”.
Cornice overhangs made of lining
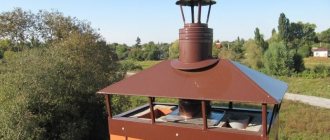
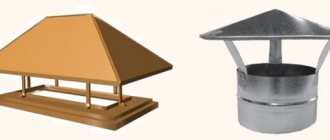
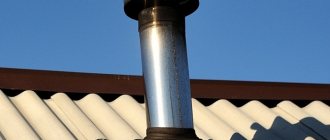
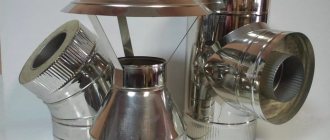
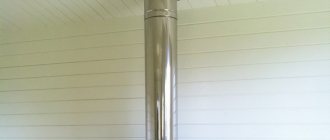
Why do you need a chimney box?
According to safety regulations, there must be a certain distance between the walls of the ceiling and the chimney pipe, otherwise, when smoke passes through, all elements will heat up, and this can lead to fire or damage to integrity.
Products of this type pass through the ceiling and come out, providing the maximum degree of protection, because inside they are filled with materials that can withstand high temperatures quite well.
Many devices for removing combustion products are made of brick; it can be destroyed over time due to weather conditions; a chimney box on the roof will be indispensable in such a situation.
It is equally important that the solution will certainly absorb moisture upon contact with the external environment, and this will lead to cracking and damage. To avoid such excesses, a casing is mounted on the outside of the ceiling.
It is often very difficult to achieve a unified composition on the roof without additional work, because the materials will be different, and modern types are produced in several color options. Such moments can be leveled out quite easily; practical cladding will help with this.