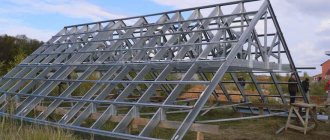
A canopy is an almost integral part of any country house, allowing you to protect gazebos, playgrounds and other areas from rain. In the last decade, canopies made of metal profiles have become very popular, which is explained by the low cost of construction, as well as reasonable cost. What types of such canopies are there, as well as their advantages, we will consider further.
An example of a metal profile canopy for parking
Scope of application and construction of a canopy made from a profile pipe
Metal profiles today have become one of the most popular and sought-after materials for the manufacture of canopies of various types and types with polycarbonate coating, since its main advantage is its long service life. If such a building is properly cared for, it can last for decades. Such canopies can be used in a variety of places:
- in parking lots;
- in country private houses to create large covered areas;
- in various public places.
The scope of application of canopies made of metal profiles is quite extensive, since they are universal structures with a large number of different modifications.
The most popular today is the arched type of product. It is much more difficult to make than a single or double slope, but it looks very impressive. Such a canopy is built separately from the house or adjacent to its side.
When choosing the type of roof, it is necessary to take into account the fact that the snow does not linger on it, but falls freely to the ground, without creating a large load on the roof.
In addition, there are canopies of dome, arc, pyramidal shape, as well as single-pitched and double-pitched.
In addition to polycarbonate, slate or metal corrugated sheeting can be used to construct the roof. Therefore, we can say that the complexity of erecting a canopy from corrugated pipe directly depends on the choice of frame design and materials chosen for the roofing.
An arched canopy made from a profile pipe looks very beautiful
Nuances of choice
To build an attractive canopy, you need to use a polycarbonate sheet.
It is best to purchase cellular polycarbonate, as it weighs little, is fire-resistant, and blocks ultraviolet rays well. A hollow sheet is preferable, as it bends well and has the property of retaining heat. Monolithic sheets are more durable, but less expensive. In addition, they have poor thermal insulation. The color of the plastic is also important. The colored one is prettier, but the transparent one has better throughput. However, if a certain color scheme is followed in the design of the site, you should not violate it. The canopy for the children's pool may well be blue, yellow, or green. In gazebos, it is better to maintain a balance of transparent polycarbonate and metal profiles in order to create moderately diffused lighting, but not to shade the area too much.
If you plan to use not only polycarbonate sheets in the construction, but also metal profiles, you should take into account that the more metal in the project, the less light the finished product will transmit. Therefore, it is better to limit yourself to the frame, leaving as much space as possible for transparent sheets that protect from ultraviolet radiation but allow the sun to pass through.
If the shape of the canopy is planned to be straight, without bends or unusual elements, then it is not necessary to use metal; you can replace it with profiled or laminated timber.
The heavier the structure, the stronger its base should be. An arch or canopy for a pool requires not just a metal profile, but a profile pipe. In some cases, steel strips may be needed.
How to weld a professional pipe
During any welding work, safety precautions must be observed. Also, after completing all work, each weld seam must be cleaned of slag so that there are no joints. This can be done with a regular grinder with a special metal hedgehog attachment.
To connect metal structures from a profile with a wall thickness of more than 3 mm, it is best to use gas welding, since an electric analogue may simply not be able to handle such a volume of work.
What to consider when designing a canopy
First of all, you should decide on the material for the frame for the canopy or polycarbonate canopy. When choosing it, you need to take into account durability and the ability to maintain its performance throughout its entire service life. The optimal choice is metal profiled pipes, which are easy to connect and have high load-bearing capacity and strength. The disadvantage of this choice is the large weight of the structure, which requires the creation of a sufficiently powerful foundation.
This is also important to know: Do-it-yourself polycarbonate roof - where to start?
The use of wooden parts allows you to create lighter structures that do not create loads on the walls and do not require a strong foundation. At the same time, a wooden canopy has low strength and is unstable to wind loads. A squally gust can tear it away from the supporting structure.
When designing the shape of the canopy, you need to take into account your capabilities and production base. Some options require the presence of specialists and the use of sophisticated equipment. If there are no such possibilities, it is better to limit yourself to simpler forms.
You should definitely get information about the amount of snow that falls in your region in winter. The weight of the snow layer can crush a large polycarbonate canopy, so you should consider options with a removable covering, reduce the surface area or increase the angle of the roof
At the same time, it is important to ensure safe snow removal so as not to damage objects found under it.
How to bend a metal pipe
A special pipe bender is used for this. With its help, you can easily bend various types of metal profiles. But if you don’t have such a tool at hand, then an angle grinder and welding will help you cope with the task.
It is very important when bending various pipes to prevent the appearance of cracks and large kinks, which should not be in the structure of the canopy. Also, they should not be flattened. When working with a manual pipe bender, considerable physical effort must be applied, so it cannot be used to bend profiles with a cross-section of more than 40 mm.
A manual pipe bender will help you make an arched canopy
Color selection
The first polycarbonate sheets were transparent. Today the industry produces this product in a wide range of colors. Light transmittance is affected not only by the thickness of the polymer, but also by the specific color of the material.
Transparent. Has the highest solar transmittance, up to 95%. Does not scatter light or create shadows, useful as protection from precipitation. It is better to choose it for places where natural light is important. It is good for them to cover greenhouses so as not to disrupt the process of photosynthesis. Other types of polycarbonate are classified as translucent materials, with varying degrees of light transmittance.
External finishing of the structure
After the canopy frame structure is completely welded and free of scale, it is necessary to degrease all metal elements before painting them. To do this, you can use a regular solvent, acetone or gasoline, which needs to be allowed to dry. After this, you can begin the priming process.
A light gray primer is suitable for any type of paint. Dark is used for bright materials. White is usually used when painting a metal profile with pastel-colored paints.
The primer will be able to protect the metal from premature corrosion, and thereby significantly extend its service life, and also reduce paint consumption.
Basic moments
There are several ways to make a canopy in the courtyard of a private house with your own hands correctly, quickly, and so that it lasts as long as possible? To obtain the best result, it is necessary to take into account a number of important parameters.
Canopy
The shape of the canopy can be arched (good characteristics, the elements must be identical to each other), gable (has all the characteristics of a roof for a house) and single-pitch (the simplest and most reliable option).
Purpose
The canopy can be used to protect:
- woodpiles, tools, boards and other similar materials;
- play area/relaxation area for adults;
- terraces, swimming pool;
- greenhouses, greenhouses;
- grill/grill;
- entrance group, car.
Construction type
The design itself comes in several types:
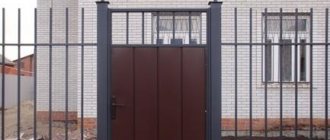
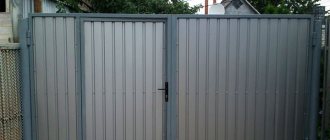
- closed - openings are closed with various materials, there are windows;
- semi-closed - there are side parapets, a stationary roof;
- open - light roof and several supports.
Semi-enclosed canopySource daughtersfareandale.com
Drawing
Verandas, canopies, gazebos: you can find out tips on how to build cheaply and beautifully below.
Start with a drawing, it will allow you to calculate the number of materials, racks, dimensions, cross-section, weight, loads to get the best result.
Supports
Basically, supports are made of wood or metal, but the most stable structure is obtained when using concrete elements. The holes for the supports should be below the freezing point of the soil, about about a meter, but in the northern regions more may be required. Sand is poured into the bottom, compacted, concrete is poured and a support is placed. It must be leveled and then the hole must be completely filled. You can make formwork on top so that the concrete level is higher than ground level.
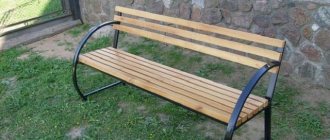
Canopy with wooden supports and metal legsSource aironplast.com
It is not recommended to immerse wooden supports in the ground, even when using moisture-proof materials. Concrete supports with a depth of at least 50 cm are made for them; they act as original piles. Reinforcement is laid in the concrete and timber is attached. It is also possible to install supports made of stone building materials on the foundation. Metal/wood is used for rafters. This option requires quite a lot of time to set up. Another method is asbestos-cement pipes: durable, not afraid of constant moisture or strong daily temperature fluctuations, and easy to install.
Frame
Mounted from wood/metal. It is easier to work with wooden elements. Connected with self-tapping screws or bolts. When using laminated veneer lumber and dry boards, a wooden canopy can last for many years. Metal elements are mainly welded. A combination of both types of materials is less commonly used. When arranging a high and wide canopy, it is better to choose semi-arched or triangular shapes.
Metal frame with forged elementsSource i.ytimg.com
The supports are placed at intervals of at least 1.2 m; for a structure attached to the wall, two supports are enough. It is not advisable to frequently lay a profile or beam under polycarbonate; for tiles, it is the opposite. Supports, racks and rafters are often made from profiles of different thicknesses, depending on the purpose of the structural elements. This applies equally to timber. The pillars must be strictly vertical.
Wall support
How to make a canopy for a house? It is necessary to remember that canopies can be single-pitched, flat or with a bend. Fastening is carried out by inserting the rafters under the roof or to the wall using the selected fasteners. If there is a lot of snow in winter, the racks should have a rigid fastening. If the area under the canopy will be concreted before the canopy is built, then openings for the posts must be immediately made and water drainage must be considered, and the wood must be treated with protective agents.
Canopy for the houseSource meco.dn.ua
Slope
The optimal slope is considered to be 50 degrees; snow practically does not accumulate. A slope of less than 7 degrees is considered horizontal. If it is not possible to make the required slope under the roof of the house, then the material is laid on top of the roof. We need to think about the right drainage. You can also set up a separate structure near the house.
Photo gallery: finished structures from profile pipes
An arched canopy in the form of a canopy is ideal for the porch of a house. A gable canopy will perfectly hide your car.
An arched canopy for a gazebo can be made from multi-colored polycarbonate An arched canopy can act as a canopy for a house An arched canopy is ideal for a country house A lean-to canopy is used for arranging park areas
On personal plots you can often find a lean-to canopy
You can build a metal canopy from a profile pipe yourself quite quickly, without much effort, if you have the appropriate materials, drawings and the necessary tools. The simplest structure that can be erected on the territory of a country house is a lean-to canopy. The main thing is to follow all installation rules and strictly follow the developed project diagram.
- Author: Elena Davydova
Rate this article:
- 5
- 4
- 3
- 2
- 1
(20 votes, average: 3 out of 5)
Share with your friends!
Varieties
There is a wide variety of types of polycarbonate canopies for pools in the country. They differ in several ways:
- design;
- color;
- material type.
Type of material
The type of polycarbonate affects how it can be used for awnings.
According to its type, it is divided into 2 groups:
- Monolithic – a synthetic material homogeneous in its structure. It has more weight compared to cellular polycarbonate. The thickness of the monolithic type is from 0.4 cm to 2.5 cm.
- Cellular - has a more complex organization, consisting of a pair of sheets with vertically arranged inserts. This organization makes the material more flexible during processing and lighter in weight.
The cost of cellular polycarbonate is less than monolithic.
The photo shows cellular (left) and monolithic (right) polycarbonate:
Design
All the variety of designs can be conditionally divided into 3 main groups:
- Sliding. A structure of this type has doors that can be moved to the side, freeing up, for example, a passage. Some models of this type of canopy allow you to completely enclose the pool.
- Stationary. Such structures are the most expensive, but at the same time the most durable. These are reliable structures that are installed for a long time. In this case, the possibility of partial dismantling can be realized, for example, removing part of the roof, introducing sliding elements, etc.
- Open. This is the simplest and most inexpensive type of canopy. It is organized on the principle of a polycarbonate roof, which is mounted on supports. Such a canopy is mobile and can be assembled if necessary, for example, for the winter.
Material
The material must take into account the type of structure and the planned load on the elements. If a significant load is expected, a monolithic option is preferable. It allows you to create a stronger canopy without being too dark.
Cellular polycarbonate is more flexible and is used in lighter and cheaper structures. But it should be borne in mind that the honeycomb structure of the material with cavities inside can quickly lose its appearance, since even with end caps, dust and dirt can get into the existing voids.
Color
Polycarbonate is available in various shades: from transparent to dark. The choice of a specific color is determined by personal preference and whether or not it needs to be shaded.
Transparent material does not provide a color shadow, but is inferior in practicality, since dirt and dust will be more noticeable on it compared to tinted models.
Height
If the pool is rarely used and is often idle, you can save on the height of the canopy, focusing on protecting the bowl from environmental influences. In this case, care should be taken to install sliding sections for comfortable access to water.
High structures (from 3 m) make using the tank more convenient. This option allows you to stand near the bowl at full height without discomfort. It can be complemented by a seating area with flower arrangements, sun loungers, and tables.
Economical
The cheapest option is a canopy without side walls. If a pavilion is needed, then it is better to install it around the perimeter of the pool bowl with a distance of literally 20 cm from it along the entire perimeter.
The canopy option may not be completely closed, but semi-open. This is convenient when the wind blows more often from a certain direction.
The sliding system increases the cost of the project, but adds comfort.
Form
The choice of canopy shape is most often chosen based on the shape of the tank itself:
- For rectangular bowls, a canopy in the shape of a “P” fits perfectly;
- for round ones - rounded, dome-shaped.
The most difficult options for implementing canopies are those with irregular asymmetrical shapes.
Beautiful examples
When choosing a lean-to carport, many people want not only practicality, but also originality. You can get ideas from the Internet or specialized literature, or you can bring your ideas to life.
You can illuminate the canopy with additional lanterns, or hang bright flowerpots with flowers.
If it is a wooden canopy, then the racks or individual elements can be decorated with carvings. This style will be especially relevant at the dacha; it will create the look of a cute country house.
Canopies with a completely transparent roof also look impressive. For this, transparent polycarbonate is used.
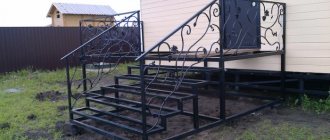
And metal frames look good with additional forging.
Whatever the canopy, everyone notes its practicality. This is an inexpensive and high-quality alternative to a garage.
How to make a lean-to carport with your own hands, see the following video.
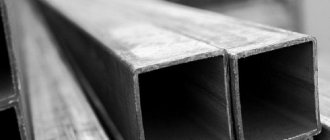
Materials
Metal canopies are divided according to materials of manufacture:
| Material | Supports, | Rafter system | Auxiliary elements, lathing | Fastening |
| The wall thickness and profile cross-section depend on the size of the building | ||||
| Round pipe | 50-100 mm in diameter | Ø25-30 mm, often the truss is made of wood | Ø18-25 mm | Welding |
| Profile rolled products | Profile rib 50-150 mm | 25*25, 40*30, 25*50, 40*40 mm with a 2 mm wall for small, medium buildings, 3 mm for large ones, or use a 60*40*2 mm profile | 40*20 mm | Welding on a metal gusset or bolted connection |
| Prefabricated structures made of aluminum profiles | Finished products are assembled as a constructor: on washers or by the end method | |||
| Stainless steel canopies | Only professionals can make a high-quality product with their own hands; a special type of welding is required. Stainless steel canopies do not require finishing or additional protection. | |||
| Forged Products | The most luxurious, sophisticated type of canopy that will decorate your home and site. There are 2 options for implementing the idea: order a ready-made building or do it yourself. The first solution is simpler, but comparing the cost, there are fewer financial costs; if you weld a frame from a metal profile, decorate it with forged parts, the price of serial stamping, which can be bought on the market, will be cheaper. | |||
It is more practical and economical to build a canopy from a profile pipe with your own hands. Over time, it can be covered with curtains, glazed, covered with brick, stone, decorated with forging, wooden lattice.
Drawing of a standard cantilever metal canopy over the entrance door
DIY canopy attached to the house (photo report)
It was decided to attach a canopy to the house, under which to hide favorite equipment - a car and a boat. First, using a motor drill, we dug holes 1.5 m deep - below the freezing depth.
It's easier to dig with a motor drill))
We inserted waterproofing sleeves, a frame made of 10 mm rods with welded mortgages, and filled them with concrete.
Base for pillars
The installation step of the pillars is 2 meters.
This is what a poured row of supports for a carport looks like
When the concrete set, the pillars and top trim were installed. They are sanded and treated with protective impregnation. To prevent the frame from moving, we secured it with what we had - aluminum corners. The joint between the posts and the frame was reinforced with metal plates.
The pillars are screwed to the “heels”
A support board was nailed to the wall of the house. Roof beams (50-200 cm board) were attached to it. The slope turned out to be small, about 9°, but it was enough. Small cuts were made in the beams to fit the size of the timber - for support, the edges were cut off to create an even overhang.
Gaps on beams
The beams were fastened to the frame with nails diagonally, 2 pieces on each side.
A board was nailed to the wall, beams were attached to it
The beams on the wall are fixed to U-shaped metal plates.
Plates that attach beams to the wall
The rafter system was assembled - the beams were installed with a small pitch - 40 cm, they were made from 50 * 200 mm boards.
Rafter system of a lean-to canopy from below
OSB was attached to the rafters on top. Roofing material - soft tiles. It needs a continuous sheathing underneath.
OSB laid on the roof
A board was nailed to the side between the posts: for greater rigidity and so that the rain would wet the site less.
The sidewall was sewn up with a board - so that the rain would get in less
Soft tiles were laid. It worked - at least dance.
You can dance on the canopy
Now there's competition in the parking lot.
Ready carport
Advantages and disadvantages
Wood is a constantly in demand material, used by man for construction for many centuries. It is reliable, completely safe for health, environmentally friendly and affordable, it pleases the eye with color and the soul with warmth. Wooden buildings make the landscape unique and inimitable.
Unfortunately, wood lasts a much shorter period of time than structures made of iron or stone, and is less durable; moreover, wood rots over time and can be damaged by insects or rodents. Such problems can be avoided if the wood is treated promptly and correctly with fixing solutions and stains. Varnish also strengthens the wood, adds shine and elegance.
Many people consider wooden canopies to be the simplest awkward structures. But if you turn on your imagination and develop the project competently, a simple structure will sparkle with new colors. It is necessary to take into account the overall design of the site where the canopy is planned to be placed. In accordance with it, the canopy can be decorated with ornaments, carvings, and other decorative elements.
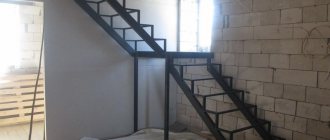
Frame assembly
After installing the vertical supports, proceed to assembling the canopy:
- First, the support pillars are leveled to the same level.
- Strengthen the perimeter. To do this, short sections are welded first, and then long sections. Before welding, the pipe section is grabbed at one point and secured with a clamp so that nothing moves during welding.
- Trusses from professional pipes are assembled on the ground exactly according to the drawing. Holes are drilled on them for roof fasteners.
- Using a crane or other method, they are raised to the desired height and secured.
- Additionally, the roof support is reinforced with inclined beams.
As an alternative, truss welding can be done immediately at height. But this makes it more difficult to maintain the verticality of the structure.
After completing the welding work, all seams are cleaned of slag with a grinder. When cracks appear, they are further strengthened with steel plates. All joints are carefully painted and varnished. These areas are primarily susceptible to corrosion.
Projects
Before building a canopy at the dacha, you need to make a detailed drawing and calculate the fastening elements and their cost (that is, create a project), this will help create a reliable shelter and save money.
What such a project includes: the number of load-bearing supports and the size of all components of the canopy, frame drawings, calculation of wind resistance and snow loads, approximate estimates.
Since the future protective roof will be intended for a car, some nuances should be taken into account when designing:
the size of the canopy should be larger than the size of the car itself, this will allow you to freely park and exit the car; the frame should be mounted so that the sun's rays do not enter inside throughout the day; It is important to provide wide and convenient access to the canopy.
However, not every person will be able to independently design and make the necessary calculations; in this case, you can always invite a specialist. He will help with the shed project.
Construction
Making a good and strong canopy with your own hands is not as difficult as it might seem at first glance. The master must only work strictly according to the instructions and in accordance with the prepared plan. Let's look at how to act correctly using the example of making a canopy to cover a car.
Foundation
The manufacture of the canopy will begin with the construction of the foundation
It has already been indicated above what you will need to pay attention to at the preparatory stage, and now we will consider in more detail how to properly build the foundation
- The area under the canopy will need to be cleared of all debris and plants. It is advisable to remove the top soil layer by about 15 cm, and then thoroughly level the treated area.
- Next, you will need to designate a site (for example, 6.5x4 m), which will need to be filled with concrete. Inside this area, another square with a size of 4.33x3.15 m is designated. Supporting elements will be installed at its corners.
- Installation of supporting parts will be carried out by concreting them directly into the ground.
- First you need to dig 2 holes at an approximate distance of 4.33 and 2 m, as well as 2 holes at a different distance - 3.15 m. Their depth should be 1 m.
- Next, crushed stone is poured into the bottom of the pits. A layer of concrete is poured there.
- You will need to install a pipe in the concrete and then secure it with spacers. Perfect vertical alignment must be provided.
- Next comes the concrete pouring stage. After this, you will need to wait until it hardens completely and becomes quite durable.
Having completed the installation of supports, you can begin concreting the entire designated area. Usually this is not difficult to do. For this purpose, an area measuring 4x6.5 m should be blocked off with a board - this will create a kind of formwork. Then the ground should be sprinkled with sand and gravel, and a 5 cm layer of concrete should be poured on top. Without waiting for the concrete to dry completely, a special reinforced mesh should be laid out. Then another 5 cm layer of concrete is poured. Next, you need to wait until the solution hardens.
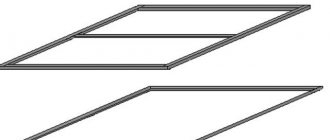
Frame
Having completed the construction of a strong foundation, it is worth moving on to the construction of the frame base of the canopy. A homemade frame can only be made correctly using a welding machine. It will be difficult for an inexperienced craftsman to build such a structure, so in this case it is advisable to turn to professionals.
- First of all, the stiffeners are welded. They will connect the frame supports along the length. A 50x50 cm pipe is suitable for these purposes. It should be laid out on racks so that ends of approximately 1 m remain at the edges.
- Then the arcs are welded to the stiffener. Between them you need to leave gaps of 106 m, not taking into account the arc thickness parameter.
- Next, along the tops on the inside of the arches, for additional rigidity, you will need to weld a 40x40 cm profile pipe.
- Having completed the assembly of the frame, its supporting parts will need to be coated with a special primer to protect against corrosion, and then with paint.
Roof
The next stage of canopy construction is the construction of the roof. This step is no less responsible and significant. You can also make the roof yourself. If you are determined to build this part of the canopy yourself, you should first decide on the material that you will use for flooring on the frame base.
Polycarbonate is suitable for arranging a canopy over a car. It will need to be divided into 3 parts 3.65 m long. This material will need to be attached to the metal arc parts using bolts installed in the drilled holes. A thermal washer on the bolts will be needed to prevent moisture from getting onto the material and leading to further cracking. The fasteners should not be overtightened, but they should not be too weak either.
Finish stage
If a carport is being built for a car, then you can stop at building the roof. If we are talking about arranging a recreation area on the site, then it is advisable to prepare the floors and make a small cozy gazebo under a brand new canopy.
If the canopy was made of wood, then the floors under it do not need to be prepared. If this foundation is necessary, then the simplest and most quickly erected option, as in the previous case, is pouring concrete mortar. A gazebo under a canopy can be decorated with artificial plants.
At the final stage of building a canopy, it is necessary to install electricity. It is worth installing several lamps. They will be useful in any case, be it a recreation area or a place to park a car.
Preparatory work for installing a lean-to metal canopy
We could also consider gable structures, but the purpose of this particular article is to make an extremely practical, simple and cheap canopy with a metal frame, so we chose a lean-to structure. Make it 2 times faster, since there is no need for bent trusses, joining the roofing material in the center and 30% less materials will be needed. Let's look at all the instructions step by step and start with the preparatory work.
STEP 1: choose a place for a lean-to canopy. You can build wherever there is space, but it is better to choose a small hill in the yard and a place with shallow clay so that water after rain does not accumulate under the canopy, and you can spend a minimum of money on installing concrete under the supports. Feng Shui lovers are not welcome here, since practicality is the main thing here.
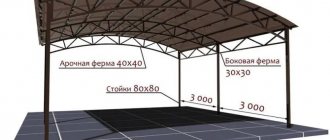
STEP 2: selection of materials. We have already chosen it. Our supports will be made of a metal square 40x40 mm, we selected it taking into account the load of the structure and the possible wind load of 4%, and we also did not forget about precipitation for the harsh climate zone. The supports are designed for a metal canopy with a slope of 15-20% and dimensions of 4x4 meters. The roof can be made of polycarbonate, but we still preferred metal sheeting because it is inexpensive and easy to work with.
STEP 3: clearing the area. We will use a concrete floor for the car, so the area needs to be planned and about 10 cm of earth removed to be filled with slag and a screed of at least 5 cm thick to be installed. This is a lot, quite enough for a heavy SUV (within reason, up to 2500 kg). If you want to buy a hummer or tractor in the future, then your screed depth will be at least 12 centimeters.
STEP 4: calculate communications. Yes, you heard it right, there will be more communications around the canopy. For what? It's simple. Firstly, water will not wash it away and will not flow under the canopy, and secondly, it just looks cool and is inexpensive. These will be low tides in the ground and drainage systems. In addition, it is necessary to supply electricity to the canopy just in case of a fire (suddenly there is no place to barbecue or you need to warm up the car) and make future wire leads from under the screed or along the supports.