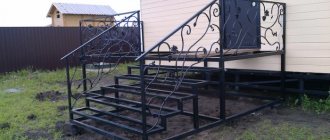
Just as a theater begins with a coat rack, so the entrance to an estate begins with a gate. All homeowners are faced with the problem of fencing a site and creating a convenient entrance to it. Requirements for a gate: ease of use, beauty, strength and reliable protection of the area from uninvited glances and guests, ease of manufacture and maintenance, durability.
A product made from profile pipes perfectly meets these requirements. A do-it-yourself gate made from a profile pipe will serve as a source of pride for the owner and as proof of his craftsmanship skills.
If you, our dear reader, are reading this article, then the topic of installing gates is not alien to you. Here you will find a detailed description of the technology for installing and manufacturing a gate made of corrugated pipe. We hope that this information will be useful to you.
Pros and cons of gates made from corrugated pipes
A gate made from a profile pipe is easy to install, since there are no rounded elements.
The design has positive and negative characteristics. The simple production of the frame and the canvas itself, and convenient installation mean that you can make a gate from a profile with your own hands. The pillars are dug into the soil after a simple preparation of the bottom of the hole.
Design advantages:
- long service life;
- low cost of building materials;
- beautiful view;
- resistance to corrosion when cutting and welding technology is followed.
Thin-walled profile pipes do not have strength against mechanical loads and impacts. The steel frame promotes the propagation of sound, and the slightest damage to the protective coating causes the destruction of the metal.
Painting
In order for your gate to last a long time and not be subject to corrosion, it is worth treating the frame with a special primer. This will also ensure that the paint is applied evenly to the pipe. You can start painting only after the primer solution has dried. Which device to use is up to you. This can be either a regular brush or a spray bottle.
Important! Avoid drips. Apply two coats of paint to even out the color, but don't try to fix everything in one go with a thick coat of paint.
Building design
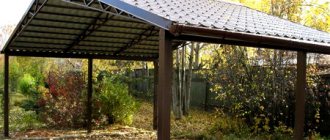
Gates, as a rule, are made swinging.
The gate consists of supports in the form of pillars and a door leaf on a frame, which is fixed to the posts using canopies. To close, locks are installed. The pillars are made of brick, steel, reinforced concrete or wood. Inside monolithic and stone supports, embedded parts made of thick metal, angles or rods are inserted in order to weld a gate frame made of corrugated pipe to them.
The door is made as a separate passage in the fence or combined with a gate. In this case, the frame of the gate is placed in one of the leaves. If there is a sidewalk in front of the yard, the opening is made inward so as not to disturb pedestrians. In this case, the size of the leaf is taken into account so that there is a distance for the sash to fully swing open.
Hinged or sliding
The first option is considered an inexpensive design that is easier to cook and install. Such a gate does not require a base to install guide beams; it does not need a counterweight or roller elements. The swing system is combined with the gate and saves space at the entrance. At the bottom, the canvas is cut to height in areas with heavy snowfall. This way, the resulting snowdrift does not affect the opening.
Sliding schemes are more complicated, since guide girders are often placed at the bottom and require a level foundation. There are options with a device for cantilever movement of the leaf, in which the beam is hung so that it does not limit the height of the span, and the rollers are placed inside the sash frame. Automation is installed on swing and sliding systems.
Profile advantages
The gate can be made from a corner, but the profile has a number of advantages. The design made from it has a large margin of safety. For such a wicket this quality is especially important. It is subjected to not only static loads, but also dynamic loads during repeated daily openings.
The profile pipe is inexpensive in comparison with other types of rolled metal with the same technical characteristics. With good processing after welding, the structure will serve for a long time.
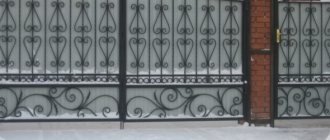
Using squares you can make a gate of any configuration. It can be solid, sewn with multi-colored durable corrugated sheets, flat slate, or “cards” made of sheet metal. The gate is decorated with forging elements or simply sheathed with metal mesh and profile sections.
The design itself is quite simple to manufacture using electric welding.
Two pillar parts must be welded with 3 cross members and covered with corrugated sheeting. The only difficulty is welding and installing the hinges.
If you can weld a gate, then you will be able to weld gates and other frame structures for your home.
It is possible to manufacture a gate without welding. The parts are secured to brackets and bolts. But welding is a more reliable and durable option.
Selection of material
The appearance of the entrance group determines the choice of building materials for support pillars and lining of the panels. You can weld a gate from a round pipe, but it is inconvenient to attach hinges to it, and difficulties arise when connecting the corners of the frame. The square section avoids such difficulties.
The internal filling is made of mesh, artistic forging, this structure looks openwork and opens up an overview of the internal space of the yard. Corrugated sheeting is used more often due to the wide choice of colors and patterns to resemble stone and wood.
For the canvas, cellular or monolithic polycarbonate is used, and sandwich panels are installed. Sometimes forged elements are combined with wooden filling.
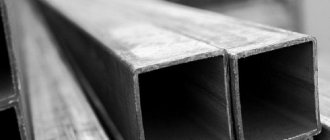
Characteristics of professional pipes
Profiles are pipes whose cross-section differs from round, for example, oval, rectangular, square. For gates, the last two types are used. The raw material is low-carbon steel (09G2S or St3Sp). There are options for stainless steel pipes.
Material characteristics:
- strength and durability;
- low cost;
- small mass.
Products are produced by cold and hot pressing of straight-seam electric-welded pipes of circular cross-section. After this, the products are subjected to control and heat treatment to eliminate internal stresses. They produce pipes with a cross section from 10x10 mm to 500x500 mm, the walls are made with a thickness of 1 - 22 mm. Sections 6 – 18 m long are available for sale.
Properties of corrugated sheets
Corrugated sheet is a sheet of rolled steel. It is used for covering roofs, erecting fences, and cladding buildings. The wide scope of application of the material is due to its technical characteristics:
- strength;
- ease of installation work;
- light weight;
- the most diverse color palette;
- reliability in operation.
To all of the above, it must be added that corrugated sheeting also has excellent anti-corrosion properties.
Drawing and preparation
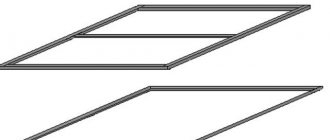
Example of a drawing
At the initial stage, they think through the design, select materials and make a sketch of the future product. The drawing shows the location of the racks in plan and makes a schematic representation of the appearance.
Information contained in the sketch and its description:
- dimensions of supports, material of manufacture;
- depth of installation in the soil, taking into account freezing and standing groundwater;
- section of the corrugated pipe for welding the frame frame, dimensions of the blade;
- enlarged joints of elements;
- description of the opening method and necessary fittings.
The optimal solution would be a gate made of a 40 by 20 mm profile pipe, but the exact cross-section of the profile is taken taking into account the load from the filling and the width of the span.
Dimensions and shape
The height of the gate is made according to the size of the fence, sometimes reduced by 15 - 20 cm. The width is taken in the range of 0.9 - 1.2 m. If a sliding system is being made, with a large width of the gate, it is divided into two panels, which move in different directions. Large gate sizes will make the structure heavier and require powerful hinges.
Diagonal struts are inserted inside the frame to increase rigidity and resistance to deformation. Additional parts increase weight, which is taken into account when choosing the cross-section and material of the pillars. Diagonals are placed from the center to the corners of the canvas and vice versa. Such schemes have a beautiful appearance. In another case, amplifiers are placed between opposite corners or small diagonals are made at the corners of the frame.
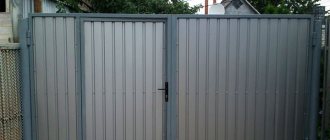
Swing options
There are two types - with one or a pair of valves. The doors themselves can be designed in swing gates made of corrugated sheets either symmetrically or be multi-sided.
Important! The height and width of the structure should not exceed two and a half meters - the increased windage makes manual opening difficult.
Giving additional rigidity is achieved by placing the top crossbar with bolts. True, if you install the crossbar at a height of up to two and a half meters, then trucks will not be able to enter the site.
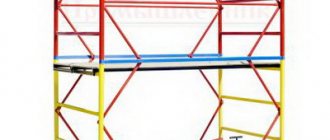
Tools required for work
Tools for installing a gate
For excavation work, use a bayonet shovel or crowbar. Sand, crushed stone, and cement are transported using stretchers or buckets and mixed in a concrete mixer. A small volume of the mixture can be prepared manually in a trough, stirred with shovels. To weld a gate from a profile, welding is required; consumables are purchased for it.
Other tools:
- tamper for crushed stone, sand, electric vibrator for concrete;
- grinder with a grinding and cutting wheel for metal;
- electric screwdriver and drill;
- level, square, plumb line, 5 m tape measure, core.
An angle grinder (grinder) is used to cut off the parts of the frame and diagonals, and using a grinding wheel to clean the welds from scale. In different cases, you may need other tools, such as an ax, to cut roots in the ground.
Additional finishing
Ready-made or home-made forged parts are sometimes used as decorative elements. They are mounted on the frame after installing the corrugated board.
To protect the locking mechanism and the gate itself, it is advisable to install a visor. It can also be decorated with forged decor.
It is not advisable to install mailboxes on a gate made of corrugated sheets, since the thin material experiences excessive loads under the weight of the box.
How to weld a gate correctly
Select the location of the passage in the fence, taking into account a convenient approach to the building, flat terrain without a slope. A foundation is made for sliding gates:
- remove the fertile layer from the surface of the earth by 15 - 20 cm;
- dig a trench to a width and depth of 0.5 m, the length of the base will be equal to half the length of the sash (for a 1 m panel you need to dig a 0.5 m trench);
- make two recesses for installing pillars to a depth of 1.3 - 1.5 m, and the width is used 2.5 times the cross-section of the rack or pillar;
- sand and crushed stone filling is carried out, compacted;
- weld the reinforcement and lay it on the bottom of the foundation.
The foundation is concreted at one time to avoid making joints.
Installation of pillars
The weight of the gate influences the selection of the diameter of the posts. When calculating, the weight of the frame and filler, canopies, and constipations are taken into account. The gate posts should not be visually different from the supporting elements of the fence. The only difference is that they will have awnings and locks placed on them.
The supports are placed so that they are slightly higher in height than the gate leaf, and the sash is 5 - 10 cm above the ground level. The sash can over time loosen the post, so it is buried to a depth of at least 1 m, with the lower end deepened into the pillow from crushed stone.
On the underground part, metal rods are welded crosswise for stability, which are then concreted. The frame is hung only after a week, when the concrete has completely hardened and gained strength.
Frame making
To make a gate from a metal profile, you need to weld a frame from a pipe. Before cutting parts, the surface is degreased and cleaned with special preparations. Anti-corrosion agent is applied. The pipe at the corners is cut at 45°, and the T-shaped joints are joined at 90°.
Measure the width of the product between the posts locally.
Step-by-step instruction:
- cut off the crossbars and racks (2 pieces each);
- the crossbars are spot welded to the embedded parts, taking into account horizontality;
- the racks are welded to them with a continuous seam;
- control verticality, right angles, and install canopies.
The open ends of the pipes are sealed with sealant, welded, or plugs are made to prevent moisture from getting into the holes.
Hanging on poles
Installation of embedded parts
To secure the frame frame, embedded elements are concreted into the pillars. In brick supports, the brick is carefully trimmed so that the plate fits. There are at least two of them placed on one span. On metal racks, the hinges are fixed to the posts using vertical bars from the corner for installing awnings. You need to weld with a continuous seam, moving it along the joint.
There is an opinion that the hinges can be fixed directly to the embedded elements. But such parts will not be able to withstand dynamic loads from the movement of the sash for long. That's why they install a vertical bus. The element is additionally buried in the ground if the weight of the wicket is large. Additionally, the channel is welded along the bottom to the width from one pillar to another.
Installing hinges
Installation of loops on the pole bus is a crucial moment that is given attention. The lower canopy is installed first, at the same time making repeated checks of horizontality and verticality with a level and rechecking with a plumb line. It is first clamped by welding, and after alignment it is welded with a continuous seam.
The second is to mount the upper hinge, while maintaining the vertical axis of the installation. Actions are no different - they control horizontality and verticality. After final alignment, the attachment points of the horizontal crossbars are beaten off. The gate should open in the opening without delay.
Covering and decor
Forged construction
Wood filling is popular because the material belongs to the category of environmentally friendly fillings. Wood burns, is destroyed by microorganisms, and absorbs moisture, so cladding requires treatment before installation.
Profiled corrugated sheeting is easy to install; its surface already has anti-corrosion protection. The material is lightweight with a wide choice of surface types.
Forging is an artistic type of metal finishing parts. This is a durable ornamental pattern that matches many finishes.
Polycarbonate can be transparent and with a color tint. The material allows you to view the interior of the courtyard in blurry outlines.
Painting the product
You cannot simply paint the parts of the gate, as the coating will fade over time or begin to peel off in layers. Changes in appearance are caused by corrosion under the finishing layer.
Sequential steps in the finishing process:
- cleaning the coating using a grinder with a wheel;
- if there are traces of construction paint on the structural metal (used pipe), it is removed with special removers;
- treatment with anti-rust preparations;
- sanding, degreasing with acetone solvents.
The white coating that appears is removed with rags or sponges. After this, a primer layer is applied to the surface twice. Wait for it to dry and apply paint using a roller.
Installation of pillars
In the marked places, in accordance with the plan, holes are made for the pillars. They are recommended to be made with a hole drill. It is recommended to rent it for little money. According to standards, the depth of each recess should be exactly a meter. It is not recommended to increase or decrease the depth.
Crushed stone is poured into the bottom of each prepared hole, which will serve as a “cushion” for the post. After which the structure is concreted with cement mortar. Sand, crushed stone and cement are taken in a ratio of 2:4:1.
Gate locks
The wicket mortise
lock experiences temperature changes, exposure to humidity and atmosphere. A special feature of the lock is a narrowed bar and a short distance from it to the axis of the lock.
Mortise lock is chosen by more than half of users. Padlocks belong to the category of unreliable locks and are installed in dachas and garden plots. Rack locks include a bolt that moves along hinges. The rim lock is reliable; its installation requires a drill and welding.
Electromechanical locks consist of a locking device and a control panel; they require electricity to operate, just like an electronic lock. The radio wave lock works on the principle of a car alarm and is difficult to crack.
Frame welding
Welding can be done first, and then installing the pillars, but it can also be done the other way around. It will not take much time to weld the structure. The pillar parts and lintels are laid out on a flat surface.
They are set according to level. Connect the pillars and the top jumper. Place 2 potholders on each rack on the outside and sides. The lower part is grabbed in the same way.
Use a tape measure to measure the diagonal. A 2 mm skew on the side is allowed, but it is better to do it without skew. Having set the diagonal, they grab it from the outer end surface of the joints. Mark and grab the additional strut of the structure. It should be flush with the surface of the racks.
The entire structure is scalded on all sides. The front side of the gate, on which the lining will be attached, is cleaned with a grinder. All other joints are hammered and the quality of the weld seam is checked.
If the pores are large, scald these areas again. Now you can clean up the uneven joints a little without disturbing the seam. The wicket structure is ready.
It is necessary to weld the hinges onto the gate frame. This can be done when hanging it on poles, but welding in the lower position will provide a better quality seam.
For welding, mark the same distance from the edge of the structure, align the hinges coaxially to each other and the gate, and grab them in several places. Once again check that the hinges are installed correctly and weld them on both sides.
Sheathing
If you are sewing up the gate with mesh or rods, they should be secured before installing them on the posts. When laying a sheet of corrugated sheets, it should be fastened after welding. The corrugated sheeting is secured with self-tapping screws, the heads of which are covered with decorative overlays.
Without high-quality welding, the gate will not last long. For reliability, be sure to check the filling of the seam with molten metal.
Before welding, double-check that the part or the structure as a whole is installed correctly. Take your time.
Before sheathing with corrugated sheets, be sure to degrease all surfaces and first apply a primer and then paint that matches the color of the decorative coating of the gate and fence.
Having completed all the work on welding and installing the gate correctly and efficiently, you gain invaluable experience in the manufacture of frame structures.