| INSTALLATION OF ANY STOVES AND FIREPLACES We will install any stove, fireplace, cladding or chimney. Finishing the fireplace with stone. | WARRANTY FOR ALL TYPES OF WORK We are responsible for the quality of work performed and materials. You will receive a one-year installation warranty. | SAFE INSTALLATION All work is carried out strictly in compliance with safety standards. We use only non-flammable safe materials. |
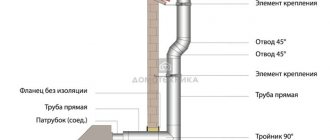
How to install the most fire-hazardous section of the chimney
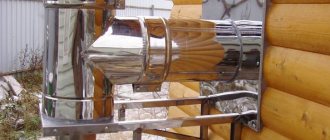
When installing an amber stove through a wall, sandwich systems are installed with your own hands. The first segment of the chimney is made from a fragment of a smaller pipe. It is fixed in such a way as to prevent overheating of the fasteners; for this it is necessary to retreat a sufficient distance. Basalt insulation is laid from the 2nd bend.
The first segment of the chimney is made from a fragment of a smaller pipe.
Safety regulations
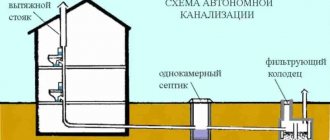
Do not forget that the chimney is a source of danger. Place the flue away from the cable and gas pipe. Contact with other utilities is undesirable. The maximum length of individual fragments is 1 meter
It is important to follow building codes and regulations
Place the flue away from the cable and gas pipe.
Choosing the material and design of the chimney pipe
The design of the chimney pipe is directly related to the type of stove for heating the room. So, for a stone Russian stove, a brick structure is most organically suitable, which rests on the stove itself, or is built on its own foundation. In multi-storey buildings of the last century, chimney ducts were installed in the thickness of the walls.
Similar chimneys are usually equipped with all types of stone stoves and fireplaces. Installation of brick chimneys should ensure the smoothest possible surface of the internal channel and ideal verticality of the masonry.
As a compromise, in recent years old brick chimneys have been "sleeved" - a steel pipe inserted into the brick chimney. This was necessary to reduce the cost and, accordingly, the amount of materials for a stone chimney, the installation of which could be more expensive than the rest of the stove structure.
In more modern and technologically advanced metal furnaces, steel or ceramic-composite pipes are usually used. A metal chimney is much cheaper than a brick pipe and much easier to install. However, under the influence of the condensate that appears, the metal actively corrodes and collapses. In addition, at the junctions of individual sections it is difficult to ensure perfect tightness and smoke can leak into the room.
Ceramic chimney pipes are more reliable. But, unlike steel ones, they have significant weight, require reinforced fastening, and are comparable in cost to brick ones. The new design systems, called sandwich chimneys, do not have all these disadvantages.
Types by design
The iron chimney for the stove can be divided into two types according to its design: single-walled and double-walled. Now let's take a closer look at each of them:
Single wall
Based on the name, they have only one wall. These are installed mainly in the finished chimney duct of the stove, and serve as a sleeve. Also used in outbuildings, garages, etc. such a chimney. They can be made from stainless steel, galvanized steel, or regular iron.
Double-walled
Double-walled, as the name suggests, consists of two pipes thermally insulated with non-flammable material.
In everyday life they are called sandwich pipes.
Pipes can be made of either stainless steel or galvanized.
The first outer layer is a pipe that can withstand prolonged exposure to adverse weather conditions and other destructive environmental factors. The second layer consists of non-flammable thermal insulation, which ensures fire safety and no condensation
When purchasing, you need to pay attention to the quality of thermal insulation. The inner layer is made of steel grades that are resistant to destructive smoke substances. The choice must be made based on specific tasks, conditions and budget
To protect yourself and your property from possible fires, you should opt for a double-walled pipe, moreover, its service life is much longer than that of a regular one.
The choice must be made based on specific tasks, conditions and budget. To protect yourself and your property from possible fires, you should opt for a double-walled pipe; moreover, its service life is much longer than that of a regular one.
Varieties and materials
Pipes for fireplaces come in the following types:
made of brick;
metal;
monolithic or multilayer;
decorative or the most simple ones.
But in fact, it doesn’t matter: what shape, what material, whether they are prefabricated systems or not - nothing really matters
One thing is important - adequate ventilation of the firebox. And based on these considerations, only that pipe is good for a chimney, which ensures that the room with the fireplace does not smell of smoke and that the wood ignites from the very first match
If you are planning to install a fireplace with a chimney, then at a minimum you should know something about the materials from which chimneys are installed.
Ceramic
These are chimneys that are resistant to relatively high temperatures. They have great heat capacity and durability, but they cost a lot. A ceramic chimney is usually a three-layer structure with a ceramic inner pipe (fireproof), a heat insulator and a concrete shell. Thermal insulators are non-flammable mineral wool, and the concrete shell contains channels that reduce the temperature of the outer surface and provide additional heat removal.
Steel
A steel chimney is a round pipe, made of stainless steel or galvanized, with insulation and an insulated contour on the outside. The steel kit is quite easy to install and weighs very little. Metal pipes are increasingly becoming fashionable today, and to connect a stove or fireplace to a chimney, they very often use products made of black steel, because with them there will be no condensation at the fire source and the pipe will not corrode.
Ordinary metal cannot act as the main chimney riser. Inserts and open connection components are most often enameled steel sectional pipes, the metal thickness of which is at least 0.5 mm. This is due to their corrosion and acid resistance and are designed for temperatures of 450C, and for a short time - at 750C. As a rule, this is enough.
Stainless steel
The cost of a metal chimney made of stainless steel will be higher, but its service life will be longer. In addition, this design can withstand much higher temperatures (up to 1200C).
If these are domestic heating sources, then the thickness of the steel is used in the range of 0.5-0.8 mm, sometimes 1 mm. At the same time, easy installation of the entire structure, its low weight and immunity to acids are of great importance.
The highest chemical aggressiveness of the emission occurs when liquid fuel is burned. Here it is worth mentioning modular chimneys for metal fireplaces, which can be single or double, insulated. They can be laid openly, without fear that the structure may catch fire or, even worse, burn.
It must be said that visually such pipes look quite aesthetically pleasing, do not require brickwork, and do not require a foundation. The double chimney with insulation is suitable for installation both indoors and outdoors.
Combined
A variant of combined insulated chimneys made of metal is also possible, when the inner part is acid-resistant stainless steel from 0.8 to 1 mm, and the outer part is thinner and enameled.
Sandwich
Stainless steel sandwich pipes require special attention.
This is, first of all, durability, excellent traction due to the smoothness of the inner surface and minimal soot deposition.
At first glance, it is expensive, but it is unlikely that a brick structure, and even taking into account the foundation, mortar for masonry and payment for all the work, will be cheaper.
Coaxial
This is a chimney of a double-circuit design, having pipes of different diameters and the narrower of them is located inside the wider one. To prevent the pipes from touching, jumpers are provided.
Attached chimney
The safest solution may be to install a fireplace with an attached chimney. In this case, there will be no combustion products in the living space even if the masonry becomes leaky. And such a smoke removal system is installed not necessarily simultaneously with the construction of the house itself, but at any convenient time.
In this case, a device in the form of a tee with an inspection channel and a condensate collector is connected to the chimney.
External placement
A pipe with external placement increases the area of a small room. The chimney for the fireplace here is led through the wall near the heating device directly to the street.
Oval chimney
The draft force in it will depend on the cross-sectional shape of the chimney. The most aerodynamic are round tubes. Square pipes are better than rectangular ones, and an oval chimney is completely rare; it is used only when lining a rectangular brick channel.
Key functions and technical characteristics of the spotter
A homemade or factory-made spotter with an industrial purpose has a number of important functions:
- connecting parts by welding repair washers using a spotter;
- spot welding using a metal electrode, which pulls out the metal of the panel;
- the ability to heat metal parts with a carbon electrode and then cool them. Thanks to this function of the welding machine, it is possible to carry out upsetting of metals;
- the design features of the spotter make it very simple and convenient to use;
- the presence of two welding modes in the spotter. The first is a constant-on mode using a carbon electrode, and the second is a short-term on-off mode, which is time-regulated. It uses a metal electrode and is often used to weld washers;
- the presence in the spotter of a forced cooling system and a thermostat to turn off the welding machine when overheated and automatically turn it on at the required temperature for welding.
Main technical characteristics of the device:
- 220 volts – the required supply voltage for normal operation of the spotter;
- 56-60 Hz – required AC mains frequency;
- 10 kW – maximum permissible power;
- 1300 A – maximum possible operating current;
- about 8-9 V – voltage for the secondary winding of the welding machine;
- 0-1.2 seconds – time setting limit;
- two operating welding modes - a timer for precision welding and a continuous mode for conventional welding and tempering;
- 15 percent – productivity when spot welding metal parts, taking into account the maximum output power;
- 75 percent - productivity with coal boiling, taking into account the maximum output power;
- from 100 kg and more – traction condition for the needle;
- 100 kg and above – traction condition for the puck;
- 380 by 290 by 840 mm – length, width and height of the product;
- 32 kg – weight of the structure.
Construction of a ceramic smoke channel
The most reliable and safe option for installing a chimney in a wooden house is a construction made of ceramic blocks. Its outer side practically does not heat up, which means there will be no problems with passage through the ceilings.
Let's consider the sequence of assembling a smoke channel from components of the German brand Schiedel Rondo Plus:
Let’s immediately make a reservation that the main one is constructed from ceramic modules, i.e. a separate pipe for which a separate foundation is arranged.
All technological holes are cut out along the construction site. Cutting is done with a regular grinder with a diamond blade.
To make geometrically accurate holes, the ceramic chimney kit includes a template. Further:
The ceramic chimney is assembled in a standard manner: modules are built up one after another
However, it is worth paying attention to the specifics of passages through the attic floor and through the roof
In our example, the chimney and ventilation riser are located next to each other, which is why we had to slightly trim the rafters:
We also have another article on our website containing step-by-step instructions on how to build a ceramic chimney, attach it and decorate the outside.
Installation
Installation of structures is always considered on an individual basis. This is the most critical stage; to install a chimney for a fireplace with your own hands, you need to calculate its diameter and location.
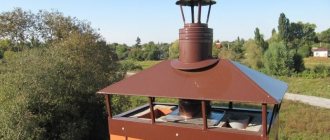
A suitable place to place a fireplace chimney is near the ridge of the roof. This will make the protruding part of the pipe smaller.
The height must be at least 4 meters. Calculation of maximum values depends on your building.
Calculation of the diameter of the pipe will also be required to ensure that the structure passes all the floors without difficulty.
Particular attention is always paid to the installation of equipment in wooden buildings. Such buildings are most susceptible to fires
In order to avoid this, it is necessary to use a transition pipe, which will not only protect against fires, but will also provide high-quality insulation between the roof and the fireplace chimney.
In order to make a hole in the roof, you must remember that its size should be slightly larger than the diameter of the pipe.
In addition, you need to pay attention to possible joints. They can not only reduce the efficiency of the heating device, but also worsen safety parameters
In addition, the service life will be noticeably reduced.
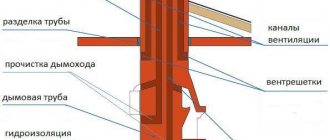
Sectional view of a chimney pipe on the roof
The most difficult part of the installation is considered to be the point where it passes through the roof.
The main parameters that you need to pay attention to are quality and safety.
For each design there is a basic set of requirements that need to be addressed
Diagram of the relationship between the type of heating device, the temperature in the chimney and the material of its manufacture
For example, for a brick building, the work scheme looks like this:
- Foundation.
- Solution.
- Masonry.
- Mopping.
- Header.
- Dymnik.
For a ceramic device, the work flow is as follows:
- foundation,
- Fastening modular elements.
The construction and installation of chimneys for fireplaces is carried out taking into account the expansion of the material under the influence of heat. In addition, it is necessary to take care of the tightness of the equipment during operation.
A properly equipped chimney will last a long time.
Requirements
Smoke channel gravity value
Modern designs must meet the following criteria:
- Durable construction and long service life. The design of chimneys for a fireplace must withstand various temperature changes and the formation of condensation. Resist under the influence of aggressive acids, and, most importantly, comply with all fire safety standards and regulations.
- Aerodynamics. The installed structure must ensure unimpeded flow of combustion products. For example, a round cross-section can quickly and easily remove all flue gases from the firebox. Rectangular structures are not as efficient; in them, combustion products encounter resistance, thereby reducing the exhaust speed.
- Easy maintenance.
- Resistant to erosion and corrosion. To achieve this indicator, when installing a chimney for brick fireplaces, it is necessary to select the right materials.
Tips for cleaning chimneys
Unlike chimneys of heating solid fuel stoves, which are cleaned at the beginning of each heating season, sauna pipes are serviced as needed. Practice shows that if you regularly use a steam room, this procedure must be carried out at least 2 times a year.
To remove soot from the inner surface of the flue, it is convenient to use metal or plastic brushes with a metal weight. A rope tied to them allows you to lower the device from top to bottom, cleaning the channel along its entire length.
A brush with a weight for cleaning smoke ducts allows you to clean chimneys of any length
If it is not possible to get to the upper end of the pipe, then a hatch is installed in its lower part. Through it, cleaning is carried out from the bottom up, using the same brush attached to a long steel cable. Condensate from a system with metal pipes is drained using a ball valve, which is mounted at the lowest point of the moisture trap.
The mechanical method, although the most effective, is associated with quite serious labor costs. The process of removing soot can be made easier by using chemicals that are burned in the stove along with firewood.
Video: how to clean a chimney in a bathhouse
https://youtube.com/watch?v=WT3FqN4DLa0
The chimney is a mandatory attribute of a sauna stove, on which the efficiency of its operation depends. Choosing exactly what its design should be is only half the battle.
It is equally important not to forget about SNiP and fire safety standards during the design and installation process. Only in this case will the wish “enjoy your steam” sound like a call for a safe and pleasant pastime
Treatment of wood against fire
Additional means of protecting wooden structures located in the immediate vicinity of an iron stove are fire-retardant impregnations and mastics. Beams, load-bearing structures, floors and walls adjacent to the furnace are subjected to this treatment. Mastic has a higher level of fire protection, and the impregnation is almost colorless.
Fire retardant treatment can be carried out by both representatives of the Ministry of Emergency Situations and the owners of a wooden house. In the latter case, before starting to operate the stove, it will be necessary to obtain a certificate from the inspector of the Ministry of Emergency Situations about the compliance of its installation with the requirements of the safety regulations.
All leading European and Russian manufacturers of solid fuel stoves describe in detail the rules for installing equipment and fire safety requirements in their technical documentation.
Advantages and disadvantages of sandwich chimneys
In industrial conditions, stainless steel products are used for the inner layer of the sandwich, and zinc-coated steel pipes are used for the outer layer. In this case, the inner contour is covered with thermal insulation and placed inside the outer cylinder. As a result, such a structure functions quite efficiently and efficiently.
Installing a chimney made from sandwich products does not take much time and effort - all the work can be completed in a day. Below we present a number of advantages and disadvantages of such pipes.
Among the advantages of such structures are:
- multitasking - such pipes can be used in buildings made of any materials;
- occupy a minimum of space;
- ease of transportation;
- Even a beginner in construction can install sandwich pipes, as it is very simple and quick;
- laconic and pleasant appearance;
- fire safety - this is one of the best options for chimneys in this regard;
- the existing roof truss system does not create any obstacles to the installation of a sandwich pipe;
- due to the presence of several layers, much less soot accumulates in such a pipe and almost no condensation forms, so cleaning it is required much less frequently;
- The sandwich pipe is capable of fully protecting residents from the influence of toxic combustion products.
But such designs have very few disadvantages, although they still exist:
- the price of a sandwich pipe is quite significant;
- The optimal service life of such products is only about 15 years.
If you want to make a sandwich pipe with your own hands, then such a chimney will cost you much less than, say, one made of brick. This will result in a completely reliable chimney, and there should be no difficulties with installation and assembly.
Protective cladding for walls and ceilings
The walls directly adjacent to the stove, as well as part of the ceiling along the passage of the chimney, are subject to significant thermal loads.
Therefore, before installing a stove in a wooden house, you need to fulfill a number of prerequisites:
- The ceiling lining is made of non-combustible material. Wooden or plastic panels are not used. It is best to purchase gypsum fiber boards treated with gypsum putty for painting.
- The walls must be protected with a layer of basalt cardboard and covered with a sheet of steel. As an option, you can use ready-made decorative stainless steel screens. These products are able to provide safety and are distinguished by external beauty. In addition, the walls can be plastered with a layer of 3 cm or more, and also lined with brick (read: “How to line a metal stove with brick in a house - a step-by-step guide”).
Fire safety rules for installing iron stoves in wooden houses are described in more detail in SNiP 05/31/2003 and SP 118.13330.2012.
Criteria for choosing natural draft flues
When selecting the material for a future chimney, most homeowners focus on the price of the product and the cost of installation. For reliable and safe operation of heating equipment, other factors will have to be taken into account:
- Compatibility of the chimney with the type of boiler. Units with high efficiency (gas, diesel) emit smoke at a temperature of 70...120 °C, brick stoves and solid fuel heat generators - 150...200 °C, steel and cast iron stoves - up to 400 degrees.
- The method of installing a gas duct is internal installation with a passage through the ceilings and roof, or external installation along the wall.
- Combustibility of the material from which the building is constructed.
- The ability to repeatedly withstand an increase in the temperature of exhaust combustion products up to 1000 degrees. Such emergency situations occur when soot accumulated inside the pipe ignites.
- Corrosion resistance, durability.
Wooden structures located next to the hot pipe of a wood-burning stove must be protected with non-combustible materials.
Before choosing a chimney material, decide on the option for laying it and sketch out a diagram. Let us remind you about the requirements for smoke exhaust pipes:
- the diameter (sectional area) of the channel is no less than the outlet of the boiler, stove or fireplace;
- the minimum pipe height is 5 m, calculated from the grate (burner) to the top cut;
- the chimney head should not fall into the wind pressure zone formed behind the ridge of a gable roof or a tall building standing close to it;
- the maximum number of channel turns by 90° is no more than three;
- the indentation of the pipe surface unprotected by insulation from combustible (wooden) building structures is 50 cm, protected – 38 cm;
- the length of the horizontal section connected to the boiler pipe is a maximum of 1 m;
- According to fire safety requirements, all metal gas ducts laid through the rooms and attic of a residential building must be insulated with non-flammable material - basalt or kaolin wool.
The chimney for a stove or boiler must provide stable natural draft and removal of harmful gases to the outside of the room - this is the main requirement
It is equally important to comply with other fire safety standards, for example, not to use corrugated aluminum hoses on heating boilers
Regulatory requirements for head height and fire clearances
Installation requirements: safe installation of the fireplace
Before deciding how to install a classic fireplace in a wooden house, you need to make sure that all installation safety requirements can be met. An open hearth should be a source of heat, not problems.
There are special requirements for the installation of fire hazardous appliances in wooden houses.
General safety rules for installing fireplaces in wooden houses
Those who decide to build a real brick fireplace will have to check the project’s compliance with 10 basic requirements for fireplaces in a wooden house:
- At least 12 months must pass from the date of construction of the house.
- The optimal interval between the completion of construction and the installation of a stove or fireplace is 36 months - this is how much time should pass for wooden structures to become stable and natural shrinkage to complete.
- Installation of open fireboxes on upper floors and attics is prohibited.
- The structure cannot be installed on a wooden floor.
- The foundation for the fireplace must be poured in isolation from the foundation of the house.
- Construction of a chimney is mandatory.
- All wooden surfaces located near the stove or fireplace must be insulated from overheating and sparks.
- You cannot install fireboxes near windows with curtains or drapes, or place upholstered furniture or textile decor near the fireplace.
- The firebox must be equipped with a removable screen.
- There must be a working fire extinguisher in the room at all times.
Can't meet all the requirements? Give preference to safe electric fireplaces, especially if you plan to install them in the attic, on the second floor of a house with a wooden floor.
Beautiful and safe: an alternative to standard stoves
Surface insulation: how to protect wood from fire
Those who decide to build a classic brick fireplace will have to take care of protecting wooden surfaces. The main tasks are to prevent heating of the walls and ceilings, to protect the floor and walls from sparks that could fly out of the firebox.
Wall insulation scheme
Basic insulating materials for wooden walls:
Basalt wool.
Plates of different thicknesses
Mineral sheet insulation with a heat-reflecting screen - sold in sheets.
Rolled non-flammable insulation.
Heat-resistant synthetic foil insulation
Brickwork: instead of sheathing with sheets, you can lay out part of the wall with half-brick masonry.
You can protect the floor made of parquet or deck boards with steel sheets or stainless steel, or line the area in front of the stove with porcelain stoneware, ceramic tiles or facing stones.
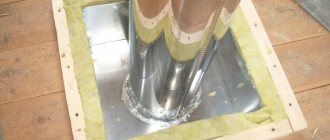
The chimney passing through the ceiling is insulated with rolled fire-resistant wool with foil film.
Disadvantages of brick chimney pipes
Like most materials, a brick chimney for a fireplace also has some disadvantages. One of them is a short service life (7 – 10 years). In addition, temperature changes in winter will inevitably lead to the formation of condensation on such pipes, which, after numerous freezing and thawing, will cause destruction of the brick chimney masonry.
However, the impact of this negative factor can be significantly reduced by using one of the following actions:
- increase the cross-section of the chimney for the fireplace, or rather, its external walls to 25 centimeters in those areas that are above the roof;
- insulate this sector of the pipe with mineral wool.
Another disadvantage of a brick chimney is a large number of irregularities on its inside. In this case, the draft efficiency is significantly reduced, which cannot be said about chimneys with a smooth inner surface. To avoid such a problem, even at the design stage, the chimney should be provided with a certain cross-sectional reserve.
When installing fireplaces and chimneys, the use of galvanized steel chimney pipes mounted inside will also increase the service life.
Violations of fire regulations
It will not be possible to describe all the intricacies of fire safety measures carried out when laying a chimney within the framework of a short chapter. More detailed materials are available on our website; a lot can be learned from the instructions for the factory firebox. Let's mention the most important points:
- Between the fireplace chimney and combustible structures (floors, access to the roof) there should be a fireproof groove filled with fireproof material; basalt wool is suitable for these purposes. The distance from the outer surface of the chimney and wooden structures is determined by the type of fireplace or stove and the type of pipe.
In any case, it should be at least 13 cm for sandwich pipes and 25 cm for single pipes. If the plates covering the hole are made of steel, they are applied to wooden structures through a sheet of insulating material (asbestos cardboard, glass magnesite, gypsum fiber board).
- Instead of being cut with cotton wool, a brick chimney can be thickened to one and a half bricks (38 cm) with a lining of asbestos cardboard or LSU at the points of passage through combustible structures.
- It is necessary to maintain a certain distance between the fireplace chimney and walls made of combustible materials or install a protective screen.
- It is important to correctly install the lining of the factory fireplace insert to prevent overheating. Between the ceiling and the internal space of the cladding there should be a convection chamber separated by heat-insulating screens. Ventilation holes of sufficient cross-section must be made in the lining and chamber.
In conclusion, we note that calculating a chimney for a fireplace and its installation is a responsible matter and the execution of this work should be entrusted to qualified craftsmen.
Describe your question in as much detail as possible and our expert will answer it
Stainless steel chimneys for fireplaces
These pipes are assembled elements made of stainless steel, and their thermal insulation is carried out using flammable materials.
Chimneys of this type can have different diameters and lengths. The kit often includes ceramic pipes that are mounted inside steel pipes.
A galvanized steel chimney has a number of advantages:
- due to their light weight, sandwich chimneys for fireplaces can be installed without a foundation (read: “Sandwich pipes for a chimney - installation”);
- such a chimney can be installed even after the entire construction process is completed;
- a stainless steel chimney pipe is cheaper than block and ceramic chimneys;
- Individual parts of the chimney can be easily replaced if desired.
Information with photos on installing chimney pipes made of stainless steel can be found on our website if desired.
Chimney placement methods
There are two ways to place a fireplace chimney - internal and external. The first involves installing a pipe to remove smoke and fuel combustion products in the room or in the wall of the room (if it has a shaft provided for during construction).
The second method is to install a pipe outside along the wall of the house, when exhaust gases and smoke are removed from the fireplace through a standard chimney. It is connected by a transition elbow to a horizontal pipe running through the wall. The elbow is connected to a tee onto which a chimney pipe leading upward is installed.
Both methods of placing a chimney have their advantages and disadvantages. The internal arrangement protects the structure from temperature changes in winter and also reduces heat loss. The disadvantage of placing the pipe indoors is the loss of valuable square meters.
Outdoor placement is more rational in terms of space saving and fire safety, but with this arrangement, condensation often forms in the pipe due to temperature differences.
Block ceramic chimneys
Thus, the installation of fireplaces and chimneys is sometimes carried out using special block ceramic pipes. Technical characteristics of block ceramic chimneys. The ventilation channels of these chimneys are represented by blocks made of light weight concrete. Today there is a wide selection of samples, and everyone can choose the one they need in terms of height and size.
These blocks are connected using vertical reinforcement, and a ceramic pipe and thermal insulation made of non-combustible materials are placed inside. There may be several options for making a ceramic pipe; it all depends on the manufacturer, who recommends applying one or another technology to a specific sample. Therefore, there is no single device system.
About the mount
Proper mounting for the chimney is very important. To fix the pipe, the outer contour must be crimped using a special clamp and secured with rivets
After this, the clamp must be secured to the ceiling with a special angle and fastening bolts. In this case, the main weight of the chimney will fall not on the fireplace insert, but on the clamps and corners attached to the ceilings.
Even when the chimney for a fireplace is constructed in compliance with all the rules, some amount of water can still get into the pipe. Everything will depend on the cross-section of the chimney and the size of the “skirt”, which has an umbrella or deflector installed above the chimney.
Advantages and disadvantages of ceramic chimneys for fireplaces
The advantages of a ceramic pipe include the following characteristics:
- the material is very quick to install and assemble;
- is a guarantee of high efficiency;
- long service life;
- the range of blocks is large, which makes it possible to mount a chimney opening with any configuration;
- the presence of a special hole that makes it possible to clean the chimney;
- the condensate that appears drains away thanks to the hole located at the bottom of the chimney.
Among the disadvantages of block ceramic pipe systems, it is customary to highlight the following:
- relatively high price;
- Due to the fact that most of these chimneys are manufactured abroad, the delivery time is sometimes very long.
Design features of the chimney
The purpose of the fireplace chimney, as well as the main function of the chimneys of stoves or boilers, is to discharge fuel combustion products out into the atmosphere. Gases along with soot flow from the furnace into the chimney under the influence of draft.
The correct formation of a chimney consists in choosing and constructing a structure in which a minimum of soot remains on the walls of the pipe, and the draft prevents the flow of gases into the room.
Chimneys made of different materials have their own characteristics and may differ in design. For example, a traditional brick chimney consists of the following parts.
Modern chimneys made of steel or ceramics do not have such fragments as otter or fluff, but for the normal removal of smoke in brick pipes and to protect the ceilings from heating, they are simply necessary
When choosing a material, it is necessary to take into account the temperature of the gases: in the furnace it is higher, at the outlet it is lower, but even at the highest point it can reach +100 ° C. The creation of draft is based on the temperature difference - hot air is replaced by cold air.
Also important are indicators such as the height and internal diameter of the chimney - they are calculated when drawing up the project.
A variant of a fireplace design with a chimney made of a steel pipe. Features: floor and wall cladding with non-combustible materials, finishing of floors, possibility of creating non-vertical sections using half-bends
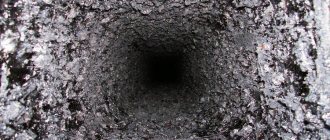
No matter how hard you try, it is impossible to build a chimney that does not need cleaning. Even in a properly assembled ceramic chimney, soot accumulates over time, making it difficult for gases to escape. Therefore, chimney cleaning must be carried out regularly. This is usually done during the period when the fireplace is idle.
In addition, it is necessary to monitor the integrity of the connections and the internal surface: cracks, potholes or protrusions that may appear over time prevent the normal circulation of hot air.
Option number 1. Block homemade design
It doesn’t matter whether you are planning to install a fireplace or stove, you need to start by preparing tools and purchasing materials.
Tools and materials
From the tool you will need:
- Master OK;
- hammer and preferably a rubber mallet;
- Notched spatula with a blade width of 100–150 mm;
- An ordinary metal spatula with a blade width of 50–70 mm;
- Containers for mixing the solution (buckets);
- Hammer;
- Screwdriver;
- Mixing attachment for an electric drill or construction mixer;
- Construction bubble level;
- Hydraulic level;
- Plumb line, tape measure, pencil or marker;
- Screwdriver;
- Bulgarian;
- tile cutter (required for brickwork).
You can't build a fireplace without quality tools.
Fireplace installation material
- Red stove brick M-200;
- Facing brick;
- corner 50x50 mm;
- strip 50x5 mm;
- Self-tapping screws and wide washers for them;
- dowels for self-tapping screws;
- masonry mixture for stoves and fireplaces;
- mastic for laying tiles;
- cement and quarry sand;
- Thermal insulation boards 50 mm, preferably foil-coated (superizol or something similar);
- Minirite slab (for installation in a wooden house);
- Porcelain tiles or ceramic floor tiles.
- UD and CD profiles for drywall;
- Drywall sheet;
- 3 decorative grilles for ventilation windows;
- Heat-resistant sealant.
Let's start installation
The installation diagram for a fireplace with a homemade platform is selected individually according to location, depending on the dimensions of the firebox and installation conditions. I will tell you step by step about the simplest option.
| Illustrations | Recommendations |
| Foundation in a permanent house. Compared to a large brick stove, the weight of a small fireplace is not so great, so here you can do without a reinforced concrete foundation. The floor slab or screed is quite capable of supporting such a structure. But you shouldn’t start installing a fireplace directly on bare concrete; the floors, or at least the area under the fireplace, need to be tiled; porcelain tiles are best suited here. | |
| Foundation in a wooden house. To lay ceramic tiles or porcelain stoneware under a fireplace in a wooden house, you need a durable heat-resistant layer. We will use minirite sheet with a thickness of 15 mm. It is not advisable to use an asbestos cement sheet, since its thermal conductivity is higher, which means it will get very hot. We fasten the slab to the floor with self-tapping screws, clearly under the chimney, on the center line. To make it easier to navigate, you need to lower a plumb line from the chimney hole in the ceiling; in the photo on the left it is shown with an arrow. | |
Laying tiles. It is advisable to lay the tiles end-to-end under the fireplace, without seams.
On the sides, the base is made wider than the future fireplace by at least 150 mm, and in front of the firebox doors there should be a platform of at least half a meter. If the fireplace is installed on the upper floors, then there is a limitation on the weight of the structure:
| |
| Laying the first row. We will lay out the fireplace body from red stove brick M200, although in this case you can also use facing brick, it is lighter but more expensive. We place the platform on a cement-sand mortar, and the frame around the firebox on a heat-resistant clay-fireclay mixture. The first row of the platform is made solid. | |
| 2nd row. Starting from the second row, the platform is laid out in the form of the letter “P”. In addition, near the arch of the letter “P” a square brick column is laid in the center. | |
| 3–4 rows. These 2 rows are laid out exactly the same. In total, the height of the platform will be 4 rows of bricks.
| |
| Laying out the slab near the firebox. The bottom plate of the firebox is one of the most noticeable places. We will lay it out of shaped facing bricks, but if you have the funds, you can order a slab of natural or artificial stone. On the back side, a ceiling (arch in the center) made of shaped bricks is supported by a 50x50 mm corner. Plus, 2 more strips of 50x5 mm are laid under this overlap. The slab protrudes beyond the platform by a quarter of a brick. | |
| Laying side overhangs. The width of the side overhangs is determined individually; if space allows, then shaped bricks can be laid at full size, then the corners are cut at 45º. In this case, the side overhangs were made a third of the way from the façade platform; accordingly, the corners were cut off individually. We lay out bricks from the inside for installing the firebox. | |
| Installation of the firebox. We installed the firebox with the approach to the façade slab. On the back side, the firebox rests on the same square column, and on both sides of the column we have 2 small gaps. These gaps are needed to ensure air leaks from below; they must be there. | |
Gaps. Do not try to make the brick “jacket” for the fireplace insert too bulky.
| |
| Rear thermal insulation. In this case, we decided to lay stove bricks behind the firebox, but this option is only suitable for plastered block walls. Instead of back brickwork, you can attach thermal insulation with a thickness of 50 mm or more to the wall, for example, superisol or foil-lined basalt wool. This insulation is attached to self-tapping screws.
| |
| Protection. In a wooden house, the wall in the area of the fireplace will need to be treated 2-3 times with a fire retardant and when the wood dries, the wall will need to be covered with thermal insulation. | |
| Box laying. The height of the front part of the firebox was 7 rows of bricks. The first 6 rows are laid out evenly, and in the 7th row there is an overhang of 25 mm. In the 8th row, an overhang of 25 mm is also laid out. This is a purely decorative protrusion and is optional. | |
| Laying the pediment above the firebox. We made the upper gable from ordinary facing bricks, the technology was the same as when laying the lower slab.
| |
| Top plate. Since the facing brick on the upper pediment of the firebox was installed on edge, the rest of the masonry turned out to be below the upper cut of the pediment, so it was decided to fill the missing space with cement-sand mortar. To do this, we installed formwork around the perimeter of the masonry box. | |
| The cement-sand mortar for pouring the slab is made using the usual 1 part cement, 3 parts sand. We laid a reinforcing mesh inside the slab. By the way, in order for the slab on top to be perfectly level, the formwork is mounted clearly along the horizon, and after pouring the mortar is simply “cut off” with a wide spatula. | |
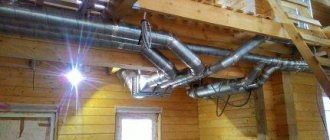
| Chimney finishing. Installation of a fireplace chimney indoors consists of 2 parts:
The photo on the left shows the structure of the supporting cage for the frame. The cage is assembled on the basis of metal UD and CD profiles for drywall and screwed together with metal screws (fleas). The design consists of two sectors, in the lower sector a regular steel pipe is mounted, and in the upper sector a sandwich pipe with a heat-insulating layer is already connected. | |
| Installation of insulation. Installation and installation of the box is also carried out in 2 stages:
All joints of heat-insulating sheets from the inside must be taped with foil tape. Ventilation hatches are cut on both sides of the box, then we will cover them with decorative grilles. | |
| Sector separation. The lower and upper sectors of the chimney duct also need to be separated from each other; they should not communicate in any way. We also use foil insulation board for fireplaces and stoves as a separator. All joints are coated with heat-resistant sealants and sealed with foil tape. | |
| Assembling the box for the chimney . Step 1. Cover the lower sector with thermal insulation and install a sheet of drywall on top of it; | |
| Step 2. We arrange a ventilation window in the center of the upper box and thermally insulate the plane around the window; | |
| Step 3. Attach the top panel of gypsum cardboard and insert decorative grilles into the ventilation openings. | |
| Trial by Fire. It is advisable to light the firebox no earlier than after 3-4 days; you need to let the masonry mortar dry. Now all we have left is the decorative trim of the fireplace and chimney:
|
Calculation example
For example, there is a house of 60 sq. meters. On average, heat loss is 100 W/sq.m., the required heat flow is 6000 W. We apply a safety factor of 1.2 - 6000 * 1.2 = 7200 W In the table, the maximum approximate value will be 7185 W at a flow speed of 0.5 m/s. In the leftmost column, the internal diameter of the pipe will be 15 mm. Using the manufacturer's table, we find the required outer diameter of the pipe. For example, for the closest value in the direction of increase - 18 mm. This is a universal multilayer pipe (PE-Xc\Al\PE) 25 mm. We look the same way. A 25 mm Stabi polypropylene pipe is suitable for us.
Possible problems with the operation of the fireplace pipe
The operation of a fireplace largely depends on the correct installation of the chimney. If insufficient draft occurs, you should check the calculations according to which the chimney was built.
The fireplace pipe is installed incorrectly if:
- smoke enters the room;
- lighting a fireplace takes a long time;
- the fire in the fireplace burns too low;
- The burning intensity of solid fuels varies constantly and depends on weather conditions.
The first step when these problems occur is to ensure proper ventilation in the room. It is necessary to check the tightness of the windows and the intensity of the ventilation, if any. Since the fireplace flame burns most of the oxygen, there must be a constant flow of fresh air into the house.
The reasons for the chimney not working properly are as follows:
- Insufficient pipe height. The larger the fireplace, the higher the duct must be to provide sufficiently strong draft.
- The pipe design contains bends of more than 45 degrees. It is advisable to make the chimney as straight as possible. If there are still horizontal elements, you should choose the minimum angle of inclination. The vertical part must be at least 5 meters.
- Incorrect calculations. The draft largely depends on the correct cross-section of the chimney.
- External influence. Weather conditions can affect the intensity of draft in the pipe. To prevent this from happening, it is necessary to install a weather vane on the chimney.
The chimney pipe for the fireplace must be installed in accordance with all standards. This will make the fireplace fireproof and also ensure its proper operation.
Rules for connecting to the chimney
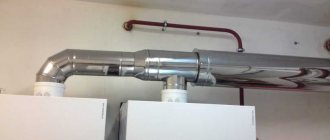
Construction of a fireplace or stove is a complex and responsible matter. It is necessary to build a smoke removal system for the heating boiler and heater: not only the efficiency of the heating unit or heater, but also your safety and peace of mind depends on how professionally the chimney is installed.
Incorrect installation of the chimney pipe can negate all your efforts and financial investments in installing a fireplace. Insufficient traction is the most harmless thing that can happen to you if you are careless in solving this problem. It is worse if smoke and sparks are carried into the room. It's not far from fire and carbon monoxide poisoning. Let's figure out how to connect a gas boiler to a chimney.
Diameter
In order to calculate all the parameters, it is now necessary to decide on the material that will be used in the construction process. It is most convenient to carry out the calculation on paper, creating a sketch of the future structure; it is necessary to take into account some nuances:
- The diameter of the chimney for a fireplace must have a certain relationship with the firebox. Calculating this value has its own subtleties. For example, when calculating the diameter of a pipe that connects to an open firebox structure, a proportion of 1:10 is used. This method is only correct for a cylindrical type of chimney.
- The calculation of the cross-section for a square type device contains proportions of 1:15. But the diameter should be smaller than the size of the blower. If the resulting heat transfer is less than 300 cal/hour, the cross-section should not be less than 140 x 140.
- In order to determine the optimal diameter of the fireplace chimney, you can take as a basis state standards, which stipulate the permissible cross-section under certain conditions.
- In addition, the height and diameter are calculated in accordance with the area of the room.
Standard dimensions of internal diameters and cross-sectional areas of brick chimneys
It would be a good idea to show your calculation to specialists and analyze it together. In addition, a suitable calculation scheme can be posted on the Internet.
It must be remembered that the calculation of these parameters must be done correctly; the efficiency of the heating device depends on this.
About offers on the market and general characteristics
At first glance, it may seem that chimneys for fireplaces are very diverse. In reality, there are only 3 proven directions and a couple of alternative options.
Good old brick
Brick pipes are a classic, they are reliable, durable and look quite solid, but it is advisable to build a brick chimney at the stage of building a house.
A brick pipe is reliable and durable.
The average price for materials, excluding foundation costs, fluctuates around 6-8 thousand rubles, this is provided that you lay the brick with your own hands. Plus, fireplace work is easier than laying stoves.
On the other hand, if everything is done correctly, then this fireplace chimney will safely survive until your grandchildren come of age.
Time-tested stainless steel
About 20 years ago, double-circuit insulated stainless steel chimneys appeared. The design is simple - heat-resistant thermal insulation is stuffed between two pipes of different diameters, the thickness of the steel in them is 0.5–1.2 mm, the thing is reliable, the guarantee is given for 15–20 years, although it may last longer.
The price for such pipes starts from about 1,400 rubles. for 1 meter section and can reach up to 5,000 rubles, but here you need to look at the grade of steel:
- for high temperatures, brands from AISI 304 to AISI 321 are suitable; they can withstand temperatures up to 700 ºС;
- grades from AISI 409 to AISI 430 are already designed for temperatures no higher than 500 ºС.
Stainless steel pipes are assembled quickly and last a long time.
If you have a fireplace with a closed firebox, the temperature of the combustion products in the chimney will be higher. Firewood in open fireplaces gives a maximum of 400 ºС, and in closed ones 450-600 ºС. But if you load anthracite or coke into the firebox, the temperature at the outlet of the open firebox will be at least 500 ºС; in a closed firebox it can easily rise to 700 ºС.
Ceramics
A ceramic chimney is almost ideal; this material can withstand temperatures up to 1320 ºС, plus ceramics are absolutely indifferent to an acidic environment, it is not for nothing that ceramic chimneys are used in hazardous industries with high temperatures.
Modular ceramic pipes are reliable, but expensive.
There is only one problem - a set of such pipes for a chimney will cost you from 20 thousand rubles, plus add to this the cost of heat-resistant glue and arranging a small foundation. But it’s quite easy to assemble such a construction set with your own hands, but more on that later.
Alternative for DIY
- Asbestos cement pipes. Such a chimney will cost pennies and can be assembled in a couple of days, but the maximum for an asbestos-cement chimney is 300 ºС and it collapses instantly, it simply bursts;
- A steel chimney (meaning ferrous metals) holds the temperature well and is not expensive, but the problem is that the condensate that periodically falls inside any chimney duct is an acid-base “cocktail” and it corrodes iron very quickly;
- A cast iron fireplace pipe would be a good alternative, because about half of fireplace inserts are made of cast iron, but these pipes are very heavy and, as a rule, they are installed inside a brick “jacket”, which means you will have to first fold the brick box and then insert it into it cast iron pipe.
A cast iron chimney is durable, but very heavy.
A few words about calculations and standards
If you follow GOST 9817-95, then the size of the chimney for a stove or fireplace is calculated depending on the power of the unit, so for 1 kW of power there is 8 cm² in the cross section of the chimney; There is a less accurate, but simpler method of calculation: the diameter of the chimney for a fireplace is related to the area of the firebox mirror as 1:10 (the firebox mirror is the front opening of the fireplace); The height of the chimney pipe should not be less than 5 m; It is also important how much the chimney pipe rises above the ridge of the roof, the level of draft depends on this, the minimum parameters are shown in the diagram below, but in general, the higher the pipe rises above the ridge, the stronger the draft will be;
The height of the pipe above the ridge is a very important parameter when constructing a chimney.
The configuration of steel chimneys can be different.
Rules for installing a chimney through a wall with your own hands
Smoke removal will be effective if you follow the basic rules:
- For good traction, you need to raise the pipe above the ridge.
- With a long part of the chimney (more than 10 m), the fuel will quickly burn out; with a short part (less than 5 m), there will be no intense combustion.
What is the best way to route the pipe from the stove through the wall, experts say. The main stages of installing a smoke exhaust system are indicated in the step-by-step instructions.
For good traction, you need to raise the pipe above the ridge.
Sandwich chimney installation diagram
Installation of a chimney made of sandwich pipes through a wall is carried out in accordance with the following standards:
- Indoors without condensate drainage;
- From the outside - “through condensation”, the resulting moisture flows into the drainage cup.
The scheme is selected for a specific room, taking into account the interior design. You can install a sandwich chimney with a passage through the wall yourself.
The scheme is selected for a specific room, taking into account the interior design.
Preparatory stage
Before installing the heat generator, insulate the base with cement or heat-resistant metal. All components are assembled; the sandwich system consists of many elements; it is necessary to prepare a complete sandwich set. Swivel fittings will be required to form the elbows. They buy insulation with a reserve. It is recommended to lay a foil layer to the inner contour. You will need hardware to install fasteners. The joints are fixed with clamps.
It is recommended to lay a foil layer to the inner contour.
Basic installation steps
After determining the location of the pipe, heating equipment is installed. Then a hole is made in the wall slightly larger than the outer diameter of the sandwich. A connecting pipe is mounted, the chimney is connected to the heating equipment through a tee. At the last stage, the outer part of the flue is attached to the outer wall of the building in increments of at least 50 cm.
At the last stage, the outer part of the flue is attached to the outer wall of the building in increments of at least 50 cm.
What do you need to know for proper connection?
Types of chimneys
In earlier times, almost the only material for making chimneys for a heating boiler or water heater was brick. It has not lost its attractiveness even today. It has not lost its attractiveness even today. If a stove or fireplace is initially made of brick (see Laying brick fireplaces), then the chimney is most often built from it according to all the rules of stove art.
In this case, connecting the fireplace to the chimney is not required; it is part of the overall structure.
As for modern models of fireplaces, heating boilers or water heaters running on gas or other fuel, they most often have a metal body with an outlet pipe for connection to the chimney.
It is a pipe of a certain diameter, the material for the manufacture of which can be the following materials:
- Asbestos cement.
- Cink Steel.
- Stainless steel.
- Ceramics.
The most popular today are steel chimneys of a double-circuit design - sandwiches. They consist of two pipes, internal and external, between which a layer of non-combustible basalt-based insulation is laid.
The insulation prevents the chimney from quickly cooling and condensation forming in it.
Chimney installation options
Manufacturers offer water heaters and heating boilers with various pipe outlet options. Therefore, connecting a gas boiler to a chimney is carried out in different ways.
Chimney with horizontal section
The most common option is with a vertical pipe at the top of the firebox, but depending on the location of the fireplace relative to the outlet, the chimney can deviate from the vertical by 30, 45, 60 or 90 degrees . And in each case you have to choose how to connect the chimney to the heating boiler.
Connection methods may vary depending on room conditions. For example, it depends on whether it is possible to install a chimney with access to the roof or whether it needs to be brought out to the outer wall of the building.
In old houses with existing chimneys in the walls, the best option may be to connect a water heater or wall-mounted heating boiler to them, instead of installing new ones.
But in this case, before connecting the chimney to the heating boiler, it is necessary to first inspect and clean the smoke exhaust channel.
But the main condition for installing chimneys for a gas water heater or heating boiler is their location inside the house. The shorter the outer part, the less the risk of reverse draft occurring when the fireplace is not working due to the strong cooling of the pipe.
If this is not possible, the chimney should be well insulated and a tight damper should be installed to block the access of cold air to the room.
Attention! When connecting chimneys, it is necessary to strictly comply with the requirements of GOST, which are regulated by SNiP 2.04.05–91 “Heating, ventilation and air conditioning.”
How to remove soot
It will be safe and comfortable to have a fireplace in the house only if there is good draft in the chimney. And this largely depends on his condition.
There are several cleaning methods for chimneys: there are traditional ones, which people have used for centuries, and modern ones, based on scientific developments. These methods include:
People's
In the old days, chimneys were cleaned with aspen wood, which could generate heat in the firebox up to 1200C. Under such influence, the soot becomes loose and burns, and everything that remains of it flies out along with the smoke into the chimney.
Before cleaning using this method, you must be sure that such high temperatures will not harm your chimney, since it will be difficult to avoid destruction or fire if the chimney, for example, cracks.
Even in the old days, they used another method of cleaning the chimney: they burned dried potato peelings, the combustion of which released substances that could loosen the soot, and then it was easily removed from the cleaning holes. But traditional methods will not always help, and in case of severe blockage it is better to turn to chemistry.
Chemical
Today, you can find a variety of cleaning products for cleaning chimneys in the stove store. It can be powder, tablets, liquid or special pellets, logs and briquettes, which are simply placed in the firebox (with or without firewood) and burned. More details about the use of each chemical are described in the instructions supplied with them.
Cleaning briquettes are considered the most convenient of all chimney cleaning chemicals. They heat the fireplace for about two hours, due to which the substances that bind the soot in the chimney are destroyed, and the remaining fines are carried out, like the smoke, into the chimney.
If there was a large blockage in the pipe, it will fall down, and therefore, after servicing the chimney, an inspection of the entire chimney space is necessary, for which there are special doors.
Why do you need a fireplace?
Happy owners of country real estate, owners of city apartments, modern restaurant offices and other commercial real estate, the technical characteristics of which allow the installation of fireplaces, sooner or later think about creating comfortable conditions for leisure and negotiations.
A beautiful fireplace not only decorates the room, but also, when lit, creates favorable conditions for relaxation or constructive dialogue.
This is confirmed by the main building of our country - the Kremlin, whose fireplaces are pleasing to the eye and create a favorable environment for holding negotiations at the highest level.
Fireplace in the St. George Hall of the Kremlin
Fireplace of the Red Living Room in the Kremlin