For the most part, people erect small sheds with dimensions up to 6x6 meters in their dacha or in the courtyard of a private house. They require less material, and besides, they are often enough to satisfy household needs. But there are times when you have to build large sheds. This is where you have to rack your brains to figure out the drawing, the materials, and the construction features. We will try to address a number of potential issues related to such construction within the framework of this publication.
Classification of lean-to sheds
Sheds are a fairly common type of building structure, which is found both in the private sector (residential buildings, garden plots, carports) and in urban and industrial infrastructure (canopies for buildings, covered areas, parking lots, bus stops, etc. ). There are a huge number of design options for lean-to canopies and are limited only by the customer’s imagination.
However, to make this type of construction easier to understand, lean-to sheds can be divided into several main categories.
By type of material used:
- Wooden
- Metal
- Combined
By type of installation of the main structure:
- Freestanding
- Wall mounted
By type of fastening of structural elements:
- Welded
- On bolted connections
By type of fastening of vertical posts:
- Classic awnings
- Cantilever awnings
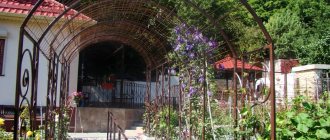
You should also divide the canopies according to their functional purpose:
- Decorative
- Protective
And also by the type of roofing material used:
- Polycarbonate canopies
- Canopies made of metal tiles
- Canopies made of corrugated sheets
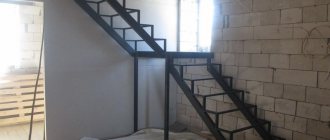
Stage V. Lathing
You cannot assemble wooden roof trusses using nails, modern metal fastening plates, or angles. We advise you to use plates, which perfectly hold the fastened elements and the gable roof turns out to be very durable. Moreover, they are easy to use.
You just need a good press machine or a regular hammer, depending on which fastener you choose. In the ridge, all these construction firms will be connected by one beam, along which you will align the distance between the trusses so that it is the same.
Now we move on to installing the crossbars. The first way is to attach the support beam with self-tapping screws using fastening metal corners. It is important that there is a distance of 50 to 55 cm between the crossbars.
As for the sheathing and its density, this issue should be based on what roofing material you will use. For example, for something as heavy as shingles, you will need to make an almost continuous sheathing so that it can support the weight of the covering. Moreover, sometimes you have to use OSB boards. But for corrugated sheeting or seam roofing, lathing with a pitch of 60 cm is quite suitable. Continuous lathing should also be for a soft roof, like roofing felt or flexible tiles.
More details in the video:
Construction of a lean-to canopy
Next, we will consider the design of a classic metal canopy coated with cellular or monolithic polycarbonate, since this type of structure is the most common and frequently used type of lean-to canopy.
Construction of a lean-to canopy
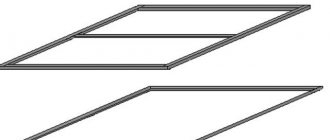
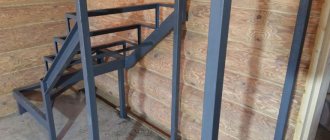
The design of a classic lean-to canopy is quite simple and consists of:
- metal trusses
- vertical racks
- horizontal posts holding trusses
- top sheathing in the form of longitudinal ties (lags)
- directly the roof material - polycarbonate, corrugated sheeting or metal tiles
The basis of this design is a metal frame. It holds the main loads in the form of the weight of the canopy itself, snow and wind loads.
Metal frame of a lean-to canopy
Metal frame design of a lean-to canopy
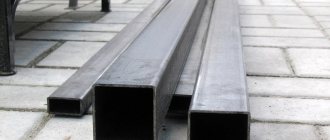
Materials used
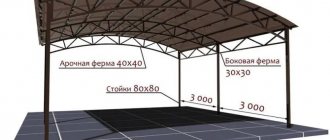
The metal frame of a lean-to canopy is usually assembled from a profile pipe of square and rectangular shape (in section). For vertical and horizontal racks, a pipe measuring at least 80 mm x 80 mm is used. To produce trusses, a pipe measuring at least 40mm x 20mm is used.
The use of a pipe profile in the production of a metal canopy frame is due to the technical characteristics of this material:
- the pipe profile can withstand significantly greater loads than, for example, a profile in the form of an angle
- the pipe profile is hollow inside and therefore the structure is lighter and less expensive
- the pipe profile in a vertical position significantly increases the stability of the entire structure
- installation of a pipe profile structure is much faster and easier
Depending on the type of steel used, it can be used
- Cink Steel
- ordinary steel
The operation of structures made of galvanized steel is more durable, however, galvanization can lead to a significant increase in the cost of the metal frame of the canopy by 2 or more times. Therefore, to reduce the cost of construction, they usually use ordinary rolled steel and treat the steel with a coating with anti-corrosion properties before installation.
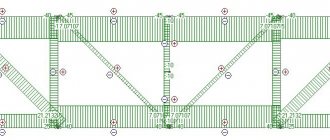
Strengthening the structure of metal trusses
Reinforcement of the metal truss structure is a lattice structure of regular geometric shape, welded inside the main frame of the truss.
The following types of truss grids are distinguished:
- Simple vertical
- Triangular
- Triangular with vertical reinforcement
- Cross
- Diagonal
- Rhombic
- Semi-diagonal
- Cross
- Shprengelnaya
In the practice of producing metal canopies, as a rule, the first three types of gratings are used: simple vertical, triangular and triangular with vertical reinforcement.
First of all, you need to figure out why you need reinforcement and, based on this, then decide on the required type of truss lattice. As we said earlier, canopies perform two main functions - protective and decorative. As a rule, customers always try to find a balance between reliability and aesthetic appearance. An overloaded grille looks unaesthetic and visually turns a private house into an industrial facility. But on the other hand, our polycarbonate canopy must withstand basic loads - its own weight, snow and wind. You also need to take into account the fact that the more reinforcement elements a metal truss has, the more metal is consumed, and the more expensive the canopy frame becomes.
The simple vertical form of the grating is cheap to implement, since a significantly smaller amount of metal is consumed. However, it looks simple and gives the impression of a cheap product. The reliability of this design is also inferior to other forms of lattice for metal trusses.
The triangular lattice shape is the most common and optimal in terms of reliability. The metal consumption is higher than that of a simple vertical form, and with proper installation of longitudinal ties (joists) on the top of the triangle, this design provides reliable and stable support for all types of loads.
The triangular shape of the lattice with vertical reinforcement is the most reliable and durable of the three types listed above and is mainly used in structures with increased load requirements, however, it carries an element of “visual overload” and is inferior to the triangular shape from an aesthetic point of view.
All other forms of truss lattice are used mainly in industrial facilities, where the requirements for the aesthetics of the appearance of the structure are not critical.
Stage I. Design
A shed with a pitched roof is the simplest design that even a beginner can handle. Most often, sheds are installed on the north side of the house, which is usually not suitable for anything larger: it is useless to grow anything near it, and because of the falling shadow it will always be cool there.
So, place the corner points of the future canopy directly on the ground. For convenience, use two stakes that are connected to each other by a rail. In total you will need about 10 of these, and they will help you lay out the correct markings for the future canopy.
Now let's move on to choosing the roof slope. Let's clarify that any roof suffers most from these two factors: wind and load from precipitation, and the smaller the angle of inclination of a pitched roof, the less wind affects it, but the steeper the roof, the worse snow and water are retained on it.
In order for water to completely drain from the shed roof, the angle of inclination should be at least 15 degrees. And to do this, cut both edges of the boards at this angle. In general, select the angle of inclination of the shed roof in accordance with the conditions of your region. For such a building, a slope of 15-20 degrees is usually recommended.
Here, for example, is how to build the simplest shed with a pitched roof:
And the same standard roof with a standard slope for such a building.
Features of the production of lean-to canopies
When producing lean-to sheds, it is necessary to focus on the following building codes regulating the production of metal structures:
- SNiP P-23-81 – Steel structures
- SNiP 2.01.07-85 - Loads and impacts
- GOST 23118-99 — Steel structures
- GOST 27579-88 Steel rafter trusses made of bent-welded profiles of rectangular section. Specifications
- GOST 23119-78 Metal trusses with welding of profile pipes
Selecting a metal profile
The choice of metal canopy profile is a very important factor in the stability of the structure. The thicker the wall of the metal profile, the greater the load-bearing capacity of the metal frame of the canopy. It is also necessary to take into account the anti-corrosion properties of the material. A galvanized or stainless steel profile will be a more reliable and durable option, but it will lead to a significant increase in the cost of the canopy structure.
For ease of understanding, we offer the following classification of canopy frame reinforcement depending on the thickness of the metal profile:
Strengthening the canopy frame depending on the thickness of the metal profile
| Profile type | Profile used | Anti-corrosion | Load bearing capacity | Price |
| 1. Standard profiles | ||||
| 1.1. Lightweight | 80 x 80 x 2 mm, 40 x 20 x 1.5 mm | Average with proper surface treatment | Average | Average |
| 1.2. Reinforced | 100 x 100 x 3 mm, 40 x 20 x 2 mm | Above average with proper surface treatment | High | Above average |
| 2. Galvanized profiles | ||||
| 2.1. Galvanized lightweight | 80 x 80 x 2 mm, 40 x 20 x 1.5 mm | High | Average | High |
| 2.2. Galvanized reinforced | 100 x 100 x 3 mm, 40 x 20 x 2 mm | Very high | High | Very high |
Selecting the type of truss reinforcement
The next step in configuring a lean-to shed is choosing the lattice or type of truss reinforcement. As we said earlier, the best option is a triangular lattice. However, you can follow the path of simplification - choose a simple vertical reinforcement and the path of strengthening the truss structure - triangular with vertical reinforcement. The more complex the lattice pattern, the more expensive the design of the metal frame of the canopy.
Spacing of trusses and longitudinal ties (joists)
The main risk when using a polycarbonate canopy is the destruction of the roofing under the influence of external loads. Although polycarbonate is a fairly strong and flexible material, significant deflection loads can lead to its destruction or deformation. The longer the span between the metal supports on which the polycarbonate sheet is supported, the stronger the deflection loads both on the metal sheathing of the frame and on the polycarbonate itself.
The second significant limitation is the standard size of the supplied polycarbonate sheet - 12m x 2.1m and 6m x 2.1m. That is, the roofing sheet cannot be wider than 2.1 meters, which means the metal supports under it must also go in increments of no more than 2 ,1m. Taking into account the fact that a polymer spacer is used to join two sheets, which also takes up space, the optimal pitch for a metal base (i.e. our trusses) for a polycarbonate sheet is the range of 1.5 - 1.9 meters.
The same considerations apply to longitudinal ties. Considering that the profile pipe for longitudinal ties bends significantly more than the reinforced truss structure with lattice, since the trusses can withstand significantly greater loads, the pitch between the lags should vary in the range of 0.4-0.6 m and, as a rule, is synchronized with the truss lattice, for so that the logs fall into the most reinforced place of the truss - the top of the lattice triangle.
Choosing polycarbonate
The choice of polycarbonate is one of the key factors influencing both the service life of the canopy and its appearance. There are a huge variety of modifications of polycarbonate, varying in type, color, density, thickness, UV protection, etc.
Let's look at the main options:
By type of polycarbonate:
- Monolithic polycarbonate is a solid transparent plastic sheet without cells. It is durable and at the same time flexible material. Supplied in sheets of different thicknesses and colors. Significantly more expensive than cellular polycarbonate.
- Cellular polycarbonate is a transparent plastic sheet with cells (honeycombs). It is inferior in strength and flexibility to monolithic polycarbonate, but is much cheaper. The combination of the properties of this material, combined with the price, makes it the most common material for the production of canopies and canopies.
- Corrugated polycarbonate - or profiled monolithic polycarbonate, is a type of monolithic polycarbonate that has been given a profile shape - usually a trapezoid. It is used for roofing work and is a transparent plastic replacement for materials such as tiles and metal tiles. This material, like monolithic polycarbonate, is significantly more expensive than cellular polycarbonate.
By sheet thickness:
- Thin - sheets from 4mm to 6mm. This material is mainly used for the installation of advertising structures and is unsuitable as a roofing covering.
- Medium - sheets from 8mm to 10mm. The main working material used for the installation of greenhouses, greenhouses and canopies.
- Durable - sheets from 16mm to 25mm. Roofs of houses with transparent properties.
- Heavy-duty - sheets from 32 mm. Used as roofing with high load requirements.
By material density:
- standard - plastic density 1.0 kg/sq.m. for polycarbonate 10mm
- premium - plastic density 1.5 kg/sq.m. for polycarbonate 10mm
The final choice of material lies with the customer, however we do not recommend using polycarbonate thinner than 8mm with a low plastic density. The best option is a thickness of 10mm with a standard or premium density . The difference in price for such polycarbonate will be proportional to its density.
Painting a lean-to canopy
Painting a metal structure is one of the most important stages in the canopy production chain. This is primarily due to the peculiarities of operating the product in an aggressive environment: precipitation, temperature changes, ultraviolet radiation. In order for the canopy structure to serve for a long time, it is necessary, first of all, to protect it from corrosion.
Anti-corrosion treatment of a metal frame must necessarily include the following steps:
- pre-treatment of metal surfaces and welding seams. Cleaning the surface from unevenness, roughness, and pockets of rust
- surface treatment with anti-corrosion compound
- priming the metal surface before finishing painting
- final metal painting
The painting of the metal frame of a lean-to canopy may differ, depending on the chosen technology. Recently, the so-called three-in-one paints, which contain anti-corrosion material, a primer and a finishing paint. The use of such paints significantly reduces the time and labor costs when painting a canopy.
Before installing the canopy at the customer's place, the pre-prepared structural elements are carefully processed and painted with a finishing layer. Next, you need to wait at least a day for the paint to dry and acquire its final properties.
However, individual parts of the canopy are assembled together at the customer’s site, and therefore individual welding points are processed and finished painting on site.
Stage VI. Roofing pie device
What is insulation? First of all, it is a waterproofing film, which is located directly under the roofing. The main task is to prevent moisture from getting in after rain or from melted snow through problem areas in the roofing.
If this is planned, you will do everything in the following sequence:
- Step 1. Place a vapor barrier film on the finished canopy joists and nail it in place using nails or a construction stapler.
- Step 2. Place thermal insulation on the film.
- Step 3. Cover it all with another film - waterproofing. Also nail it to the joists.
- Step 4. Nail the batten and roofing on top.
Ventilation of such a roof is mandatory. Forced, if you install a special fan, or natural, if you position the dormer window correctly or leave a mandatory gap between the waterproofing film and the insulation so that the air takes moisture droplets from it.
Installation of a lean-to canopy
Installation of a lean-to canopy is carried out on a strip foundation, a prepared concrete surface, piles, or screw piles. The construction of a strip foundation for a canopy is not economically justified, therefore, as a rule, the last three options are used.
Installation on a strip foundation
A strip foundation is a closed contour of a concrete strip (grillage), supported by concrete piles installed along the contour of the grillage with a certain pitch. A strip foundation is considered a reliable structure that can withstand the loads of structures of several floors. For the purposes of canopy installation, a strip foundation is a reliable, but expensive and redundant form of support. We recommend using a strip foundation only when there are significant loads on the main structure of the canopy.
The organization of a strip foundation is carried out in several stages:
- Digging a trench for a grillage
- Drilling holes for bored piles
- Preparing a bed of sand and gravel for piles and grillage
- Organizing waterproofing if necessary
- Exposing a metal frame from reinforcement
- Pouring concrete
When organizing a strip foundation for a canopy, bored piles are placed in the places where the load-bearing vertical posts of the canopy are installed. Ideally, the vertical posts of the canopy are deepened 1-1.5 meters into the middle of the bored pile and filled with concrete. However, this installation option is not always convenient, and therefore they often make do with the installation of metal embedded parts - a metal profile is installed into a bored pile to a depth of 1-1.5 meters and filled with concrete. Next, when installing the canopy, the vertical posts are welded to the mortgages.
Installation on concrete surface
Mounting a canopy on a concrete surface is one of the most common options for installing a canopy. With this type of installation, it is assumed that the customer has poured a reinforced concrete slab over the entire site under which the canopy is being built. The thickness of the concrete should be at least 10-15 cm. When installing a canopy, metal plates and expansion anchors are used, which go deep into the concrete and are fixed on four sides of the plate. Next, the vertical post of the canopy is welded to the metal plate.
Installation on bored piles
The second most popular is installation using bored piles. This type of installation is very similar to installation on a strip foundation, except that there is no grillage. The reliability of such installation is lower than in a strip foundation, but is sufficient to support the canopy structure. This installation option is one of the most budget-friendly - there is no need to pour a full-fledged strip foundation, no need to pour an expensive concrete slab under the canopy.
Installation on screw piles
The third most popular option is to install the canopy structure on metal screw piles. A metal pile is a pipe with a narrowed cone-shaped tip and blades or threads welded to the pipe.
Using special equipment - a hydraulic pile driver, or manually, a special metal pile is screwed into the ground to a depth of 1 - 1.5 meters. Next, a vertical canopy post is welded to the top of the metal pile. To strengthen the structure, concrete is usually poured into the cavity of the pile pipe.
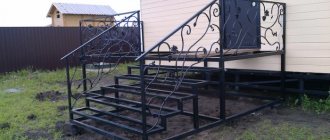
Stage III. Construction of the foundation
So, we’ve decided on the material – it’s time to start construction:
- Step 1. So, we dig cylindrical holes. Make the depth from 60 centimeters to 90. In total, for this option we will need 6 holes.
- Step 2. We prepare the concrete separately, for example, in an old bathtub, where it is easy to mix cement and sand with gravel. Take the proportions 1:3:5. Add water.
- Step 3. Mix well and pour a layer of concrete into the holes so that the thickness is 5 centimeters, and lower the pipes there. They will serve as formwork for the foundation.
- Step 4. Now we fix the pipes from the outside. Fill with concrete.
- Step 5. Level the pipes and make shelves for them from boards.
- Step 6. Now we wait three days for the mixture to harden. The easiest way to install wooden posts on such a foundation is with an anchor, which is installed on completely hardened concrete.
- Step 7. Now we connect the support beams to this pillar. We screw the boards with self-tapping screws so that they protrude about 3 centimeters beyond the edges of each post. And on the side these protrusions will be needed to fasten the crossbar of the sheathing.
- Step 8. To give the entire structure greater rigidity, especially if the anchors have come loose, use spacers. The spacers are cut at an angle of 45 degrees and screwed with self-tapping screws.
That's all! The hardest part is behind us.
Design parameters
To ensure the overall strength of the structure, the dimensions of the panels play an important role: thickness, length, width.
The dimensions of the polycarbonate sheet+ are directly responsible for the strength of the panel.
In order for a roof built from polycarbonate slabs to have the necessary strength, it is necessary, taking into account snow and wind loads, to select the optimal thickness of the panels.
Monolithic sheets are available in thicknesses of 2, 3, 4, 5, 6, 8, 10 and 12 mm.
Honeycomb sheets have the following thickness parameters:
- up to 32 mm - five-layer with inclined cell partitions, designated SX;
- 16–20 mm - five-layer, in which the cell is in the form of a rectangle, designated SW;
- up to 16 mm - three-layer, having a rectangular cell structure, as well as adjustable stiffeners - 3X;
- 6–10 mm – three-layer, the cell structure of which is rectangular – 3H;
- 4, 6, 6, 10 mm – with square cells – 2H.
There are different types of cellular polycarbonate.
Monolithic type polymer has parameters of 3050 × 2050 mm.
The retail chain recommends cellular polymer in two sizes: 2.1×6 m and 2.1×12 m.
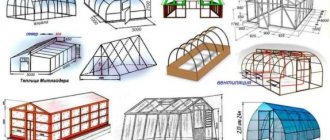
Types of trusses for different tasks
You will be surprised how many types of metal trusses there are:
Let's take a closer look at the most popular forms of metal trusses, which are most often produced in Russian factories:
- Parallel - the simplest and most economical, for the manufacture of which the same parts are used.
- Classic arched , in which the lower and upper chords look like an arc, and the belts are interconnected by stiffening ribs. Different types of such an arch differ in radius. And the radius itself is determined by such external limiters as the dimensions of the rafter system, your planned roof design and the complexity of its design.
- Triangular shed roofs, which are most often used for roofs with steep slopes.
- Triangular gables, more suitable for roofs with steep slopes, but leaving a considerable amount of waste after production.
- Polygonal , which are well suited for roofing made of heavy flooring, but are difficult to install.
- Trapezoidal , similar to polygonal, but with a more simplified design.
- Segmental , suitable for buildings with translucent roofing, but the most difficult to produce. To make them, arcuate elements are made with precise geometry, which allows the load to be evenly distributed.
Here are the popular and little-known types of metal canopy trusses:
What does the frame consist of?
Before you start calculating a canopy, you need to clearly understand what elements it consists of. And there are only a few of them.
The racks, as the name suggests, are the elements on which the entire canopy rests. As a rule, this is a profiled pipe 2.2-2.8 meters high. Its height depends on the method of fastening. If it is attached with anchors to a mortgage concreted in the ground, then its height is taken to be 2.2 meters. In cases where the stand is concreted or buried, the height is taken to be 2.8 meters.
Arches and trusses are used to strengthen the canopy. The latter are most often installed in two. But only a calculation of the canopy will tell you the exact number of arches. This value depends on the dimensions of the structure.
Truss is a structural element connecting support pillars and joists.
Polycarbonate sheets are attached to structural elements called guides. Thermal washers are used for this. Their location and step frequency depend on the distance between the supporting supports and the type of polycarbonate (its thickness).