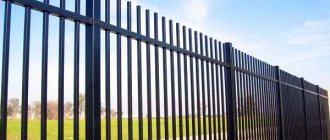
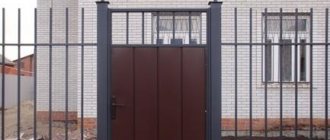
Hello again! We return to the fences. When the question arises about a simple and reliable design, a fence made of a profile pipe is the “golden mean” between practicality and aesthetics, durability and efficiency.
In the next article, we will again outline the features of choosing materials, break down the manufacturing technology and honestly tell you about all the advantages and disadvantages. Therefore, dear reader, even if you have basic skills in working with welding equipment, you can easily build a fence from a corrugated pipe with your own hands.
Why professional pipe? Advantages and disadvantages
The choice of this material was determined by its versatility and diversity. There are plenty to choose from, including square and rectangular ones with a wall thickness of 0.5 mm or more. Many cross-sectional sizes from 15*15 to 150*150.
You can choose for veins and pillars, for filling the frame. Such a pipe is easy to process, it is convenient to cut it with a grinder and weld it. And above all, the light weight allows you to perform work without assistants and mechanisms. In the process of work, this material will allow you to seriously save on trimmings and other waste. There are no serious disadvantages to professional pipes for the construction of fences.
Welded or sectional. Which method should I choose?
Before deciding which method of manufacturing a metal fence to choose, you need to make a project. You can choose ready-made drawings of fences, or you can create your own, unique design with various decorative elements. This is important for “face” barriers. If you decide to make a boundary fence with a neighbor, or a fence around outbuildings, then you can get by with a sketch.
Based on these sketches or drawings, tied to actual dimensions, it is necessary to calculate the required material.
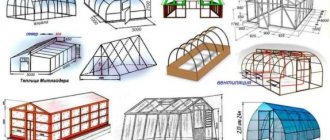
Based on the accepted design, the manufacturing technology is determined. There are only two options here. If you have chosen a fence made of corrugated pipe filled with decorative elements, then it is better to assemble it in sections, on a table and then install it. The second option is fully welded fences made of profile pipes, and it is suitable for constructing fences with a simple design in the form of a lattice or picket fence.
Which type is better
There are two main types: round, profile. Each type is good in its own way, but there are some differences:
- The cross-section of round supports is more durable with minimal material consumption. There are thinner ones, they can still withstand considerable loads, and can be easily screwed into soft soil with a collar.
- rectangular purlins to profile pipes. Due to the flat surface of the contact edges, welding takes place better, forming a more durable structure. They are easier to cut, which significantly reduces working hours.
Preparation
It is necessary to calculate the materials for the project. But without a site diagram or on-site measurements, it will not be possible to make a calculation. The most accurate markings can be made on site. After all, you need to mark where the gates and wicket will be. We do the marking as follows. On the front, “red” line, we hammer in two pegs. One is in the place of the left corner post, the second is on the right, also where the corner post will be.
We stretch the string between the pegs. Then, along the cord, we hammer in the pegs where the gate with the wicket will be. We mark the distance that remains from the corner peg to the gate under the pillars. You need to focus on a distance of 2.5 to 3 meters, between the supporting pillars. Most likely you will end up with one link smaller than the others. Let's leave it like that for now. Go to the side of the gate and measure the distance from the gate to the corner post.
Based on the measurements obtained, it will be clear how many pillars there will be in the span from the gate to the corner. It is advisable to adjust the distances between the posts to the same size on the side of the gate and the gate. Then you will get links of the same size. The number of pillars has been determined; it must be taken into account that the pillar goes deep into the ground, 1/3 of the length, i.e. if the height of the pillar is 180 cm, then it should be at least 60 cm into the ground, but more is possible. It will be better for the fence, but not for the budget. You buy material.
Features of using professional pipes on the fence
Today there are unspoken standards for the construction of fencing. If its height does not exceed two meters, it is necessary to install two transverse logs. If the height is more than two meters, three logs should be installed. It is these design features that guarantee the reliability of the entire structure and its resistance to various weather conditions, as well as mechanical stress.
When choosing iron profiled pipes for a fence frame, you need to take into account many factors. The first thing you need to start with is assessing the wind load. Profiled sheet material has a high windage rate. If you save money by purchasing thin, small-sized material for the frame, then in a strong wind there is a possibility that the supporting elements will become deformed, repair work will be required, and if the damage is more significant, individual sections may even need to be replaced.
In areas where there are very strong winds or where there is no dense building as such, a profile must be chosen with a thickness two or one and a half times greater than when used in normal cases. It is important to always deepen 1/3 of the length of the pillars. For example, if you want to make a fence 2 or 2.3 meters high, you need to prepare support pillars with a total length (ground - underground part) of three meters. Thus, purchasing products six meters long is the most justified.
The span between the supporting elements should not exceed three meters, most often it is 2-2.5 meters. If the span is two meters, then the flow rate during the formation of transverse joists is waste-free. If there is a need to save on supports, then the span can be 3 meters. For transverse joists, you need to use a profile with a slightly larger cross-section. This is necessary to prevent the sagging effect; the structure will be more reliable, durable, and durable.
To ensure that the supporting elements always remain vertically positioned, it is necessary to carry out the installation work correctly. It is possible to prevent their deformation from seasonal ground movement only if they are concreted, and it is important that they go deep below the freezing level of the soil. During each stage, using a building level, you need to control the vertical and horizontal planes. The final result directly depends on this.
Tools and equipment
When building metal fences, you will need the following tools:
- 3 meter tape measure, with magnet;
- Measuring tape (fabric or metal tape measure) 30 - 50 meters;
- Square
- Construction lace (rope);
- Sledgehammer 3-5 kg.
- Hammer.
- Welding machine, gaiter mask, 3 mm electrodes;
- Pendulum cutting machine or miter saw, or angle grinder (grinder), cutting and cleaning discs;
- A device, like a miter box, for cutting pipes at an angle if you plan to work with a grinder
- Building level. Preferably for metal work, with a magnet on the sole; if possible, level 2 is better.
- A hand drill with an auger with a diameter twice as large as the cross-sectional size of the post.
- For marking, chalk or marker.
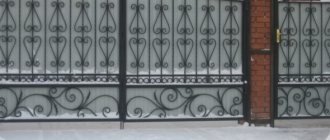
Advantages of barriers made of professional pipes
These types of iron fencing are among the most popular. The popularity is explained not only by low prices, but also by a number of the following advantages:\
- good strength indicators;
- long service life;
- light weight, which makes installation easier;
- resistance to external factors (atmospheric or mechanical influences);
- easy adjustment to specified dimensions (can have almost any dimensions);
- versatility and the ability to combine professional pipe with other materials - corrugated sheets, stone, brick, etc.;
- aesthetics of the design and its practicality.
Metal panels are used to assemble profile fences. They can be of a frame type (metal angles are additionally used during installation) or have a free structure (metal modules are supported by transverse reinforcing parts).
In the manufacture of barriers, we use especially strong high-quality steel with the addition of alloying additives. We provide services in Moscow and the region, and provide a guarantee for our work. To place an order, contact us by phone. The company's managers will advise on all issues, explain how much 1 meter costs and arrange for a surveyor to come out.
Drawings, dimensions and selection of section
For the front fence, purchase pipes of the following sizes:
- For load-bearing columns of spans 80*80, the wall is 2 mm;
- For gate posts - 100*100 wall 3 mm;
- Horizontal veins - upper and lower 60*40, wall 2 mm;
- The veins inside the frame are 40*20, the wall is 1.5 mm;
- Vertical grid 20*20, wall 1.5 mm.
The above pipe sizes are recommendations. You can change them at your discretion, but you must take into account that the larger the cross-section and thickness of the wall, the greater the weight and cost.
Beginning of work. Manufacturing and installation
Pillars and foundation
First make fence posts. Mark the pipe 80*80 and 100*100 using a tape measure and a square in accordance with the project. Cutting to size using a grinder must be done very carefully, without trying to cut immediately to the entire height of the cutting disc. Cut in a circle, being careful not to drive the disc too deep. The slightest misalignment will cause the disc to rupture. Serious injury may result. Weld the upper end of the workpiece with a plug and paint it with a primer for metal.
Take a drill and drill holes for installation with a diameter twice the size of the pipe, strictly according to the markings made earlier for the pillars. Make the depth 10-20 cm more than you plan to bury the pillars. Cover the resulting “extra” 20 cm with sand or crushed stone. You need to install the corner ones first. The pillars must stand strictly vertically along the front and boundary lines. This is where two magnetic levels come in handy. You can fix the vertical position using stretch marks. Then you can fill it with concrete.
Tip: before pouring concrete, place roofing felt in the drilled hole around the entire circumference. You will get a sleeve like this. This will preserve the cement laitance and increase the strength of the concrete. Particularly important for areas with high groundwater levels.
When the concrete at the base of the pillars “sets”, pull the string from corner to corner. Install the remaining supports along the cord.
Advice: it is better to connect the supports on which the gates will be hung together with a foundation with a three-dimensional reinforcement frame. This will prevent the pillars from moving when the ground freezes deeply and the gate will always close freely. The size of the concrete foundation must be at least 200 mm wide, 400 mm deep. Reinforcement frame 150*350.
Frame welding
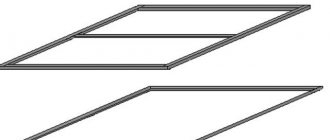
While the concrete gains strength and dries, we make a table for work. Its size should be equal to the size of the links and gate leaves. It should be positioned so that you can walk around the table.
On the table you mark and cut the pipe. Lay out the resulting blanks by size near the table. We place all the necessary equipment, tools, and a welding machine at the table so as not to waste time looking for something necessary. Start making the frame. Lay the logs on the table so that the horizontal width is greater than the height. If the log is 60*40, then the height is 40 mm.
Then you align the outermost vertical elements using a square and weld them to the joists. Then you begin to fill out the resulting frame, as it is drawn in the project. Secure all elements with tacks for now. When you finish the preliminary assembly and you like the result, boil all the potholders. Clean all welds. Make each link according to the dimensions of the installation site. Because the distance between the pillars cannot be adjusted with great accuracy.
Make the gate and wicket in the same way. The installation of wicket and gate locks and welding of hinges will have to be done not on the table, but in place.
It will not be easy to install fence links and gates with a wicket alone. We need one more person's help.
After installing the fence, it needs to be primed and painted. There are a lot of options for this, and you probably included one in the project.
Installation of decorative grilles on brick pillars
The same links can be mounted in a fence combined from brick and metal. The posts of such fences are made of brick, and if during construction no embedded elements for welding were provided, decorative grilles can be installed in the following way. Using a hammer drill, holes are made in the pillars at the installation sites. An anchor made of reinforcement is hammered into them and a decorative lattice is welded to this anchor.
What is a profile pipe and why is it better than a round one?
A profile pipe is one of the types of rolled metal that can be purchased at any metal depot or on the construction market . It comes in two types square - used for the manufacture of various supports or racks, and rectangular - used as a connecting element for these racks.
When constructing a frame for a fence, a profile pipe has a number of advantages over a round pipe
Let's consider the advantages of a profile pipe compared to a round one.
The advantages of a professional pipe include:
- ease of installation;
- large selection of section sizes and thicknesses;
- regulated length (6 and 12 meters);
- ease of maintenance;
- the cost is lower;
- Possibility of use without preliminary preparation (welding on additional fasteners).
What is required to build a fence?
First of all, you need to decide what kind of base your fence will have . It can be either with or without . The foundation will increase the service life of your structure and give it an aesthetic appearance. You can use a strip foundation , and subsequently use decorative brick or natural stone. This will of course increase the cost of your fence, but will also give it an element of completeness.
If you want to save money, you can simply concrete each pillar in the ground. This method is also suitable for constructing a frame.
After you have decided which foundation option you will have, you need to decide on the remaining materials . You need to decide which profile pipes to use for the racks and cross members.
The choice of sizes depends on your requirements for the height of the fence, territorial weather conditions (wind intensity and strength in your region) and the material you will use to close the openings (corrugated sheeting, polymer material, mesh or profile pipe).
General practice shows that profile pipes with a cross-section from 50x50 to 100x100 can be used for racks. In this case, their thickness must be at least 3 mm. You also need to take into account that when using a larger section, its strength characteristics increase.
For gates, you need to use stronger profile pipes, since the design of the gate involves a significantly greater load on the pillars . It is better to use gate posts with a cross-section of 80x80 or more.
For binders, you can use rectangular pipes with dimensions 30x20, 40x20, 40x25, 50x25. Their thickness can be from 1.5 to 3.0 mm. The choice of thickness is determined by the installation method . If the frame will be mounted using electric arc welding, then it is better to use a thickness of 2.0 mm or more. This will minimize the risk of burning through the metal by welding.
It must be remembered that any material has its own weight and when choosing the lining of openings you need to take this into account.
After you have decided on the dimensions of the profile pipe you need, count the number of pillars and crossbars . To minimize costs, it is best to calculate the length of the openings in such a way that they are no more than 3 meters, since pipes with a cross-section up to 80x80 are produced in lengths of 6 meters , and corrugated pipes 80x80 and longer are produced in lengths of 12 meters . But you need to understand that the shorter the span, the more stable and durable the entire structure .
When calculating the length of the pillars, do not forget that you will need to concrete part of this pillar in the ground, usually 1-2 meters or 1/2 of the height of the fence above the ground.
After calculation, adding about 10% the results obtained for possible waste during installation.
You will also need:
- To fill the pillars - sand, cement, crushed stone or broken brick;
- Gate hinges;
- Electrodes;
- Metal wheels and grinder for grinders;
- Metal screws (if corrugated sheeting will be used);
- Bulgarian;
- Shovel and drill;
- Electric drill;
- Construction level and plumb line;
- Square for determining right angles;
- Welding machine;
- Scrap;
- Primer;
- Pipe plugs;
- Dye.
Preparatory work
We prepare a profile pipe , cut it into the required lengths. the profile pipes intended for the posts with primer or paint, but not completely, and cover the part that will sink into the ground and let it dry. There is no point in painting the remaining profile pipes at this stage , since after using welding they will have to be additionally coated with paint.
While the pillars are drying, you can mark them . After marking, we recommend stretching the twine along the entire length of the future fence; this will allow you to install the fence evenly. After this, excavation work can begin. It is advisable to remove all vegetation along the entire perimeter of the future fence. If you install a fence on a strip foundation, you will need to go 30-40 cm deep into the ground. Next, use a drill and make holes for all future posts. Wells 20-30 cm deep are filled with sand and crushed stone to create drainage.
Fence installation
After this, you can begin installing the pillars . The column is installed in the well and checked with a level for perpendicularity . Next, it is strengthened on the sides with crushed stone or broken bricks and filled with concrete. We recommend checking the perpendicularity of the pole after each operation; during installation it may skew. We also recommend that after installing each pillar, measure the distance between the already installed one and the future one , so that there are no displacements.
To fill the foundation after installing the pillars, install formwork around the entire perimeter of the fence and make reinforcement . To create foundation reinforcement for a fence, you can use corrugated reinforcement A500C with a diameter of 6 mm.
The foundation must be poured along the entire perimeter of the future fence while the concrete is liquid, this creates a uniform structure and avoids cracking at the joints.
After pouring, the foundation will need to harden and settle , preferably 4-7 days.
Next, you can begin the installation of the crossbars ; they are attached to the vertical posts using electric arc welding . To fix them on the pole before welding, you can use a drill and a small pin. After completing the installation of the frame, it needs to be coated with a primer and painted. And after drying, you can install sheets of corrugated sheets on it and fix them with self-tapping screws.
If you want to use lattice fence sections made from corrugated pipe , they must be assembled separately. Therefore, after the foundation has hardened, special loops must be welded for further fixation of the spans.
Assembling spans from professional pipes
We mark the binders in such a way that the vertical profile pipes are equidistant from each other and perpendicular to the binders. It is important to remember that the vertical pipes must all be at the same level.
After marking, use a drill to drill holes and secure the outer pipes. This way you will get a rectangle, after which you can fix the remaining perpendicular pipes and weld them to the jumpers. Be sure before welding . After finishing, you can mount the finished section on poles and paint it.
The gates are made using the same technology, with the only difference being that they will be mounted on more massive pillars and movable hinges, and a lock will need to be installed at the point where the doors touch.
After completing the installation work, it is necessary to coat the structure with a primer, let it dry and paint it. This will allow you to get a beautiful element of your site, as well as protect the metal parts of the fence from corrosion .
When choosing a paint , please note that it must be for exterior use and intended for painting metal.
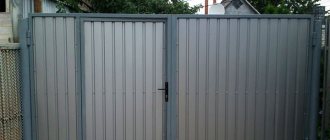
If you need a “solid” and light fence
Such a fence is usually built if the site is located at the edge of the block. The front fence is on one street, and the side fence is on the other. It can be done using a profiled sheet. Order corrugated sheets in the required size and color. Profile pipes for a fence made of corrugated sheets are welded from the outside to the supporting posts. Then the outer surface will have no breaks on the pillars.
Depending on the height of the fence, two or three logs are installed. After about 60-70 cm. If you make the distance large, then perhaps the profiled sheet will make noise. It also depends on the height of the wave. The sheets are attached to the joists using roofing screws. The technology for installing and manufacturing pillars is the same as described in the first case.
https://www.youtube.com/watch?v=hZ2FCG6dro8
Let's finish here. Good luck to everyone and good ideas in arrangement. Subscribe to our articles and ideas will definitely come. Share on social networks with your friends and acquaintances everything useful that you have learned from us, and they will be grateful to you for your attention and care.