Any territory has its own relief; flat and simple ones are rare. Arrangement of the entrance to the site, which is allocated for the construction of a house, is the first thing that needs to be done.
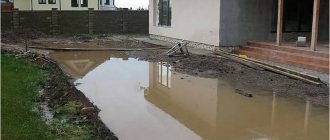
Entrance to the site through a ditch
The complexity of the task often lies in the location along the perimeter of the drainage necessary to drain sedimentary, ground and flood waters: trenches, ditches, etc. You cannot simply fill them with shovels or a bulldozer, because this will disrupt the drainage system and threaten the basement of the house, cellar, etc. with flooding.
The entrance to the site can be constructed in different ways. The main thing is to make the check-in safe and reliable. The work can be done independently, taking into account general standards.
Regulatory Requirements
Arrival is organized taking into account building codes and regulations (SNiP), so as not to interfere with others and ensure safety.
Requirements for basic parameters:
- entrance width – 4-4.5 meters;
- adjoining the highway - 8-8.5 meters, because the turning radius should not be less than five meters;
- use of pipes in the ditch with a length of 4.5 m and a diameter of at least 0.3 m;
- ensuring equal levels of slope of the trench and drainage under the main road;
- leveling the entrance and road surface at the junction with the highway.
Entering the site should not interfere with the capacity of a public road; planning personal parking on it is not allowed.
Garden paths made of crushed stone in the country: technology and options
We have already arrived at the site, we have made a place for the car, it is time to improve the area near the house. For backfilling garden paths, natural granite or crushed gravel is often chosen due to the spectacular color and pattern of the stone. In addition, such crushed stone has high strength (M1200 and M1000) and frost resistance (F350 and F200), which guarantees the durability of the coating and reduces the risk of its deformation and frequent backfilling.
How to make paths from crushed stone with your own hands?
Step 1: Prepare the base. To do this, remove a layer of soil 10-15 cm thick and fill the space with sand. It is needed not only to seal the paths, but also to create a drainage effect.
Step 2. Lay geotextiles. As in the case of the road and parking lot, it will prevent weeds from sprouting and crushed stone from going deeper and causing holes to appear.
Step 3. Pour crushed stone 10-15 cm high on top. Take fraction 5-20 for this - it compacts well and is comfortable to walk on. The size of stones 5-20 is optimal: they do not spread around the area, do not cling to the sole of shoes, and do not cause discomfort. Level the crushed stone using a rake.
Step 4. If desired, make curbs to visually highlight and technically separate the paths from other areas. For the border, rubble stone, decorative brick, boards, tiles laid vertically, and any other option to your taste are suitable.
More information about all types of crushed stone for roads, paths, parking lots and other objects - here: eco-crushed stone.rf/shcheben
Still have questions? Call us, we are always happy to give advice!
Choice of coverage
When choosing a coating for the entrance device, you need to proceed from the fact that this area wears out more. You also need to take into account the types and number of expected vehicles that will enter the site, and the possibility of organizing parking.
Basic parameters for entrance covering materials:
- strength;
- durability;
- frost resistance;
- resistance to ultraviolet radiation and external influences.
There are two types of coatings: simple economical (soil compaction with a drainage layer of crushed stone, sand or gravel) and especially durable: concrete slabs or monolith, asphalt, paving slabs or paving stones, sleepers or wood flooring.
Wooden bridge
Some owners make bridges from sleepers or timber. The disadvantage of this material is its relative fragility.
To increase service life, it is necessary to impregnate lumber with antiseptics, or at least with waste oil.
Materials and equipment for arranging the arrival
To carry out entry work, you need to prepare everything that may be needed: pipes, screenings, cement, crushed stone, sand, etc.
To save money, in small farms a layer of sand is laid, but more often they are filled with concrete. To make the driveway more durable, you can order industrial concrete and ABS (concrete mixer truck) services.
If the driveway must support the increased weight of heavy construction equipment, then additional reinforced concrete and metal structures, wooden materials, steel channels and waterproofing may be required. Sleepers decommissioned from the railway or finished metal structures are also used.
To complete entry coverage you may need:
- Pouring concrete solution. Monolithic, high-strength, reliable coating (requires strict adherence to technology). Disadvantages include high prices and dust formation with frequent use.
- Concrete slabs. Over time, the coating may deteriorate at the joints, leading to the appearance of uneven surfaces on the road.
- Screenings or crushed stone. The easiest coating to install, however, it requires periodic leveling and replenishment of material.
- Asphalt. Unlike cement, it has a lower cost, but to obtain a high-quality coating, it requires the use of special equipment, in particular, a roller.
- Paving slabs, paving stones. The coating has high aesthetic characteristics, while being durable and strong. Disadvantages also include considerable cost and lengthy installation, which requires special skills and experience.
- Wood flooring. Cheap, accessible and fairly durable coating. However, its service life is limited, because wood is subject to rotting processes.
Landscaping of the area above the canal
This will require the construction of an embankment. This is not a very expensive method, but quite labor-intensive. It involves pumping out water, installing a partition, laying gravel, carefully compacting the layers, and placing a pipe.
The fittings are placed inside. Then the concrete is poured. After it hardens, a layer of gravel is again laid on top and compacted well.
Check-in without using a pipe
A pipe at the entrance to the site is not always necessary to drain water. Sometimes it is possible to arrange an entrance without installing it. To do this, the following conditions must be met:
- a ditch of small depth - no more than fifty centimeters;
- the site is located on a hill;
- The area is characterized by a dry climate with little precipitation.
When organizing a check-in, road reinforced concrete slabs, railway sleepers, as well as wooden or metal materials and structures are used.
Covering with reinforced concrete slab
The simplest solution is to cover the shallow ditch on top with a reinforced concrete slab. Of course, there will be expenses for its transportation, but the entrance will last a long time.
To increase service life, the edges of the ditch should be reinforced with stones, crushed stone and concrete.
Road slabs need to be strong enough so that the surface can easily withstand loads even from loaded dump trucks. Their dimensions depend on the width of the ditch. As a rule, 1P, 2P (3×1.75×0.17 m) or PDN slabs are selected - stressed road slabs (6×2×0.18 m), which are laid across the obstacle.
How to arrange a race from sleepers
When the ditch is wide enough, a deck can be constructed using discarded railroad sleepers. This option is simple and economical.
And although the sleepers are not strong enough to cope with the load of heavy freight transport, they will withstand a passenger car. In addition, during manufacturing they are impregnated with antiseptics, special compounds that prevent rotting, in order to increase moisture resistance.
Entry from sleepers
Among the features of this material, one can highlight a specific smell, which intensifies in the open sun. Therefore, it is better not to arrange recreation areas and playgrounds for children near such a structure.
It is quite possible to assemble an entrance to a site through a ditch from sleepers with your own hands. Here you need to take into account that in wet soil, for example, in the event of heavy rainfall, such a design will diverge. To avoid this, you need to securely fix the sleepers together.
Made of metal and wood
Entrance to the site through a ditch can also be arranged using wooden or metal materials.
Metal structures are a rather expensive and labor-intensive method. Firstly, it is not recommended to use used metal, and secondly, assembling such structures is not so easy. They are made using electric welding, which must be performed by a qualified craftsman with sufficient experience.
Construction of an entrance to a site made of iron structures
Grating for the entrance to the site
Lumber will be cheaper. A kind of bridge is built from them, which must withstand increased loads, in particular, a car. Supports are made from logs or beams of at least 25x25 cm in diameter. They need to be placed along the sides of the ditch, laid in increments of 1.5 meters. Those ends that rest on the ground must be wrapped in roofing felt and lubricated with bitumen mastic in two layers to ensure normal waterproofing. 5 cm thick boards are laid across the supports. In order for the structure to withstand heavy loads, the pitch of the supports must be reduced, bars or logs of smaller diameter should be placed on top of them, and only then boards.
Bridge made of reinforced concrete slabs
To create a crossing over a narrow ditch, many people do this simply:
- compact the soil in the areas where the slabs adjoin;
- purchase ready-made slabs and order crane services;
- Using a crane, the slabs are placed in their places.
The disadvantages of this method are also significant. These include:
- the possibility of gradual subsidence of the structure and the appearance of cracks between the slabs on soft soils;
- not aesthetically pleasing.
Device for entering a site using a pipe
The most common option is when the pipe is laid in a ditch at the entrance to the site. This method is cheaper and simpler. It is quite durable and is carried out depending on the depth and width of the ditch.
A pipe made of concrete, plastic, asbestos or metal is laid in a small ditch and filled with soil. A covering is arranged on top: reinforced concrete slabs, paving stones, concrete pouring, asphalt, etc.
Entering the site using a pipe
In the case of a wide and deep ditch, it is necessary to reinforce the edges using stone or concrete. Otherwise, they will collapse while the pipe is being filled, which will reduce the strength of the structure.
It is recommended to start your check-in with the following points:
- measurements of the main dimensions of the trench (depth, width);
- determining the type of pipe, its material and dimensions (width, length);
- preparing the necessary tools and materials;
- drawing up a work plan.
Which pipe to choose
First you need to choose the type of pipe. Since water will flow through any hole, the diameter does not really matter. The material for the pipe can also be selected in a variety of ways. Most often it is concrete, asbestos cement, metal or plastic.
Sometimes drainage structures are even mounted from wood. Thick wooden boards treated with an antiseptic compound are used. But such a ride is characterized by low durability and is rarely used.
Concrete and reinforced concrete products
Reinforced concrete and concrete structures are strong and can last a very long time, especially if they are covered with sufficient layers. The main disadvantage is that the concrete pipe is heavy.
To increase the strength of concrete, metal elements are added to it, which further increase its mass.
This option will require organizing loading, transportation, unloading and stowage, which will lead to additional costs.
Asbestos-cement
Such pipes are not subject to corrosion, are relatively light in weight and have affordable prices. They are quite easy to install yourself. Among the shortcomings, fragility is worth noting.
To increase resistance to wear and service life, a strong crushed stone-sand embankment is made around such a pipe.
Steel products
Metal pipes are relatively inexpensive and durable. However, they are highly susceptible to corrosion. During operation, such a pipe will collapse, making entry unreliable.
Plastic analogues
One of the most accessible ways. The material is light, but at the same time durable, withstanding sufficient loads. Plastic pipes are not subject to corrosion and are resistant to deformation.
Laying can be done with your own hands, without the involvement of workers or special equipment.
Sand and crushed stone are used to strengthen the structure.
Installation of pipes in a ditch with your own hands. Step-by-step work order
When installing a pipe yourself, as a rule, it is recommended to follow the following basic steps:
- excavation of a trench with a slope and walls about one meter deep;
- compacting the bottom;
- sand cushion device;
- filling the crushed stone layer on top;
- laying geotextiles;
- installation of formwork under a concrete frame;
- grouting;
- top covering flooring.
Laying pipe in a ditch at the entrance
Access to the site through the ditch is temporary
If time and budget are limited, you can arrange a temporary entry yourself. Here, in general, any available means will do: boardwalk, tires, used sheets of metal, logs, etc.
However, if you plan to enter the site with heavy vehicles, then such structures will not withstand such loads. The solution here will be a metal, plastic or asbestos-cement pipe laid at the bottom of the ditch and covered with a mixture of sand and crushed stone.
Temporary entry to the site
Permanent access to the site using pipes
Temporary entrances can be organized quickly and relatively inexpensively, but they are not designed for permanent use, and also, as a rule, do not look aesthetically pleasing.
To organize a permanent drive, the sides of the ditch must be protected from possible spreading, using capital supports and asphalt or reinforced screed.
In this case, pipes with a diameter of 30 cm or more made of concrete, metal or asbestos cement are used. The intermediate layers are carefully compacted.
At the last stage of work, the entrance can be decorated with natural stone, greenery, tiles or pebbles.
Mistakes when laying drainage pipes
Improper drainage can lead to poor drainage or even flooding of the area. Common mistakes when laying pipes include the following:
- Lack of design studies;
- Incorrect slope;
- Insufficient depth;
- Improper drainage filling;
- Connection of drainage and storm sewer;
- Shortcomings in the selection of materials;
- Errors in water drainage.
Concreting
Site preparation begins with leveling the soil. Then you need to dig a pit about 30 centimeters deep. The bottom of the pit must be compacted well and covered with a sand cushion approximately 25 centimeters thick.
On top of the pillow you need to lay a reinforcing mesh, with a rod of at least 8-10 millimeters in diameter and with a cell width of no more than 20-25 centimeters. Then you need to start concreting.
The grade of cement should not be lower than M-300. For one share of cement there should be three shares of sand and crushed stone. The thickness of the concrete mortar layer should be at least 12-15 centimeters.
To avoid the occurrence of places where moisture accumulates and the risk of concrete cracking, the surface is carefully leveled using a rule and checked with a level.
Entry structure through drainage with retaining walls
When it is necessary to strengthen the strength of the entrance through a drainage ditch, concrete walls are used.
To do this, after laying the pipe parallel to the ditch with a similar slope, formwork is installed on both sides, the height being equal to the ditch or slightly higher. Steel reinforcement about 14 mm in diameter is installed in it. Then the solution is poured, after which the formwork has hardened and the formwork is removed. From above, the pipe between the walls is covered with crushed stone-sand mixture.
Water should not seep through the embankment.
Entry device for slopes up or down from the road
Often the site has a lower or upper slope, which can cause the car to spontaneously roll away. Most often in these cases, an entrance ramp is made with a slope of no more than 23-24 degrees.
To do this you need:
- cut off the soil on the surface and form steps;
- limit entry from the sides with curbs (concrete walls);
- fill the resulting space with a layer of crushed stone about fifteen centimeters and create the necessary slope;
- fill with concrete 10 cm or a little more;
- lay a covering on top, such as paving slabs or paving stones.
Other solutions for safe passage on uneven terrain
In the case where the slope has a very large angle, to gradually reduce the height difference, an entrance along a curved path is arranged. If there is not enough space for this, then an extended driveway and a turning area in front of the gate are made parallel to the site.
For ditches that are too large, sometimes it is necessary to organize entry into the territory from behind, and in front - only a gate with a small bridge for pedestrians.
If there is no drainage ditch
If there is no drainage ditch in the area of the proposed entrance, then the builder’s task is greatly simplified, because there is no need to build a bridge. The most appropriate ways to create an entry in such a situation would be:
- paving;
- concreting;
- creating a driveway from paving slabs.
Each of them deserves a more detailed conversation.
Protection of the embankment from erosion
To protect the embankment from erosion, it should be reinforced with reinforced concrete slabs, white bricks or natural stone. The edge of the channel should protrude about 10 cm beyond the formwork. To close the pipe and level the surface, you can put a layer of ASG (sand and gravel mixture) on the bottom. Then arrange the sides, which should be 15-20 centimeters above the ditch. Cover the space inside with a layer of crushed stone and lay borders.
Entry reinforced at the edges
Monolith
It is quite possible to make a good race using monolithic technology. To do this you need:
- lay a layer of sand and crushed stone at the bottom of the drainage trench and install a drainage pipe;
- install formwork;
- pour the same sand and crushed stone inside the formwork;
- install fittings;
- Fill the future bridge with concrete.
The entrance can easily be arranged with your own hands. All you need is time and desire.
Which geotextile to choose
Geofabric (geotextile) is a material with high rigidity, porosity and elasticity. Its use in drainage systems is desirable because it protects the pipe from contamination and the embankment from spreading.
Geotextiles are resistant to aggressive environments with a long service life. Due to its elasticity, it does not tear on stones when laying.
Geotextile is produced in different densities: 100-600 g/sq.m. To organize the entrance to the site, a density of 300 g/sq.m is suitable.
This material is simply assembled, easily laid, cut and rolled.
Laying geofabric
Entrance made of paving slabs
The entrance to the dacha plot may well be made of tiles. This material must withstand the weight of not only cars, but also light trucks.
The owner only needs to level the area and lay the tiles in accordance with the technology.
Gabions as an alternative to concrete work
In landscape design, gabions (from the Italian “gabbione” - large cage) are often used - structures that have a metal cellular frame filled, for example, with large stones. They are also suitable for the drainage system, because... are less expensive compared to concrete walls, and allow you to give the structure not only strength, but also aesthetics.
Strengthening the entrance with gabions
The gabion structure has a long service life and can withstand loads of up to five tons per square meter.
Installation of such a structure is simple and does not require additional workers.
Functions
The main purpose is to provide a convenient access route for the cars of the owner of the house, his family members and guests from the street to the yard, so that they do not get stuck in bad weather.
An additional function can be identified as aesthetic. The pleasant impressions of guests will be enhanced if, for example, they drive across a mini-bridge decorated with wild stones.
↑ Presence of expansion joints
Expansion joints are a mandatory attribute not only of monolithic sites, but also of roads and paths. Naturally, a reinforced concrete slab does not have such seams, but during road construction they are obtained naturally. When constructing monolithic coverings, expansion joints are combined with technological joints. The gap between the slats is selected based on the amount of capture of one fill. When the formwork is installed, as well as the reinforcing frame, wooden slats are laid at the seams.
The slats are laid:
- Flush with the road surface, and also taking into account the angle of inclination of the surface to form water drainage. Reiki can also be used as beacons.
- The width of the slats is about 15-20 mm, and their height is at least 4 cm if the concrete thickness is 16 cm.
- The slats are located at a distance of 4 meters from each other. Typically this distance corresponds to 25 times the thickness of the concrete.
After 4 hours, the concrete is covered, otherwise it will lose some of the moisture.
The slab is opened after the expiration of the two-week period. The slats are removed from the concrete, and the resulting space is filled with bitumen mastic, with 20% filler in the form of sand and small gravel.
↑ Surface strengthening
If the surface of the concrete is not treated, it is not resistant to abrasion and the concrete will become dusty. As a rule, ironing is performed by simply rubbing cement into the surface of a reinforced concrete slab. Immediately after pouring, dry ironing begins, and wet ironing is completed two weeks later.
To obtain a reliable coating, you can use topping, when the surface of the slab is coated with a mixture of additives that resist the abrasion process.
They mainly use additives such as quartz, corundum and metallized. The most common and most affordable additive is quartz sand. The strength of quartz sand is such that the surface can withstand medium-sized loads, and the cost of raw materials is the cheapest.
The topping process (hardening) consists of several stages:
- The first portion of the topping mixture is poured when concrete milk appears on the surface of the concrete. The first portion is 2/3 of the total volume of the mixture.
- The mixture must be evenly distributed over the entire surface.
- The surface is smoothed as soon as the mixture absorbs all the moisture. If necessary, you can add some water from time to time.
- After the formation of a smooth, homogeneous surface, the rest (1/3) of the mixture is poured onto the surface.
After this, the final leveling of the concrete begins. After acquiring initial hardness, the surface is rubbed.