Communications in most houses on the secondary real estate market are worn out by more than half. The decision to replace pipes is made for different reasons, but the actions have to be taken in approximately the same way.
Replacing a sewer riser in an apartment raises a number of significant issues. The first thing you should find out is who should carry out the work and at whose expense. Secondly, what and how to do if you have to change the sewer riser yourself.
When is it time to change the sewer riser?
Partial replacement of the sewer riser, when changing a section of communications in a separate apartment, may be necessary in the following cases:
- the sewer pipe became unusable and leaked;
- the owner or tenant of the property decided not to wait for leaks, but to start with major repairs and replacement of pipes;
- The sewer riser is being replaced as planned.
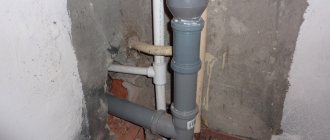
Sewage drains in multi-storey buildings were traditionally installed from cast iron pipes. The material is reliable, but in most homes it is already so old that it leaks and needs scheduled replacement or urgent repairs.
Note! There is a clearly defined procedure for replacing a sewer riser, which is defined in regulatory documents that spell out the responsibilities and rights of home owners or tenants.
Materials
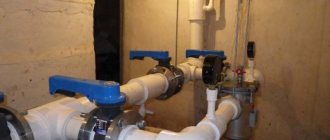
- What materials can be used to replace a section of the water supply system (riser or liner)?
For domestic hot water, the answer depends on the heating system in your home.
If it is open (that is, hot water flows to your faucet directly from the heating main), we strongly recommend choosing metal pipes:
| Image | Description |
Galvanized steel | According to GOST 3262-75, water and gas pipes (including those with zinc coating) undergo hydraulic tests with a pressure of 25 (for reinforced pipes - 32) kgf/cm2. Mounted on threaded or (less commonly) compression connections. In practice, they last at least 30-50 years. |
Copper | With a wall thickness of 0.8-1 mm, they have a tensile strength of up to 240 kgf/cm2. They are connected by socket soldering, as well as deformable crimp fittings and compression fittings. They have limited flexibility and unlimited service life. |
Stainless | A corrugated stainless steel pipe has a wall thickness of only 0.3 mm, but its tensile strength (up to 210 kgf/cm2) is not much inferior to copper. The bending radius of the pipe is equal to its diameter, which greatly simplifies installation and allows you to get by with a minimum number of fittings. Connections are compression, with silicone seal. The service life of the pipes themselves is not limited by the manufacturer, but after thirty years the owner will have to replace the silicone rings in all fittings. |
In cold water and hot water supply systems with water supplied from boilers, geysers, heat exchangers of a heating point, etc. You can use lightweight, durable and inexpensive polymer and metal-polymer pipes (PPR, PERT, PEX, PERT/AL/PERT, PEX/AL/PEX).
Preparation of hot water in a house with a closed heating system
Connections and risers made of PPR pipes
Why shouldn’t they be installed in a centralized hot water supply system with water supplied from the elevator unit?
There are actually only two reasons:
- The possibility of water hammer occurring in such a system;
- Non-zero probability of a significant (up to the maximum possible 150°C) excess of the standard water temperature.
In cold weather, the supply temperature of the heating main reaches +150 degrees
If metal pipes tolerate overheating and pressure surges well (of course, within reasonable limits), then for polymer pipes deviations from the operating conditions recommended by the manufacturer mean a significant reduction in service life or even instantaneous destruction.
The influence of operating conditions on the durability of polypropylene
Who is obliged to change the sewer riser?
The state regulates the rules for maintaining property in apartment buildings, including the replacement of the sewer riser, since the riser itself and the drain from it to the first joint are the common property of the house.
Regulations:
- Government Decree No. 491 of August 8, 2006 on the maintenance of common property.
- Manual on repair and maintenance of common property dated April 2, 2004.
- Resolution of the State Construction Committee No. 170 of September 27 on the standards of technical operation of the housing stock.
We recommend that you read: How to weld profile pipes efficiently and correctly - recommendations from experts
All maintenance, repair and replacement work is carried out by the management company. It is enough for the owner of the apartment (or the tenant) to write a corresponding statement justifying the reason for the need to carry out work to replace (or repair) the sewer riser.
Next, the work time is agreed upon. The owner of the apartment must provide free access at the agreed time.
Note! A request to pay for work or materials when repairing or replacing a sewer riser, citing its location inside the apartment, is illegal.
Personal or community property?
According to Article 36 of the Housing Code of the Russian Federation, risers and branches up to the connecting connection are part of the common property .
The owner of the common property is the local government , that is, to which the house is assigned.
Owners of housing in apartment buildings are responsible for the safety and proper operation of common property.
If malfunctions or needs to be replaced, residents are required to report the problems to the management company.
At whose expense
Since the sewer riser is common property, its repair or partial replacement is carried out at the expense of the apartment owners. If tenants live under a social tenancy agreement, then the owner of the property is the state. In this case, the costs are compensated by the municipal budget.
The planned replacement of a sewer riser in an apartment building can be financed from funds allocated by residents for major repairs of the house.
The owner of the apartment, as well as the tenant, independently pays for materials and work to replace part of the riser in his apartment if he decides to change working communications at his own request. Such a replacement can be made, for example, during a major renovation of an apartment or during redevelopment.
Note! Payment for the work and costs of materials is made by the owner of the property. However, in the case of common property, this occurs through monthly payments for housing maintenance.
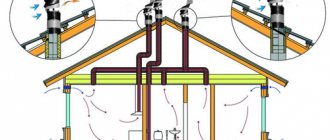
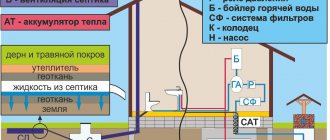
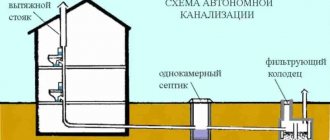
Turnkey sewerage in a private house
Communal amenities in a private house are just as necessary for life support as in a high-rise building, but the owner himself must ensure their availability. Creating an autonomous sewer system or making a connection to a municipal sewer requires a competent approach; before carrying out the work, you will need to create a project, select materials, and select implementation methods.
Involving specialists will reduce the time and cost of work, ensure ergonomics and convenience of pipe routing, a high level of reliability of connections, and durability of the system.
When can a tenant be denied pipe replacement?
There are several legal situations when a management company may refuse to replace a sewer riser in an apartment:
- If the applicant has debts on utility bills. Here, the management company has the right not to carry out work (except for the elimination of an emergency) until the debt is paid in full.
- If the owner of the apartment decides to independently replace the sewer riser in his apartment, outside the schedule of house maintenance work.
- If the homeowner previously changed his part of the sewer riser himself.
We recommend that you read: Installation of residential sewage systems - rules and possible errors
Note! Work to replace pipes in an apartment, carried out without the approval and control of the management organization, relieves it of responsibility for further maintenance of this area.
What documents are issued to the property owner?
Upon completion of the installation of the MKD water riser pipe, a “Certificate of Work Completed” must be drawn up, which will state the following:
- date of drawing up the contract;
- serial number of the agreement according to which the act is issued;
- the volume of work performed and all actions taken;
- cost of work;
- name of the person performing the repair work;
- signatures of the contractor and the customer.
This document is made in 2 copies, one of which is given to the contractor, and the second remains with the customer. The contractor is the organization that replaces the damaged element. The customer can be the management company (in which case one copy remains with them and is not given to the owner of the apartment) or directly the owner of the property.
Even if the agreement was drawn up by a representative of the management company and the repair company, the apartment owner should make himself a copy of this act.
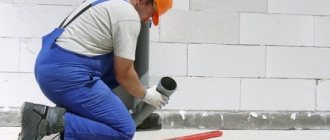
What you need for self-repair
When carrying out sewer repairs yourself, it is important to consider the following points:
- The management company should be notified of the work being carried out, even if the entire activity is carried out independently and at its own expense.
- Neighbors should be notified about the time of work. It's better to do it in person.
- During the work, you will need to turn off the water in the riser and ask your neighbors not to use the drain.
You should purchase all the necessary materials and tools in advance. To work you will need:
- grinder for cutting pipes;
- perforator for opening interfloor connections;
- hammer, chisel, hacksaw, sharp knife;
- crowbar, nail puller;
- mortar or sealant;
- clamps for attaching pipes to the wall;
- a piece of pipe with appropriate fittings.
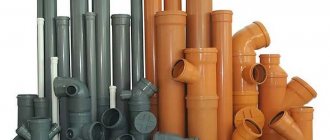
Note! For installation of a sewer riser, polypropylene pipes are the best choice.
Advantages of polypropylene pipes:
- mounted in a socket, equipped with a sealing rubber ring from the manufacturer;
- easy to assemble on your own;
- fit well (and are allowed to do so) with cast iron communications.
It is better to have a bucket or large basin on hand, which will be needed in case of an unexpected amount of drainage during dismantling.
Regime for different periods of incubation
The development and hatching of chickens in the incubator lasts 20-22 days (the average is 21 days) and takes place in 4 stages. There is a calendar and table for the development of domestic chicken embryos:
- The first period is from the beginning of warming up to the 6th day. At this time, the embryo begins to form; stable conditions and frequent turns are important for it, which prevent the chick from sticking to the shell and dying in the first days.
- The second is days 7-11. The skeleton begins to form, the allantois closes in the acute part (embryonic respiratory organ). At this time, it is recommended to cool the chamber by a few tenths of a degree and reduce the humidity.
- Third – 12-18 days. Breathing increases and the incubator is ventilated to improve gas exchange. The chicken begins to pull its head towards the air chamber.
- From the 19th day until the end of biting. The last period is the completion of hatching chickens in a home incubator.
The incubation modes for chicken eggs at each stage have their own characteristics. The main parameters that need to be regulated are temperature and humidity.
Incubation table for chicken eggs and features of modes in different periods:
| Temperature with a regular thermometer | Humidity | Number of revolutions | Ventilation | |
| 0-6 days | 37.8-38 °C | 60-70% (55% on day 5) | Every 1-2 hours with a short break at night | – |
| 7-11 days | 37.5-37.7 °C | 35-46% | Every 4-6 hours | 2 times a day for 15-20 minutes |
| 12-17 days | 37.3-37.5 °C | 70-80% | 4-9 times a day | – |
| 19-21 days | 37.2 °C | 70% | – | – |
The incubation regime for chicken eggs at home is changed gradually. To raise the humidity, place a rag in a tray with water. Reduce humidity levels by covering the surface with a piece of foam. In the initial period, a gradual decrease in humidity indicators is carried out from the 4th day. Already from 10 days they begin to raise it.
When ventilating the chamber during incubation, monitor the air temperature. It should not drop too much to prevent the material from cooling. It is recommended to preheat the room in which the chicks are “hatched”.
It is good if the farmer turns the material every hour in the first week. This schedule is optimal because the hen does just that in her nest. Not everyone manages to adhere to this rule, so it is better to purchase an automatic device. Then it is easy to reduce the time spent turning eggs and increase the hatchability rate of chicks.
How to properly dismantle the riser?
Before installing a new section of sewer pipe, you need to dismantle the old one.
There are two options:
- the work does not affect floor slabs;
- replacement is carried out with the capture of the area between the floors.
The procedure for dismantling the pipe itself is no different in both cases. The difference lies in the need to open the interfloor ceiling before dismantling the pipe in the second case.
Algorithm for dismantling the sewer riser:
- At a height of 1 m at least from the adjustable fittings, an incision is made on the cast iron pipe with a grinder and the section is removed from the lower socket.
- If the pipe cannot be loosened using a nail puller or chisel, you can try heating it to soften the old sealant.
- The riser is analyzed from top to bottom, from connection to connection.
We recommend that you read: How to make a proper brick chimney with your own hands?
The opening of floor slabs between floors will need to be agreed upon with the neighbors. Dismantling of ceilings is carried out either with a hammer drill or using a crowbar, chisel and hammer.
Note! Work should be carried out without strong impacts, using rocking, heating, and gentle tapping. Excessive physical impact on a cast iron riser can split it.
Using an ovoscope
One of the most reliable ways to identify defects in eggs is to check them using an ovoscope. It allows you to notice the thinnest notches on the surface of the egg, which are difficult to notice with the naked eye. Usually such eggs are immediately discarded, since the young cannot be hatched from them due to the rapid evaporation of moisture through the crack.
If the egg is of great value to the breeder, then a small notch or crack can be smeared with glue prepared with starch.
Sometimes, when checking eggs with an ovoscope, the breeder may notice some marbling of the shell. It is characterized by small dark and light spots on the eggshell. This phenomenon was studied in detail by L.V. Kulikov, who claims that such eggs rarely hatch into viable chickens.
They exhibit slow development of the embryo, so in 21 days it does not have time to fully form into a chick. This defect can be neglected if the poultry farmer breeds rare breeds of chickens with low egg production.
Also, when examining eggs using an ovoscope, the presence of an air chamber is carefully checked. It is she who is responsible for the freshness of the egg. The camera is located in the area of the blunt end and is visible on the ovoscope as a dark spot. If the air chamber has too large a height and diameter, then such an egg will be stored for a long time, but a chicken will not hatch from it.
In addition to the air chamber, the condition of the yolk is examined using an ovoscope. If it moves easily inside the egg, it may mean that one or two of the egg's hailstones are torn. Under no circumstances should such an egg be sent for incubation.
Step-by-step instructions for changing
Replacement of the riser is carried out in the following order:
- Open and do not close any water tap to drain. Make sure the riser is turned off and there is no water in it.
- Disassemble the cold water supply unit into the apartment from the tap to the coarse filter following it, if possible without removing the meter. Secure the disconnected water supply so as not to damage its elements.
- Cut out the old riser inside your apartment, leaving 15-20 cm of pipe at the top and bottom to knock the pipe out of the ceiling.
- Cut out 15 cm of old pipe from the neighbors below near the ceiling, and from the neighbors above near the floor, so that you can remove the rest of the pipe from the ceiling.
- In your apartment, use a sledgehammer to knock out an old pipe from the ceiling. If it is not possible to knock it out, then use a hammer drill to hollow out the concrete around the pipe until it becomes mobile, and then knock it out again. There should be a second partner below who controls the exit of the pipe so that if it falls, it does not cause damage to the property of neighbors.
- Install fasteners for new plastic pipes in increments of no more than 40-50 cm, otherwise the pipes may bend and a leak will appear at the soldering site. This is typical for hot water, but it is also possible with cold water.
- Solder a tap into the tee to connect the apartment. You will need a piece of pipe for the transition of a smaller diameter. A tap with a tee is connected to the apartment water supply. This will allow you to accurately determine the location of the tee.
- Cut threads on the remaining old steel pipes using grapple. If this is not possible, move on to the second option, with GEBO fittings.
- Assemble the unit: screw the drive with a steel coupling and locknut into a plastic coupling with an internal metal thread. Attach the squeegee to the old riser with a cut thread and connect them with a coupling. This is necessary to accurately measure the length of the plastic pipe and determine where to cut it.
- Insert new pipes into the holes in the ceiling and solder them into the tee. Fasten to the wall with clamps.
- Cut plastic pipes at the top and bottom at the level of the edge of the plastic coupling, taking into account the length of the inserted end of the pipe into the coupling when soldering.
- Remove the squeegee and the plastic coupling from the squeegee and solder the coupling to the plastic pipe. Then screw the squeegee into the plastic coupling. Screw a locknut and a steel coupling onto the drive. All threaded connections are sealed using sealant or fum tape.
- Attach the squeegee to the old threaded riser and connect them with a steel coupling. Lock the coupling with a locknut or install GEBO fittings. These operations are performed for both connections.
- Connect the internal water supply to the tap soldered into the tee. To eliminate the gap, you can use steel inserts from a bend or double-sided thread.
- Invite management company employees to accept work and supply water to the riser.
- Turn on the riser to pressurize the mounted section of the riser with operating pressure. Why does one person open the tap at the bottom of the riser, and the second must monitor the presence of leaks. If a leak appears, give a signal to close the riser, then repack the current connections.
Attention! If there are no leaks, the work is considered completed