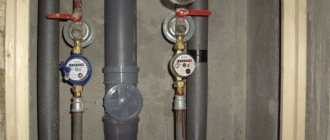
Is it necessary to replace the cast iron riser with a plastic one, let's decide. Cast iron sewerage was installed everywhere in the last century, and it had many advantages. The sewer riser minimized noise during operation of the sewer system, and its service life was tens of years. These risers are found in many apartments to this day.
Indeed, if a cast iron pipe is not destroyed by corrosion and passes wastewater well, then there is no point in replacing it. But if the service life of such a riser has already been completely exhausted, as evidenced by its leaks and the appearance of unpleasant odors in the bathroom, then replacing the cast iron riser with a plastic one would be a good solution.
It is worth noting that now when installing sewerage systems, preference is given to plastic. This material is lightweight and sufficiently durable, but its most important advantage is its anti-corrosion. The plastic sewer riser does not become overgrown with deposits from the inside and does not rust over time. The only drawback is its weak soundproofing properties, that is, the use of sewerage is accompanied by noise.
Installing plastic sewer pipes or replacing a cast iron riser with a plastic one is not particularly difficult, and no special equipment is required. The light weight of the pipes and fittings and their simple joining make all the work quick, which is why residents increasingly prefer to carry out such work themselves.
Rules for replacement
Maintenance of sewerage systems made of cast iron is fundamentally different from maintenance of utilities made of polypropylene. Therefore, if we are talking about an apartment building, repairs are preceded by submitting an application to the management company.
All work is carried out only after obtaining permission for individual actions on a separate site.
In the event of unauthorized insertion of PVC pipes into a cast-iron communal riser, the house management legally declines responsibility for emergency situations.
When do you need to change a sewer riser?
There are several situations in which carrying out work is advisable. Sometimes replacement is carried out as part of the plan, but there are times when repairs need to be done urgently due to an emergency or structural damage. The main options are:
- Carrying out work as part of a major overhaul of a multi-storey building. In this case, the riser is changed from top to bottom, which is much simpler and more convenient. Most often, the work is planned in advance and the apartment owners are informed when it will be carried out.
- A decision was made to replace the cast iron element with a plastic one as part of the renovation of the apartment. In this case, you need to coordinate the work with the service organization. Most often, they send workers who carry out replacements at the appointed time.
- Blockages periodically form in the riser, which requires calling plumbers. Over time, the diameter of the internal part can decrease significantly, which causes constant problems.
- Damage or leakage of connections, causing the riser to constantly leak. The extent of the leak can vary from minor to quite severe.
Important!
If the leak is significant, the problem must be fixed immediately by the emergency services.
Dismantling
Replacing a cast iron riser with a plastic one requires knowledge and experience. If you are not sure of the presence of both, you should invite a plumber.
Before replacing a cast iron drain with a plastic one, you should make sure you have the following tools:
- perforator;
- Bulgarian;
- grinding discs;
- adjustable wrench;
- chisels;
- screwdrivers.
Stage 1. The junction of the cast iron elements is identified.
Stage 2. The connection method is determined. Combining the tee with the cross and the pipe can be done using:
- sulfur filling;
- mixtures of cement and polymer;
- caulking with mortar.
Stage 3.
The cast iron structure is dismantled. Using a pipe cutter or grinder, a pipe standing vertically is cut into 15-centimeter pieces. The cut should be made at an angle of 15-20 degrees, two-thirds of the perimeter.
The cut sections are dismantled using a chisel. In this case, care must be taken to ensure that residues do not get into the sewer.
The top edge is cut at a pre-measured height. The height parameters must correspond to the shaped product. The cut is made in accordance with the horizontal line. The location of the upcoming cut is marked with masking tape.
Stage 4. The lower part of the riser consists of several parts. Each part is cleaned in turn at the connecting seams and broken out from the overall structure. The connecting seams in the nodes are removed using a hammer drill. The remaining solution is removed with a chisel.
Dismantling cast iron sewer risers is often difficult due to the lack of a seam or strong gluing of parts together. To expand the joint, a metal blade is used. Otherwise, the pipe is cut 3–5 cm above the joint.
The riser pipes, sealed with sulfur, are preheated with a blowtorch at the junction. To replace a cast iron sewer tee, carefully rock the heated pipe until the elements separate. Sulfur has a strong unpleasant odor and its fumes are poisonous.
What tools and materials will be needed?
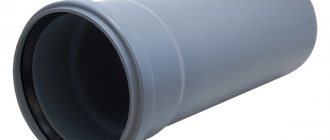
Replacing a cast iron sewer system begins with you deciding which pipes you are replacing. The most practical and affordable material is plastic. It not only looks good, but is a completely reliable alternative to cast iron products. The material has the advantages of low flow resistance and, accordingly, a low risk of clogging. The light weight of the elements is also noted, which facilitates the installation process.
Plastic pipes for sewer replacement
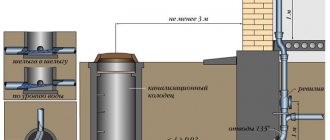
Experts also recommend making sure in advance that the new riser has an inspection hatch, and also paying attention to the shaped connecting elements and cuffs.
This is what the inspection hatch looks like
Required tool:
- the most important one is the Bulgarian;
- gas-burner;
- hammer and chisel;
- level and tape measure;
- mark, plumb line, safety glasses, respirator.
Don’t forget about sealants, cement mortar and having liquid soap on hand.
Installation
Before starting work, you should purchase all structural elements:
- The seal is a rubber cuff that ensures tightness at the joints when replacing a tee in a sewer riser.
- Plastic tee.
- Sewer pipe with markings corresponding to the size of the tee.
- Compensators with a diameter that matches the size of the pipe - base.
- Pipe adapters, clamps, fastenings.
- Bends, sockets.
- Protective equipment: respirator, gloves, goggles.
The replacement process begins by installing a rubber cuff into the pipe socket. To do this, a cross or tee is inserted. For a tight connection, the end is washed with a dense layer. Additionally, you can treat it with a silicone mixture applied to the linen winding.
Next, the pipes are cut into calculated pieces, and the end is chamfered. The exact length is determined by inserting the product into the pipe. The resulting structure is inserted into a pipe located in the upper ceiling.
The distance between the tee and the structure should not exceed 30 mm. Preparatory assembly is performed without the use of cuffs and gaskets.
Sliding couplings are used to tightly join the cast iron section with the plastic section.
At the final stage of assembly, gaskets, couplings, and cuffs are installed. Fasteners and clamps are clamped. The joints are checked. Polyurethane foam fills the voids between the floors. The throughput functionality of the assembled system is checked.
Calculation of sewer pipeline
Selection of sewer pipe material
Of all the possible types of sewer pipes for DIY repairs, choose pipes made of polymers.
Advantages of plastic pipes:
- Corrosion resistance.
- Chemical resistance.
- Easy to assemble.
- Light weight.
- Smooth wall surface (inner).
- Resistant to low and high temperatures.
- Easy to repair.
- Durability.
Compared to metal pipes, plastic products are more fragile, so care must be taken when handling and storing them. This disadvantage is compensated by its light weight and ease of installation.
Selecting the diameter of the sewer pipe
Minimum permissible diameters:
- Bidet, washbasin, sink – 40 mm.
- Shower cubicle, bath – 50 mm.
- In the case of including several plumbing fixtures in one pipe - 85 mm.
- The riser (main) of a house or apartment is 100 mm.
The versatility of the system can be achieved by using a 50 mm diameter pipe to connect all plumbing fixtures, except the toilet, and make the main riser from a 110 mm diameter pipe; connect the toilet to the same 110 mm sewer pipe.
Calculation of the number of system elements
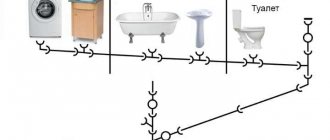
To calculate the pipeline and install sewer pipes, it is necessary to draw up a diagram of the future system. Simply take a sheet of paper and place on it all the plumbing fixtures that need to be connected.
Approximate diagram of an intra-house pipeline
It must be taken into account that it is not recommended to use bends with an angle of 90°. In this case, it is better to use two 45° bends, which significantly reduces the likelihood of blockage in the pipe.
A large assortment of fittings - angles, crosses, tees, couplings - will allow you to select the necessary element of the desired configuration and the required diameter. If you plan to install another plumbing fixture in the future, then determine the installation location and add it to the diagram. When installing the system, this outlet will be closed with a plug until it is needed.
Having selected all the necessary pipes and fittings according to the diagram of the future pipeline, you can proceed to the next stage of repair.
How to dismantle an old riser
The question of how to change the sewer riser in an apartment between floors needs to be addressed from the moment the old cast iron pipe is dismantled. The work is not difficult if you follow simple step-by-step instructions:
- First you need to mark the cutting areas. Usually, 10 cm or more is removed from the ceiling at the top, and about 80 cm is left at the bottom to the tee, so that it can be easily removed later.
- Make cuts at the top and bottom. Their depth is approximately half the diameter of the pipe or a little more. Then you will need a chisel; it must be inserted into the cut and hit hard with a hammer. Repeat this procedure in the other incision. After the cast iron has cracked, you need to carefully remove the old element.
- Place a bag over the top ledge as liquid will drip from there. You must first try to loosen the tee by hand. If there is tow and paint on the joint, you can remove part of it with a chisel or knife, then you should proceed from the situation. Once the joint is caulked with cement, the easiest way to free it is with a hammer drill.
- The ends of the pipe must be cleaned of dirt and old paint residues. This is easiest to do with a wire or grinding disc; there are options for both an angle grinder and a drill or hammer drill.
At whose expense
Another question that needs to be examined in detail so that you don’t have to pay money in vain. Everything is quite simple here:
- If part of the structure is changed due to an emergency, damage or constant leaks, all costs are borne by the service organization.
- When a planned reconstruction of a building is carried out with a complete replacement of the riser, residents are also not required to pay the costs. Funds are taken from contributions for major repairs, which are paid monthly.
- If the design is changed by the owner of the property on his own initiative, all costs must be paid by him. Especially if there are no reliability claims.
Important!
You shouldn’t try to break the design in order to present everything as an accident. If the examination reveals such a fact, you will have to pay not only the cost of materials and work, but also a fine.
Who should change the riser
Before replacing a cast-iron sewer riser in an apartment with a plastic one, you need to figure out who is responsible for carrying out the work. Most often, the responsibility falls on the organization that services the multi-story building. The following order can be considered standard:
- The owner of the apartment writes a statement indicating why the sewer riser needs to be replaced.
- The organization reviews the appeal and provides a response. If a positive decision is made, the time at which you need to be at home is agreed upon.
- The owner is obliged to provide unhindered access to communications.
In this case, replacement of the riser may be refused for the following reasons:
- If unauthorized changes have been made to the design.
- In situations where the system is fully operational and its reliability is not a concern.
- When the owner has outstanding debts on utility bills.
It must be remembered that the sewer riser is the common property of the house. The owner does not have the right to arbitrarily change its design. The question often arises of how to replace the sewer riser in an apartment if the neighbors are against it. Everything is simple here: only the part that is located in the apartment is changed, or a lawsuit is filed if there is a conclusion that replacement is required. In this case, a decision will be made that the neighbors are obliged to obey.