In the past, cast iron pipes were usually used for drainage; this material is good, but not eternal. In particular, the sewage system of most of the panel houses built in the 2nd half of the last century is in deplorable condition. Therefore, nowadays it is becoming important to replace the sewer system in a Khrushchev building with your own hands.
Sewer replacement technology
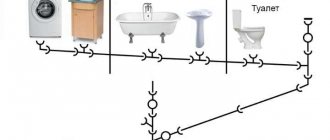
Scope of work when replacing a sewer system
For residents of city apartments, this is usually limited to dismantling old horizontal pipes connecting plumbing fixtures to the riser.
The work is performed in the following sequence:
- during the period of work in the house, a “prohibition” is established;
- Plumbing fixtures are disconnected from the drainage system;
- after this comes the turn of the most labor-intensive operation - removal of horizontal pipes. If they were laid underground or in a special box, then this can be done quickly. But if they were laid in a screed or embedded in a wall, you need to remove the concrete layer using a hammer drill and grinder;
- special attention and care must be taken when removing the area connected to the riser;
The photo shows the result of careless handling of the bell
- a new pipeline is laid, the tightness of the system is checked, then they are hidden in the wall or floor.
If the replacement is carried out in a private house, then in addition to internal work, updating the external sewage system will be required. This is fraught with certain difficulties - the volume of excavation work is significant, and the layout of the site may not allow the use of special equipment for digging trenches. In this regard, the trenchless method of laying a new pipeline is quite popular.
Dismantling external sewerage is quite labor-intensive
Installation of plastic pipes
After dismantling is completed, assembly begins. They start with the riser. Insert a piece of pipe into the tee, then a revision tee. A piece of the required length is inserted into it, onto which the coupling is previously put on. When all the parts are installed, the coupling is moved upward, connecting and sealing the parts of the riser. After this, a horizontal section is assembled according to a pre-drawn diagram. The plumbing is connected, a check is made to see how the new sewer system works in the Khrushchev building. If leaks are detected, all defects are immediately eliminated.
Technology of work execution
If the work will be carried out in a city apartment, then before starting you need to ask your upstairs neighbors to refrain from using the sewer system for a while. It’s better to just turn off the water supply along the riser.
In the future, instructions for performing work look like this:
- after disconnecting the plumbing fixture, cut off the visible part of the pipe;
Note! When working in the bathroom, the siphon must be knocked out carefully. If the bathtub itself is cast iron, then it can be easily split with a careless blow of a hammer.
- It is better to remove the old pipeline in parts, making cuts with a grinder . As a rule, it is not possible to cut through metal to the full depth at once, so you can first make a small cut and use a hammer to bring the wall down inward. After this, the disk will reach the far wall;
To facilitate dismantling, it is better to make a notch
- After removing the pipeline that discharges waste into the riser, you can begin laying a new one.
Features of dismantling old sewerage
The most difficult thing is to dismantle it without damaging the bell. If the slightest crack forms in the riser, you will have to replace it; the cost of updating the sewer system will only increase in this case.
Note! When removing a section of sewerage approaching the riser, it is strictly forbidden to rock it. Cast iron is a very brittle material and this can cause cracks to form on the socket.
Previously, when connecting using the socket method, for additional sealing, the free space at the joint was filled with sulfur or filled with cement mortar. Over the years of operation, the riser has most likely been painted more than once, so first you need to remove a layer of paint and excess sealant.
The first step is to remove excess sealing material. A regular screwdriver or chisel and hammer will do for this. Gently tapping the screwdriver to chip off the excess material.
Excess material around the bell is carefully chipped off
Then you need to remove the sealing material from the space between the pipe walls.
There are several ways to do this:
- using a drill - the frozen sulfur is simply drilled out;
- by heating the joint - in this case the sulfur burns out, absolutely safe for cast iron.
If the connection was filled with sulfur to make it tight, you can simply burn it out
Note! When burning, a lot of harmful gases are formed, so you need to organize good ventilation and equip yourself with personal respiratory protection equipment.
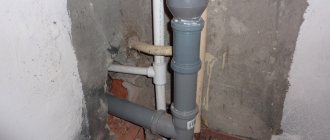
Dismantling the old riser
A rotten riser can cause a lot of headaches, however, you can cope with replacing it yourself.
Riser replacement diagram
Instructions for installing a new riser instead of a cast iron one look like this (assuming that the horizontal pipeline has already been removed):
- part of the old riser is removed. You need to step back about 10 cm from the ceiling and make a cut with a grinder; the same cut will be needed in the lower part - above the distribution sewer tee;
- A chisel is carefully driven into the cut; due to the slight bend of the pipe, the cast iron bursts. As a rule, the fault line turns out to be perfectly smooth;
- if the piece of pipe going to the tee looks reliable and does not wobble, then you can leave it, otherwise it is better to cut it along with the tee (the cut should go below the lower socket). The tee socket is cleaned;
The bell needs cleaning
- after this you can proceed to installing the plastic riser.
Installation of a new riser
When connecting a plastic riser to cast iron pipes, a special rubber cuff is used for additional tightness of the connection. Otherwise, the joining process is not much different from a simple socket joint.
In the photo - a rubber cuff in a cast iron pipe
First, a rubber cuff is inserted into the thoroughly cleaned socket and only after that the pipes are connected. Additionally, the connection is generously sealed with sealant.
The joint between plastic and cast iron pipes is carefully sealed
Since only part of the riser is changed, the last pipe connection is made end-to-end, and the tightness of the connection is achieved using an adapter.
The result of replacing a cast iron riser with a plastic one
Replacement of external sewerage
This part applies only to owners of private houses. The price of replacing an external sewer system is not that high, but the process itself is quite labor-intensive, since a large amount of excavation work will have to be performed.
The solution in this situation may be a trenchless method of replacing pipes. If with the open method you need to dig a trench and remove the old pipe, then with the closed method you can do without digging ditches
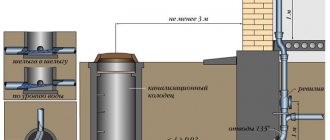
Gravity sewerage
Most private houses have just such a drainage system. All work is performed by a special mechanism that destroys the old pipe, slightly expands the diameter of the hole and seals its walls.
Scheme for replacing a non-pressure sewer system
Pipe replacement is carried out in areas between wells.
When replacing a drainage system using a trenchless method, the work is performed in the following order:
- a pneumatic punch equipped with an expander and a destroyer moves to the end point along the old pipe;
- the pipe that has served its purpose is destroyed, and at the same time, due to the expander, the walls of the resulting tunnel are compacted;
- Following the punch, a pipeline is immediately sent, the sections of which are connected by a threaded connection.
Pipeline segments are pulled up following the punch
The price, of course, is higher than when replacing pipes using the traditional method. But, given the time savings and quality of work, this method deserves attention.
Features of Khrushchev
Apartments in panel or brick houses are considered one of the most budget-friendly types of real estate. One of the main complaints of consumers about Soviet-era houses is their lack of aesthetics and poor layout. The task of the builders was to quickly erect houses to provide citizens with housing. At the same time, comfort faded into the background.
The standard ceiling height is 2.5 m. The layout in Khrushchev's houses comes in several types. One of the most common is a two-room apartment with narrow adjacent rooms. There are one- and three-room living quarters. The bathroom can be shared or separate. In both cases, a minimum of space is allocated for the premises. Khrushchev houses are characterized by small kitchens, where only a minimum of furniture can fit.
view album in new window
In most cases, owners of such real estate prefer to redevelop. The kitchen is combined with the living room, and the bathroom is expanded due to the hallway. However, all work must be agreed upon with the supervisory authorities.
The main advantage of apartments on the secondary market is their low price. The cost of such real estate will be less than in a new building. However, the disadvantages include the fact that apartment renovation and redevelopment can become quite a costly undertaking.
Pressure sewer
The principle of operation remains the same - the new pipeline is stretched along the route of the old one without digging trenches. The main difference from replacing a gravity sewer is that the old pipeline is not destroyed.
That is, a new pipe of a slightly smaller diameter is simply pulled through the old sewer. Considering that the diameter decreases, this method cannot be used for free-flow sewerage. Due to a decrease in diameter, the throughput will also decrease, which means the likelihood of clogging will increase.
In pressure systems, a decrease in cross-section can be compensated by a slight increase in pressure. Therefore, this method is not used to replace sewerage in private homes.
Replacement of a pipeline operating in pressure mode
Compared to destroying an old pipeline, this method has the advantage that a new pipe can be pulled not only in areas between wells, but also along an inclined line, that is, from the surface. In addition, the old pipeline will serve as additional protection.
Pipeline laying diagrams
This type of diagram characterizes the method of laying system pipelines depending on the method of connecting heating devices to them. There are 3 main schemes for laying pipes of a water heating complex:
- Single-pipe;
- Two-pipe;
- Collector-beam.
In a single-pipe scheme, radiators are connected to the supply pipeline in series - the coolant passes through each device in turn, from the last device the return pipeline returns cooled water to the boiler.
Here there is a gradual decrease in temperature from the first battery to the last on the line, so the length of the branches is limited - it is not recommended to place more than 4 - 5 radiators on one line. In addition, difficulties arise in temperature control - when the coolant flow is limited, the temperature on all radiators located behind the adjustable one decreases. You cannot disconnect the batteries either - in this case the circulation along the entire line will stop.
The single-pipe circuit has a modified version - the change is made by installing a bypass on each radiator - a jumper of equal or smaller diameter between the inlet and outlet of the coolant from the battery.
Through this bypass, part of the hot water bypasses the heating device and enters the next one, mixing with the return flow from the first one (on which the jumper is installed). This optimization somewhat equalizes the temperature on heating devices and makes it possible to partially regulate and turn off individual batteries.
The two-pipe scheme is more advanced from a technical point of view. In it, the radiators are connected in parallel to two independent pipelines - supply and return (return). This allows the batteries to operate with minimal mutual interference; the devices are easy to control and can be turned off for repair or cleaning.
The two-pipe system has 2 varieties - a tee (dead-end) scheme and a Tichelman loop (passing scheme). Most experts agree that the Tichelman passing system is more efficient in operation. You can read more about the two-pipe water heating scheme in a special article.
The collector (radial) circuit is implemented by connecting radiators with separate connections to distribution manifolds. When installing a system of this type, increased pipe consumption is observed. The advantage of this scheme is that the control of heating devices is concentrated in one place - on the collector unit. But in this case, difficulties may arise in laying pipelines - a massive bundle of pipes departs from the collector unit, which are difficult to hide, especially in the groove. In addition, when using a collector system, increased hydraulic resistance occurs - this may require the installation of a more efficient circulation pump.
Basic schemes are often combined with each other. For houses with 2 or more floors, a popular scheme is a system with 2 vertical risers. They are a two-pipe component of the circuit; either single-pipe floor-to-floor branches or floor-to-floor collector groups are connected to them.
A separate water heating scheme is a complex of heated floors. It includes a special unit and operates in low-temperature mode. The pipelines of the circuits are laid according to 2 main schemes - in rows (coil) and in a spiral (snail). You can read more about the installation of water heated floors here.
Summarizing
Replacing the drainage system is an integral part of a major overhaul, especially if the house used old cast iron pipes to drain drainage. This task is not as difficult as it seems at first glance, and besides, it can be significantly simplified. For example, when updating the drainage system, trenchless sewer replacement will allow you to quickly cope with work outside the home, but you can handle the internal system yourself.
The video in this article focuses on the internal work of replacing the sewer system.
Did you like the article? Subscribe to our Yandex.Zen channel
Equipment options, how heat consumption is calculated and payment methods for services
In order to understand how much coolant you consume to heat a house with a large number of apartments, the best option would be to install a house meter. To calculate the payment for consumed heat, readings are taken from the meter. They are divided by the number of apartments in the building and their area. A house meter makes it possible to pay for heat only in the cold season and it is possible to reduce the amount of incoming energy into the heating systems of buildings.
House heat meter
This leads to you saving your finances when favorable living conditions arise. The cost of this type of heating is indicated by local authorities. To install a home meter, first of all, gather the residents for a meeting and decide whether everyone agrees to switch to a different heating method. It is also worth seeking help from specialists to assess the feasibility of a home heating system.
Such a heating system in a five-story building or in a house with fewer or more floors allows heating at certain times of the year and paying bills for actual energy consumption. Such a heating system for Khrushchev houses implies that a meter is installed to control the heat, from which monthly readings are taken. However, this is the most complex heating system for a five-story building for profitable heating. There are a lot of nuances that need to be observed, and there is no guarantee that local authorities will release your home from control.
Heating scheme for a multi-storey building