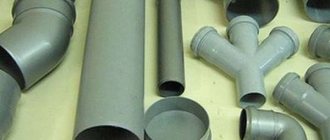
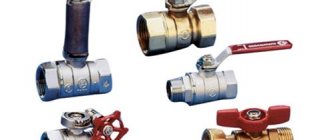
Optimal material for tee
As a rule, a sewer riser tee is selected from the same material as the rest of the system elements. For a plastic riser, it is most convenient to use a PVC tee. If all the parts are made of cast iron, then use a cast iron sewer tee. When choosing, various factors are taken into account:
- the tee is subject to pressure from the rest of the vertical assembly located above it. If work is carried out on the lower floor of an apartment building, the load will be quite high. As a rule, cast iron pipelines are not attached to walls, relying on the self-supporting ability of the material. When replacing this becomes a noticeable problem;
- assembly of plastic elements is easier and faster. They are connected into a socket equipped with O-rings. You just need to insert one element into another. Cast iron pipes must be sealed separately, and the gap in the socket must be sealed with cement mortar or other compounds.
In addition, you must remember to connect the rest of the internal sewer line. Usually it is made of plastic pipes with a diameter of 50 mm. If a cast iron assembly is used, an appropriate adapter will be required.
The important point is that there are two tees. One is built directly into the riser and provides drainage to the horizontal part. The second one is connected to this outlet and is needed to connect the toilet. This assembly scheme is typical for most apartments. If a sewer tee is replaced, then, as a rule, both elements are changed at once. However, sometimes one tee is cast iron, the second is made of PVC.
This option is quite acceptable; you only need a rubber adapter to connect the plastic and metal elements. There is another type of similar elements called “revision”. Its outlet is used as a service hole for cleaning or servicing the system. After completing the work, the hatch is closed with a special sealed lid.
Replacing a tee in a sewer riser
Introduction (backstory)
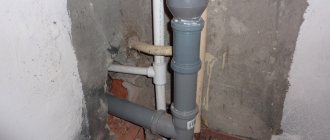
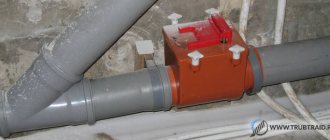
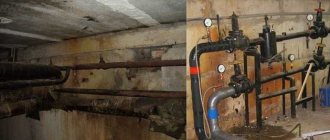
At the very beginning of the toilet renovation, at the stage of dismantling the toilet, sink, water and sewer pipes, I came across an unexpected problem in the form of a leaking riser. The house is practically new - built 3 years ago. There were no problems observed before the repair began. But after the drain pipes were disconnected and the holes in the riser crosspiece were plugged with plugs, the riser began to leak. Well, not exactly a river. Not even a trickle, but an almost imperceptible drip leak. Nevertheless, she did not give peace. This was all aggravated by the fact that it was time to start building a new wall of the plumbing duct. And after its construction, access to the lower elements of the sewer riser will become seriously more difficult. The reason for the digging could not be explained.
Everything looked something like this. The lowest joint of the riser pipes, or rather the pipe sticking out of the floor and the cross inserted into it, was constantly wet. However, there were no visible signs that water was getting there from above. Moreover, upon careful examination with a flashlight, periodic expulsion of drops from the lower pipe was clearly observed. Actually, this gave rise to the version that the cause of the leak was a poor-quality or missing rubber sealing collar of the pipe.
One way or another, earlier I was still thinking about replacing the tee, since two more clients were added to the riser: a washing machine and a dishwasher in the kitchen behind the adjacent wall. Previously, in the bathroom, we easily changed the riser tee together with my godfather, spending about 20 seconds on this procedure. But I didn’t really want to change the tee on my own in a sewer riser that was obviously leaking. As far as I know, risers, both sewer and water, are the responsibility of the DEZ. Therefore, I called there and invited the plumber Vasily, the author of the legendary phrase “domestic valve with a cap for the seal,” to come to 18:00.
Vasily agreed that the reason was probably the lack of a cuff. However, he said that it would be better for me to invite a team to repair the riser tomorrow morning or afternoon. To this I assured him that he could count on me as a member of the team, and that if a team of two people was enough, then it would be time to start the repairs right now.
- Okay, let's look at the cuff first! - Vasily decided and the procedure began.
We need to change it! But how to disassemble a sewer riser?
Really? HOW? Now everything will be told in detail.
No - I will tell those who think that in order to remove the pipe from the riser, the entire pipe assembly is moved up or down - this is unrealistic, since the pipes sticking out from the ceiling and floor are fixed quite thoroughly.
And not so - there will be an answer to those who believe that the riser should be tilted to the side and then its length will increase, which will make it possible to release the element.
In fact, disassembling the riser is quite simple! For this purpose, it has a special element - compensator . This is a short pipe, the bell of which is significantly longer than the 5 cm bells usual for all other elements of the route. Thus, this compensator can be pushed onto the upper pipe by 15-20 centimeters, which will make it possible to easily disassemble the sewer riser and replace any of its elements .
IMPORTANT! If you decide to make such a replacement, then to make the work easier, 2-3 hours before starting, drop a little machine oil into the connections of the compensator and other elements that you plan to disassemble. And on the wall it would be completely useful to mark the original heights of the joints. Just in case.
So. Having moved the compensator up along with all the tees attached to it from below, we removed and opened the lowest connection. Vasily fished the cuff out of the pipe. And while none of the residents of the upper 9 floors decided to wash themselves, or, which is certainly much more fun, to flush the toilet, we pushed the cross back into the pipe. The cuff did not cause any complaints. There was no particular point in changing the cuff, and I suggested that Vasily replace the lower tee with a new cross. Vasily asked to see it, and after examining it, expressed satisfaction with the quality of the element, finding it higher than that of the existing element. Indeed, all surfaces of the cross were perfectly smooth, unlike the noticeably rough old one.
After waiting 3-4 minutes for the sound of water inside the sewer to subside, we moved the compensator up a second time. Vasily inserted a new (just in case) cuff into the lower pipe - 3 seconds. Disconnected the old cross - 2 seconds. Then a bad and very suspicious sound began to appear in the riser! (drum roll) Increasing in strength, like an approaching locomotive, the sound left no doubt that its cause was 6 liters of water from the toilet tank + a certain amount of human waste products - in liquid or somewhat more solid form. Having absolutely no desire to verify the type of product with our own eyes, we, with coordinated movements, installed a new cross into the lower pipe and moved the compensator and upper tee down, within 3 seconds. The entire replacement took 8 seconds, although the last three seconds, it seemed to me, dragged on for a very long time...
Such a quick replacement is possible if all the old elements being separated and the new elements being connected are pre-treated with lubricant at the joints. If you don’t have machine oil on hand, then, at worst, you can use regular sunflower oil.
We installed all the riser holders back, we went to wash our hands and asked ourselves the question:
Why did the sewer riser leak?
The rubber cuff was removed, the narrowing of the cross was pushed all the way into the lower pipe. There is only one reason left - there is a crack in the crosspiece. And it can only be in one place - in the one that could not be seen while it was part of the riser. This is the bottom corner of the tee.
Turning it upside down, we immediately discovered this crack.
Judging by the appearance, the crack was far from fresh. Apparently it was clogged from the inside with you-know-what, and when it dried, it formed a sealing layer. However, all you had to do was move the outlet a little and this unreliable sealant stopped performing its functions.
- See how shitty it is! - Vasily pointed his finger at the defective tee.
I just offered to take this with me to the DEZ as proof of the repair of the riser without calling the emergency team. He politely refused. Just as politely, he did not refuse a small thank you, and, as it seemed to me, very pleased with the work done and the reason found, he took his leave.
And who is he - our today's hero?
ZYZH: It is clear that drawing conclusions about quality based on such a small sample is incorrect.
Therefore, if you have something to say about the quality of this or that manufacturer of PP pipes for sewerage, please comment! Comments on the article (2)
What tools and materials will be needed for replacement?
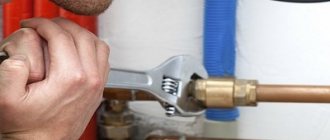
In order to change the tee, you will need the following tools:
- grinder with cutting disc for cutting cast iron or plastic;
- a long screwdriver or chisel for removing the cement seal of cast iron sockets;
- lubricant for the repair coupling (ordinary shampoo will do);
- new tee;
- a piece of straight sewer pipe of the same diameter as the main pipeline;
- through coupling;
- adapter from cast iron to plastic (if necessary);
- device for hanging a vertical pipe (selected according to the situation);
- hammer, possibly with a rubber striker.
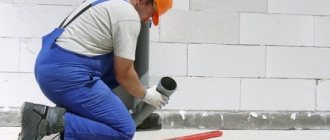
If the sewer crosspiece is being replaced, the procedure and set of tools will be needed the same. Only the most necessary items are listed. Disassembling the riser is not easy. You need a strong and reliable suspension. To avoid collapsing the top assembly. Usually they use a clamp that is attached to the wall. It must be taken into account that the toilet of a typical apartment will not accommodate large structures. Therefore, it is necessary to make the suspension as compact as possible. Even combined toilets (as in Khrushchev) are very limited in working space. Therefore, before replacing a cast iron tee in a sewer riser, you need to think through the procedure. It is important to ensure free access to the work area and reliable support for the top of the riser.
In addition, it is necessary to notify neighbors about the start time of work. If someone uses the drain during the replacement, the entire contents of the pipe will end up on your floor. It is important to organize the process correctly so that it goes quickly and with the desired result.
You may also like:
Replacing a cast iron sewer riser with a plastic one - features and procedure
Sanitary standards for the distance of sewerage from a private house: requirements and rules
Conclusions and useful video on the topic
Visual instructions for installing sewer pipes are given below:
Almost anyone can change the sewer system in their apartment on their own. Especially if the system is made of polypropylene pipes. No welding is required to connect them. The pipes are inserted into a socket with rubber gaskets, and perfect sealing is achieved using sealant. Installation of such a sewer system will be inexpensive, and it will last longer than cast iron.
Have you recently changed the sewer system in your apartment and want to share your experience with other users? Tell us what difficulties you encountered in the process of replacing the riser - the comment form is located below.
If you have questions about the topic of our publication, do not hesitate to ask our experts for advice - we and other site visitors will try to help you.
How to dismantle the riser
Before replacing the tee in the sewer riser, you will need to partially disassemble the vertical part of the system. Considering the pipe connection technology, two disassembly methods can be used:
- sequential dismantling of the entire riser, starting from the top point;
- partial dismantling of a riser section in one apartment.
The first option can be applied if the work is carried out on the penultimate or top floor of the building. The second method is most often used - partial disassembly.
Action plan:
- shut off the water in the apartment;
- temporarily dismantle the toilet;
- disconnect the horizontal part of the system;
- the riser is cut at approximately 1-1.2 m above floor level;
- remove the remaining part of the straight pipe;
- remove the defective element.
It's easy to cut a plastic pipe. If the riser is cast iron, cutting is performed according to a certain pattern:
- make two cuts one above the other;
- the riser is securely suspended from the top to ensure the immobility of the assembly located above;
- A chisel or chisel is inserted into the upper cut, and a part of the pipe is broken out with gentle blows;
- after this, the remaining part is cut and the defective elements are removed.
Replacing a cast iron sewer tee is a procedure that requires accuracy and thoroughness. It is quite difficult to remove the problematic element. Especially if the riser has worked for many years before and all connections are tightly cemented. The parts must be removed carefully, without shaking them too much in their sockets. If the safety of the components to be replaced is not important, then the socket of the lower part of the riser must be kept in normal condition. This is important, since the lower part will have to be replaced from the apartment located on the floor below. This will create unnecessary complications, so such danger should be avoided. Sometimes a cross is used instead of a tee. It is usually used in apartments of old construction or in private houses. Replacing a crosspiece in a sewer riser is practically no different, only you will have to disconnect the horizontal part of the system from both sides.
Price issue
Replacing a sewer tee that will meet the requirements of GOST is a service that is in demand in the Russian Federation, and accordingly, it has its price. It is difficult to answer the question of price with utmost precision, because it depends on many factors. We are talking about the material used to make the new adapter that is planned to be installed. Just so you know, a propylene tee costs several times less.
The price of the service reflects:
- tee location;
- its diameter;
- current condition of pipes, etc.
The cost of the service is approximately 4000 rubles
Today, the cost of replacing a riser sewer pipe with a tee with a diameter of 110 mm is approximately 4 thousand rubles. Moreover, the price is not fixed and may vary depending on conditions.
Tee installation
After removing the old elements, begin installing a new tee. To do this you need to do the following:
- thoroughly clean the lower bell of the riser from any remaining sealant and other deposits;
- apply a layer of sealant to the walls of the socket and insert a new assembly into it;
- Place a coupling on the top of the riser and push it up so that the end of the pipe protrudes;
- Insert a piece of straight pipe of the same diameter into the socket of the installed element using the same method. It must be adjusted in length so that after installation in the socket both ends are as close to each other as possible;
- slide the straight coupling down and connect the top of the riser to the bottom.
After this, the horizontal part of the system is connected to the new outlet - a 110 mm tee and a pipe with a diameter of 50 mm. Connect the toilet, seal all connections and check the system for functionality. If all steps are performed correctly, there should be no leaks or other problems. Periodically it is necessary to carry out maintenance of the cast iron tee in the sewer riser. This will remove any buildup or fatty deposits that are causing blockages. For maintenance, it is recommended to install an inspection - an element with an inspection hatch. It is placed on top of the main unit and used for various repair work.
Options for laying pipes in the bathroom
If the toilet in an apartment or cottage is not combined with a bathroom, then special problems with preparing the pipeline layout are unlikely to arise. As a rule, there is only one toilet and there are two risers, from which it is necessary to connect a couple of pipes to this single plumbing fixture.
However, next to the wall there is usually a kitchen and a bathroom, where pipelines also need to be laid. It is with their wiring that there are mainly difficulties when replacing pipes.
Plumbing fixtures are connected to water sockets using a rigid or flexible method (via drain hoses); toilets are connected to the sewer system only using the first option or using corrugated pipes
There are two technologies for laying pipes in the bathroom:
- Outdoor.
- Hidden.
The first method is easier to implement, and the second is better from an aesthetic point of view. When laying pipelines hidden, you will have to trench the walls, which means dirt and additional preparation time.
The best option is to lay the pipes in the toilet according to the external scheme, and then cover them with a decorative box. Moreover, the risers will still have to be covered with decor. If you leave them open, the interior of the bathroom will look ugly.
With a hidden gasket, any leak immediately turns into a headache. We have to start all over again. You will have to remove the cladding, break down the walls and replace the pipes again.
A good option for outdoor installation with decorative false walls and boxes. The latter have inspection hatches and are easily removed if necessary, if you need to get to leaking pipelines.
The sewer pipe is laid with a slope towards the riser to ensure gravity flow. According to the rules for laying pipes in bathrooms, in places where plumbing fixtures are installed, tees are inserted into it with the sockets positioned towards the flow of drains.
According to construction regulations, the slope of the sewer pipe is selected based on the diameter of the pipeline. The smaller the cross-section, the more the latter should be inclined.
For an indoor sewer pipe with a diameter of up to 50 mm, the slope is 3 degrees (3 cm in height for each linear meter). For products with a cross section of 50–110 mm, it is recommended at 2 degrees, and for analogues with a cross section of 110–160 mm – at 0.8 degrees.
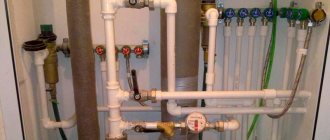
Plumbing is connected to the water supply:
- according to a sequential scheme;
- through the manifold at the riser.
The manifold version is more expensive, but the pressure at each water outlet with such a layout is always the same. In this case, the water pressure in the taps and shower does not fluctuate when you turn on the washing machine or fill the toilet tank.
When using a collector circuit for supplying water from the riser to the plumbing fixtures, a lot of pipes will have to be installed, and all this equipment is usually located in the toilet
Water outlets are attached directly to the walls or to cross beams (metal plates with holes for fasteners). In this case, the outlet for the toilet in the toilet is most easily done with a hose.
On the cold water supply pipeline passing by, a tee is simply inserted with a terminal having an external or internal thread. Ideally, pipes should be installed parallel everywhere, without intersecting each other.
A shut-off valve is installed immediately from the riser and at the end of each water supply outlet. This is necessary so that, if necessary, you can turn off only one plumbing fixture to replace or repair it.
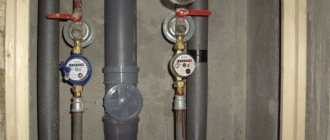
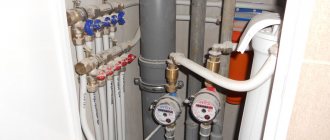
From the water supply riser, a ball valve is first installed, then a coarse filter, and only then a meter. The simplest and cheapest filter is a mechanical one without backwashing (with a small straight or oblique “branch”, with a dirt mesh inside).
From time to time you will have to unscrew the lid on it with a wrench to wash out the stainless steel mesh that accumulates sand and rust. The self-washing filter is large in size. It must be connected to the sewer, and a bypass bypass must be installed parallel to it.
If there is not enough space on the toilet wall, then it is better to refuse this option. All this together is called the “input node”. After it comes a pipe for connecting plumbing or a manifold.
How to remove the lower parts of an old pipe when it is secured with concrete in the floor and the joint is not treated with sulfur
The lower sections of risers are usually made of component parts. They may include a coupling, an expansion pipe, and more. The first thing to do is check all joints for strength. Why, swing the pipe in the upper part, only very carefully so as not to harm the lower bell
If you're lucky, if it gets a little loose, carefully remove all the wobbling parts. When the crosspiece is even slightly loose at the joint, remove it using a nail puller
In the case where the cross is firmly fixed, you will first need to clean the joint deeper. If its clearance allows, then you can use a hammer drill with a narrow drill. Do not use a pobedit drill. The solution filling the joint crumbles around the perimeter and is removed using a chisel.
It’s bad when there is practically no seam, and the cross is fixed tightly. Here you can try to clean the seam with a metal file. But, if these manipulations do not help, and you confidently want to replace the crosspiece, then you will have to cut it down 2-3 centimeters above the bell. The riser hole must be covered with a rag and secured with a rope; this is done so that cast iron scraps do not fall into it. Then, using an angle grinder without protection, carefully cut out the rest of the pipe from the socket. Do not spoil the socket itself remaining in the ceiling. Use a special wedge to remove the remaining pipe fragments from the socket.
Preparing to replace a cast iron sewer with a plastic one
Do-it-yourself dismantling of a cast iron sewer begins with preparing the tools.
The work is done using:
- chisels;
- a hammer with an attachment (rubber or wooden);
- hammer drill;
- chisels;
- 2 adjustable wrenches, knives, screwdrivers, crowbar, steel wedge for disassembling pipe parts;
- grinder, sanding disc and 3-4 pieces of 125 mm discs.
Before dismantling, it is determined how the cast iron parts (in particular crosses and tees) were connected to the shaped section, which requires finding the connection point - usually it is located higher than the level of the floor covering. If there are tiles on the floor or a screed, you will need a hammer drill or chisel to find it.
You need to work with them carefully - do not damage the socket remaining in the ceiling
The connection between tees, crosses and pipes can be made in three ways:
- filling with gray;
- polymer cement mixture;
- caulking with mortar. You can use cement-sand or cement.
When is it necessary to replace water pipes?
After a certain period, all property owners have to replace their water and sewer lines. Over the years, a coating forms inside cast iron pipes, which not only significantly impairs the permeability of the system, but also has an unpleasant odor. Simple cleaning will simply not be enough. In addition, cast iron itself is a brittle metal, so if the system is used incorrectly, cracks may form. Replacing sewage systems in Moscow and other regions with plastic ones is a fairly expensive service, and the process occurs in the same sequence. The only thing that may differ is the prices of the plumber’s services and the quality of the work done. If any problems arise with the operation of the old system, it is better to immediately contact professionals and replace long-worn water pipes. At the same time, prices for replacing sewer pipes in an apartment can vary dramatically.
Advantages of plastic sewerage
A sewer system with a cast iron pipe becomes completely unusable after 40-50 years of use. It is optimal to replace it with practical pipes made of polypropylene or PVC. These materials have quite a few advantages:
- light weight compared to metal ones;
- smooth inner surface (reduces the risk of blockages and simplifies the cleaning process);
- plastic is not afraid of corrosion;
- No special equipment is required for installation.
The only disadvantage of plastic is the high noise level when draining water or wind noise (in a private house). A noise protection box made of soundproofing materials will help solve this problem.
Dismantling the crosspiece when the joint is sealed with sulfur
The connecting part itself is not cut, but its extension with a diameter of 100 mm must be removed. Now you can work with a blowtorch in the pipe, providing the necessary heating of the structure. An asbestos or metal shield must be installed on top of the product to adjust the draft in the riser.
If there are holes at the bottom near the socket, for example, obtained during the installation of water pipes, through them hot sulfur can penetrate into the plumbing unit of the neighbor below. To prevent this from happening, the holes must be covered with plaster or cement. Mineral wool can be used to repair small cracks. The riser itself is sealed with a lump of fire-resistant materials to prevent the ingress of molten sulfur.
Warming up is carried out evenly, only the angle of inclination and direction of movement of the fire change. This process must be controlled, otherwise the bell may crack, as evidenced by a powerful bang. However, this rarely happens. Usually pipes made of low quality cast iron burst.
One way or another, if the clearance of the groove allows, before starting work it is recommended to clean out as much sulfur as possible using a drill with an extended drill or a hammer drill, but without a pobedite tip. It must be taken into account that heated liquid sulfur can flow inside or splash out. However, when cooled, it quickly takes on a solid state. It is better to put the frozen pieces at some distance from the burner flame.
It is not necessary to use a gas mask or special masks before the sulfur begins to burn. However, do not forget that from strong fire the liquid substance can boil and begin to splash out. To protect your face and eyes, it is recommended to wear special goggles when working with heating elements.
Periodically you need to check the mobility of the cross by shaking or hitting with a hammer from different sides. As soon as you notice that play appears, you need to stop heating and begin removing the part using two adjustable wrenches. You need to carefully swing the element in different directions, then lift it up.
You need to be extremely careful, because the edges of the crosspiece are quite fragile and can crumble when grabbed by keys.
If drops of burning sulfur remain on the surface of the pipeline connecting piece, it can be lowered into a metal bucket filled with cold liquid. Next, you need to clean the remaining sulfur and soot inside the bell using an old chisel or a sharp pocket knife. Only after the funnel-shaped expansion has completely cooled can you begin to install the plastic riser.
Which pipes to choose
If you need to replace the old riser with a plastic one, you can use the following pipes:
- metal;
- ceramic;
- polymer.
PVC pipes for internal sewerage.
Ceramic ones are expensive. The products are not afraid of the negative effects of aggressive chemicals, which is why such pipes are often installed in enterprises. But they are not needed in apartments.
Polymer pipes are lightweight. They are good because even after several years of service, growths do not appear on their inside.
There are products made from polyvinyl chloride and polypropylene on sale. The first material is durable, it is resistant to ultraviolet radiation, but when burned and strongly heated, it releases harmful substances. Sewage drains have a low temperature, so such pipes can be used.
Polypropylene has no such disadvantages. The products are easy to install; all the work can be done on your own. Pipes have a long service life and can withstand sudden temperature changes.
Metal pipes can be steel or cast iron. The former are distinguished by their strength and resistance to high temperatures. But steel is susceptible to corrosion, so such risers are not installed in apartments.
Products made of cast iron are more expensive than others, but among their advantages can be noted their resistance to corrosion. They are durable and will last for many years.
Among the disadvantages, we can note the large weight, so it will be difficult to install the riser. Cast iron pipes become overgrown on the inside, which reduces their permeability.