There are many pipes in the bathroom and toilet of every residential apartment. Some of them deliver water inside our homes for our sanitary and hygienic needs, while others, on the contrary, transport waste water and waste to the sewer system.
As a rule, communications passing through your bathroom are connected to centralized water supply and sewerage systems, thanks to which they function perfectly. However, most of the houses in our country are still built in the Soviet Union; they have not seen a major renovation for a long time, and therefore these systems are gradually falling into disrepair.
Replacement of pipes in the bathroom and toilet can be carried out for various reasons: due to wear, due to the transition to more modern materials, or due to redevelopment in the bathroom. In this article we will figure out how difficult it is to replace communications with your own hands, as well as how much it will cost.
Stages of preparatory work
Like any household work, replacing old sewer pipes will be faster and more efficient if you evaluate the work in advance, draw up a plan and carry out thorough preparation. The entire volume can be divided into several stages.
Planning and purchasing materials
Due to the fact that in this case the sewerage system will not be installed from scratch, but only the pipes will be replaced, design work can be simplified. However, they must be carried out in two cases:
- it is planned to change the design of the engineering system, taking into account the shortcomings of the previous version;
- new consumers need to be added.
If the system functioned successfully, experts recommend laying pipes along the old route and using existing technological holes in the partitions.
Before replacing a sewer pipe, it is necessary to clarify the number and nature of water intake points in the apartment or house. They are: household appliances, namely washing machines, dishwashers, sinks, toilets, bidets and others.
In this case, it is easier to purchase materials. When compiling a shopping list at a building materials store, you will also need measurements of the old pipeline and a census of the fittings used. Naturally, new sewer pipes and fittings will be qualitatively different than dismantled ones, since the industry for their production is rapidly developing, offering more and more effective solutions, but the quantitative volume will be the same. You just need to provide a certain reserve.
Pipe measurements
Today, polymer pipes are mainly used for sewer installation; steel pipes are less commonly found, the installation of which is associated with certain difficulties.
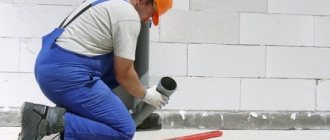
Dismantling
When the old system has been studied and the places that need to be changed have been specified, you can begin to dismantle it. Basic rules for dismantling:
- It begins with the fact that furniture and household appliances that may interfere and are subject to the possibility of being damaged are removed from the premises.
- First turn off the water supply and also disconnect the hose that leads to the toilet flush tank.
- Old sewer pipes are cut into fragments using a grinder and taken out of the apartment or house.
- If the place where the pipe runs is far from the riser, and you can’t get there with a grinder, you can simply break it with a hammer or sledgehammer, since cast iron is quite fragile.
Sewage dismantling
Shopping list
Here is the minimum shopping list - for apartments with an adjacent bathroom with a single mixer, a kitchen with one sink and a separate supply to the tank, embedded directly into the cold water riser:
- Ball valves 1/2 inch with female-male threads - 2 pieces;
- Coarse filters 1/2 inch in size with female-male threads - 2 pieces;
- Couplings “fitting - internal thread” - 2 pieces (for connecting hoses with filters);
- Couplings “fitting - external thread” - 2 pieces (for connecting the hoses with the flexible hoses of the kitchen faucet);
This fitting will allow you to connect a mixer with flexible hoses.
- Double water socket for bathroom faucet - 1 piece;
For installation on top of tiles, you can use single water sockets.
- Tees “fitting-fitting-fitting” - 2 pieces (for the branch of the supply line to the mixer in the bathroom);
- Pipes - along the length of the connections;
- Fastening clips - at the rate of one piece per half meter of pipe;
- Dowels and screws for fastening clips and water sockets;
- Plumbing linen and some paint to seal the threads.
Captain Obviousness suggests: if you have additional plumbing fixtures (washing machine or dishwasher, washbasin, etc.), the number of fittings will increase. In addition, it is better to equip the devices with their own valves for independent shutdown.
The water for each device is turned off by a separate pair of taps.
Installation of internal wiring
After installing the riser, it is necessary to change the internal wiring in the apartment. The work rules include the following recommendations:
- The wiring is carried out from the central riser to the plumbing fixtures (toilet, sink).
- It is necessary to install not only rigid, but also moving elements of the pipeline. Moving elements made of corrugated pipes relieve the internal stress of the system.
- The sockets should be positioned towards the flow of wastewater, this reduces the risk of leakage.
- The sewage system must be installed at a slope towards the drainage direction.
- A pipe with a diameter of 110 mm is used to drain water from the toilet.
- For all other plumbing fixtures, a 50mm diameter pipe must be used.
After installing the wastewater disposal system, the drain tank is connected and a test run is performed. The correct operation of the flush tank depends on the correct connection to the toilet and the tightness of the connection with the supply pipe. There are also cistern models that need to be mounted to the wall. All necessary components for installation are usually supplied with the equipment. Also, the cistern device can be hidden inside a plasterboard structure, which will add aesthetics to the restroom room.
Compliance with simple recommendations for laying a drainage network guarantees the reliable operation of all plumbing fixtures in the apartment, the absence of leaks, extraneous noise and odors. If difficulties arise when carrying out the work yourself, you can call qualified specialists.
Diameter selection
Before purchasing building material, it is necessary to calculate the volume of waste water produced by water consumers. It is not recommended to save money by buying an inexpensive product with a narrow cross-section.
The recommended drain diameter in the wiring diagram is taken as follows:
- riser in the restroom - 100-125 mm;
- outlet from the bathtub and shower cabin - 50 mm;
- toilet and bidet drain - 100 mm;
- outlet from the kitchen sink - 50-70 mm;
- dishwasher and washing machine outlet - 32 mm.
For installation of external sections, only rigid pipes that can withstand strong mechanical loads are required.
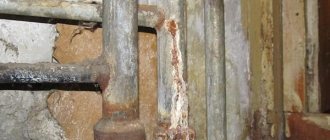
How to dismantle a cast iron pipe
If a pipe is “welded” to a wall or floor using sulfur or aluminum, it will be very, very difficult to destroy such a coating.
To get started, you must first turn off the water supply to the apartment. Then you need to free the bathroom from unnecessary items that you can damage during work. This includes the sink, washing machine, laundry basket, etc.
Next, you need to disconnect the flush tank from the water supply and dismantle the toilet itself. Problems may also arise here, since Soviet toilets were screwed to the floor conscientiously, in other words, tightly.
Try to unscrew the bolts that attach the toilet to the floor and remove it from its place. If you succeed, consider yourself half done.
Now comes the turn of the pipes themselves. Cast iron, as you know, is not particularly strong, so at some distance from the riser you can simply break the old pipe with a hammer. It is much more difficult to remove the remains of pipes from the old riser and clean them before installing new ones.
To dismantle pipes, you may need:
- A hammer with a rubber or plastic tip.
- Chisel
- Torch or blowtorch
- Mask
Quite a strange combination, isn't it? However, a gas mask is necessary to comply with safety precautions if the joints of sewer pipes in your bathroom are filled with sulfur.
The easiest way to remove sulfur is by heating it. However, when heated, the sulfur mass releases toxic substances into the air, which are extremely harmful for humans to inhale. That is why it is better to protect yourself with a gas mask in advance.
So, dismantling must begin at the point of greatest distance from the riser. Here, most craftsmen do not bother with the torch, but simply break the pipe with a hammer. This is much simpler, but can cause some complications.
Make sure that when broken, pieces of pipe do not fall into the sewer passage. They can cause serious clogs in the drain, which will be much more difficult to get rid of than getting rid of old pipes.
With a hammer, you can destroy the pipe up to the crosspiece inserted into the riser. Here it is somewhat different and filled with much more sulfur.
To free the pipe and cross from the layer of sulfur, you need to heat it. The impact of a burner or blowtorch can last for several hours, while harmful substances will be constantly released.
Before you start heating, isolate animals and household members, cover furniture or other furnishings located in the immediate vicinity of the riser, and put on a gas mask.
During the heating process, you can easily chip off pieces of sulfur until the pipe is sufficiently clean. Now, the cross inserted into the riser must be loosened if possible and removed from the riser.
The dismantling of the old pipeline is carried out as much as possible. That is, all possible pipes are removed, and others are installed in their place.
Connecting a new PVC pipe to an old cast iron riser will require certain operating skills. Please note that you must clean the connection area as much as possible from the same sulfur and rust.
To make the job easier, use a special coupling that is specifically designed to connect cast iron pipe and PVC pipe.
If you still have questions, take a look at ours and ask them there. Our experts will help you understand the intricacies of good construction and renovation.
From time to time, the pipeline wears out under the influence of mechanical load and the sewer pipes in the apartment need to be replaced. Most often, this problem is faced by residents of old houses, where over the years cast iron pipes rust, cracks appear and leaks occur.
To change drain lines, you must first properly dismantle the old pipes. Successful completion of the task requires the availability of the appropriate plumbing tools and necessary components.
When is it necessary to replace pipes in an apartment and at whose expense is it carried out?
A pipe leak in an apartment is a big nuisance and, unfortunately, a common event. The areas of greatest risk are apartments in old housing stock, where communications have not been changed for decades. However, you don’t have to wait for an emergency to replace pipes. You can renovate your apartment and install modern pipes instead of outdated ones.
When the need to replace pipes arises, the first question that comes to mind is where to go? Should the management company do this? What is the cost of replacing pipes in an apartment? Is it possible to contact a third party to carry out this work?
- Replacement of pipes in the apartment. How to act.
According to the rules for maintaining common property, the management company is responsible for the section of communications up to the first drain valve from the riser. After the tap, the pipe belongs to the owner of the apartment, and only he is responsible for its performance and safety. Therefore, eliminating the breakdown or replacing this area falls on the shoulders of the homeowner. It’s a different matter when repairs or replacement of risers are required. Since these pipes are the responsibility of the housing office, if they leak or malfunction, you should contact them for replacement.
However, as practice shows, utility workers are usually reluctant to contact apartment owners on this issue and do not always respond promptly to calls for plumbing work. Quite often there are reasons why they do not want to replace the risers themselves. To avoid such a situation, you need to contact the management company not orally, but with a written statement, a copy of which you should keep. The Housing Office should put a resolution on this statement. In it you should indicate the reason for replacing the pipes.
If the answer to repair or replacement is negative, it is necessary to insist on an inspection of communications, after which a report on the technical condition of the pipes must be drawn up. If a refusal follows even after this, you should again take a written response from the Housing Office with a justification for the refusal. This document will be very useful if the riser breaks and you suffer property damage. In this case, the management company must be sued and demanded to compensate for the losses incurred.
There is another option for replacing a public pipe. You can do this yourself by involving a specialized organization. However, this does not cancel the application to the housing office according to the above scheme. If the hired company replaces or repairs the pipes in your apartment improperly, the document will be able to help in solving the problems that have arisen.
You also need to remember that if it is the management company that replaces the pipes in the apartment and determines the cost of the work, then the owner of the premises pays for the service.
It cannot be said that any refusal by the management company to replace risers will be illegal. A reasoned refusal is quite possible, for example, if the owner of the apartment moved the pipes in the bathroom during the renovation, in order to implement the planned new design of the premises. In this case, the transfer or replacement of communications is not the concern of the management company.
If leaky places and traces of rust are visible on the riser, then this is a serious reason to contact the housing office. True, specialists can not replace pipes, but “repair” them by installing a clamp on the problem area. Sometimes there may be 5-6 such clamps on a pipe.
- How to write an application for pipe replacement.
This application is made in free form. In it, you describe the situation and demand the intervention of the management company to replace or repair the pipes in the apartment.
It is also worth noting that the owner of the premises who submits the application has no debts to pay for utilities, does not make late payments, and therefore can count on the provision of quality services. An application is written addressed to the head of the management company. If there are any difficulties with drawing up the document, then samples are available at any housing office, you can check them.
- Replacement of pipes in a privatized apartment and a municipal one. Who cares?
Not everyone living in an apartment can be its owner. The owner of the premises pays for work in a privatized premises. When concluding an agreement with a contractor, you need to check that he has permission to carry out this type of repair. The document must also contain a clause stating the company’s responsibility for its work. If the contract is concluded with a management company that constantly maintains the house, then it must provide all the necessary guarantees.
If a person lives in a municipal apartment, then you need to look at the terms of the rental agreement. It is possible that the tenant himself must carry out the necessary work to replace or repair pipes in the apartment. In this case, you need to look for an organization that will replace the pipes and pay it. If the agreement states that the repair of communications should be carried out by the municipality, then it is necessary to write an application to the appropriate department under the administration of the city or district.
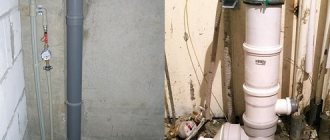
Removing a Cast Iron Pipe
Dismantling the riser begins with removing the pipe located between the tee and the ceiling. First, a ring-shaped gap is made on top of the section. To do this, at a distance of 12-16 cm from the ceiling, using a grinder, a cut is made in the pipe with a wall remaining of about 3-5 cm.
An incomplete cut is needed to prevent the tool from jamming during possible vertical movement of the column. Then, retreating 9-13 cm down, a similar cut is made, parallel to the first. The ring between the cuts is carefully knocked out with a hammer or using wedges.
The next step is sawing the cast iron section from the bottom. To implement this, an incomplete cut with a grinder is made at a height of 50-70 cm from the upper socket of the tee. The clamps securing the section to the wall are removed (they can simply be cut off with a grinder). The pipe is broken by rocking or hitting with a hammer at the place where the cut is incomplete and is removed from the column.
Removing the tee
The most important operation of the entire dismantling of the old sewer system is the removal of the tee from the socket of the lower section of the riser
As noted, there is an important condition: this bell must not be damaged. The simplest dismantling options are used when filling the joint with cement mortar
First, an attempt is made to disconnect by loosening.
A crowbar is placed in the hole in the remaining pipe, with its help creating bending forces in different directions. Most often, such loosening destroys the cement bond, and the tee can be removed from the lower socket. If the joint is destroyed, large cement pieces should be prevented from getting inside the pipe, that is, the cement is removed from the socket with a screwdriver or chisel.
If loosening does not lead to a positive result, then you will have to use a more labor-intensive method: the cement mass is destroyed using a chisel and hammer
Given the fragility of cast iron, this procedure should be carried out very carefully, and the impact force should be applied away from the walls of the socket. The goal is to provide a gap between the tee pipe and the socket walls
As cement pieces break off, they are immediately removed from the joint area.
The most difficult method of dismantling has to be used when filling the joint with sulfur. This composition is very durable and does not lend itself to the methods of destruction described above. In this case, heating the connection area using a gas torch or blowtorch is most often used. The work is carried out by two people. One worker heats up the joint, and the other loosens the tee.
When the mass melts, the tee is easily removed from the socket
Such work is carried out with the release of very harmful gases, which means it is necessary to take precautions (respirator and safety glasses)
Finally, extreme circumstances may arise when it is not possible to remove the tee from the lower section in any way (it is impossible to use heating, particularly strong pouring and other non-standard situations). In this case, the most undesirable option is used - the tee is cut off at a height of about 5-6 cm from the socket. The end of the remaining pipe is carefully leveled, and subsequently, when installing plastic pipes, you will have to use a coupling.
If you plan to install new plastic sewer pipes, then it is impossible to do without the rather labor-intensive dismantling of the old cast-iron sewer system. This process can cause a number of difficulties, so you should prepare in advance to solve emerging problems.
When replacing a used pipeline, the most difficult task is considered to be dismantling the cast iron pipe. Adding to the complexity of the work is the material used to connect the pipes. Previously, for reliable joining of pipes, they used cement mortar, sulfur or aluminum (see. Thus, the entire structure became almost monolithic. The cement composition is quite easy to remove, but sulfur and aluminum require maximum effort (see).
Dismantling worn-out elements of the sewer line
In order to repair the sewer system in an apartment, it is necessary first of all to identify the location of wear. If there is major damage to the drainage lines, it is enough to simply turn off the water supply in the apartment, remove the plumbing fixtures and begin removing the worn-out area. If you need to replace the sewer riser, you must coordinate your actions in advance with your neighbors, because their water supply will have to be cut off as well. The exact time it will take to repair sewer pipes is difficult to calculate in advance. However, proper preparation and following the intended plan will ensure the successful completion of the process.
Removal of damaged sewer sections consists of the following steps:
Shutting off the water supply to the apartment or to the entire riser. Disabling the flush tank device in the toilet. To dismantle the flush tank, you need to disconnect the water supply hose. Dismantling the toilet. The process is quite labor-intensive; you will need to free the base of the toilet. Sometimes it is enough to simply unscrew the bolts, but sometimes you have to remove the layer of tiles around the toilet leg. Dismantling the toilet must be done using a special tool: a wrench, a chisel, a hammer. Dismantling of the sewer system. Old pipes cannot be reused, so they can be dismantled using physical force and a hammer without sparing. If the replacement of sewer pipes will be carried out only in your apartment, at the next stage you will need to cut the riser using a grinder. The cut pipe should be carefully removed using a hammer and chisel. You can try to remove the lower part of the drainage system near the riser by simply rocking it to the sides. If this manipulation does not lead to the desired result, you will need to make cuts using a grinder
How many cuts to make on the pipe is not so important. The main thing is to split it in order to remove individual fragments in the future. Clean the socket from grease, cement residues and other contaminants, and prepare for installation.
What to change for
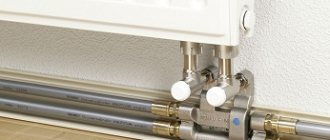
I recommend two types of pipes, differing both in consumer qualities and market positioning:
- Corrugated stainless steel pipe is a solution for those who need maximum reliability and are willing to pay for it. The working pressure for this type of pipe is 25 atmospheres, the destructive pressure is at least 50, the operating temperature range is from 0 to 150 degrees. Alas, you have to pay for quality: with a nominal diameter of 15 mm, a linear meter of South Korean Kofulso will cost 250 - 300 rubles;
Corrugated stainless steel water pipe.
- A metal-plastic pipe has much more modest characteristics: 95 degrees and a working pressure of up to 16 atmospheres. These parameters can be exceeded in DHW and cold water systems only under force majeure circumstances, but such a possibility always exists. But the price of a linear meter of pipe is much more modest: with an outer diameter of 20 mm, it is only 80 - 100 rubles.
The water distribution in the attic floor of my house is made using metal-plastic.
It is these two types of pipes that are attractive, primarily because they are installed using the simplest tools. A couple of adjustable wrenches are all you need to assemble the compression fittings.
It was not by chance that I compared the prices of pipes of different diameters. They differ in wall thickness and fitting design, which directly affects the throughput of the water supply system. As a result, this same throughput approximately corresponds to a half-inch steel pipe standard for Soviet-built apartments with a diameter of 15 mm for stainless steel and 20 mm for metal-plastic.
The fitting for metal-plastic further reduces the useful cross-section of the liner.
Calculation of sewer pipeline
Selection of sewer pipe material
Of all the possible types of sewer pipes for DIY repairs, choose pipes made of polymers.
Advantages of plastic pipes:
- Corrosion resistance.
- Chemical resistance.
- Easy to assemble.
- Light weight.
- Smooth wall surface (inner).
- Resistant to low and high temperatures.
- Easy to repair.
- Durability.
Compared to metal pipes, plastic products are more fragile, so care must be taken when handling and storing them. This disadvantage is compensated by its light weight and ease of installation.
Selecting the diameter of the sewer pipe
Minimum permissible diameters:
- Bidet, washbasin, sink – 40 mm.
- Shower cubicle, bath – 50 mm.
- In the case of including several plumbing fixtures in one pipe - 85 mm.
- The riser (main) of a house or apartment is 100 mm.
The versatility of the system can be achieved by using a 50 mm diameter pipe to connect all plumbing fixtures, except the toilet, and make the main riser from a 110 mm diameter pipe; connect the toilet to the same 110 mm sewer pipe.
Calculation of the number of system elements
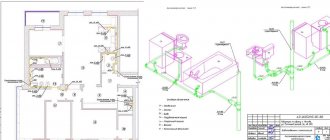
To calculate the pipeline and install sewer pipes, it is necessary to draw up a diagram of the future system. Simply take a sheet of paper and place on it all the plumbing fixtures that need to be connected.
Approximate diagram of an intra-house pipeline
It must be taken into account that it is not recommended to use bends with an angle of 90°. In this case, it is better to use two 45° bends, which significantly reduces the likelihood of blockage in the pipe.
A large assortment of fittings - angles, crosses, tees, couplings - will allow you to select the necessary element of the desired configuration and the required diameter. If you plan to install another plumbing fixture in the future, then determine the installation location and add it to the diagram. When installing the system, this outlet will be closed with a plug until it is needed.
Having selected all the necessary pipes and fittings according to the diagram of the future pipeline, you can proceed to the next stage of repair.
What material to choose so that the replacement of pipes in the apartment is successful
The most common pipes for cold and hot water today are made of metal-plastic, polypropylene, copper and galvanized steel. Let's take a closer look at the pros and cons of each material.
Metal-plastic pipes
Metal-plastic pipes have the form of a structure in which there are four layers - cross-linked polyethylene, an aluminum layer, the thickness of which is 0.4 mm (performs a reinforcing function), a layer of glue and wear-resistant plastic on the outside.
These communications are universal. Based on the name, such a pipe combines a layer of both plastic and metal. Thus, the outer layer is not subject to corrosion and has a long service life. The inner layer makes the pipe reliable, yet flexible and durable. The developers of metal-plastic communications managed to eliminate the problem characteristic of plastic - instability to high pressure and temperatures.
Advantages of metal-plastic pipes:
- corrosion resistance;
- ease of installation;
- the outer layer of the pipe does not conduct current;
- many different fittings.
The disadvantages of such pipes are:
- the need for constant tightening.
Read material on the topic: Metal-plastic pipes: types, sizes, operation
Polypropylene pipes
If you are replacing pipes in your apartment with polypropylene ones, the price of the repair will definitely please you. The cost of such communications today is the most optimal in terms of price and quality ratio. You will also get high performance characteristics of pipes made from this material. This type of communication can be called the most utilitarian and practical.
Unlike pipes made of PVC or polyethylene, polypropylene pipes are not so susceptible to temperature changes, especially low ones. Polypropylene can also cope with hot water, but it is necessary to prevent exceeding the threshold values.
Polypropylene pipes are smooth on the outside, have high strength and are resistant to deformation. The thickness of their walls can be up to 8 mm, and inside they are often reinforced with aluminum or fiberglass.
By replacing the pipes in your apartment with polypropylene ones, you will receive a pipeline with a very long shelf life, because... these communications are not afraid of exposure to water and can be used in adverse conditions.
So, the advantages of polypropylene pipes include:
- high throughput;
- ease of installation;
- maximum tightness of joints;
- resistance to mechanical damage;
- low cost.
The disadvantages of these pipes are:
- permanent connections;
- limited operating temperatures.
Read material on the topic: Wholesale sale of polypropylene pipes at competitive prices
Copper pipes
Copper pipes are a classic that have proven themselves over decades of excellent work. Since pipes began to be made from this material a very long time ago, there are houses with copper pipelines whose service life is approaching a hundred years. Despite such impressive characteristics, these communications are far from the most affordable price.
The durability of copper pipes exceeds that of even polymer products. At the same time, they have good flexibility and a very wide operating temperature range. In addition, copper also has advantages from an aesthetic point of view.
In addition to the price, which is a significant disadvantage of these pipes, the disadvantages include poor resistance to deformation. This, of course, makes installation easier (you can bend the pipe to any position), but it also reduces the overall safety of the entire site.
Pros of copper pipes:
- longest service life;
- ability to work at any temperature;
- aesthetically pleasing appearance;
- corrosion resistance.
Disadvantages of copper pipes:
- price;
- difficult installation;
- low mechanical strength.
Galvanized steel pipes
Galvanized steel pipes remain popular. By replacing communications in an apartment with this material, you will receive good moisture resistance, as well as high reliability and durability. At one time, galvanized pipes replaced ordinary steel ones.
Advantages of galvanized steel pipes:
- maximum mechanical strength - they are perfect for replacing a riser in an apartment;
- corrosion resistance;
- high throughput - due to galvanization, the pipe does not overgrow or become covered with plaque.
Disadvantages of these pipes:
- relatively high price;
- complex installation.
Sequence of work
Some may think that dismantling old communications can be done quickly and without problems. However, it is necessary to take into account that the riser passes through several apartments, which means that if it breaks, many people will suffer. Dismantling is a plumbing job of increased complexity. Some experience working with tools and equipment and compliance with safety precautions are required. Therefore, such responsible work must be entrusted to qualified specialists.
To completely eliminate possible emergency situations, it is necessary to perform the following manipulations:
- turning off the water flowing through the riser;
- disconnecting the hose that goes directly to the toilet;
- dismantling the toilet, for which you unscrew the mounting bolts;
- all unnecessary materials, equipment, household appliances and plumbing fixtures are removed from the room so that there are no unnecessary obstacles to dismantling;
- pipes located a little further from the riser are dismantled with a hammer;
- get rid of structures leading to the riser;
- A special cuff is installed on the socket of the tee, for which the old lubricants are removed in advance. If this is not done, then it is impossible to talk about high-quality installation of the new system.
Important! Careless installation of the cuff can damage the tee. In such a situation, it will be necessary to replace a certain section of the riser, which will entail additional costs.
Dismantling Guide
Due to the fact that the sulfur used to connect sections of communications tends to harden, demolition will be difficult. So how can you understand what composition was used for fastening? To find out, you need to bring a blowtorch to the connection. An unpleasant odor and melting indicate the presence of sulfur.
Dismantling joints with a torch or blowtorch
To destroy a pipeline where there is a connection using sulfur, you will need a hammer, chisel, blowtorch or torch. Sulfur is a chemical element, so when heated it will begin to release harmful substances into the air. They are poisonous to humans and harm everything around them. Moreover, the heating process can last several hours. Therefore, you will need a gas mask and other protective equipment to prevent the fire of nearby equipment or furniture. You can use a protective screen made of a metal base or asbestos.
Detailed instructions on dismantling communications
Dismantling the system begins with the elimination of pipes located at a distance from the riser. For operational work, use a hammer and chisel. After all, cast iron itself is a rather fragile material, and accordingly, it is easily susceptible to mechanical destruction.
Important! To disassemble pipes, it is not recommended to use a hammer with a metal attachment. If you do not calculate the force of the impact, the hammer will fall inside the pipe, which can cause a large-scale blockage of the sewer system or the lumen of the pipeline will close.
A hammer with a polymer attachment is suitable for the job.
The pipe removal process includes several stages:
1. Work with a hammer is carried out until the cross in the riser becomes visible.
2. It is necessary to loosen the crosspiece. This procedure is easier to do when there is a small section of pipe remaining. However, some wizards do not leave extra in order to fully open the connection.
3
Wear all protective equipment and take precautions using protective screens. If two professionals are involved in dismantling, the work will take less effort and time
One specialist heats the sulfur, the second, at the same time, loosens the pipe, breaks off and removes the viscous sulfur.
4. The crosspiece can be easily removed from the riser when most of the sulfur has been removed.
Important! Care should be taken when removing pipe attached to a tee. Part of the pipe is cut off with a grinder. In this case, a fragment no longer than 10 cm should remain.
Then this segment must be loosened and removed.
In this case, a fragment no longer than 10 cm should remain. Then this segment must be loosened and removed.
Types of fan products
Fan pipes are classified according to the construction material used in the manufacture of the product.
The classification divides fan pipes into 2 types:
- metal;
- plastic.
The metal (cast iron) version can be installed in a sewer system made of a similar material. Plastic products can be installed in both plastic and cast iron pipelines.
When repairing fan pipes, it is recommended to replace cast iron elements with plastic analogues. This material is much more durable than cast iron
When installing a plastic element, you get a flexible sewer pipe, a monolithic elbow or a compact adapter. Cast iron products are not flexible and do not have a variety of shapes.
Carrying out work
Dismantling an old sewer system includes several main stages: dismantling the intra-apartment pipe distribution, removing the cast-iron riser pipes and dismantling the tee (cross).
Removing the indoor system
When carrying out a major overhaul, it is advisable to completely disassemble the wiring (to the kitchen and other devices). If the joints are made very firmly, then there is no point in wasting time disconnecting all the elements.
It is simply cut as close as possible to the socket of the tee using a pipe cutter or grinder. Difficulties with disassembly may arise if the pipes were previously masked with floor coverings - they will have to be carefully removed. It’s even worse if the pipes get under a concrete floor screed. In this case, you will have to work with a hammer drill, a chisel (chisel) and a hammer.
Dismantling the old sewer system
Dismantling of sewer pipes begins with preparing the premises. It is necessary to clear the workplace of all unnecessary things in order to gain full access to the riser and sewer pipes. You also need to prepare a tool for the job: a hacksaw, a grinder, a set of screwdrivers, a hammer, a hammer drill, a chisel, a needle file.
Dismantling stages
- If you are making repairs in a multi-storey building, then you need to agree with the neighbors on the sewer riser that at such and such times they will not use the sewer. Otherwise, all the waste will end up in your workplace.
- Turn off the water.
- Disconnect the water supply hose to the drain tank.
- Remove the toilet, first unscrewing the bolts securing it to the floor.
- Disassemble and dismantle old pipes.
Dismantling cast iron pipes
Since the old sewer system is made of cast iron pipes and fittings with sockets, dismantling will not be difficult. The pipes need to be pulled out of the sockets using auxiliary tools - a chisel and a screwdriver. If the joint cannot be disassembled, then you should use a grinder or a hacksaw
By making cuts in the required places and carefully hitting with a hammer, you can remove part of the system
Particular attention should be paid to work at the junction with the main riser. You cannot use a hammer here, as this could damage the integrity of the entire building sewer system.
The tee connected to the riser is carefully cleaned of the remnants of the old seal. If during disassembly it was not possible to pull the pipe completely out of the joint with the riser, then using a grinder with a small circle (the diameter of the cutting circle should allow it to go inside the tee), cut the rest of the pipe into pieces and pull them out with a chisel. If necessary, you can use a hammer drill with a metal drill.
Solving organizational issues
It is necessary to provide a pipe laying diagram and make the necessary measurements. You need to draw up a project on paper, it is advisable to write down all the data, and decide on a water supply layout.
To lay pipes, you need to take measurements.
It is necessary to count the number of shut-off valves, lintels, tees, and holding anchors. Then you need to decide on the material of the products, the method of their installation (threaded or soldered).
When replacing a sewer system, special attention is paid to the riser in an apartment building. Here it is necessary to warn neighbors from above not to use the toilet during this period.
This does not need to be done in a private home, but access to the sewer line in the house requires digging a trench to replace the drain.