Have you noticed that mold is appearing more and more often in our homes lately? Often, mold damage is caused by uneven room temperature and high humidity. This happens due to damage to building structures: loosely covered special. roof material, insulation defects in the basement, damage to the pipeline or condensation, etc.
[contents]
Typically, mold appears after replacing outdated double-glazed windows on windows with new ones, providing increased tightness, thereby disrupting natural ventilation.
Improper use or complete lack of ventilation leads to the formation of water vapor during human activity, which condenses on the walls, most often in the bathroom and kitchen. This is facilitated by cooking, drying clothes, etc.
Penetrating dampness
It is brought in by moist air from the street, often due to wear and tear and defects in the building itself; However, dampness can also appear on solid walls that become wet in heavy rain.
The first sign of damp penetration appears after a heavy rainfall, and it can be found almost anywhere, despite the fact that this place is sometimes located at some distance from the actual leak: mold very often forms exactly where the problem itself is located.
| Poor ventilation exacerbates condensation problems. | A moldy area on the inside surface of an exterior wall is usually the first sign of damp penetration. |
Factors of penetrating dampness
- Damp in the ceiling of the upper floor of a home can be caused by broken or loose roof tiles or damaged upper course of masonry walls.
- Dampness on the ceiling, coming in streaks from the wall above the fireplace (from the protruding part of the fireplace), usually occurs due to a violation of the waterproofing at the junction of the brickwork elements or the appearance of cracks in it at the seams.
- When damp patches are on the walls below the ceiling of the upper floor, look for dirt clogged or broken gutters or pipes, and also look for a layer of fallen leaves on the roof.
- When the dampness has spread throughout the entire wall, check whether the bricks in the masonry are cracked or whether their surface is too porous.
- Individual spots of dampness on the wall arise due to damage to the jointing, as well as the formation of cracks in the plaster (large spots of dampness) or due to damage to the cement screed covering the anchor ties in the hollow wall (small spots).
- Rotting woodwork and damp spots around window and door blocks are the result of the formation of gaps between the brickwork of the openings and the trim bars and the absence of drain slats on the windows and doors. Perhaps the drip tray (a groove or protrusion on the lower surface of window sills, window frames, etc. for water drainage) is clogged with old paint or overgrown with moss.
| Spalling of the mortar and damage to drains (roofing elements) can cause dampness to penetrate. | Gutters that are clogged with dirt or broken allow water to seep through the masonry. | The flow of water through cracks and holes in a damaged roof and saturation of load-bearing wooden structures with moisture is fraught with dampness and rotting of the wood. |
Rising damp
The reason is water that has soaked the floor and walls; dampness then typically covers a surface up to one meter wide above ground level. This is a constant problem, even in dry weather.
The main areas that need to be monitored for increased dampness are the damp proofing around the walls and the damp proof film on the ground floor. Older properties, often built without either, can contribute to widespread damp.
If the materials from which such a house is built deteriorate or are damaged as a result of the displacement of its structural elements, then they can be insulated, but this cannot be done with damp spots that occur in places where water penetrates.
A layer of waterproofing that is less than 150mm thick allows water to pass over its surface, seep through the walls and ultimately cause damp patches at baseboard level. If the waterproofing comes into contact with a layer of exterior or interior plaster, the dampness will rise above the baseboard. Spaces filled with rubble, soil or plants pressed against the wall can also allow damp to penetrate.
| The gaps between the masonry of the opening and the perimeter of the wooden window frame no doubt allow rainwater to pass through, which in turn leads to damp patches. | Injecting a silicone layer onto the inner surface of the wall; to do this, you will need the help of specialists. |
| Water vapor from household work can cause condensation. | Condensation is a common feature of our modern, draft-proof homes, but to maintain your home and your family's health, it is important to control condensation. |
How to identify the problem
The presence of condensation is indicated by areas of rust on metal parts.
Typically, filter ventilation is a complex technical device with many branches. It is not always possible to disassemble it and see where the drops form for a number of reasons. In this case, you have to approach the problem indirectly - look for signs of a defect on the outside.
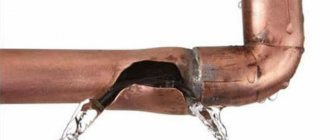
The first sign of water formation on the walls of a metal channel may be areas of rust. If the shaft is covered with insulation, wet areas will still appear, making the insulation material itself wet. In this case, the damaged material is removed and a new one is put in its place.
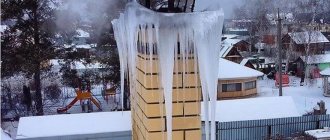
Another potential problem area may be a section of ductwork that extends above the roof covering. In order to save money, they do not always organize insulation in this place, which often leads to icing of the material.
Condensate
When warm, moist air hits a cold surface—such as a wall facing the chilling winter winds—or ceramic tiles, condensation results.
Condensation is common in bathrooms and kitchens where washing, laundry and food preparation occur. The fight against condensation will be successful with a precise balance between good ventilation and adequate heating, but since a modern house is always warm and well protected from moisture and wind, very often the level of ventilation remains insufficient. The key to success is effective ventilation, which does not waste precious heat.
If you are not sure whether the problem of high humidity will transform into condensation or dampness, place a piece of aluminum foil on the damp area, seal it tightly around the edges with tape and leave for 48 hours. Condensation will appear in the form of water droplets on the surface of the foil; penetrating or rising damp will create beads of moisture under the foil. Aluminum foil test to determine the nature of problem spots: dampness or condensation?
The concept of “dew point”
The “dew point” is the temperature at which cooling vapor turns into liquid. Such a point can be located anywhere in the wall insulation. It cannot be seen visually, but can only be seen on the corresponding graphs and maps.
Condensation is equally affected by temperature and humidity. And the lower the humidity in the room, the lower the dew point will be. In addition, the dew point is influenced by:
- external temperature;
- density of the wall “pie”;
- humidity and temperature in the room;
- as well as environmental humidity.
Fighting dampness and condensation
Dampness and condensation should never be ignored, as these natural phenomena do not disappear on their own and, of course, are a sign of more serious problems. Often the remedy for dealing with dampness and condensation can be simple and inexpensive, but in this case you can only eliminate the consequences of these problems for a while, and then real effort will be required when it comes to putting the premises in order and eliminating the causes.
Waterproofing walls by applying a waterproof layer. Sweep and clean the wall and remove any mildew. Seal all cracks on the surface. Apply a waterproof layer with a brush: cover the entire wall from bottom to top.
Does it need to be cleaned?
The process of moisture deposition itself is not critical , but it is undesirable for walls and other objects surrounding pipes. Absorption of moisture contributes to the destruction of building materials, causing the appearance of fungus, mold, and insects.
If condensation occurs on polymer surfaces in well-ventilated areas, you may not be too afraid of this phenomenon.
It is enough to get rid of the causes of steam deposition, and no harmful consequences will arise.
It is more difficult when steel parts , structural elements of the house, and reinforcement of load-bearing walls get wet.
In these cases, the most effective measures must be taken immediately, including temporarily turning off the water and identifying the source of danger.
Waterproofing layer
The first line of defense against dampness is an effective waterproofing layer combined with a moisture barrier film, supported by a good system of pipes and rainwater drainage gutters, as well as a plumbing system.
Ventilation is key to preventing problems that cause condensation. An air flow corresponding to the volume of the room must be ensured by the design of the building itself through soffit fans and hollow (perforated) bricks; while exhaust fans will effectively remove warm and humid air generated by household activities such as cooking, washing clothes and bathing.
What do experts advise?
A protective cap on the pipe prevents water from entering the ventilation.
Based on experience in operating various ventilation systems, experts recommend:
- Insulate air duct lines in unheated areas with polyurethane foam insulation. When using mineral wool, waterproof the base before and after laying the heat insulator.
- On long sections of the air duct along the street, equip it with condensate drains for ventilation.
- The end of the upper pipe, rising above the roof, should be equipped with a protective canopy.
- Equip rooms with high humidity with a local exhaust fan.
It is necessary to periodically inspect the entire line as a whole and problem areas in particular. To do this, the channel must be organized in such a way that inspection hatches are easily accessible.
Eliminating dampness
This problem can only be eradicated after the cause of the penetrating dampness has been identified and eliminated. The remedy for combating rising dampness caused by the absence or damage of the waterproofing layer and moisture-proof film is not so simple: the only way out is to build a new waterproofing layer or make a major renovation of the house.
However, it is quite easy to construct a waterproofing layer in the form of a lintel. If the dampness is caused by high ground, dig a 6-inch-wide trench between the level patio or path and your house, then fill it with gravel to help drain rainwater faster.
When you suspect that the cause of dampness is construction debris in a cavity wall cavity or dirt on the surfaces of anchor joints, removing a few bricks from the wall masonry will give you access to remove debris or gouge out mortar stuck inside. After replacing hollow (holey) bricks, apply a layer of water-repellent material to them.
The waterproofing layer must be free from soil, construction debris and plants climbing along the wall.
Vapor barrier comes into play
It should be the first one. For this purpose, a vapor barrier is installed. It was invented precisely in order not to turn frame walls into equipment for dehumidification. Moreover, please note, and this is again extremely important, we protect our walls from warm air, and not from cold air, in which there is extremely little moisture! This means that especially careful insulation must be inside the room so that this particular air is not allowed into the walls.
What about insulation of external walls? Yes, she seems to be even harmful! Indeed, why do we need to keep moisture inside the walls? Let it come out! Do you feel sorry for her? This is why I generally advise against insulating external walls. I wrote a special article about this. However, in our case, and in frame construction in general, we use exterior finishing materials that are themselves moisture-proof. Simply due to its original properties. Here is OSB, for example. These are chips impregnated with epoxy. Of course, it does not allow moisture to pass through!
Another intermediate conclusion
A vapor barrier is the insulation between a room inside a room and a wall. It is this that protects the wall from steam. But the insulation between the wall and the street or the external finishing is not and should not be called a vapor barrier! What is this insulation called? Personally, I call it a mistake by the developer and sabotage by the builders, which I have written about many times.
Knowing about these properties of frame houses, vapor barrier is given extreme importance and is done extremely carefully. Ventilation holes should be provided in the external walls to allow the interior of the walls to dry out. Why should they dry out if we made a vapor barrier and got a complete analogue of a sealed bag of cotton wool?
Consequences
Walls and floors can take up to one month for every 25mm of thickness to dry, while a layer of old plaster, if heavily contaminated with mineral salts from rising damp, will continue to absorb moisture from the air.
Replacing indoor plaster as a preventative repair is recommended in extreme cases, but this should be delayed as long as possible to allow the walls to dry completely. Try using a mildew remover that appears due to dampness or condensation on the interior wall surfaces.
Pipe insulation: priority of work
- The ventilation pipe is wiped dry.
- The selected insulation is tightly wound around the problem area of the pipe and fixed.
- Insulation materials, which are shaped like a pipe, are cut along the entire length on one side.
- Then you should put it on so that all areas fit tightly, it is necessary to achieve complete tightness.
- Only then is the cut seam sealed with glue or tape.
Important! If the insulation does not fit tightly, the condensation in the ventilation pipe will wet the thermal insulation. This will lead not only to the formation of mold and a damp smell, but also to rust - soon the pipe will have to be replaced.
Methods for creating a waterproofing layer
There are many ways to construct a waterproofing layer - from the use of rolled and mastic materials that are embedded in the brickwork, to polymer solutions pumped into the walls through special holes.
In theory, you can do this job yourself, but dealing with rising damp is rarely easy. Here it is worth seeking advice from professionals. If you have a mortgage on your home, the lender may also require guarantees that prevent you from doing the work yourself. The quality standards of this work are as important as the mortgage system used, so you need to choose a reputable company that offers insured guarantees.
Installation of film waterproofing
Any competent “do-it-yourselfer” can handle such work. Installing new waterproofing film involves removing the old floor tiles and installing new ones, which is a difficult but most effective method of waterproofing a cement floor.
The floor can also be insulated by laying down several layers of moisture-resistant polyurethane, but it is important that any leaking spots are completely sealed with hydraulic cement first. The third option is to apply a two-layer coating of rubberized bitumen mastic to the old surface, then make a sand-cement screed on this surface, which will raise the floor level by about 50 mm.
Whichever method you choose, the waterproofing material must run up the adjacent walls so that it comes into contact with the film insulation, if any exists. The problem of damp floors, caused by rising groundwater levels that typically affect basements, is more serious and requires structural waterproofing or basement waterproofing, which should definitely be done by a professional.
Installation of a waterproofing layer. The polymer waterproofing layer is pumped into holes drilled in line, spaced approximately 115 mm apart. Once injected into the wall, the polymer components are layered on top of each other to create a continuous, impenetrable barrier. When the liquid dries, the drilled holes are sealed with mortar; then the plastered surface can be painted.
Fighting condensation
A well-ventilated range hood over the stove can remove steam from cooking, but in areas where a lot of water evaporates, such as when you shower, a hood fan is the best way to remove it.
In order for such a fan to work quickly and efficiently, it must be correctly located in the room and have the appropriate dimensions. In the kitchen, such a fan should perform from 10 to 15 air exchange cycles per hour; this figure should be increased from 15 to 20 exchange cycles for an electric boiler in a shower room. Simply multiply the volume of the room by the required number of air exchange cycles and look for a fan whose performance will provide the same cubic capacity of air per hour (m³⁄hour).
The exhaust fan must be installed on the wall as high as possible and as far as possible from the main source of supply ventilation. As a rule, a location diagonally opposite the front door is ideal. More intense condensation can be alleviated with an electric dehumidifier or prevented with a comprehensive thermostat-controlled home ventilation system.
A hood above the stove removes steam from the food being cooked.
Most expensive method
In the event that the methods described above do not lead to positive results, you can resort to making a new ventilation system with muffling of the old ventilation system. Typically the biggest source of evaporation is in the kitchen, so this is where it is recommended to install an exhaust fan. To carry it out, you can disturb the load-bearing walls or use a window, which is the easiest installation method.
Such a fan extracts air from the kitchen and other rooms, but it is worth taking care in advance to solve the problem of the influx of air mass in order to avoid disrupting the air circulation. You can open the windows in all rooms or use special supply valves for the walls. Since they can be installed behind heating equipment, they are not only practical, but also completely invisible.
The most expensive method is a new ventilation system
The cost of all the necessary equipment is not high, and you can buy it in virtually any specialized store. However, installation work, plugging the existing ventilation system, and punching through load-bearing structures and walls are currently expensive. To calculate the cross-section and count the required number of holes, you need to contact an organization that carries out such work at a professional level.
Condensation in the ventilation system can create a huge number of problems, so to get rid of it in multi-storey buildings, collective coordinated actions of all residents are required. Only in this case can positive results be achieved, because the ventilation system is a single organism, the failure of any section of which can negatively affect the operation of the rest.
Practical advice
- When you shower, close the bathroom door and run cold water first to minimize the steam it creates.
- When condensation forms in a confined space, such as a built-in closet, and this causes dampness and mold, use silica gel crystals, which absorb excess moisture from the air.
- Make sure your kitchen tumble dryer is properly ventilated.
These articles may also be of interest to you:
- Original small kitchen design
- Can vertical gardening of the facade harm the house?
- How to build a wooden toilet in the country
- Replacing the siphon and sink drain
In an apartment and in a private house - what is the difference?
Water supply systems for private and apartment buildings differ in size. The number of subscribers in the apartment building is very large, which creates conditions for constant cooling of the risers and cold water pipelines.
In a private house, the number of users is limited, so the water moves through the system less actively and has time to heat up a little. These few degrees are enough for the conditions for moisture deposition to change and the process to stop.
If a private house has an autonomous water supply system, then the water is not under strong pressure and flows into the premises more smoothly. Then evaporation appears only due to poor-quality ventilation, which does not have time to remove air supersaturated with moisture.