The quality of the home sewer system should not be inferior in reliability to the water supply or electrical network. If the sewage system in an apartment is installed efficiently with your own hands, it will last for decades, provided that installation standards are followed and high-quality consumables are used.
Do you doubt your abilities and are afraid to make mistakes? We will help you competently design and install a sewer system. The main thing is to take into account all the basic requirements, choose the right pipes and adhere to the installation technology described in the article.
Composition of the sewer system
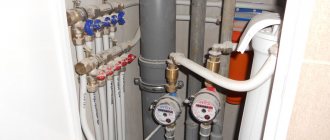
The sewage system in the apartment is represented by the following elements:
- vertical riser. Provides communication between the apartment horizontal wiring and the external underground network;
- horizontal layout ( lounger );
- connecting elements - corners, tees, crosses, etc.;
- siphons are curved elements that form a water seal and are located directly under the outlet of each plumbing fixture connected to the water supply in the kitchen, bathroom or toilet, etc.
The entire sewer system consists of pipes installed in a certain way according to a given pattern. A special feature of the system is the natural movement of wastewater (gravity network). Most pipelines are empty and filled with sewer gases, which pose a certain danger in a sanitary and physical sense. To prevent them from entering the apartment, water seals are used to form a plug of water. Installing an internal apartment system is not fundamentally difficult, but it requires compliance with certain rules and requirements.
More details in the article: How the sewage system works in an apartment building
Sealing connections
Sealing of joints is carried out as follows:
- The sealant used is neutral (non-acidic), silicone or polyurethane. For propylene, any is suitable; for PVC, only silicone.
- Each plastic gasket is treated with a thin layer of sealant. Rubber gaskets are installed dry in the couplings.
- The sealant is applied to the inner surface of the mounting pipe in a minimally thin layer and to the outer surface of the mating pipe with a layer of normal thickness, according to the instructions for the sealant.
- We insert the pipe into the coupling. The squeezed-out bead of sealant should have a diameter of approximately half the flange of the mounting pipe and be uniform in thickness. If there is something missing somewhere, we add a little.
- We wrap the joint with thin plastic film and use a spatula, brush or fabric swab to smooth the sealant through the film with slight pressure. A fillet should form at least 2/3 of the flange and the same amount along the pipe.
- Leave the film on the joint until the sealant hardens.
Preparatory work
Project
Creating a sewer system in an apartment with your own hands must be preceded by certain preparations. It consists of planning, creating a project for the future system. It is necessary to make a diagram that will display the composition, configuration, parameters and dimensions of all elements. The sewerage diagram in the apartment will allow you to calculate the number of pipes, connecting elements, and ensure the required slope of the horizontal wiring. The slope of the pipelines is necessary to avoid stagnation of wastewater, leading to the formation of congestion. The minimum slope depends on the diameter of the pipes:
- for pipes 50 mm - 30 mm/m length;
- 110 mm - 20 mm/m;
- 160 mm - 8 mm;
- 200 mm - 7 mm.
More details in the article: Slope of sewer pipes according to SNiP
At the same time, there is a restriction on the maximum slope value, which should not exceed 150 mm/m.
Before you start installing the system, you must notify your neighbors from above about your intentions. In addition, you need to contact the management company and resolve the issue of temporarily shutting off the water supply, since neighbors may simply forget about the repair work and start using the water supply as usual, which will lead to flooding of the apartment. It is necessary to prepare all the necessary tools, materials, and fasteners so as not to delay the process and complete the installation as soon as possible. It is important to remember that the entire time the sewerage system is being laid in the apartment, the neighbors will remain without water, so we must try to minimize the problem for them as much as possible and reduce the time required to complete the work.
Protective Equipment and Precautions
When repairing a sewer system, the riser outlets, even if they are not changed, will have to be released for some time. Let’s say everything is settled with the neighbors and the water is turned off. But where is the guarantee that one of them will not be “grabbed” to the point that he forgets, does his job in the toilet and flushes out of the bucket? And all this will be yours. And on you. Therefore, before starting work:
- Remove the toilet and clean the toilet completely.
- Cover the walls and floor of the toilet with plastic film and tape.
- Stock up on a plastic raincoat, rubber boots, gloves and a helmet with protective glass. A separate glass on the hoop will not work: you will have to work with heavy, brittle cast iron hanging above your head.
Pipe selection
Today's stores offer a wide selection of sewer lines. Unlike Soviet times, when there were no options other than cast iron pipelines, today there is a wide choice of materials:
- PVC (polyvinyl chloride);
- PPRC (polypropylene);
- HDPE (polyethylene).
Pipe selection
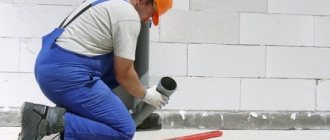
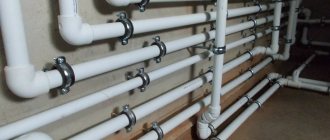
Plastic pipes are much more convenient to install. They are lighter, equipped with connecting sockets with O-rings, look much neater and do not require a protective layer of paint. Laying a horizontal system of such pipes is much easier and faster. There are all the necessary connections, tees, crosses, etc. In addition, fastening clamps are sold for plastic pipelines of any diameter, ensuring reliable fixation of the system. This makes installation of sewerage in an apartment a quick and high-quality event.
Untrained people often cannot decide on the size (diameter) of sewer pipes. There is a generally accepted method for installing 110 mm pipelines into a toilet. Sewage in the kitchen or bathroom does not require such dimensions; 50 mm is enough. If there are no specific requirements, you can follow this rule.
You may also like: Sewer pipe diameters - table and dimensions
Securing the riser at the top
A prerequisite for do-it-yourself sewer repair is a securely fastened top of the riser. You should not rely on standard fastenings (if they still exist) on the floors: over time, they weaken, rust, and during repairs, all the upper sections may end up in your apartment. Replacement, of course, at the expense of the culprit.
In addition, an old cast-iron riser can burst from vibration when working with a power tool or impacts, even in an area quite distant from it. A properly executed fastening unit is also a damper that absorbs vibration. And in any case, a securely fastened riser will reduce the likelihood of a sewerage accident.
To secure the riser at the top, right under the ceiling, but always above the very top joint of the pipes, on both sides of the riser, two strong crutches with a diameter of at least 12 mm are mounted on cement mortar. Threaded rod pieces or ready-made studs with a metal mounting collet work well; in this case, you can do without cement. The embedment depth is at least 120 mm. The stud must protrude at least 40 mm beyond the middle of the riser pipe.
The riser is secured with two semicircular brackets (half-clamps) 2-3x40-60 mm in front and behind. Strips of thin, dense rubber, for example, from a car inner tube, are placed under the staples. In the “ears” of the half-clamps you need to drill holes for the studs. The staples are attached to the studs between two nuts, tightening them alternately to prevent lateral forces from appearing on the riser. It is also unacceptable to secure the riser with one clamp or bracket, pressing it against the wall. If the riser is already adjacent to the wall, you need to carefully knock out a groove under it for the rear bracket. And don’t forget – cast iron is very fragile!
Dismantling old used pipes
Before making a sewer system in an apartment, it is necessary to dismantle the old system. This has to be done because used pipes have poor-quality and leaking connections; connecting new pipelines or plumbing fixtures to them is difficult or completely impossible. In addition, sometimes it is necessary to completely redo the wiring, since the location of the old pipes does not suit the owner. Often it is necessary to install a hidden system located in a different location or at a different level.
Dismantling old pipes is a complex and time-consuming task. Reworking the system should not affect other communications or finished interior elements, so you will have to work very carefully and carefully. The open part of the pipelines usually does not create problems; it is more difficult to remove hidden pipes built into walls or floors. The horizontal wiring is completely cut off along with the fasteners. The vertical riser must first be securely secured at the top with a clamp. Then a piece of pipe is carefully cut out, the cement is cleared from the joints using a chisel and a hammer, and the riser is disassembled into pieces. If you do not have experience in such work, it is better to invite a qualified specialist, otherwise you may cause the collapse of the entire column of vertical pipes. It is especially dangerous to carry out such work in apartments located on the lower floors of an apartment building with cast iron risers.
If any areas of the old system are in good condition, they can be mothballed and continued to be used. You just need to install adapters on modern plastic pipes, which are commercially available for all types and diameters of cast iron pipelines.
What are the dangers of installation errors?
Lack of an internal sewerage design, savings on building materials, neglect of installation rules and simply minor mistakes made during pipeline assembly can lead to the most unpleasant consequences:
| Mistake made | Possible consequences |
| insufficient slope of the pipeline from plumbing and household appliances to the common riser | formation of stagnation |
| use of pipes with a damaged inner surface, burrs remaining during cutting | accumulation of waste on pipe walls, reducing pipeline capacity |
| Performing right angle turns or U-turns | clogging, with high wastewater pressure - depressurization and damage to the unit |
| connection of socket elements against the flow | clogging of the joint area |
| no siphons under plumbing fixtures | the appearance of an unpleasant odor, backflow of wastewater into the plumbing fixture |
| leaky connections: lack of insulating layer, loose or overtightened threaded connection | appearance of leaks |
| absence of inspection hatches in difficult areas of the system | impossibility of cleaning the unit. |
Laying a new sewer system
After the old pipes are completely removed, the installation of the new system begins. Installing a sewer system in an apartment with your own hands requires skills and abilities, so it would be correct to organize the process with the participation of experienced professionals. Guided by a pre-created diagram, the system is marked in compliance with the required slope angles and other technology requirements. It is most convenient if the sewerage installation is carried out in a new building or a private house, where all actions are carried out simultaneously throughout the entire building. However, most often it is necessary to assemble a new system to replace the old internal network that has reached the end of its service life.
The procedure is determined by the configuration and size of the system. If you have to carry out extensive installation of branched wiring, you can carry out work in parallel in several areas, provided that the markings are correct and accurate. When connecting cast iron and plastic elements, one important condition must be observed: first, the plastic pipe is pushed into the cuff all the way, and then it is pulled back about 1 cm (no more). This will provide the temperature gap necessary to compensate for the expansion of the plastic when heated by the passage of hot drains.
Installation of the riser
The vertical riser is usually installed first. Plastic adapters with couplings are installed at the top and bottom of the cut ends. It is necessary to ensure that the level of the horizontal outlet corresponds to the height of the toilet outlet pipe, otherwise it will not be able to work normally. This point should not be missed; you should control the level at all stages of the installation yourself.
Sewer riser
To assemble the riser you will need:
- Tee with outlet for a horizontal bed;
- straight pipe sections;
- inspection hatch.
Assembling the riser begins from the top. The length of the lower section is first adjusted roughly, then set permanently. With the right approach, no special problems arise; the main thing is to firmly fix the upper part of the column in place.
In more detail: How to replace a sewer riser - what are the responsibilities of utility workers?
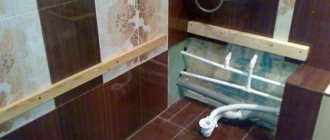
Installation of horizontal wiring
After assembling the riser, the installation of sewerage in the apartment continues with the manufacture of a horizontal section. First, a line is drawn along the wall with the required slope according to the technology. Holes are drilled along it at the required points, where plastic dowels are inserted and clamps are installed. Then, from the riser, they begin to assemble the sunbed. In difficult cases, a rough fitting is performed without complete sealing to determine the length of straight pipe sections. They are cut off from the free side; the cuff cannot be touched. After trimming, it is necessary to clean the end both outside and inside. This is done in order to reduce resistance during assembly and remove burrs, which will later become areas of blockage. All corner or rotary sections must be immediately turned into working position.
Sealing connections
If a network is assembled from plastic pipelines and adapters with rubber seals, then no additional actions are required. The density of such a connection for non-pressure systems is considered quite sufficient. If plastic sleeves are used, silicone or polyurethane sealant should be applied to the inside of the nozzle and the outside of the pipe before final assembly.
About neighbors
Replacing the sewer system yourself in an apartment building is impossible without good neighborly relations: after all, during your work, the neighbors “on the risers” (above and below) will have to sit without water and endure it or go to a bucket instead of a toilet. And any secret ill-wisher, by opening the taps of the cold and hot water risers in the basement, will give them a sign that the work is supposedly finished. They will start using it “from the heart”, and everything from above will come to you. Non-trivial options are possible here. The author of these lines knows of a case where an evil and irresponsible alcoholic was successfully neutralized during work by getting him drunk to death.
Why do you need a water seal?
To prevent the stench from the sewer network from penetrating inside our apartments, engineers came up with a very simple but very effective solution - connect all plumbing fixtures to the sewer system through a water seal. A water seal is a bend in a pipe that drains drainage from a plumbing fixture, in the shape of the Latin letter S. You can see what a water seal looks like in cross-section in the figure below:
The design of the water seal is simply genius. After draining the water, a small amount of liquid remains in it, which reliably blocks the pipe, preventing odors from leaking through it from the sewer. However, in some cases, a water seal may not prevent unpleasant odors from entering the room. Typically, this happens in two cases:
- the water in the water seal has dried up and air from the sewer began to freely penetrate into the room;
- the water seal failed.
In the first case, everything is clear - if you do not use a plumbing fixture for a long time, the water in the water seal simply dries out, opening the way for unpleasant odors. Therefore, if you are planning to go somewhere for a long time, you can protect against drying out by pouring vegetable oil into the toilet or sink, which will prevent the water from evaporating and protect the water plug from drying out. In the second case, everything is somewhat more complicated. A water seal failure can occur due to the fact that when a large mass of water moves along a riser, a vacuum is formed behind it, which can cause a failure. The water from the water seal will simply be sucked out by this vacuum.
How to check the sewer system for leaks and get rid of them if found?
Testing of the assembled sewage system is carried out in the following ways:
Pour and check
- A bucket of water with a capacity of at least 10 liters is abruptly tipped into a washbasin or sink. For greater reliability of the results, such a test should be repeated several times in a row.
- Throughout the entire installed facility, all available plumbing fixtures are turned on, creating loads on the sewer system (all taps are opened, the toilet is flushed, it is advisable to apply a load even to the drain of the washing machine). Such a check allows you to effectively evaluate not only the tightness of the system, but also its throughput, which in itself is of great importance.
If no leaks were detected, then the system is ready for operation. What to do if defects are still discovered? There are two ways to fix the problem:
- Disassemble the “problematic” connection and reassemble it, paying maximum attention to the quality of the assembly (correct installation of the gasket, quality of pipe joining).
- If the first method does not help, then the leaking joint must be disassembled and carefully treated with sealant. As a rule, silicone is used as such.
After the drying time specified by the sealant manufacturer has passed, testing the system must be repeated. Manually assembling a sewer system in a private house is a rather labor-intensive process solely because there is a need to dig trenches for laying structural elements.
The assembly process itself does not require any special physical effort from the master; here it all comes down to the correct connection of individual parts and their synthesis into a finished structure.
Provided that all the necessary calculations were carried out correctly, the required slope was realized during the installation process, and the assembly process itself was carried out efficiently and responsibly, the operation of the assembled structure will not cause any difficulties, and the service life will be measured in tens of years.
Video on sewerage options
Features of polymer material
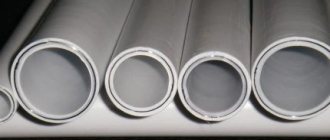
When organizing sewerage, it is customary to use technical polymers (PVC, polypropylene). Such materials are characterized by good rigidity and excellent mechanical strength, even if the product is small in thickness. These properties of polymers are suitable for organizing non-pressure systems, which is why sewage systems made from such pipes can be found in many homes.
Before installing sewer pipes, you should watch a training video and read the recommendations of professionals
Characteristics of pipeline material:
- The products have a smooth inner surface;
- Plastic has good resistance to the negative effects of substances contained in waste liquid;
- Not subject to corrosion, as well as various biological influences;
- The pipeline is characterized by low roughness, but at the same time it is characterized by good throughput, and this indicator does not change even with prolonged use;
- Sewage from pipe products can be quickly installed even in the absence of special professional skills.
To ensure good resistance of plastic pipes to external influences, manufacturers make the material two-layer or corrugated.
General provisions
In many apartments you can still find old cast iron pipelines, the service life of which has long expired. And if you do not want an emergency to occur, then it is better to take care in advance of replacing it with a more practical plastic design.
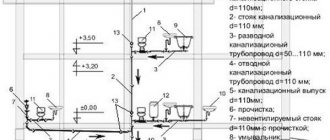
But what exactly is an apartment sewage system? Let's take a look at its typical structure:
Classic apartment sewerage scheme
| Designation on the diagram | Name |
| 1 | Distributor pipeline |
| 2 | Cleaning |
| 3 | Unventilated riser |
| 4 | Branch pipeline |
| 5 | Ventilated riser |
| 6 | Audit |
Installation height of plumbing fixtures from floor to top of side
In order to understand in advance how the sewage system will flow after installing all sanitary fixtures, you should know the installation height of each fixture from the level of the finished floor to the top of the side. The installation height of a sink, washbasin or bathtub depends on the purpose of the room and is determined according to table 13 SP 30.13330.2012. For residential premises these values are:
| Device name | Installation height from floor to side, mm |
| Wash basin | 800 |
| Sink and sink | 850 |
| Bath | 600 |
| Urinal | 650 |
| Shower tray | 400 |
Open way
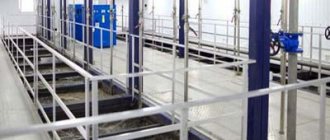
This method involves laying pipes in prepared trenches and backfilling. All necessary work on digging trenches and installing a pipeline can be done with your own hands. The only special equipment you may need is an excavator if the length and depth of the sewer system is large and you want to save your own effort. However, it is possible to install a drainage system using an open method only on a relatively empty area without trees or outbuildings.
The order of work in the presence of a project is as follows:
- Trenches are dug, cleared of stones and compacted. The depth should be below the freezing level so that wastewater does not freeze during the cold season. If the pipeline is planned to be insulated, the depth of the trenches should be at least half a meter. The width of the trenches is 40 cm greater than the diameter of the pipes used, the slope is 1-3 cm per linear meter.
- Sand is poured into the trench and compacted to create a shock-absorbing cushion that will support the pipe in the correct position.
- A pipeline is assembled from the outlet pipe of the home sewer to the installation site of the well.
- Cover the side shock-absorbing cushions in layers and compact them.
- Backfilling is carried out without compacting: first sand, then earth.