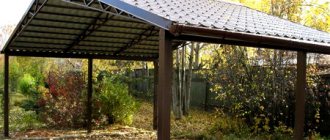
Today, on many countryside plots you can see gates made from profile pipes. Typically, many owners of country houses try to make their own gates that will meet their requirements and parameters. Let's see how you can make a reliable gate with your own hands, and what tools you will need for this.
- 2 Preparation for construction: how to calculate the dimensions of the future structure
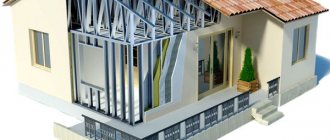
- 3 Which profile pipe to choose, tips
- 4 Calculation of material and tools for work
- 5 Instructions for the manufacture of various types of gates
5.1 Swing gates for a country house
- 5.2 Sliding gates
- 6.1 Forging elements - how to make
Materials for production
To make a gate you will need:
- Profile pipe.
- Profile sheet for covering the frame.
- Rivets or self-tapping screws for fastening corrugated sheets.
- Rollers for sliding gates.
- Accessories: locks, hinges, handles.
The profile pipe can be of the following sizes:
- 60 x 30 mm for making a gate frame;
- 100 x 100 mm for pillars;
- 40 x 20 mm for lintels and stiffeners.
The profile sheet can be used in any configuration and color; the metal thickness must be at least 0.4 mm. It is more convenient to use a profile pipe with a rectangular or square section. To train your skills, it is better to first make a gate.
Which profile pipe is better to use?
When choosing, it is important to pay attention to the following parameters:
- Type of raw materials. Stainless, galvanized, carbon steel is used in production. Welding of stainless steel gates is not done due to the lightness of the material and its inability to withstand high loads. A carbon steel frame will cost less, but a galvanized frame will last longer since the raw materials are coated with a protective layer against corrosion.
- Section type. They produce pipes of square, rectangular and oval sections. The latter type is rarely used in the construction of fences.
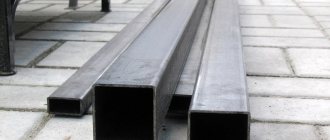
Common profile sections
For the frame, it is recommended to take material with a square section - 40 * 40 mm, 25 * 25 mm, 30 * 30 mm or rectangular - 20 * 40 mm, 40 * 20 mm.
- Mode of production. It is customary to produce pipes using the welded method of cold or hot rolling, seamless. Hot rolled elements are not strong enough for fencing. Less expensive cold-rolled pipe is ideal for the frame. Although seamless rolled metal is considered the most reliable, it is rarely used for fences due to its high cost.
- Wall thickness. The optimal value is considered to be 2 mm. If you have little experience in welding, then it is better to take 3 mm steel. You should not take a thicker one, as this will complicate installation and increase the weight of the structure.
Manufacturing of gates
Let's look at how to weld a gate from a profile pipe with your own hands. For its manufacture, it is necessary to take into account the location. The gate must be located on level ground, without holes, depressions or slopes. Ease of use should also be taken into account. It should be located opposite the entrance to the house or opposite the path leading to the entrance by the shortest route.
After choosing the installation location for the gate, measurements and a drawing of the product are taken. A standard opening must be at least 1 meter wide and height – at the level of the fence. It should be taken into account that the higher the height of the gate, the greater its weight, and the greater the impact it will have on the supporting posts and hinges.
Scheme for manufacturing a gate Source dostup-zabor.ru
To increase the strength of the structure, it is recommended to weld an additional jumper between the pillars. If the gate is about 2 meters high, it is advisable to weld additional stiffeners.
Main manufacturing stages:
- The pillars are being installed. For this, profile pipes 100 x 100 mm are used. They are buried 1-1.5 m and concreted.
- The frame of the gate is made from a 60 x 30mm profile. Pipes are cleaned and treated with anti-corrosion agents. Next, according to the drawing, pipes of the required length are cut. The joints at the corners must be sawed off and welded at an angle of 45°. This results in a more aesthetic and reliable design.
- Additional jumpers are cut out and welded from a 40 x 20 mm pipe.
- Curtains are welded to the gate. Then the curtains with the gate are welded to the support posts.
- All welds are ground. The gate frame and posts are painted.
- Next, the gate is sheathed with corrugated sheets. It is attached using roofing screws or rivets. Holes for rivets must be pre-drilled.
- A handle and lock are attached to the finished gate.
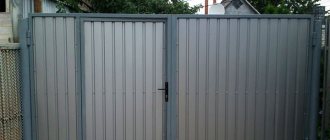
An example of making a gate Source metabox.by
Installation of support pillars
my own gates so that they will delight you with excellent quality. It will not be possible to achieve the desired result without the correct installation of support pillars.
- For supports, dig a hole at least a meter deep, 50x50 cm in size.
- The bottom is reinforced with a layer of concrete mortar or a crushed stone cushion.
- Support posts are installed in prepared pits.
- Using a level, the pillars are aligned horizontally and vertically.
- The supports are filled with concrete mortar.
Manufacturing of swing gates
Let's look at how to make a gate from swing-type corrugated sheeting. The main advantages of this type of gate are:
- ease of manufacture;
- cheapness;
- reliability.
The disadvantages include:
- large gate opening area;
- strong exposure to wind loads.
The main element of this type of gate is the stiffening ribs. The swing design involves hanging one side of the sash on curtains. The second side hangs freely, and therefore the structure needs to be strengthened. This is done using a 40 x 20 mm pipe.
Options for stiffeners Source moyaograda.ru
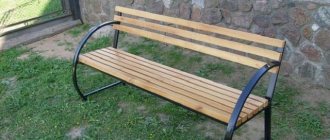
See also: Catalog of companies that specialize in small forms
Options 1 and 2 are the most budget-friendly and are suitable for small-width gates. Used in regions with low wind load.
Options 3-5 – balance between weight and reliability. Various variations provide for strengthening the structure with latches, supporting wheels, and locking devices.
Option 6 is ideal for automatically opening gates. Does not require additional locking and supporting devices.
There are additional options for strengthening the structure using corners or profile pipes in the corners of the sashes. Experienced specialists will suggest the best option for a specific product.
Let's look at how to properly weld a gate. For proper manufacturing, a clear drawing is required indicating the dimensions, dimensions from the ground, and the required clearances. Further:
- According to the drawing, blanks are cut out at 45° angles;
- a 60 x 30 mm pipe is used for the frame; for small gates it is rarely used, for example, in a dacha it is possible to use a 40 x 20 mm corrugated pipe;
- Next, the frame blanks and stiffening ribs are laid out on a flat surface, and the correctness of the design is checked;
- all parts are welded into a single structure, squares are used to maintain the correct shape;
Here you can see how to properly weld a gate from a 40 20 profile pipe with your own hands Source zabor-vorota-stolby.ru
See also: Catalog of companies that specialize in fences and enclosures
- hinges, latches, brackets for locks and additional devices are welded;
- the gates are welded to posts 100 x 100mm;
- the entire structure is cleaned, rust and scale are removed;
- The gates are coated with primer.
Next, the installation site for the gate is prepared. At this stage, you should consider the material of the entrance cover. If the entrance road is covered with asphalt, tiles or concrete, it is enough to leave a gap of 5 cm between the gate and the ground. If the entrance is unpaved, it is necessary to leave a gap of at least 10 cm. Taking this into account, holes are dug for installing the pillars. Further assembly is carried out in the following sequence:
- curtains with shutters are removed;
- the pillars are installed to a depth of 1-1.5 meters and concreted;
- after the concrete has hardened, the doors are hung;
- the structure is painted;
- a corrugated sheet is attached to the frame using self-tapping screws or rivets;
- The lock is cut in, handles and bolts are installed.
To securely fix the bolts, metal tubes are driven into the ground. The latch must go at least 10 cm deep into the tube to prevent spontaneous opening in strong winds.
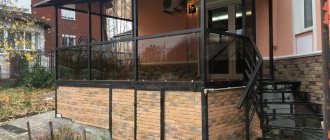
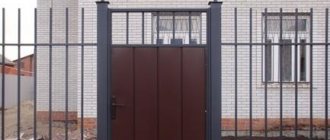
Ready-made gates Source stella-partner.ru
Installation of wooden gates
Logs serve as supports. They are installed in the same way as metal profiles. The waterproofing process requires special attention: treatment with resin, bitumen, and roofing felt is required. The parts for opening and closing the halves consist of 2 plates. Some attach the doors to the canvas. The structure is installed in the gate opening, leveled, and checked for distortions. The second halves of the plates are attached to the pole. All hinges should be welded in this way. All that remains is to treat the finished product with an antiseptic and paint it.
DIY sliding gates
Sliding gates are an excellent option for your home or cottage. They have a reliable design and have a long service life. Sliding gates are made from profile pipes and sheathed with various materials, including metal profiles.
Sliding gates come in two types:
- Rail - an outdated model, used mainly in industrial enterprises.
- Console is the most common option. This design provides for a console, which is a continuation of the gate and hidden behind the fence. Thanks to it, the gate moves on sliding trolleys attached to the foundation. Each sliding mechanism is equipped with bearings with polymer or metal rollers. The trolleys themselves are located in a guide, which protects them from contamination and precipitation.
Sliding gates on sliding trolleys Source vorota-goroda.ru
Finish options
Metal structures must be protected from the effects of natural and climatic phenomena. To do this, the surface is primed and painted, and only then the cladding begins.
A more popular option for gate design is corrugated sheets. A wide range of colors allows you to choose the desired shade and perfectly fit the structure into the overall picture of the site.
Wood cladding looks solid, providing the site with a presentable appearance. To protect wooden slats from the influence of climatic and atmospheric phenomena, they undergo additional processing and are coated with antiseptic and moisture-repellent substances.
Metal mesh is the cheapest way to sew up a gate; it has a long service life and is not very susceptible to corrosion.
Polycarbonate is a new element on the building materials market, but has already gained popularity due to its ease of installation and ease of fastening to the frame.
The metal structure for finishing the gate will be reliable and durable, but heavy, which will require additional reinforcement and more fasteners.
Design calculation
Despite the simplicity of the design, you need to know how to properly weld the gate. The first stage is preparatory activities, including design calculations. At the design stage, the following points should be taken into account:
- Design features. These can be sliding or swing gates, with manual or automatic control.
- Frame covering. Profile sheets, wood, polycarbonate, mesh or metal can be used for it.
- Necessary measurements. Careful measurements will allow you to enter the territory of your personal plot without any problems. In this case, the area for opening the gate should be taken into account in the case of choosing swing structures.
- Creating a drawing. The development of the drawing is carried out taking into account measurements and design features, taking into account the gate, fixation points, connection of an automatic control system, as well as the need to use stiffeners and reinforcement elements.
If you follow all stages of drawing development, you can accurately understand the needs for materials and other nuances. Additionally, the following points should be taken into account:
- for entry of a passenger car, the length of the doors must be at least 3 m;
- the size of the gate should be about 90 cm;
- the height should not differ from the height of the fence by more than 15-20 cm;
- the posts should be pre-concrete or attached to the fence posts.
After calculating the structure, it is necessary to prepare materials and tools for its manufacture. Materials include profile pipes, cladding material, locks and elements for fixing panels, decorative parts, primer and enamel.
The necessary equipment includes a welding machine, drill, grinder, hammer, tape measure, angle, level, grinding wheel, file and brushes for applying primer and paint.
Important information
When making gates from pipes, you need to take into account many nuances so that the work turns out to be of high quality and durable. It is necessary to select the right materials, perform calculations, and also check the availability of the necessary tools. Perhaps we’ll start with them.
What tools and materials do you need to prepare?
To complete the job, we used the following tools and materials:
- Welding inverter
- Electrodes with a diameter of 3 mm
- Welding generator, since there was no electricity on site
- Grinder + grinding and cutting wheel
- Roulette
- Square
- Level
- Profile pipes
- Loops
- Thermal insulation material (in our case, foam)
- Facing material (in our case, metal sheets)
- Paint and primer + roller
- Polyurethane foam
Selecting materials
The most important thing to do is to choose the right materials. After all, the strength and durability of the entire structure largely depends on them.
You can weld garage doors from angles or profile pipes. The second option is more reliable and durable, in our experience. That is why now we will not tell you how to weld a garage door from corners. This is a topic for a separate article.
The profile pipe can be square, oval or rectangular. It's better to use a square one. A square pipe makes a reliable and beautiful gate, and this profile is easier to work with. Of course, you can weld a garage door from a round pipe, but such work is more difficult and more expensive.
We've sorted out the profile. Now we need to choose the material from which our professional pipe is made. If the budget is completely limited, then you can buy carbon steel pipes, they are cheaper. The best option is stainless steel pipes, but you will have to spend money. The optimal choice is pipes made of low-alloy steel.
Next you need to decide on the thickness of the pipe wall. Manufacturers offer products with thicknesses from 1 to 20 mm. In our case, 2 mm will be enough. It is not advisable to take pipes with a larger wall thickness when assembling garage doors.
As for the sizes, prepare pipes 40x20 mm. This is a universal size, easy to find on sale, relatively inexpensive, and can withstand loads well.
We use metal sheets 2 mm thick as cladding. You can also use corrugated board or wood.
Additionally, the doors can be insulated using polystyrene foam. If you spend a long time in the garage in winter, then insulation will significantly reduce heating costs. Styrofoam is cheap and works great for this purpose.
After assembly and installation, the gate can be painted to protect it from premature corrosion. Choose paint for exterior use.
What to consider?
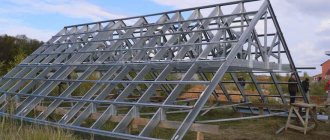
To ensure that the gate meets all requirements, think through every detail. To begin, select the design type. The consumption of material and the complexity of the work will depend on it. Below you can see the most common gate frame options.
Next, decide whether the design will be complicated by any additional elements. For example, a gate inscribed in one of the gate leaves. This also affects material consumption and welding complexity. In our case there will be no gate.
Decide what material you will make the cladding from. In our opinion, the best option is metal sheets a couple of millimeters thick. Take care in choosing paint and its color.
Make a detailed drawing; do not assemble the doors by eye. Otherwise, you risk getting a lopsided, crooked gate. Based on the drawing made, calculate the amount of materials and purchase them with a small margin. This way you will be sure that during the work you will definitely have enough of all the components.