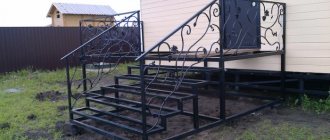
Adding a terrace to a private house not only increases the area of the room, but also serves as an additional decoration for the entire building. It is here that you can arrange a comfortable recreation area, make a workshop, dining room or summer kitchen.
There are many different materials for building a terrace for your home yourself. In this article we will look at how to build a frame veranda for a house with your own hands, what advantages and disadvantages such an extension will have, how to correctly draw its drawing, choose materials, pour the foundation, assemble the frame and much more.
Terrace - types and features
In essence, such an extension to the house represents a summer recreation area. It differs from the veranda in the following features:
- The terrace is always open and not heated.
- It may be adjacent to the house or separate from it.
- It may not have a roof or fencing.
- Various platform shapes are acceptable.
- It can be presented in the form of a wide porch or a structure that completely encircles the house.
Metal frame - materials and assembly methods
It is clear that rolled metal products are used to assemble the frame - pipes, angles, channels, profiles. What to choose from this variety so that your budget doesn’t suffer too much? So, let's look at each type in detail.
Drawing options
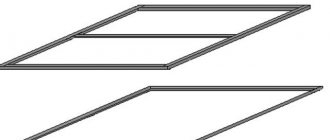
To make a high-quality and reliable veranda frame from metal pipes, you need to draw a sketch of the future building in advance. This drawing must indicate:
- location of the terrace (on the side of the house, at the entrance, separate from the cottage);
- exact dimensions of the extension (height, width);
- type of foundation and roof;
- materials used;
- presence of windows and doors.
Attention : having a well-drawn plan - project on hand will help you avoid common mistakes during construction.
You can draw a project plan with your own hands. This is provided that you understand the construction industry and know how to correctly calculate all elements of construction.
Better yet, order a drawing from a specialized company. There, qualified builders and architects will calculate the dimensions with millimeter precision, help you choose the optimal design of the building that is in harmony with the overall architectural style of the house, and select the ideal building materials for it.
Profile pipe
Hollow pipes of square, rectangular or oval shape are in demand among home craftsmen. Indeed, it is not difficult to assemble a frame for a terrace from this type of metal. The design will be light and at the same time durable.
Metal can be bent, cut, decorated, welded, or bolted together. Externally, such pipes look decent. The advantages of using a profile pipe for a terrace frame:
- The frame is not subject to deformation even under significant loads.
- The weight of the pipes allows installation alone. In addition, the design does not require an expensive monolithic base.
- The cost of the pipes themselves is reasonable.
- It is possible to manufacture a frame of any complexity and architectural form.
Welding method. Welded or bolted.
For a do-it-yourself metal canopy, there are two ways to assemble it. By bolting or welding. The second is preferable, since the structure is stronger. It is better to perform welding in a carbon dioxide environment or its mixture with argon.
Only very simple configurations can be made with bolts, but they will not be particularly reliable. Such structures are often sold ready-made, which are assembled at the installation site.
Metal corners
An L-shaped beam, with different wall thicknesses and a length of up to 12 m. The edges may not be the same in size, so the name of the corner will be appropriate - equal or unequal. It is used in the production of bases for frames, reinforcement of racks, rafter systems and other things.
All products share common technical characteristics - strength, durability, any processing and reasonable cost. To assemble a metal terrace frame, you need to purchase several types of products for ease of use and speed of installation.
Preparing the base
Any of the described rolled metal products does not have much weight, which means that the platform for the terrace can be made of a lightweight type: piles, pillars. How to prepare such a foundation:
- The area is cleared and leveled. All subsequent root growth should be stopped in advance, so the area is spilled with chemical solutions. Level the soil by removing the turf and top layer.
The marking is done using wooden pegs and a mooring cord. Markers must be set according to the number of holes for supports specified in the project. It is impossible to do less, or only for load-bearing elements - the terrace is fraught with unreliability, fractures, and deformations of the metal frame.
- The holes for the supports must be of sufficient depth. The freezing of the soil + shock-absorbing layers - sand and crushed stone - are taken into account. The height of each of them must be at least 15 cm.
- If the work is not carried out with factory-made reinforced concrete pillars or piles, then reinforcement will also be required for self-pouring. The rods can simply be stuck into the ground - the reinforcement cannot be welded, since the metal is destroyed under the influence of temperature.
- The ends of reinforced concrete pillars should be waterproofed by wrapping them with roofing felt or covering them with mastic. Thus, the foundation will gain durability - aggressive wastewater and constant soil moisture can destroy the foundation.
- The cavities between the pillars are backfilled - that is, construction waste is placed inside and filled with concrete, leaving for three weeks to harden.
Strip foundations
Combines with verandas of increased mass, built on blocks and bricks. But some owners prefer combinations with other materials.
The arrangement procedure is described as follows:
- The first step is to mark out a suitable area and clear it of all excess debris.
- A trench is dug along the entire perimeter on which the capital parts of the structure will be located. Freezing of the soil together with its composition affect the digging depth. Usually the depth is in the range of 300-500 millimeters. When forming basement levels, the elevation above ground level will be the same. The base parameters of the main house also affect the height of the house.
- A layer of sand as a waterproofing cushion is laid at the bottom of the trench. This cushion will be about 100 millimeters after the work is completed.
- Formwork made of boards and timber is built along the entire trench. The height of such a part and the height of the entire foundation must be equal to each other. Precise markings, created in advance, simplify the top installation of the formwork edge.
- Filling formwork with materials with waterproofing characteristics.
- 80-100 mm is the average fraction of crushed stone filling the bottom. Tamping is required.
- The next step is to form a reinforcement frame. It is easier to connect elements using twisted wire.
- Order concrete in the required quantity. The minimum grade is M200, but it is better to choose M300, it will be more reliable.
Preliminary calculation of how much material will be required for pouring under a particular structure is simplified with the help of special calculators.
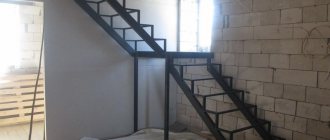
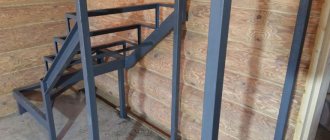
Frame assembly
If you decide to use a welding machine in your work, then you will need the following materials and tools:
We must not forget about personal protective equipment - glasses, dielectric gloves and shoes. Further:
- A grillage is laid on the finished pillars. This can be a perforated channel (with pre-made holes for reinforcement). The ends of the rod are bent and placed inside the grillage.
- Channels must be welded securely, placing a seam over the entire mating surface.
- In accordance with the diagram, a profile pipe with a cross-section of 80 mm is welded along the perimeter or protruding parts of the site - these are the canopy posts. They can be of different lengths depending on the design of the rafter system. In this case, a lean-to canopy.
- It is necessary to immediately make the top trim. A corner is used for this. It is welded to the ends of the posts to form a frame. The slag should be beaten off immediately so as not to make the structure sloppy.
- You can also make a strap in the middle of the frame. Subsequently, forged elements are inserted into the voids, and the terrace turns into a noble adjoining structure.
Assembling the rafter system
According to the diagram, profile pipes of small cross-section - 40-20 mm - are welded onto the frame from corners. They will serve as a sheathing. However, the large size of the site, and, consequently, the roof, must receive proper reinforcement.
Prefabricated trusses will serve this purpose. What it is? These are two metal belts connected to each other in a zigzag manner. Several designs will protect the metal frame canopy from sagging. How to do:
- First, the frame is welded from corners or profile pipes.
- Pipes are installed between the belts. The angle between them should not be more than right.
- A sheathing is welded across the trusses using tack welds, the pitch of which is also subject to the design.
Metal painting and care
Steel is susceptible to corrosion - that's a fact. You can avoid damage if you make a galvanized metal frame in advance. However, such products will be more expensive. Therefore, protection is carried out by painting the frame with special red lead - paints containing anti-corrosion compounds.
The coating must be done before the roof is laid to avoid unpainted areas. If pockets of rust occur periodically, then in order to avoid damage and, as a result, destruction, the affected areas are cleaned and painted again.
It should also be taken into account that when laying the roof, the eaves overhangs should protrude beyond the frame by 30-40 cm, this will protect the metal structure from constant contact with moisture - rain and snow.
There are many options for constructing a metal terrace - arches, open wooden platforms, areas with fences, etc. Steel structures will serve their owners for a long time if all the features of the project - loads, interfaces - were taken into account during assembly.
Do-it-yourself awnings from a profile pipe: photos and videos
Canopies are cost-effective and very easy to make from a metal profile or pipe with your own hands. In this case, a profile pipe is used to construct the supporting frame, and the canopy and walls of the structure are made from metal profiles. Various types of metal are used for canopies: galvanized, copper, aluminum, ferrous metal.
Awnings are widely used to cover the area of a private yard, as well as in commercial settings. They are used to cover parking lots, bus stops, canopies over entrances, transition galleries, summer and winter utility buildings.
Briefly about supports
Most often, steel pipes with a square or rectangular cross-section are used for the manufacture of supports. The round cross-section of a regular pipe will also work, but difficulties may arise with it at the junction of structural elements.
As for the pipe parameters, that is, its thickness and wall width, there is a whole method for determining it taking into account loads. However, in a small structure these calculations can be neglected, since with a relatively small vertical load on the canopy roof, even a thin-walled pipe will not be subject to deformation. In general, use either a thin-walled pipe with a wide cross-section, or a thick-walled pipe with a small cross-section. From a cost point of view, it is more economical to use a thin-walled one with a large cross-sectional perimeter.
Typically, a do-it-yourself canopy from a profile pipe is made from a pipe with a size of 50-100 mm. The pipes can be thinner if the racks are placed more often. If the roof rests on only four pillars, then it is better to make them from a pipe of a larger diameter or cross-section. The supports are poured with concrete or installed using anchors. In the first case, particularly careful leveling of the vertical is required. In the second, with the help of anchors, you can later correct some distortion of the support.
Various canopy designs
Depending on the needs, they build various canopies from profile pipes with their own hands. Photos of canopies can be viewed in Internet catalogs, namely:
- mini-structures are small gazebos, canopies, shelters for barbecues;
- free-standing metal pipe canopies;
- attached canopy structures made of corrugated sheets - verandas, terraces, canopies on the wall of the house, utility shelters.
Depending on the functional features they build:
- separate open canopies made of corrugated sheets, located on racks and having one roof;
- buildings of a closed type, having protection from the weather not only from above, but closed from the walls, one or more sides.
Closed types of canopies are made from various materials. Glass, plastic, plywood, profiled metal, galvanized steel, glass, corrugated sheeting, siding and other materials are used for walls. For glazed closed canopies, aluminum sliding systems are used , which are durable and transparent for viewing. Enclosed buildings provide protection from bad weather from all sides and allow you to stay under a canopy for a long time.
Finishing the floor
If the subfloor is wooden, we install joists, lay insulation in the space between them and fill the flooring of edged boards to the joists. We paint and varnish the boards.
You can also install a boardwalk on top of the concrete screed, similar to the previous method, or lay another material of your choice, for example, linoleum.
Insulation of the veranda The floor is covered with sheets of plywood, linoleum flooring is planned
Finally, all that remains is to install windows and doors, furnish the furniture at your discretion and connect lighting if necessary. We won't pull the wiring. It is enough to remove the extension cord from the house and turn on the necessary lighting fixtures.
Veranda
Good luck!
Advantages of corrugated sheets in the manufacture of canopies
The decision to make a metal shelter is a very profitable and practical solution:
- the metal is not afraid of temperature changes, is not subject to cracking in the cold, and does not change shape from the action of the scorching rays of the sun;
- corrugated sheeting has sufficient strength to withstand household loads and certain technical efforts.
Disadvantages include:
- high thermal conductivity, heating from high temperatures, which does not affect the metal itself, but can damage adjacent materials;
- if it is intended to rest on metal railings, then it is better to cover them with a less thermally conductive material , for example, wood;
- corrugated sheeting suffers from moisture, which manifests itself as rust on the surface; this disadvantage is eliminated with the help of anti-corrosion impregnations.
Metal profiles for canopies
The sheathing is made from a wooden beam or from a metal profile, corner, square or channel. The connection of metal parts is made by welding using overhead metal gussets. Sometimes the parts are connected with bolts and nuts.
End beams
If everything has been done with utmost precision, the ends of the end beam should be trimmed according to the pattern to meet the leading boards. Follow the rule “Measure twice, cut once.”
e2195b35631a2e05b918d55b3d85ddb3.jpe
b733e5ed1fca932b339e72fca90f65e4.jpe
When all the end boards are installed, make sure the leading ones are positioned exactly where they join (in the center). If necessary, correct it.
Now you need to fasten the leading boards: since the 10 cm bolt is too short to rise above the level of the boards, attach a second bolt with a wide head to it using a nut. But before that, screw another nut and a large diameter washer onto the second bolt. And then connect.
Cover the ground under the formwork with gravel about 5 cm thick.
Of course, the wooden veranda is not ready yet. Let's move on to the next step.
Do-it-yourself canopy construction technology
Drawing or working diagram
First, they make a diagram of the future product, indicating the dimensions. Then, structural elements are selected from this sketch, their estimated length is indicated, and the number of identical elements is counted, trying not to miss a single detail. After this, the required amount of material for the racks, trusses and roof is calculated. If the canopy structure is closed, then the material of the walls and floor is also considered.
Installation of supports
It is recommended to place the racks at a distance of no more than 1.2 m from one another. If the rack frame is adjacent to the wall of the building, a number of support pillars are also placed near it. If it is not possible to install vertical pillars near the wall, then a load-bearing beam is attached to the wall, which will take the load from the coating. To attach the beam to the wall, use long anchors , which will securely hold the beam together with the roofing.
Farm construction
Depending on their shape, trusses are divided into triangular, rectangular, trapezoidal, broken and arched. Additional racks, purlins, braces and struts can be installed inside the truss. Trusses can be supported on two supports, pinched at one end, or have a combined method of support on supports.
The farm is made so that the roof slope is 15-20º. This slope is suitable for any roofing made of corrugated sheets, plastic, polycarbonate, roofing felt, slate, metal tiles and other materials. Sheets of profile flooring, slate and tiles are laid so that the waves are parallel to the water flow, but in no case perpendicular.
Pouring the foundation for the supports
The holes for the pillars are made 70 cm deep, a layer of crushed stone and sand is poured onto the bottom and watered for maximum shrinkage. The pits are concreted after installing the pillar and fixing it in the design position. Concrete is made in concrete mixers for large volumes of work or mixed by hand. Fill the entire cell at once; you cannot leave half of the filled hole until the next day.
The next day, the concrete gains half its strength, the remaining 50% of the concrete gains within 27 days. If a solid foundation is being made for laying the floor, then before pouring concrete, a welded or bonded reinforcement frame is installed , which is then filled with concrete.
Possible mistakes
Non-professional builders often make mistakes when constructing the base of the veranda.
An obvious defect of the columnar base is the unevenness of its subsidence. This can occur if the foundation depth calculations are carried out incorrectly.
The base also sags when the load on the platform supports is unequal.
Experts do not recommend making a foundation different from the foundation of the common object. The foundation supports must have the same depth of depth.
Beginners in construction may not take into account the terrain features when working, however, the depth of freezing and the height of groundwater are very important. The monolith must be waterproofed and insulated, and before shrinkage, the height of each column must be carefully measured.
It would be a miscalculation to miss the grillage, because it is this that ensures the stability of the extension. If you immediately make a wooden frame from timber, the supporting beams may break, especially in the case of log options.
Attention ! A columnar foundation is not intended for heavy buildings. If this rule is neglected, the foundation will require repairs or even replacement.
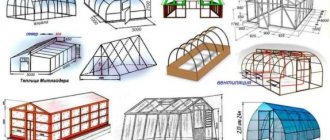
Construction of a veranda from a metal profile - step-by-step instructions
If the size of the summer cottage does not allow the construction of a separate guest house for receiving friends and family, the right solution would be to install a summer extension to the main building. And thanks to its simple design, you can make it yourself. A metal veranda is an original version of a summer cottage structure. It will decorate your summer cottage, and its production will not take much time.
Glazing
Glazing is provided in verandas, which are of the closed type. Usually you choose between a zonal or a continuous option.
Panoramic windows are mounted between frame posts. Year-round use of the verandas is possible due to the fact that most of the three main walls are occupied by glazing.
Modern plastic windows come in different sizes; you can choose any option you wish.
There are no problems even in case of serious deviations from the standards. The door is also made of glass, which does not prevent it from being ordinary or being a sliding group.
Standard glazing by zones involves placing windows 50-60 centimeters in height from the floor.
Important stages of construction work
Often when creating this type of building, the question arises of what material to use as a basis. And if a wooden or brick frame has already become a common solution for private houses, then metal elements are only gaining popularity.
Users often search for:
Of course, a building made of laminated veneer lumber with a log frame at the corners has an attractive appearance and does not require finishing or additional reinforcement.
However, several main advantages of metal construction should be noted:
- durability in use,
- not affected by the external environment and insects,
- strength,
- simplicity and ease of installation.
The construction of such a frame veranda can be done in the shortest possible time and with your own hands, step by step following the instructions and advice of experienced craftsmen.
The main stages of work include:
- design of future construction,
- preparation of necessary materials,
- laying the foundation,
- frame assembly,
- walling,
- roof installation,
- finishing,
- decoration.
And to simplify your task of creating a building, we will consider each of the listed steps in more detail.
Selection of a ready-made project or development of an individual drawing?
Taking into account the requirements of current legislation, the beginning of any construction process implies obtaining permission to carry it out from the relevant services. Otherwise, penalties may be applied to the owner of the site, including demolition of the building. You can look at ready-made drawings of verandas or terraces on the Internet, draw the option you like and take it to the competent organization for approval.
Scheme: metal frame, monolithic or cellular polycarbonate is used as a roof.
If financial possibilities allow, you should immediately contact architects who will independently design the extension, taking into account the wishes of the owners. The big advantage of this solution will be saving time and effort on collecting the required package of papers and standing in queues.
Users often search for:
Permitting documentation will be required regardless of whether the extension is created together with the house or separately, after a while.
What materials will be needed?
The range of metal building elements is quite large, but not all are suitable for creating a summer structure.
In order to get a high-quality and budget-friendly product as a result, experts recommend:
- Profile pipes. They come in square, oval and rectangular shapes. They have thin walls up to 3 mm thick and a width of no more than 30–40 cm. Light in weight. Easily amenable to any type of processing and welding. In addition, they have the following advantages: low price, do not deform under heavy loads, a structure made from this material does not require a monolithic foundation, all installation work can be completed by one person.
Photo: square and rectangular pipes
Photo: metal channel
Photo: profiled corner
Photo: lightweight profile made of thin sheet metal
To create a metal veranda, the right solution would be to purchase several different elements at once, which will simplify the assembly process and speed up installation work.
Choosing the right type of foundation
Thanks to the lightweight frame, there is no need to pour a monolithic foundation; a columnar type of foundation or a screw pile is quite suitable.
A step-by-step guide to laying a columnar foundation looks like this:
- The area is being prepared. The development area is cleared of vegetation, leveled, and the top layer of soil is removed. To prevent further root growth from causing destruction of the base, the entire area should be treated with special chemical solutions.
- The site is marked according to the drawing. Wooden pegs are forgotten around the perimeter and a cord is pulled. The number of marks must correspond to the number of supports in the project.
- Holes are dug for each pillar at least a meter deep. However, when making calculations, you should definitely take into account how much the soil will freeze.
- A shock-absorbing layer or “cushion” is laid. Each hole must be filled with at least 15 cm of sand and crushed stone. In areas with loose soil, it is better to replace sand with hot bitumen.
- Reinforcement is being carried out. It is not recommended to weld reinforcement, as under the influence of high temperature the metal will begin to collapse. Therefore, the rods are simply stuck into the ground.
- Waterproofing is being done. The ends of the pillars are wrapped in roofing felt or treated with bitumen, but in no case with concrete - it will begin to collapse under high humidity and temperature changes.
- Next comes the filling of the gaps between the pillars. Suitable materials include broken brick, crushed stone, remnants of reinforcement, and various construction waste.
- Concrete is poured. The solution can be based on imported Knauf, the quality of which has been tested over the years. After applying the mixture, the surface should be even and smooth. The foundation remains in this form for 3–4 weeks until completely dry.
Selection of materials for the extension
The veranda continues the main structure when the construction work is ready. And harmoniously combine with the design of those objects that are already present on the site. It is necessary to think in advance which materials will be the best solution.
Wood will be the best choice in many situations due to its compatibility with any other base. The main thing is to ensure that the external design is chosen correctly. This is required by any modern garden verandas.
An attached veranda made of bricks and blocks will look inappropriate for wooden houses. And docking in this case will become very problematic.
But you can do the opposite - make wooden buildings for a brick or block house. It is recommended to avoid using metal. High heat capacity and thermal conductivity will become serious problems.
Enclosed verandas with wide window openings are often built from metal-plastic; this is an acceptable solution. For winter and summer, the relevance of glazing will be the same. But here you will need help with construction.
With walls made entirely of metal-plastic, the appearance of the building also remains attractive. As for the roof, here too it is advisable to choose a material identical to the main house. What the veranda is made of is always decided only by the buyer.