Thanks to the compact placement of things, you can save free space and restore order. That's why metal shelving is so popular. They can be placed in the barn, on the balcony, in the kitchen, in the workshop, in the cellar and, of course, in the garage. When installing a shelving unit in your garage, you can use it to store spare parts, tools, and other useful little things that are usually scattered throughout the garage. If you need convenient and compact storage, you can make a rack with your own hands, using various materials. One of the most affordable and simplest options is a structure made from a profile pipe.
Shelving for a garage or workshop
Features of assembling metal shelving
Metal racks can be welded or assembled with bolts. There are usually no problems with welding. If a corner is used, the joints can be overlapped - a difference of 3-5 mm when laying shelves is unnoticeable. If you wish, you can cut out the excess in one of the shelves and butt weld, but trimming takes a lot of time, and you still won’t see much of a difference.
How to cut corners for a smooth connection
When assembling a frame for a bolted shelving, the order is as follows: first, assemble the squares of the sidewalls and shelves separately, then screw them together. It is advisable to have at least two bolts for each connection - for greater rigidity (less play).
If you assemble garage racks from a profile pipe with your own hands, the procedure is different. First, the sidewalls are assembled, and short crossbars are attached to them. You get two rectangles with crossbars. Then they are connected by crossbars.
Methods for bolting profile pipes
See the photo for how to make connections. In one case, welding is still needed - weld the heel pad, in another you can do without it - cut out the "ears", bend them and cling to them.
There is another way - special crab systems. These are metal plates with recesses molded to fit the profile. Pipes are placed into the grooves, then the two plates are bolted together.
Crab systems for profile pipes
Such a connection is unlikely to withstand very heavy loads, but there is an undeniable advantage - you don’t have to drill a bunch of holes in the metal. In a profiled pipe this is certainly easier than in a thick-walled corner, but it still takes a lot of time and effort.
By the way, the bolts used are M8 or M6, so large holes are required for them. It is easier to first drill with a thin drill, then expand to the desired size with a thick one. But even with this order, you will need a significant number of drills. To make them overheat less and break less often, place a jar of water nearby and periodically lower the drill into it.
Welded
Used to create large metal shelving. It has impeccable reliability and the ability to withstand even the most severe loads. Most often, shelves of this type are used to store large items.
There is one significant drawback - during redevelopment, it is often not possible to fit such a rack into the new space due to the non-demountable design. So if you love change, there is reason to think about choosing a different type.
Bolted
The main advantage of such a shelf is mobility. All parts are bolted together and can be easily dismantled if necessary. However, even with perfect assembly, there may be some play at the connection points. It is either present immediately or appears over time under the influence of the mass stored on the shelves.
The disadvantages of this design can be overcome by fixing it to the walls.
Combined
Typically found in spacious garages and technical rooms for car repairs. Most often it is formed through the so-called build-up - when there are more and more tools and storage items, but there is no other place for a new shelf and is not expected.
Sources
- https://www.yaprofi.net/polki-svoimi-rukami/
- https://stroychik.ru/garazh/polki-i-stellazhi-dlya-garazha
- https://www.asusfone.ru/svoimi-rukami/samodelnyj-stellazh-dlja-hranenija-v-sadovom-sarae-iz-staroj-mebeli
- https://postroika.biz/24568-stellazh-iz-dereva-svoimi-rukami.html
- https://garazhmechty.ru/polki-v-garazhe-svoimi-rukami.html
- https://1dacha-sad.com/delaem-stellazh-dlya-garazha-svoimi-rukami
Attaching drywall sheets to the frame
When the frame is ready and securely attached to the wall, you can begin covering it. This is done very simply and does not cause such difficulties as in the case of creating a frame. First, a sheet of drywall needs to be cut to the existing dimensions. It is necessary to calculate everything in advance so that the minimum number of sheets for covering is used. Shelves made of plasterboard will be perfectly flat if the cutting is done carefully so that the edges do not crumble.
To prevent the screws from falling into the plaster during fastening due to the high force on the screwdriver, you can use a special bit. We are talking about a bit with a limiter, which will rest against a sheet of drywall just so that the head of the screw goes to the required depth, flush.
To attach gypsum boards to the profile, 3.5 mm self-tapping screws are used. In this case, the fastening step can be the standard 15-20 cm. As for the length of the fastening, the point is ambiguous. It is generally accepted that the length of the self-tapping screw in this case should not exceed 25 mm. However, for those who are working with gypsum board for the first time, it is better to take longer screws (35 mm), although they are more expensive. The fact is that self-tapping screws can bend the profile and move the plasterboard sheet away from it. This often happens to inexperienced workers who have not yet gotten the hang of working with drywall. Because of this, the minimum fastener length may not be sufficient.
By cutting the profile correctly, you can use it alone to create a frame for a shelf
Sheath the frame from the top, bottom, and then from the sides
The finished shelf can easily support a lot of weight
By the way, for those same beginners, it is better to screw in the screws one after another, and not in different places, in order to attach the sheet faster. If you drill them sequentially, then there is less chance that the profile will be pressed through, because next door there is already a fastener that holds it.
Possible options and standard sizes of garage shelving
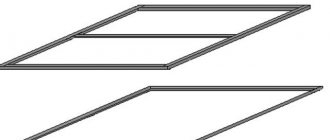
GSH are formed by racks, crossbars and shelves. Sometimes, to enhance their stability, the back side is additionally equipped with transverse ties - two steel rods attached diagonally to the outer posts. This measure is aimed at compensating for lateral loads by increasing overall stability.
Drawings and dimensions of the standard design are presented in the figure. When determining its dimensions (height and depth of shelves), the parameters of the objects that are planned to be placed on them are taken into account. Calculate the span length, i.e. The distances between single-section racks should be as precise as possible. This parameter is influenced by the rigidity of the material used for the manufacture of the GSF. Sagging of the shelves is unacceptable, no matter how strong the load on them.
If heavy objects will be placed on the racks, the approximate span length should be 1.5 m, otherwise it can be increased by another 0.5 m. If a longer rack is required, it is recommended to resort to installing intermediate racks with a distance between them of no more than 2 m.
The photo shows the recommended dimensions for a structure assembled from a galvanized profile with a cross-section of 50x50 mm. This material is used for installing drywall. It is convenient to attach it to the wall using 6x60 mm dowel nails. In this case, part of the load on the shelves is transferred to the wall. In this case, it is necessary to take into account the small thickness of the profile metal and it is advisable to strengthen the front pillars. To do this, you can insert wooden blocks with a cross section of 50x50 mm into them to the middle of the height of the rack and fasten them to the galvanized sheet using self-tapping screws.
When planning the shelving, special attention should be paid to the height of the shelves. The distance from the lowest of them, where the heaviest things are often stored, to the floor level should be 50-70 cm
The height of the remaining shelves can vary depending on personal preference. Advice: the height of the GSH shelves should be such that you can freely place a one and a half liter bottle on it, i.e. about 35-37 cm.
The advantage of gypsum plasterboard over other materials
Shelves of any length, size and shape can be created from plasterboard.
At first glance, a plasterboard sheet is not very suitable for creating shelves, because its strength raises reasonable doubts. However, with the right approach, it will become clear that the reliability of such a shelf does not depend on drywall alone. Let's take a look at the advantages of this material, which can prompt you to create a shelf made of plasterboard.
- GCR is extremely easy to work with. It is easy to give it the desired shape using available tools. It is enough to do everything carefully and thoughtfully.
- The material is very light. When you carry a whole sheet of paper with someone, it seems very heavy, but the shelves themselves are quite light. In addition, the frame for plasterboard shelves is made of a lightweight metal profile. So the load on the wall is not very large.
- Plasterboard sheets can be finished with various finishing coatings, which will allow the shelves to fit into any interior.
- Over the years, the shelves do not sag, remaining smooth as at the time of their creation.
- The cost of gypsum board is lower than that of a sheet of plywood, solid wood and OSB (the three main competitors when it comes to creating shelves). The calculation was taken from the price for 1 square meter of material.
- Cost-effectiveness plays an important role. To create shelves, you can use not only new sheets, but also leftover material that will not be used after covering the walls. At the same time, you need to be able to carry out calculations so that waste is minimal.
How can you make a shelving unit in your garage with your own hands? Photos, drawings of homemade shelves
A garage is more than just a place to park a car. Very often, it is in the garage that we store certain things that we do not need at the moment, but will definitely need a little later.
To avoid clutter inside the garage, it is very important to use the storage space correctly. Therefore, no good garage is complete without a reliable storage system.
A shelving unit is one of the most important attributes of a garage, and if for some reason your garage does not yet have one, then let’s find out how to make a shelving unit for your garage with your own hands from a corner, from a profile, from metal and wood.
First, let's figure out what types of racks there are and what materials they can be made from.
By type of design, racks are divided into:
- Not mobile (stationary) shelves. Such shelves are firmly attached to the garage wall and can stand for a long time. This is the most stable type of shelving that can support the heaviest items and tools.
- Modular shelving systems. Such shelving systems are sold in many construction and furniture stores. They can be quickly and easily assembled and disassembled. You can also add new segments to them if you wish.
- Mobile (movable) racks on wheels. They are small in size and have limited weight. They are convenient because they can be moved to another place at any time without dismantling the rack.
- Hanging shelves. Mounted on walls or under the ceiling. Not intended for storing heavy items.
- Small rotating racks. They are very convenient for storing small tools, parts, cables and other necessary items. But you can rarely find them on sale.
Garage storage systems can be made from different materials:
- metal. The strongest and most durable type of shelving. They are not afraid of temperature changes, do not burn and can withstand any weight;
- tree. Such racks are cheaper than metal ones and less durable due to frequent changes in temperature and humidity levels inside the garage;
- plastic. Structures with shelves made of this material are the cheapest and lightest in weight. Designed for storing light items;
- combination of several materials. For example, a wooden frame and plastic shelves.
The required type of structure is chosen based on the weight of things and the amount of free space for storing which shelves and racks are made in the garage.
What do-it-yourself garage shelving looks like - photo:
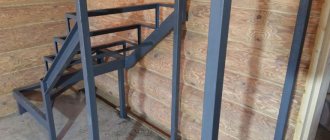
Creating a frame from a metal profile
Using a profile and guides when creating a frame is the main step in the process of creating shelves. Everything literally depends on this process. First, shelves are created from a profile for plasterboard, and then they are sheathed with the sheets themselves. But let's discuss everything in more detail.
There are two main ways to create a frame for shelves.
- The shelves are included in the project even before the walls are covered with plasterboard. In this case, the frame is formed immediately taking into account future shelves. And then niches are simply made in the wall, which are sheathed along with the wall. However, this is not exactly what we need, because niches have a slightly different purpose than shelves.
- The base for the shelf is made. It will protrude, so it will not be possible to sew it flush with the entire wall.
It will not be superfluous to know what strength characteristics plasterboard structures can have. This information can be found in the table below. The data in it is more suitable for those who were planning to install plasterboard shelves after the entire wall was sheathed, rather than thinking about them initially.
| Strength characteristics of plasterboard structures | ||
| Index | GKL 12.5 mm | GKL 15 mm |
| Required force to pull out a plastic butterfly anchor 8 mm | 50kg | 65kg |
| Maximum load per 1 anchor | 25 kg | 35 kg |
| Maximum weight of a shelf supported by two anchors | 50 kg | 70 kg |
When creating a frame from profiles, you need to mark the wall. By marking out the places where the profile will pass and be attached, you can ensure that the plasterboard shelves come out perfectly level. Fastening the profile to the wall in the marked places is done using dowels. They can be either metal or nylon (can be used if the shelf is made as a decorative element).
With an electronic level, the design will definitely come out level
The greatest load will be placed on the profile that is attached to the wall along its entire length (so do not skimp on dowels). A rack profile is used for this. However, if the shelf is not made narrow and not for decoration, then jumpers should be used to increase the strength of the frame. To create jumpers and other parts of the frame, a guide profile is used.
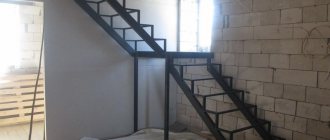
Metal shelving for basements
Collapsible rack made of metal profile pipes
For basements, a prefabricated metal shelf rack is the most practical design:
- consist of metal pipes and holders;
- solid and thin-walled pipes;
- the weight of the structure depends on the weight of the metal elements;
- shelves are made of metal sheets or wood, plywood.
If it is made of a material that rusts, then it must be coated with an anti-corrosion coating and metal paint applied on top. You can do the installation yourself. The kit includes assembly instructions and all necessary parts.
Before assembling, it is necessary to take measurements of the place where it will be located. After that, make a drawing. Calculate all dimensions using it.
If this is not done, then during the work it will be impossible to adjust the parts, which will lead to excessive consumption of material. The drawing should indicate the dimensions of the parts. The amount of material and method of fastening the elements.
Rack with adjustable shelf height
Required material:
- Thick-walled metal pipes. They can withstand heavy loads.
- Corrugated sheets or boards. For making shelves.
- Dowel with a large leg.
- Self-tapping screws for metal.
- Metal holders and corners. Will be needed to fasten and secure elements on the structure to the wall, ceiling and floor.
Tools:
- Bulgarian.
- Screwdriver.
- Hammer.
- Roulette.
- Chalk.
- Level.
- Welding equipment.
Installation:
- Connect the racks together by welding.
- The remaining parts are fastened with self-tapping screws, bolts and angles.
- Secure with dowels to the wall, floor and ceiling.
After assembling all the parts, if necessary, paint all the elements. It will have an attractive and finished look. To have a complete understanding of installation, watch the video in this article.
At the present time, a prefabricated metal rack is the most convenient design. It can be used in almost any room. The reliability of the design allows you to store heavy objects on them. You can assemble it yourself without involving specialists.
Materials and tools
Racks are made from various materials. It all depends on the shape and weight of future objects that will be placed on it. But the most durable and reliable are structures made from profiles or corners. To make your own rack from the materials described above, you will need the following components:
- Profile pipe 20 x 40 or 30 x 40 mm. In general, any profile can be used, and additional reinforcement and stability can be provided through jumpers and wall mounting.
- If there is no pipe, then a corner with a shelf width of 30 x 50 mm will do. This will even create low sides for future shelves and prevent small parts from rolling off onto the floor.
- Boards with cross-sectional parameters 15 x 25 mm or 15 x 150 mm. This depends on the items stored on the rack: for large items, shelves with gaps are suitable, and for small parts it is better to create a continuous covering. This element can be made from sheets of plywood.
To create a homemade rack you need to have the following tools and supplies:
- welding machine for connecting the main components of the structure;
- drill for creating holes for fixing shelves;
- grinder and cutting wheel for metal;
- electrodes;
- level;
- roulette;
- drill;
- self-tapping screws for fastening shelves;
- scribe;
- wood saw.
General design issues
Rack with shelves
First of all, you should forget about the first ideas that come to mind - creating the simplest hanging shelves, with a load or area that can accommodate all the property currently contained in the garage. Firstly, this is not rational from the point of view of their manufacture, and secondly, over time, the volume of things stored in the garage increases, so new and new designs will have to be made.
Therefore, it is immediately necessary to plan the design of the shelves in such a way that it is:
- universal
- expandable
- as easily movable as possible
That is, it is advisable not to make each shelf separately, but to make an entire rack consisting of several shelves as a single structure.
Rack with cabinet
The next important question is what the design of the rack will be - collapsible or not. Typically, non-removable structures are more durable and can withstand heavy loads, however, their disadvantages include difficulties in expansion, dismantling and transportation.
Collapsible structures are less stable, their rigidity is far from that of non-collapsible ones. Often, for additional stability, such structures have to be attached to walls. However, they have two special advantages - easy expandability and mobility. In addition, thanks to their modularity, shelving can be made in a variety of sizes.
In this case, the choice depends solely on the desires of each person.
Pumpkin: description of the 30 best varieties with Photos. Types, Classification
Recommendations
By choosing high-quality materials, assembling shelving at home will not be difficult. Prefabricated products will cost much less than factory models, but will not be inferior in quality and functionality. Following the recommendations will allow you to modernize, strengthen and extend the service life of such a home-made structure.
- When choosing a material, you should pay attention to its size. If the racks are installed in a small room or garage, a good practice would be to install them right up to the ceiling. Due to the height, this move compensates for the lack of space and allows you to shorten the shelves a little.
- If traces of rust were found on the material during assembly, do not be lazy and clean the areas with sandpaper. This will guarantee a long service life of the rack.
- At the finishing stage, painting is an important point, especially if the product will be in conditions of high humidity. Without a protective layer of paint, the structure can quickly rust and become unusable. Use a soft paint brush to help apply the paint in a neat, even layer.
- When creating markings of distances between future shelves, think carefully about this stage. You can make the shelves vary in height depending on their purpose. Sometimes several small shelves will be more effective than one large one.
- To increase the stability of corner shelving, you need to attach the rear posts to the wall. This will provide additional stability and will prevent them from tipping over under heavy loads. Another way to strengthen it is to install a reinforced structure under the shelves.
To do this, the reinforcement is cut with a grinder and welded to the side jumpers. This method allows you to significantly increase the load-carrying capacity of the shelves.
To learn how to make a metal rack from a profile pipe with your own hands, see the following video.
Models and designs
When choosing shelving for your garage, take into account the area of the room and the space allocated for it. So, some designs may be too bulky for the parameters of your garage or, on the contrary, not spacious enough
Before choosing a model, immediately think about what will be stored on them, because different types of storage systems perform their individual functions and withstand different loads.
The following shelving models are available:
- stationary;
- collapsible;
- mobile;
- island;
- rotating;
- modular;
- mounted
Stationary shelving is stable due to the fact that the pressure of the weight of the loaded shelves falls on the floor. The structure is made of vertical beams and horizontal bars on which the shelves are attached, and has a rigid connection, which ensures safety. Involves installation on a wall in a permanent place without the ability to move. They are easy to use, stable and durable.
Metal racks are the strongest and can withstand a lot of weight, while wooden racks are suitable for light items and are easy to make yourself. Installation of such a storage system does not require special tools or skills.
More common are prefabricated metal garage racks, which can also be purchased at any market and assembled yourself without much effort. Unlike stationary ones, they are made of perforated metal profiles, and the shelves can be fixed at any height depending on needs. Such racks are more convenient and spacious and allow you to store both a set of spare wheels and large cargo. They can be equipped with drawers that can additionally store necessary things.
Mobile racks are made mainly of metal structures. They are equipped with small wheels that allow you to freely move tools around the garage. It will be possible to easily transfer tool boxes to the workbench and continue working.
Although the movable design is mobile and makes it easier to work with necessary items, its load capacity is much less than that of other racks. This rack is sold disassembled and can be assembled in the garage like a construction set without much effort or skill. Withstand load – no more than 100 kg.
The metal island rack is a stable system of several shelves that can be changed in height. This design is designed for lighter objects and is clearly balanced to prevent possible collapse of shelves and blockage due to gravity. There are central racks that can be approached from all sides, and corner racks that are installed in the corner of the room. The load withstand is no more than 50 kg.
The rotating rack is designed for storing and storing small piece items, bolts, nails, hooks, keys and other small things that are easily lost and difficult to find in drawers. Every little detail will be visible. Such designs are convenient, do not take up much space (it would be rational to install them on a workbench) and will free up space for more massive parts. Withstand load – no more than 50 kg.
Modular shelving is a multifunctional product consisting of individual block elements that can be connected to each other, like a construction set, into a convenient storage system. You can make exactly what you need, and if there is a need for additional space, you can attach more sections and shelves to the existing rack. Withstand load – up to 150 kg.
Hanging shelves can’t exactly be called racks, but such a convenient and versatile design can be used in garages. They will fit everything unnecessary, things that are not particularly useful in work, small parts, light objects. Wall-mounted systems are practical and affordable; making such shelves will not be difficult from any available materials, and ceiling-mounted ones, if attached using special fasteners under the ceiling at a level that does not touch the roof of the car or your head, will completely hide everything from prying eyes extra items. The load should not be large, because hanging shelves can hold much less weight than stationary racks. Withstand load – no more than 100 kg.
Types of profile for work
Types of profiles for shelves.
For the manufacture of shelves, different types of profiles are used; they differ not only in shape and size, but also in their characteristics. A special wall profile is used for glass; it is possible to install LED lighting. It is made from anodized aluminum and can withstand loads of up to 15-20 kg. Such a shelf is suitable not only for books, but also for household appliances.
In addition to this option, you can use a special galvanized profile for drywall. The shelves are completely lined with gypsum plasterboard sheets on all sides; after installation they can be painted in different colors and decorated with tiles. This profile allows you to make not only simple wall shelves, but also real stable partitions with through niches, with the help of which you can quite effectively zone the space. Galvanized steel profiles will be used as the material for the frame, and glass, natural wood, and artificial stone panels will be used to cover the shelves. Everything depends only on the imagination of the master.
Do-it-yourself shelving in the garage: preparation before production
So, you've decided to make your own garage shelving. Before you begin making shelves from any material, you must carry out the necessary preparation for this.
Preparatory stage. Taking measurements and making a drawing.
First of all, decide on the size of the structure and then take all the necessary measurements.
- start by measuring the height and width of your future shelving;
- then consider the required number of shelves and their height;
- decide on the material of the shelves;
- Draw on paper the desired appearance of the finished structure. Having a drawing in front of your eyes will make it easier for you to make a shelving unit.
How to make shelving in the garage with your own hands - photo drawings:
How to make shelving in the garage: metal and wood?
You have decided to make a shelving unit out of steel and have already drawn up a drawing. Now let's move on to the next stage.
Stage 2. Purchase of materials.
Make a list of the quantity of materials you need and their sizes, then feel free to go to any hardware store. To make the frame you will need a steel channel and corners. If you want to make a completely steel structure, then buy the required number of sheets of metal. If your plans are to make wooden shelves on a metal frame, then you will need blocks of wood, plywood or chipboard.
Stage 3. Preparing tools.
To make shelves you need the following tools and equipment:
- electric drill;
- angle grinder (grinder);
- screwdriver;
- if you want to weld rack parts, you will need a welding machine and electrodes;
- hacksaw;
- hammer;
- bubble or laser level;
- screws, bolts, nails, dowels;
- construction tape;
- pencil.
Stage 4. Metal cutting process.
In accordance with the dimensions and drawing, we carefully and slowly cut the metal vertical (supports and sections) and horizontal (shelves) parts of the rack.
Stage 5. Assembly of the structure.
First we secure and install the frame. For greater reliability, you can attach it to the wall and ceiling using dowels or special screws.
After installing the vertical racks, proceed to attaching the shelves. You can bolt them on or weld them to the frame. Don't forget to use a level when doing this.
Stage 6. Painting.
To prevent the rack from becoming rusty over time, it must be primed and coated with special anti-corrosion paint.
If you want to make wooden shelving for your garage for storage and already have a ready-made drawing, then you can move on to the next stage.
Stage 2. Purchase of materials.
The most common wood garage shelving materials are oak and pine. Vertical and transverse racks are made from timber of different sizes, and for shelves you can buy boards, sheets of plywood or chipboard.
Stage 3. Necessary tools and construction equipment:
- electric tools: drill, grinder, screwdriver;
- wood hacksaw;
- hammer;
- tape measure and pencil;
- level;
- nails, screws, self-tapping screws, bolts.
Stage 4. Cutting wooden parts. Adhering to the required dimensions and drawing, we cut all the wooden supports and racks, and then the shelves. We treat all parts with a special antiseptic intended for wood.
Stage 5. Assembly of the structure.
First, we assemble and secure the entire frame, after which we attach the shelves to it using metal corners and M5 bolts. We check the strength of the finished structure and once again measure the evenness of all surfaces and corners with a level.
Stage 6. We carefully and without haste paint the structure to prevent it from rotting and the formation of mold on it. We wait for it to dry completely, and then install it in the chosen place. That's it, your rack is ready!
How to make a garage rack with your own hands from a profile:
So, now you know how to make wooden or metal garage shelving with your own hands. At first glance, this is a rather complex process with many nuances.
But, nevertheless, everyone can make a rack. All you have to do is take all the measurements correctly and without haste and follow the step-by-step instructions. A self-made rack will serve you for many years.
How to make a wooden shelving unit for your garage with your own hands, see below:
Fastening profiles to each other
To know how to make plasterboard shelves with your own hands, you need to be able to attach the guides to the rack profile. The rectangular frame is made from one profile and three guides. They need to be connected correctly. This is done in one of two ways:
- using metal screws. Special short screws are used. At the junction of the profile with the guide, they are fastened with two self-tapping screws. That is, you need 4 self-tapping screws to attach the wall profile and the guide profile to each other. Also, the guides are attached to each other according to the same principle;
- using a special cutting tool. It is usually used to temporarily attach two profiles to each other. This tool punches a hole in two profiles attached to each other and slightly bends the metal. Due to this, the profiles stick together. With this method, burrs do not appear, and the drywall fits tightly to the frame. Two notches at one profile connection will be enough to secure them.
Profiles can be attached to each other in a variety of ways.
To increase the strength of the structure, vertical posts can be used. In this case, the guides will be attached to these posts and will have support, and will not “sag” in the air. At this stage, a level and plumb line are used to ensure that the stand is clearly vertical. It can be attached to the floor, ceiling or both at the same time (depending on the chosen layout).
How to assemble a rack from an aluminum profile with your own hands
Assembling a rack with your own hands from a profile can be done even by a person taking up this task for the first time. It is easier to work with than wood.
The main advantage of the modular design is the ease of assembly from a ready-made kit
Materials and tools
To calculate how much material is needed, first sketch out a sketch indicating the dimensions and number of shelves. Profile dimensions are selected depending on the expected load. To connect the parts, you will need self-tapping screws with press washers, since their fastening is more reliable. It is better to take pointed ones, since drill ones make large holes, so the strength is reduced. Shelves are made from boards 2 - 3 cm thick, 10 mm or more plywood, OSB sheets no thinner than 12 mm.
To work you need to stock up on tools:
- Tape measure, pencil or felt-tip pen, square for checking angles.
- Metal scissors for cutting profiles.
- Screwdriver. If you screw in each screw manually with a screwdriver, it will take several days to assemble the frame.
- A wood hacksaw for cutting shelves. The process will speed up if you have a circular saw or jigsaw.
Build process
When the materials and tools are prepared, begin assembly:
- On the profile, mark the length of the racks, crossbars, and crossbars along the width of the shelves. To prevent the rack from turning out crooked due to errors with the dimensions of the workpieces, you need to re-check the correctness of the markings.
- On the side walls of the profile, cuts are made to the base and bent at this point. The workpiece is cut along the fold line.
- Longitudinal cuts are made on the crossbars to a depth equal to the width of the profile of the vertical supports. Internal bends, if any, are cut off.
- The crossbars are inserted into one another to form a rectangular cross-section. The cut ends are bent 90⁰. You need two of these parts for each shelf. They are installed on both sides of the frame.
- The assembly of the sidewalls, so that there are no distortions, is carried out on a flat surface, possibly on the floor. Cross members are inserted between a pair of vertical supports. After checking the corners, each bend is screwed with 1 - 2 self-tapping screws.
- After both sidewalls are ready, the rack is assembled from the profile. First install the lower crossbars, then the upper ones. If no distortions are found during inspection, the rest are fixed. It is more convenient to screw in the screws by placing the frame on its side. Having secured the parts on one side, it is turned over to the other.
- On profile racks with wide shelves, additional supports are installed from below in the middle of the lower crossbar. After determining the height, bends are made on them and screwed with self-tapping screws.
- After measuring, the shelves are cut. To increase the rigidity of the frame, cutouts are made in the corners so that they extend onto the side crossbars. To fasten wood, it is better to use self-tapping screws with fine threads.
Plasterboard structures
Installation of a plasterboard shelf.
Making profile shelves that will be covered with plasterboard is not very difficult, but you need to immediately decide what form they will take, what loads you plan to withstand, and the entire structure may need to be strengthened.
To make shelves based on a profile with your own hands, you need to prepare the following materials:
- galvanized steel or aluminum profile 50*25 mm;
- if curved shapes are used, then a special arched profile is needed;
- special guide rails;
- self-tapping screws for drywall, dowels with spacers;
- if it is necessary to strengthen the structure, it is necessary to take traverses, butterflies (a form of fasteners);
- plasterboard boards of the required thickness (for heavy loads it is recommended to take boards with a thickness of 18 mm or more);
- primer;
- gypsum-based putty;
- brushes and spatulas;
- mounting mesh, metal corners for finishing joints after sewing.
Tools needed for work: pliers, tape measure, long metal ruler, construction level, hacksaw, hammer.
Tools you will need:
- building level;
- plumb line;
- tape measure, long metal ruler;
- a simple pencil;
- hammer;
- Bulgarian;
- drywall knife;
- pliers;
- hacksaw;
- sandpaper;
- paint for decorating a shelf or any other material that will be used in the work.
Assembling the rack
Important points to consider before installation:
- the length of the structure should be 1.5 m less than the total length of the wall to which the product is placed;
- the width of the shelves should not exceed 1 m;
- items of different sizes and weights can be stored on the rack;
- The height of the shelves is determined taking into account the height of the storage items (approximately from 30 to 50 cm).
After all the necessary materials and tools are collected and ready for work, it is worth laying them out on the floor so that you can see everything at once and not waste time searching during the work process.
Installation of the rack includes the following steps:
- Measure the required sections on the profile pipe and cut them. If you don’t have a grinder, of course, it’s unreasonable to buy it for one-time use. You can rent a tool or ask to cut the profile where it was purchased (but this will be more expensive).
- Weld the frame elements. If you have no experience in handling a welding machine, it is permissible to connect the parts using bolts.
- It is imperative to control (using a corner and a building level) the perpendicularity of the lines. If you allow the corners to skew, you will have to live with a crooked rack; the defect can only be eliminated later by disassembling the entire structure.
- After assembling the frame, you should assemble the base for the shelves, on which the required number of boards, plywood or metal sheets will be installed. To do this, mark the installation locations of the shelves on the main structure.
Apply a corrosion protection coating to the finished product, then a layer of primer. After that, you can paint it any color (or even different ones). Now the rack will not rust and will acquire a presentable appearance. And it will be much easier to care for a surface treated in this way.
When the frame is ready, all that remains is to make the required number of shelves
When choosing a material for them, it is important to consider the purpose of the product, future loads on it and the place where it will be installed. Corrugated sheets of metal don’t care at all, but wood and chipboard can be seriously deformed from overload or a damp environment
To prevent this from happening, the wood material for the shelves should also be treated well in advance: painted, provided with an anti-fungal coating.
If a structure of increased strength is required, you can provide additional fastening of the shelves to the frame using self-tapping screws. To ensure that the rack stands firmly, you can attach it to the wall, floor or even ceiling using brackets, anchor bolts and spacers.
Greetings to all readers of my publications. In this article I will tell you how to save space and space in your utility room and correctly make a shelving unit from a profile pipe. It would be useful to know some points when making it yourself, especially since I have attached a drawing and a template for the 2 most common modifications. As you assemble the rack, you will understand why I chose this particular material.
Advantages and features of racks made of profile pipes
Metal shelving made from profiles is an integral part of the garage, workshop and warehouse. They have a high level of strength and durability, and at the same time they are inexpensive. In addition, such structures are easy to assemble yourself, using available materials and tools. In addition, such designs have a number of other advantages:
- Durability and reliability. Metal structures can withstand significant loads, so they can be used in warehouses, garages, and cellars. The metal system can be used to store household supplies, books and tools, and installing corner shelving can also save space.
- Visual appeal. Shelving made from profile pipes can also be used for compact placement of items in a house decorated in a loft or high-tech style.
- Easy to install. It is not necessary to buy a ready-made design. You can make it yourself, even without special construction skills. To do this, you will need a profile pipe, racks and material for shelves.
- Low cost. To make it you will need an inexpensive profile, corner racks, metal or wooden shelves and fastening systems. When elements wear out, they can be easily replaced with new ones.
- Fireproof or anti-corrosion resistance. Unlike wooden structures, such racks will not cause fire to spread. And the use of powder paint or galvanized coating allows you to protect the product from the negative effects of high humidity.
- Resistance to deformation. The structure does not deform under heavy load, high humidity and temperature changes.
- Easy to clean. The absence of glass and complex elements makes cleaning the surface simple and quick. Simply wipe with a damp cloth and add any detergent.
Organizing space in a garage or workshop
Installing a metal shelving unit in a garage or other premises will help organize your storage system and bring order. And the ease of manufacturing will allow you to assemble the structure from the profile with your own hands.
What types of metal racks are there?
Drawing of a metal rack and the maximum permissible load on it
They are divided by type:
- Shelf.
- Pallet.
- Palletized.
- Angular.
- Frontal.
- Stationary.
- Mobile.
Prefabricated metal racks are chosen depending on the size of the room. They are used in the office, in the store, in the garage or at home for seedlings (see How to make a rack for seedlings with your own hands).
All warehouses use prefabricated metal shelving. Because it is a convenient design that allows you to lay out any product compactly. Sizes and shapes are selected depending on the purpose.
The most common shelf racks. They are no more than 2 meters, so they are convenient to use in shops, offices, libraries and archives.
For warehouses, pallet or pallet racks are used. They are larger in size, which allows you to arrange a lot of goods in a small space.
Mobile and stationary shelving is used in archives and libraries. Mobile phones are equipped with wheels, which makes access to documents easier.
Shelving design
Trade rack that can be used in a greenhouse
The rack is a frame made of metal profile pipes. Between them there are shelves for storing various items.
The dimensions of shelves and racks depend on the size of the premises and the loads on them. Let's assume that a prefabricated metal rack is assembled from sheets whose thickness is 2 mm and corners 50 * 50 mm thick 5 mm. This design will undoubtedly be especially durable and will withstand heavy loads.
They are most often equipped with:
- separators;
- side walls;
- back walls;
- inclined shelves;
- awnings;
- mesh shelves;
- drawers;
- pallets;
Shelving provides optimal storage in a small area. Possibility of expanding them in any direction. Sufficient load capacity and strength.
Features of using a rack made of profile pipes
Many people prefer to make wooden shelving to organize space in a garage, cellar or workshop. However, such structures are not strong and durable. Over time, wood begins to rot and mold, and without constant painting it loses its appearance. Therefore, it is better to spend more time and money on materials, but make a truly strong, durable and practical rack.
An excellent solution would be to install such a rack in a garage or workshop. It will allow you to organize the space so that all spare parts and tools are stored on the structure. Profile shelving can also be used for growing seedlings. Such structures can also be installed in a greenhouse. This will allow you to grow more plants in a small greenhouse and reduce heating costs.
In addition, metal structures can be used indoors and outdoors. When they are treated with an anti-corrosion compound, you don’t have to worry about temperature changes or high humidity levels. And surface care consists only of periodic wiping with a damp cloth.
Therefore, if you follow all the rules and recommendations, it is not difficult to make a rack from a metal profile. The main thing is to use high-quality materials and follow the sequence of work.
How to assemble a rack from an aluminum profile with your own hands
Assembling the structure with your own hands will be possible even for the person who took up this task for the first time. They are much easier to work with than wood. The main advantage of the modular design is that assembly is extremely simple, from a ready-made kit.
Tools and materials
To calculate exactly how much materials you will need, you should first sketch out a sketch indicating the size and number of shelves. The profile dimensions should be selected depending on the expected load. To connect the parts, you will need self-tapping screws and press washers, since fastening with them is much more reliable. It is better to take pointed ones, since drill bits will make large holes and therefore reduce strength. Shelves should be made of boards 3 cm thick, for plywood 1 cm or more, and OSB sheets should be at least 1.2 cm thick.
Let's look at how the assembly is carried out.
Assembly process
So, to assemble a rack from pipes with your own hands, do the following:
- On the profile, you should mark the length of the racks, crossbars and crossbars along the width of the shelves. To ensure that the rack does not turn out crooked due to errors with the dimensions of the workpieces, you should re-check the correctness of the markings.
- Make cuts on the side walls to the base and bend them in this place. The workpiece should be cut along the fold line.
- Make a longitudinal cut on the crossbar so that the depth is the same as the width of the profile of the vertical supports. Internal folds should be cut off.
- Insert them into each other to create a workpiece with a rectangular cross-section. The notched ends should be bent 90 degrees, and 2 such parts are required for each shelf. Install them on both sides of the frame.
- To avoid distortions, the assembly of sinks is carried out on a flat surface, or on the floor. Insert cross members between the vertical supports. After checking the angle, each bend should be screwed using 2 self-tapping screws.
- After the sidewalls are ready, assemble the rack from the profile. Install the lower crossbars first, after the upper ones. It is much more convenient to screw in the screws if you lay the frame on its side. Secure everything on one side, and then turn it over to the other.
- On a profile rack with wide shelves, install a couple more additional supports from below, in the middle of the lower crossbar. After determining the height, bends should be made on them and screwed with self-tapping screws.
- At the end, when the measurements have been taken, you can make shelves. To improve the stiffness characteristics, make cutouts at the corners so that they can even extend over the side crossbars. For fastening wood, it is best to use self-tapping screws with fine threads.
Depending on the capabilities, the frame from profile pipes is made with bolts or welded. An alternative would be the option on metal corners, which will be cheaper. To simplify installation work, the rack is made combined. Together with the pipes for the racks, a metal corner is taken on the sides.
Finish coating of the finished shelf
How to finish a plasterboard shelf? A variety of materials can be used for this, but paint and wallpaper are most often used. Working with wallpaper is very difficult and takes a long time. It will take a lot of nerves, but you may not achieve results. Although if you trim and hide everything correctly, it will turn out very beautiful. Moreover, the wallpaper will also hide drywall cracks if they arise. Wallpaper is usually used for painting.
If you paint the shelves right away, you will need water-based paint. If you use thick paint, you can create streaks on the top of the shelf with a brush, creating unique patterns. In any case, before painting plasterboard shelves, they need to be prepared. To do this, all joints and screw heads are puttied. At the joints of the gypsum boards, you need to create a right angle, because problems with leveling the surface often arise there. It is the putty that will help make the shelves completely even, and not just top and bottom.
To make the edges more durable, paint corners are used, which are attached with putty. You can coat the edges with putty and then press in the corner. It will stick like that. If the shelves are arched, then the painting corner will not hold on so easily; it will have to be secured with a stapler, and then putty. This technique will allow you to get absolutely even shelves, ready for the further finishing layer. Their edges will become strong and will not crumble in the event of an accidental impact. After the putty has dried, you will need to sand it using sandpaper. The surface will come out completely smooth.
Check out examples of plasterboard shelves that you can make yourself.
Choice
First of all, you need to decide on the material for the structure, the final size, which depends more on the room, and the loads that will be placed on the rack. The set that you will receive in the store depends on all this.
The most interesting thing is that some stores may even offer you to assemble this entire structure after delivery, which again is a nice bonus. Personally, I am sure that, if time allows, it is better to assemble the rack that you chose in the store yourself - time passes, and men simply change toys.