Preface . In order not to encounter the problem of lack of water in winter due to freezing of the water supply system in some area, you should insulate not only the water pipes in the basement and in the ground, but also the pumping station in the suburban area. Let's consider how to insulate the pump and equipment responsible for the flow of water, which is a pressing issue for the harsh Russian winters.
Insulation of pipes from the well to the house in the ground and pumping stations is a pressing issue for residents of private houses or those who like to come to their dacha in winter. Frozen water in surface equipment or pipes is a more serious problem than it may seem at first glance. Why is frozen water in the water supply dangerous?
Solving the problem of water supply in a country house
Solving the problem of water supply in a country house
As mentioned earlier, autonomous water supply using a pumping substation is the best option for solving the problem of lack of water. As for the price of pump equipment, it is very optimal and quite affordable.
The biggest problem of autonomous water supply is the correct choice of equipment, which will be discussed now.
There are two popular schemes for organizing water supply for a summer cottage: using a well and using a well.
For the first scheme, you must first drill a well. It is best to drill it, select equipment and create a communication system at the same time as designing the estate and all planned garden buildings. This is necessary so that it is possible to easily place water supply elements in different parts of the territory (basement, ground floor of the house, adjacent buildings, etc.). Also, the advantage of simultaneously building a house and creating a water supply is that with a properly designed project, there is no need for additional protection of equipment from freezing in winter. If all the main elements of the pumping substation are located in one place, this will significantly improve the convenience for its maintenance and repair.
Where to install
The best option for placing a pressure station is next to the well. This will reduce power losses and ensure a stable supply of liquid medium.
The pump can be installed either in a separate building or in the house itself - in the hallway, under the stairs, in the kitchen. The room should be spacious, it is necessary to ensure good ventilation and a humidity level of no more than 80%. If you plan to place the unit in the basement, the room must be insulated, since the air temperature should be +5... +35°C. In addition, you should take care of sound insulation so as not to experience discomfort due to the noisy operation of the equipment. As an alternative, you can choose equipment with a large volume storage tank so that the pump is turned on less often.
When installing a caisson, the station is installed below the ground freezing level, and when installed in a well, a special platform is used.
In the well
When installed in a shaft, a removable mount is used, which is fixed to the upper part of the well shaft, or a wall bracket in the well itself. The main disadvantage of this option is the functioning of the mechanisms in conditions of high humidity. To protect equipment from freezing, it will be necessary to insulate the ground part of the structure.
In a separate room
Placing the pumping station in an outbuilding solves the noise problem, but limits access to the unit and requires the installation of a heating system. Installation in a caisson has the same advantages as installation in a well, since the chamber is built above the well head. This placement scheme will require the use of waterproofing materials and insulation.
The process of insulating a pumping station
It is easy to protect the pumping station from frost and temperature-related damage using several slabs of polystyrene foam or penoplex (extruded polystyrene foam).
The insulation boards are “set” on a special glue and secured with dowel mushrooms. If the walls of the shaft are wooden, dowel mushrooms are enough. The seams between the slabs of thermal insulation material must be sealed with sealant or polyurethane foam. This will avoid the appearance of cold bridges. It is recommended to use two layers of insulation with mandatory seam spacing. The hatch should also be insulated
It is important to avoid cracks into which cold air and snow can blow.
The situation is similar with polystyrene foam. The only difference is the thickness of the insulation layer. Due to the fact that foam plastic is inferior in thermal insulation qualities to penoplex, its layer should be at least 12-15 cm.
Device
A water pumping station for a well is a complex consisting of several interconnected parts. Typically it contains the following components:
- Pump . It can be a centrifugal, vibration, self-priming or submersible pump. Some models are powered by an attached diesel generator.
- Hydraulic accumulator . A tank that holds a supply of water. Thanks to it, you can use water for some time without turning on the pump.
- Pipeline and connecting fittings . This includes pipes, hoses, fittings, ball valves, filter sizes and check valves.
- Pressure sensor and switch . This connection allows you to have a reserve pressure in the hydraulic tank so as not to turn on the electric pump every time you use water. The link describes how to adjust the pump station relay.
- Dry running protection . Thanks to it, the pump will not turn on if the check valve suddenly lets water through.
- Voltage regulator.
- The pillow on which the pumping station is mounted. Made from concrete or iron.
See prices for plastic rings for wells.
Depending on the needs for water, the depth of its occurrence, the structural features of the house and site, several different types of pumping stations are used for the well.
Read a separate article about rings for wells.
Small installation tricks
Before starting work, a diagram or design of the water supply system is drawn up. The diagram must include all elements of the system with a calculation of the diameter of the pipes used and the number of auxiliary parts (couplings, fittings, volume of insulating material). It is better to prepare a trench for the pipeline in dry and warm weather.
Step-by-step installation instructions:
- Project preparation.
- Preparing the trench.
- Preparing the pump and hydraulic system, checking the configuration.
- Insulation and installation of pipes in the trench.
- Installation of water intake elements in the well (you must remember that you will have to drill concrete rings in the well to install the water intake element, so you must have an impact drill or other powerful tool).
- Connection of all installed elements to each other.
- If the wiring in the house is installed in advance, the system is immediately checked for leaks. If the water supply is uninterrupted, then the trench is subject to further insulation and covering with soil, if necessary.
The tightness of the water supply structure at the joints is ensured using a special silicone-based sealant.
The submersible device is lowered into the water. During water intake, the device should not be interfered with by the filtration elements used at the bottom of the well pit.
Installation of water supply
After the trench is ready, you can begin installing the country water supply. First, pumping equipment is installed in the well. From it the supply pipeline extends into the house. A receiving unit is installed in the house, which ensures the operation of relays and control systems.
It is mandatory to install a drainage unit if you have a water supply system in an unheated country house. In winter, you will need to drain the water from the system every time you leave your dacha for a long time.
Basic finishing options for any room
In order to choose a material for finishing the ceilings of an apartment, you need to decide on the design direction and determine the budget for finishing the ceiling. After all, the design of the ceiling is not limited only to the classics; if desired, you can even create very individual options, it all depends on preferences. Let's look at the most common finishing materials:
- Whitewashing, the most inexpensive and short-lived way, is an option to quickly refresh a room.
- Painting the ceiling with water-based emulsion, a classic option, requires preparatory work. The ceiling surface must be completely leveled. Therefore, for ceiling coverings with significant unevenness, this method will take a lot of time.
- Finishing the ceiling with wallpaper also requires preparatory work. It will be difficult to quickly glue it with your own hands alone; you will need helpers. The price of finishing is low, but the service life is not long, although with an interesting combination of several types of wallpaper you can create interiors from classic to avant-garde.
- Lightweight finishing slabs will help quickly solve the issue of cosmetic repairs; they will last quite a long time, but are not distinguished by their external originality.
- Liquid wallpaper is one of the inexpensive modern methods of finishing ceilings and walls. Using liquid wallpaper, you can create an interesting design thanks to a rich range of colors and combined application technology.
- If you choose the most modern materials for finishing ceilings, it is best to give preference to suspended structures: plasterboard, slatted and cassette ceilings, PVC panels. There are no restrictions in design, and by combining several types at the same time, you can create exclusive interiors.
- Stretch ceilings are also very popular due to a number of positive characteristics.
It should be remembered that not every ceiling is suitable for painting, as even minor irregularities will appear. In this case, suspended or tension structures will be needed.
Procedure for insulating a well ↑
Installation of water supply using a well requires a large number of additional devices and equipment.
Let's look at how to insulate a well most effectively . First of all, you need to dig a pit - dig a trench around the neck of the well, of any size, depending on your preferences. Its depth should be located below the exit of the pipe leading to the house and below the freezing level (about 1-1.5 m, based on climatic conditions). If necessary, all means of communication can be installed in the pit: a pump or pumping station, an expansion tank, automation and other devices. You should not do this for such conditions: a country house or if there is a danger of theft. Also, the method is not relevant for wells with high water levels. The pit can be lined with bricks, filled with concrete, or ready-made reinforced concrete rings for wells can be used. If desired, you can also use a budget option - boards. But they need to be processed and protected from contact with moisture to extend their shelf life. After this, follow these instructions on how to insulate the well:
It is believed that by leaving a gap between the walls of the well and the insulation layer, the degree of insulation can be increased due to the air gap
Cut the well neck to the level of the pit floor. It is necessary to leave a gap, otherwise it will be difficult to arrange it.
- Place the lid on the neck. You can use ready-made options - made of iron, plastic, or build it yourself. At the same time, you can insulate it; the easiest way to do this is with polystyrene foam. There are also ready-made insulated covers for wells, in which sockets for the exit of a pipe, cable, and pump cable are immediately located.
- Insulate the walls and ceiling of the pit.
- Place a lid on top, also insulated.
- The pipe leading from the well to the house should be insulated using any option.
In some cases, more often when the water level in the well is high, other methods are used to insulate the well. In particular, you can dig the pipe down to the freezing level and cover it with foam plastic or wrap it with cotton wool. After this, fill the soil back and install the insulated cover.
How to measure battery temperature correctly
When the issue with the coolant is clarified, you can think about how to measure the temperature of the battery in the apartment. This is easy to do in the following ways:
- Use a regular household thermometer. You need to apply it to the battery and wait until it warms up. To account for the error, it is better to add 1-2 degrees to the data obtained.
- Use an alcohol thermometer, attaching it to the radiator with tape, and then insulating it with insulating material, such as foam rubber. The information obtained by this method is indicative in dynamics. The device can be left for a long period to continuously monitor the situation.
- Use an infrared thermometer. In practice, they have a small error, and do not require direct contact with the heating device. And the result is given instantly.
- Use an electrical measuring instrument with a thermal ramp and sensor. The sensor is installed on the battery, and when the “measure temperature” function is selected, the device displays its value.
How to make water supply from a well in winter
Let's look at how to make water supply from a well, the winter version of which will allow you to have water supply in your house all year round. Let's consider what equipment we need, what materials we will need to purchase, how we should prepare for laying a pipeline from the well to the house, how winter insulation of the pipeline should be done.
Before making water supply from a well (winter option), you will need to make a list of purchases and preliminary preparations.
What materials and equipment will be required?
To make a water supply system powered by a well, you will need the following materials and equipment:
- Submersible pump or pumping station.
- Control relays for a submersible pump (the station is already equipped with them).
- Diaphragm tank for a submersible pump (the station already has one).
- Pipe for the pipeline (you can take plastic or PVC).
- Fittings and shut-off valves.
- Pump power cable.
- Material for pipeline insulation.
Having purchased these materials and equipment, you can begin preparation.
Preparing to lay a water pipeline
In order to lay a pipeline from a well to a house, you will need to dig a trench under it. The depth of the trench through which the pipeline will go must be greater than the established soil freezing depth for your region.
If you do not have the opportunity to dig a trench of such depth (rocky soil or large stones), you will have to insulate your pipeline. Otherwise, during a winter with little snow and frost, you may be left without running water.
Insulation of water supply from a well
To insulate the water supply system, it is best to use extruded polystyrene foam - EPS. It is also called penoplex.
This material has excellent thermal resistance, practically does not absorb moisture, and does not rot in the ground.
Penoplex decomposes when exposed to sunlight, but we are going to bury it in the ground. Therefore, this factor is not critical for us.
The width of penoplex insulation should be equal to 2 freezing depths. If you deepen the insulation, then its width can be reduced by half the distance as far as you deepened the penoplex into the ground.
Installation of equipment in a well
After the trench is dug, the pipe for the pipeline is laid in it. A pump is installed in the well. A receiving unit with control relays and a membrane tank for a submersible pump is installed in the house.
The pumping station is already equipped with control relays and a membrane tank, so it just needs to be installed.
The pumping station can be located either in a house or can be installed in a well shaft above the water line.
If a pumping station is installed in a well, the well shaft and its blind area should be insulated with penoplex.
How to insulate a pumping station?
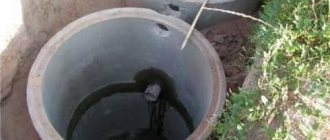
Typically, pumping stations are installed in close proximity to the source. That’s why owners often install water intake units in a pit or well. The walls of the shaft are usually lined with brick or concrete, and the top is covered with a lid to prevent debris and rainwater from entering the well. Let's look at insulation options using an example.
Deepening the hole
If you use a pump that is located in a water intake pit (whether it is the entrance to a section of a centralized water supply pipe, a private well or a well), place the equipment below the soil freezing level.
In the northern part of Russia, this figure increases to 200-215 cm. If the depth of the pit on your site is insufficient, it must be increased to avoid breakdown and freezing of the system.
Pit insulation
Even with the required dimensions of the mine, the lack of insulation will affect the degree of protection of expensive equipment and the entire water supply system. Thermal insulation of both the walls and the protective cover of the well is necessary.
Using the heat of the earth.
Another good option for placing a pumping station is to place it on a special platform inside the well or in a caisson specially made for this purpose at the well exit.
If the depth of the platform or caisson is correctly calculated, then both the station and the pipes will not freeze in the most severe frosts. The sound of the operating pump almost does not reach the surface, and certainly not audible in the house. The caisson cover and the top of the well must be insulated to prevent the penetration of cold air. And the heat of the earth at a depth below the freezing level is quite enough for comfortable operation of the pumping station.
The only problem in this case remains the water pressure in the house, which depends on the length, diameter of the pressure pipeline and pump power. But I would attribute this to the purely technical side of the issue.
But servicing the pumping station with this arrangement will be difficult. We will have to come up with some kind of portable or stationary ladder along which one could go down to the pump for its inspection or repair.
The sequence of stages of preserving a well for the winter
Preserving a well for the winter is quite simple; you can do it with your own hands, on your own. Preparations for winter preservation of the system, if you do not intend to operate it in the winter, begin in the warm and dry season, no later than September. The stages of preserving a well for the winter include the following mandatory actions:
- turn off the water supply;
- We drain the water through pipes or taps located at the lowest points of each pipeline junction. A compressor can be used to purge the system;
- remove residual water from plumbing fixtures;
- if there is a boiler, then it is necessary to empty it of water through the built-in drain pipe, and at the same time disconnect the water supply hoses;
- We disconnect the pumping station from the water supply and after draining we blow it with air;
- we dismantle irrigation pipes laid above the ground, fortunately modern designs often allow this to be done without any special complications;
- We disconnect the submersible pump from the electricity and leave it in the well, nothing will happen to it: it is below the freezing point;
- open the check valve, thus draining the water into the well.
General information
Functions of the pumping station
- Raising a resource from a well
- Round-the-clock transportation of liquid to each point of water consumption
- Eliminating air jams
- Providing and maintaining the required pressure in the system
- Delivery of water when the pump is turned off for a certain period of time (repairs, power outages).
The pumping unit differs from conventional units for pumping out liquid in that it does not require uninterrupted operation. It automatically turns on when the water level in the accumulator reaches a minimum, and turns off if it rises to the required level. Thus, the equipment wears out less.
Elements of the pumping unit
An installation is not one large unit, it consists of many devices, each of which performs a given function. Only a correctly assembled system guarantees high-quality and productive work.
How to supply water to a dacha in winter
Winter water supply can be done in several ways. Here it all depends on how often the country house is used: all year round or we are talking about periodic operation with the ability to start the water supply at any time.
Let's look at each method in more detail:
- The first method is used both for ordinary country houses and for residential country houses. Water supply from a well in winter is carried out taking into account the fact that people live there all the time, which means the house is warm in winter. In this case, during installation you can do without a preservation device.
- Water supply from a well in winter, taking into account conservation, significantly complicates the task, see photo. It is impossible to make this device with your own hands without certain skills; it is better to seek help from specialists. Insulation (see How to insulate a well for the winter on your own) makes it possible to maintain the functionality of the water supply all year round, even if no one lives in the house for a long time.
Water supply scheme taking into account conservation
Water supply from a well in winter in both cases involves the installation of an underground pipeline at a depth of about 1.5 m. Here it is necessary to take into account the observance of the slope in relation to the water source. If the length of the pipeline does not exceed 8 m, then it is not necessary to include a mandatory filling system in the pipeline structure.
Advantages of polypropylene pipes
In order to make water supply from a well, we will need to buy pipes and this is a rather important issue. There is a lot that speaks in favor of polypropylene pipes.
So:
This material is quite durable and reliable. Such pipes do not corrode, have high wear resistance, and can withstand mechanical loads well. Their service life is designed for 50 years; The environmental component of this material is excellent; such material will never spoil the taste of water
Even after a long period of use, no deposits remain on the pipe walls; The connections will be quite tight and reliable, and this is important. Make the right connection
It is best to use thermal welding, it is of the highest quality. In this option, the integrity of the entire pipeline will be ensured; It is worth mentioning the complexity of installation, this is important, especially if you do the work yourself. Here you will not need special equipment and you will do all the work yourself; The cost of this material is moderate.
Winter water supply from a well: technological details and tips
Considering that it is sometimes impossible to connect a country house to a central water supply, owners of private houses resort to other methods of autonomous supply.
Today there are 3 options:
- Extract water from a natural reservoir.
- Organize an event to supply water from a well or well.
- Build your own well or borehole.
Of all the above options, the most suitable is organizing water supply for a country house from a well.
Advantages of well water supply:
- The price for digging and organizing is much lower than drilling.
- You can do all the work yourself by watching the instructional video.
- The right structure can provide water for many years and completely free of charge (if you do not take into account the water supply to the house).
- Digging does not require special permission.
Stages of work on installing a water supply system:
- Developed water supply scheme.
- Digging a trench for pipes.
- Correct selection of pumping equipment and its installation.
- Installation of water purification filters.
- Installation of pipes from the well to the house.
- Installation of water heating devices and installation of household appliances (washing machine or dishwasher).
All autonomous water supply devices are installed in the utility room of the house or in a caisson above the well itself; a pump or pumping station is included in the installation. It connects to the well pipe, from where the pipes diverge directly to the house. It is imperative to provide insulation for the well, otherwise the water in it will freeze in winter (see Water in the well has frozen. What can be done).
Winter is coming. Drain the water
There are many cases when, after winter, people came to their dacha and discovered that the system was out of order and it was necessary to trench the walls in order to change the pipes, dismantle the pump and send it in for repair. The reason for this is simple forgetfulness or ill-conceived decisions when designing a house and a personal plot.
As with other engineering systems, water supply should be taken care of at the design stage. It is then that a fundamental decision needs to be made: whether the country house will be used in winter or will be mothballed before the onset of cold weather. The design of the water supply system and its seasonal maintenance depend on this.
If the owners plan to live in a country house only in the warm season, there should be no problems with installing the system. The pump is connected to the electrical network, the hose is lowered into the well, and the pressure pipe is connected to the water supply network.
Before the onset of cold weather, the pump is removed (it is better to take it to the city), the water from all reservoirs - tanks, water pipes, radiators - is drained, the drain valves and plugs should be left open. The drinking well must be cleaned and treated.
This can be done using special compounds, such as chlorinol, which is sold in pharmacies. After treatment, the water from the well is completely pumped out, and the well is closed with a lid for the winter.
And by spring it will be filled with fresh drinking water, and all that remains is to use the pump to take life-giving moisture from it. A well that is not used in winter is not insulated.
If the house is intended for year-round use, quite serious and costly preparatory work will be required. The pumping station must be installed in an insulated room, since it can operate at temperatures not lower than plus five degrees.
Note
The cost of an autonomous water supply system for a house, including a well, wiring, a submersible pump or pumping station and filters, is up to 15% of the cost of the entire house.
The costs of restoring it in the event of defrosting can be quite high: just dismantling and reinstalling the pump (excluding repairs) will cost from $500 to $800, and replacing broken pipes hidden in the walls will inevitably entail a major overhaul of the premises.
The pipe from the well or borehole to the house is laid below the freezing level of the soil and insulated for safety - for this purpose, an electric self-regulating two-core cable is usually used, which heats up to 65 degrees. For those who have a well under their house, it will be easier, since the pumping station is located in the basement and not in the open air.
To avoid the formation of ice on the walls of the well and ice on the surface of the water, the head and lid of the well are insulated with any environmentally friendly material. Then the well will have a constant temperature - from plus five to plus ten degrees.
The caisson is a metal bunker with a hatch, which is waterproofed on the outside, coated with a primer on the inside and insulated with foam plastic.
Nuances of insulation
The main problem is the distance of the distribution well from the heating of the house. It is not practical to make a separate line for heating 1-15 m². Therefore, it is necessary to consider other methods of insulation. But before that, you should familiarize yourself with the operating conditions of the pumping station.
Pumping station
Usually it is a well located 0.5 m below the ground level. Its overall dimensions are 1x1 m with a height of up to 0.7 m. The walls are made of brick or cinder block. In rare cases, the concrete pouring method is used. These materials have high thermal conductivity and cannot provide the proper level of thermal insulation. To ensure this, additional measures will need to be taken.
When choosing heat conservation methods, the operating conditions of the pumping station are taken into account:
- Ventilation. For a normal level of air exchange, a pipe with a diameter of about 50 mm must be installed. In winter, it is the main source of heat loss. Under no circumstances should it be blocked, since increased humidity will increase the likelihood of electrical equipment breakdown;
- Influence on the wall material. The most common mistake is installing insulation on the internal walls of a well. As a result of this, the dew point shifts, and as a result, the humidity of the walls increases;
- Flood protection. Care should be taken not only to ensure a good degree of thermal insulation, but also to prevent water from entering during melting snow or in rainy weather. Therefore, in addition to insulation, the pumping station must be sealed from the ground and the top cover.
At first glance, the fulfillment of these conditions leaves no choice of method for maintaining the required temperature level inside the station. Therefore, you should use several ways to preserve the microclimate.
Conclusions and useful video on the topic
Video #1. Outdoor installation instructions:
Video #2. Detailed description of internal installation:
Video #1. Practical application in dacha conditions:
If you choose the right method for insulating the water supply and carry out installation work in compliance with the rules, then there will be no problems with the pipes in the winter. The insulation of the main line laid in the ground should be taken care of in advance, and open areas can be thermally insulated at any convenient time .
Would you like to tell us how you insulated the water supply line on your own country property? Is there information on the choice of material and technology for its installation that is worth sharing with site visitors? Please write comments in the block below, ask questions, post photos on the topic of the article.
Since the water supply system can freeze at low temperatures, it is advisable to carefully insulate it so as not to be left without water in winter.
Moreover, insulation should be carried out not only for the water supply pipe, but also for the pumping station. If you provide high-quality thermal insulation of the pump and related equipment, you will be able to create all the conditions for comfortable living, regardless of the time of year.
How to insulate a septic tank
If there is a possibility of drains freezing, then proper insulation of the septic tank will help you in this difficult task. But what kind of insulation is best to use for a septic tank, you will find out further.
Polystyrene foam will not work because it tends to absorb moisture, which is an excellent heat conductor and the situation will only get worse. For the same reason, when deepening, you should not sprinkle the tank with expanded clay to insulate it. Since this mineral is destroyed quite quickly under soil pressure, as well as from exposure to moisture.
When insulating any septic tank with your own hands, experts recommend using special insulation materials. Extruded polystyrene foam Penoplex will cope best with this task. It has very low thermal conductivity and zero moisture absorption, which allows you to reliably protect the septic tank from freezing. It is also perfect for insulating concrete rings and for insulating plastic Eurocubes.
For additional safety, it is also necessary to insulate pipes with special materials, since, as practice shows, they are the weakest link in the drainage chain in winter.
When thermally insulated with Penoplex, the sewage system will properly perform its functions even in the most severe frosts.
Advantages of Penoplex when insulating a septic tank
Penoplex has a number of advantages over other types of thermal insulation materials:
- has low thermal conductivity,
- does not absorb moisture at all,
- ease of use - all manipulations for thermal insulation of a septic tank can be easily done with your own hands,
- durable - service life more than 50 years,
- environmentally friendly - does not contain phenol resins and is produced without the use of freon,
- safe - completely non-flammable material.
Take care in advance about high-quality thermal insulation of the sewer system and you will not have to think about its operation throughout the winter!
Recommendations and installation instructions
Covering a water pipe with thermal insulation is not as difficult as connecting heating cables, so let’s look at the technical nuances of installation that relate specifically to electrical equipment.
External installation of heating cable
Fastening along the outer surface of the pipe is often practiced when it is necessary to heat open areas of the water supply system located in the base, basement, or caisson.
There are two ways to fix the wire on the pipe:
- stretch along the surface along the entire length;
- wrap with a spiral.
The first option is more economical and practical if the cable power is enough to heat the pipe. In particularly cold areas, the second method can be used, but the wire consumption will increase.
Fastening occurs in the following order:
This is the easiest way to install a heating cable.
Recommendations for the device:
- To heat a polypropylene water pipe with a diameter of up to 32 mm, it is enough to fasten the cable along one side - which side does not matter. However, if you need to insulate the sewer, the wire is fixed exclusively from the bottom.
- If there is a choice of insulation, then you need to take a thicker one. The self-regulating cable is not in danger of overheating, but heat loss will be significantly reduced. The thicker the “coat”, the less electricity the samreg will spend, the greater the savings.
- Aluminum self-adhesive is the best material for attaching to a pipe. Acrylic adhesive does not collapse under the influence of heat, which is evenly distributed over the entire heated surface.
- The sun's rays destroy some types of insulation and fastenings, so for open areas it is better to choose black clamps and tape that do not react to UV radiation.
If the cable is fastened not in a straight line, but in a spiral, then the insulation will occur according to the same principle - putting on a “coat” and securing it with clamps. Without insulation, some of the energy will be wasted on heating the air.
The nuances of connecting a self-regulating cable
It is impractical to pull the wires to the pipe from the shield, so the samreg is connected to the power cable, which, in turn, is simply plugged into an outlet if necessary. To work, you will need a hair dryer, a knife, a set of heat-shrinkable tubes for crimping and sleeves for connecting the contacts.
It should be remembered that electrical equipment becomes more dangerous in a humid environment, so special attention must be paid to tightness. Photo instructions for connection:
Photo instructions for connection:
As you can see, there are no difficulties when installing the cable internally, all manipulations just need to be performed very carefully and consistently.
When choosing a power cable, you must consider the location of the outlet. If it is located next to a pipe, you can buy the shortest product, but more often you have to purchase a 4-5 meter cord.
All that remains is to compress the end of the samreg:
With a sealed end, the cable is completely ready for use. To prevent the water pipe from freezing, all that remains is to secure the samreg along the entire length of the pipeline, insulate it and insert the plug into the socket.
In some cases, the installation of an external cable is considered unsuccessful, for example, if it passes through floor slabs or concrete blocks of a well. Then internal installation is used.
If for external heating it is better to use a flat type product, then for internal heating a special cable with a round cross-section and especially reliable waterproofing is suitable.
Internal installation of a heating cable requires special care and compliance with certain rules. For example, you cannot pass the cord through nodes where threaded connections protrude from the inside - sharp edges can damage the protective sheath
Options for installation of the pumping station
When planning to assemble and connect the pumping station to the water supply in the house, the following points should be taken into account.
- The unit must be located close to a water source. This will ensure stable absorption of liquid from the source and smooth operation of the station. If the equipment is placed far from the well (well), it will not be able to pump water and will fail.
- To install the equipment, you need to choose a dry, well-ventilated and warm place.
- The device must not touch any objects or walls.
- Access to equipment for routine inspection and repair work must be free.
Important! When installing a station with a surface pump, you should take into account the high noise level that it creates during operation. Based on the above, there may be several options for installing the unit
Based on the above, there may be several options for installing the unit.
For proper operation of the station, the most ideal option is a heated room. It’s good if a private house has a boiler room with good sound insulation.
As a last resort, water supply equipment can be installed in the hallway, bathroom, corridor or closet. But these rooms should be located as far as possible from the rest rooms (bedroom, living room). The device is placed in a cabinet or covered with a special casing that provides sound insulation.
Most often, pumping equipment is installed in the basement of a house or on the ground floor. Sometimes the unit is installed under the floor, providing access to it through a hatch. In any case, the place where the device is installed must have good sound and waterproofing. It should also be warm enough so that the temperature does not drop below 0°C in winter.
To place the station in a well, a small platform is installed in it. It is fixed below the freezing line of the soil.
In this case, in order to properly install the pump, a small room (caisson) of sufficient width and depth (below the freezing line) is arranged around the water source.
The top of the caisson is covered with a lid with a hatch through which the unit is serviced. The lid is well insulated for the winter.
Thanks to the pit, it becomes possible to provide an autonomous water supply with a surface pump, even if the water level from the surface of the earth is at a depth of 9-11 meters.
When assembling a station with a submersible pump, there is no need to worry about sound insulation, since the unit is located deep underground and its operation is practically inaudible. All elements of the station are installed in any heated room, and the pump itself is installed in a well or well. This option for assembling a pumping station is well suited for a summer residence.
Laying pipes below freezing depth
This method is advisable to use if in winter the soil freezes no deeper than 170 cm. A trench is dug from a well or borehole, the bottom of which is 10-20 cm below this value. Sand (10-15 cm) is added to the bottom; the pipes are laid in a protective casing (corrugated sleeve), then covered with earth.
To avoid having to insulate the outdoor water supply in cold weather, it is better to do this in advance
This is the easiest way to make winter water supply at the dacha, but it is not the best, although it is the cheapest. Its main drawback is that if repairs are necessary, you will have to dig again, and to the full depth. And since it is difficult to determine the location of a leak with this method of laying a water pipeline, there will be a lot of work.
To ensure that there are as few repairs as possible, there should be as few pipe connections as possible. Ideally, there should be none at all. If the distance from the water source to the dacha is greater, make connections carefully, achieving perfect tightness. It is the joints that leak most often.
Choosing a material for pipes in this case is not the easiest task. On one side, a solid mass presses from above, so a strong material is needed, and this is steel. But steel laid in the ground will actively corrode, especially if the groundwater is high. The problem can be solved by properly priming and painting the entire surface of the pipes. Moreover, it is advisable to use thick-walled ones - they will last longer.
The second option is polymer or metal-polymer pipes. They are not subject to corrosion, but they need to be protected from pressure - placed in a protective corrugated sleeve.
Even if the ditch was dug below the freezing level, it is still better to insulate the pipes
One more thing. The depth of soil freezing in the region is determined over the past 10 years - its average indicators are calculated. But firstly, very cold winters with little snow occur periodically, and the ground freezes deeper. Secondly, this value is the average for the region and does not take into account the conditions of the site. Perhaps it is on your piece that freezing may be greater. All this means that when laying pipes, it is still better to insulate them, lay sheets of polystyrene foam or expanded polystyrene on top, as in the photo on the right, or lay them in thermal insulation, as on the left.
You might be interested in reading “How to make automatic watering“.
How to insulate water pipes outdoors in a private house or country house
Grigory Borisov
How to insulate outdoor water pipes in a private house or country house?
Nowadays, running water in a country house is no longer something inaccessible; rather, it is an obligatory attribute of country life. It usually takes place on the street underground. Many people are interested in how to insulate a water supply system in a private home or country house with their own hands? It's quite simple. You need special material and a little patience. If you do not insulate the pipes before the onset of frost, not only may they freeze, but they may also rupture. And this is fraught with emergency work and a complete replacement of the water supply system.
What is needed to insulate a water supply?
The following insulating materials are most often used to insulate water pipes:
- Glass wool. Not a very expensive material used for insulating plastic and metal-plastic pipes. It has the necessary thermal insulation characteristics.
When choosing insulation, you should pay attention to some of its characteristics: low thermal conductivity, resistance to external factors. Attention! Ease of installation, the possibility of reuse after disassembling structures, suitable price, tightness and durability - these are the qualities that are paramount when choosing insulation for water supply in a country house or in a private house
Attention! Ease of installation, the possibility of reuse after dismantling the structures, a suitable price, tightness and durability - these are the qualities that are paramount when choosing insulation for water supply in a country house or in a private house. How to insulate pipes?
How to insulate pipes?
The process of insulating pipes will not take much time and will not require specific skills. Installation of insulation is carried out in several steps.
So, water pipes are wrapped in glass wool and secured with a plastic band or tape. And waterproofing is provided through the use of roofing felt.
With basalt wool and polystyrene the situation is different. These building materials have the shape of a shell, but they are also easy and simple to install.
- The insulation shell is overlapped onto the pipe.
- The halves are glued and secured with tape for reliability.
Maintaining pressure as a remedy for frozen pipes
Few people know the fact that under certain pressure, water never freezes. This is an effective and proven method for years. To bring it to life, you need to install a receiver in the pipe. And in order to ensure that there is pressure throughout the entire section of the pipe, a check valve should be installed after the pump. Start the pump by first closing the tap in front of the receiver. This is a guaranteed way to ensure that the water supply does not freeze in winter.
Heating cable protection
Installing a heating electric cable to insulate the water supply is a reliable option for protecting pipes from freezing in winter. This is how water supply and sewerage systems are insulated both at a summer cottage and in a private house. The cable is placed both inside and outside the water supply.
Advice. When using the heating cable method, there is no need for deep pipe laying. The usual burial 2 m underground can be replaced by laying pipes in a half-meter hole.
Unfortunately, the main disadvantage of using an electric cable is its complete dependence on electricity. If it is turned off or absent, heating will stop completely.
Heating cable installation instructions
- Carrying out cable installation. There are two installation options: longitudinal and spiral.
- You need to wrap insulating material around the water pipe.
- Apply a protective coating on top.
- Electrical connection.
You should not neglect the insulation of the water supply, even if you do not plan to live in the country in winter. Water remains in the pipes, which can freeze and cause them to burst. There are several options for insulating a water supply: installing a heating cable, maintaining the required pressure and using insulating materials. In general, any man can do this job.
How to insulate water pipes outdoors in a private house or country house
How to insulate outdoor water pipes in a private house or dacha Grigory Borisov How to insulate outdoor water pipes in a private house or dacha? Currently
Why insulate
Insulation of water pipes and pumping stations is a pressing issue for those people who live in private houses or often come to their dacha in winter.
The situation described above is actually much more dangerous and serious than you might think at first glance. It’s good if the problem solves itself: during the day the temperature will rise slightly and the frozen area will thaw. However, one should not hope for such an outcome - the chances of it are minimal. Alternatively, you can independently identify the part of the pipeline in which the water has frozen and warm it up - however, such a solution is only possible in cases where the pipes and pumping station are accessible for inspection.
But the consequences of freezing (in addition to the fact that there will be no water in your house) will certainly make every owner of a private home think about insulating the entire plumbing system. As we remember from the school physics course, frozen water tends to expand, and the force of its influence will be enough to damage even a metal pipe - it will simply crack. The same applies to pumping equipment. And in this case, you will have to carry out much more significant repairs to identify and replace it - you will agree, not a very pleasant and easy task if it is twenty degrees below zero and the frozen area is located outside.
For this reason, insulation of water pipes and pumping stations is a pressing issue for those people who live in private houses or often come to their dacha in winter.
Water supply for a bathhouse in winter without constant heating
Above we showed only diagrams for adding water to the bathhouse. But we should also talk about how to take care of the main water supply points: the shower and toilet.
How to turn on the water so it doesn’t freeze: shower in the bathhouse
Since the bathhouse is an unheated room, in the absence of the owners and the heating of the stove, the temperature in it becomes the same as outside. And water freezes at zero. Internal communications are bursting with ice just as much as external ones.
The basic rule for showering in a bathhouse in winter is that if the hose is flexible with a watering can, then it must be placed on the floor or at the bottom of the shower stall before leaving. This will ensure that the water that is inside the hose drains out.
Shower taps must be left in the open position when cleaning, because when draining, air enters through them instead of draining water.
Everything else concerns the general drain, which will be discussed further.
How to run cold water into a bath toilet
Frost breaks toilet bowls with remaining water in the same way as pipes. Therefore, you can’t just leave the toilet in the bathhouse in winter. Care must be taken to ensure that ice does not form in the toilet.
This can be achieved by various means. You can fill the toilet seat with antifreeze or other liquid that changes the freezing point.
IMPORTANT! Keep in mind that you need to choose a liquid according to the climatic conditions in which you live - if the temperature drops below the freezing point of the selected liquid, ice will certainly form. Alternatively, you can use a solution of table salt made at the limit of dissolution, that is, when more salt simply does not dissolve
Its freezing point is minus 21.2 degrees
Alternatively, you can use a solution of table salt made at the limit of dissolution, that is, when more salt simply does not dissolve. Its freezing point is minus 21.2 degrees.
If frosts below this mark are expected, use another liquid - ethylene glycol-based antifreeze, for example. But keep in mind that this is poison for humans! Alternatively, it would be possible to prevent it from evaporating by using an oil film on the surface, but we do not know how oil will behave with ethylene glycol.
However, let’s remember why we need liquid in the toilet siphon - to prevent odors from the sewer from entering the toilet. There is another option - without poisons. You need to completely dry the toilet seat (using a rag, for example, or using the clever device described in the video below:
After draining, you can place an inflated balloon in the hole of the toilet bowl or even just stuff a rag into it - this is done to prevent the flow of air from the sewer. We think this is better and easier than leaving the liquid.
Well, don’t forget to first drain the water from the tank completely.
To conclude the topic, there is a video that says, in principle, the same thing as we said above, but you can check
Factors that influence freezing of water in wells
Wells today are made from various materials. You can find concrete, plastic, wooden. At low temperatures, each material reacts differently. For example, completely wooden wells are not afraid of freezing. The tree protects water from freezing. It has low thermal conductivity, and ice in the soil does not lower the temperature of the water in the well. Plastic and concrete options do not have this advantage.
Another important factor in well freezing is their location. If your country house is located in southern latitudes, with a soil freezing depth of about half a meter maximum, or without it at all, then you are not in danger of an ice crust in the well. But if you are located much further north, where the depth of freezing of the ground is from 2 to 4 meters, then the chances of freezing all the water in the area are very high.
For the Moscow region, the freezing depth is 1.2 - 1.4 meters, and most often the water level in the well is much lower. When installing a country water supply, you should be careful to ensure that the water in the well is at a level deeper than one and a half meters, otherwise it may freeze.
Another factor is the depth of groundwater and the depth of water in the well. If it is standard, about 8 meters, then you have nothing to worry about, but if, looking into the well, you see water at a level of one to two meters, then your well needs insulation.
Nuances of insulation
The main problem is the distance of the distribution well from the heating of the house. It is not practical to make a separate line for heating 1-15 m². Therefore, it is necessary to consider other methods of insulation. But before that, you should familiarize yourself with the operating conditions of the pumping station.
Usually it is a well located 0.5 m below the ground level. Its overall dimensions are 1x1 m with a height of up to 0.7 m. The walls are made of brick or cinder block. In rare cases, the concrete pouring method is used. These materials have high thermal conductivity and cannot provide the proper level of thermal insulation. To ensure this, additional measures will need to be taken.
When choosing heat conservation methods, the operating conditions of the pumping station are taken into account:
- Ventilation. For a normal level of air exchange, a pipe with a diameter of about 50 mm must be installed. In winter, it is the main source of heat loss. Under no circumstances should it be blocked, since increased humidity will increase the likelihood of electrical equipment breakdown;
- Influence on the wall material. The most common mistake is installing insulation on the internal walls of a well. As a result of this, the dew point shifts, and as a result, the humidity of the walls increases;
- Flood protection. Care should be taken not only to ensure a good degree of thermal insulation, but also to prevent water from entering during melting snow or in rainy weather. Therefore, in addition to insulation, the pumping station must be sealed from the ground and the top cover.
At first glance, the fulfillment of these conditions leaves no choice of method for maintaining the required temperature level inside the station. Therefore, you should use several ways to preserve the microclimate.
Creating conditions for proper operation
Placing the pump inside the house has many advantages. Among the disadvantages is that the equipment makes a lot of noise during operation. Placing it in a separate soundproofed room (basement, basement) will solve the problem. In the absence of the latter, the pumping equipment is placed in a subfloor equipped with an access hatch. The device operates at a temperature not lower than +5 C, so in addition to noise protection, it is necessary to consider protecting the equipment itself from the cold. To reduce noise from the motor, the station can be installed on a thick rubber lining, which will further reduce vibration. If the noise reduction of the equipment is good, it is allowed to place the equipment inside the house.
The location of the station in a caisson also requires its insulation and waterproofing. For this purpose, containers made of reinforced concrete are used or ring caissons are used. There is a ring equipped with a bottom at the bottom, and a lid at the top. An equally popular option is to install a brick caisson and fill the floor with concrete. This method can only be used in dry areas - groundwater must pass no less than 1 m below the caisson level.
In depth, the caisson is installed below the frost line. For insulation, polystyrene foam or its extruded version is used, which additionally has the required moisture protection.
When arranging this type of caisson, slab polystyrene foam can be used, which is cut into strips and glued to rings. Rectangular buildings are insulated with slabs fixed with bitumen mastic. The walls are coated with the compound, after which insulation is applied. For additional fixation, you can use nails or dowels.
Prices for country water heaters
| Model | Characteristic | Price, rubles |
| Gorenje GWH 10 NNBW |
| from 7900 to 14150 |
| Electrolux NP6 Aquatronic |
| From 7000 |
| Timberk WHEL-3 OS |
| From 3610 to 4600 |
| Bosch WRD 13-2G |
| From 15436 |
| Thermex Stream 700 |
| From 4250 to 5000 |
Required tools and materials
Tools you will need:
- drill or powerful screwdriver;
- self-tapping screws;
- roulette;
- level or construction corner;
- mixer attachment for drill.
Materials you will need:
- thermal insulation;
- boards;
- cement, sand, bricks;
- GVLS (gypsum fiber).
As for thermal insulation, the best option is mineral wool and extruded foam. Cotton wool does not hold its shape, so it can be pressed as desired, “hammered” into the cracks. But it is worth remembering that dust from mineral wool is hazardous to health. You should always wear a respirator when working with it. And polystyrene foam is ideal for insulating the box from the outside.
Infrared heater
Infrared heaters are equipped with heating elements in the form of lamps that emit infrared radiation in a range invisible to humans. This is a very economical type of heater. This radiation is absorbed by the surface of objects in the room and heats them. Heaters of this type are mounted on a wall or ceiling. Its radiation acts similarly to solar radiation. A person is usually comfortable being in the infrared radiation zone. The disadvantages of infrared heaters are that they cannot quickly heat the entire room. Therefore, the design of infrared heaters is often supplemented with a fan to quickly distribute warm air throughout the room.
Hydraulic accumulators: how do they work?
Hydraulic accumulators are energy storage devices. Like batteries in electrical systems, they store and discharge energy as a pressurized fluid and are often used to improve the efficiency of a hydraulic system.
Balloon batteries from Accumulators Inc.
The accumulator itself is a high-pressure vessel that contains hydraulic fluid and a compressible gas, usually nitrogen. The body or shell is made from materials such as steel, stainless steel, aluminum, titanium and fiber-reinforced composites. Inside, a moving or flexible barrier—usually a piston or rubber bladder—separates the oil from the gas.
In these hydropneumatic units, hydraulic fluids are only slightly compressed under pressure. In contrast, gases can be compressed into smaller volumes under high pressure, and engineers take advantage of this property in the design and application of batteries. Essentially, potential energy is stored in the compressed gas and released on demand to force oil from the accumulator into the circuit.
To use the device, the volume of gas is first pre-inflated - typically to 80-90% of the system's minimum operating pressure. This increases the volume of gas to fill more of the battery, leaving only a small amount of oil inside. During operation, the hydraulic pump increases the pressure in the system and forces fluid to flow into the accumulator. (Valves control the flow of oil in and out.) The piston or cylinder moves and compresses the volume of gas as the fluid pressure exceeds the precharge pressure. This is a source of stored energy.
The movement stops when the pressure in the system and the gas pressure are balanced. When a subsequent action, such as actuator movement, creates system demand, the pressure in the hydraulic system drops and the accumulator releases the stored pressurized fluid into the circuit. When the movement stops, the charging cycle begins again.
The three common types are bladder, piston and diaphragm accumulators. Balloon accumulators typically have large ports that allow rapid release of fluid and help ensure that the device is relatively insensitive to dirt and contaminants. The general rule is for bladder accumulators to be mounted vertically, although they can also be mounted on their sides in low-cycle applications. Cylinder-type accumulators are typically designed with a 4:1 pressure ratio (maximum pressure to charged gas pressure) to protect the cylinder from excessive deformation and material deformation.