You can repair a ball valve yourself.
It is worth noting that people are accustomed to calling all mechanisms for regulating water supply taps. This is wrong. The shut-off ball valve is designed to be installed directly on or shut off water supply pipes.
A single-lever ball mixer is a device installed on a sink, sink and bathtub for supplying and mixing water using a ball with a cavity.
Do not confuse them with a cartridge mixer, where water is supplied and mixed using specially shaped discs, because outwardly they are difficult to distinguish with an unprofessional eye.
The kitchen faucet is leaking, how to fix it yourself
To repair a kitchen faucet you will need:
- knife with a sharp end;
- hex and adjustable wrench;
- screwdrivers;
- a new cartridge, valve axle, rubber gasket, etc. - depends on which part you will change;
- WD40 is a technical aerosol that is useful if parts are “stuck” to each other. However, you can get by with the traditional tapping of a hammer on a screwdriver, but there is a high risk of damaging the mixer.
Regardless of which faucet you have installed, before starting repairs, you must turn off the water supply to the system and drain its remaining water into a sink or a separate container. To do this, just open the tap. Then you can begin to repair it, taking into account the design features.
To repair a single-lever faucet, you will need a hex wrench.
Single lever kitchen faucet repair
The main principles of repair are sequence of actions and accuracy.
- Using a thin screwdriver or knife, pry and remove the decorative plug on the faucet body.
- In the resulting hole you will see a screw connecting the lever and the adjusting rod. Unscrew it using a hex wrench.
- Remove the lever from the body and unscrew the decorative casing. This can even be done by hand if the parts are not stuck to each other.
Removing the decorative casing
- There will be a locking (clamping) nut underneath it. Gently unscrew it with an adjustable wrench or by tapping it with a hammer on a screwdriver.
- If you disassemble the ball mixer, you will see a sealing collar under the nut. Inspect it for dirt, deformation and tears. Pull out the ball. Inspect its surface - it should be smooth and clean. It is necessary to remove the seals and support springs - their poor condition can cause the tap to leak.
- If you are disassembling a faucet with a cartridge, remove it and thoroughly inspect it.
- Replace the failed part.
- Reassemble the faucet in reverse order.
Installing a new cartridge
To extend the service life of the product and ensure smooth running of its rubbing parts, you can use a special silicone lubricant.
Removing the mixer handwheel
Repair of a two-valve mixer
What to do if your two-valve faucet is dripping in your kitchen? Almost everything is the same.
- On the valve flywheel, pry up and remove the decorative plug.
- Using a screwdriver, unscrew the screw that secures the flywheel.
- Remove the flywheel. There will be a crane box in front of you.
- Unscrew it counterclockwise and inspect it.
Removing the crane axle box
- If it is a worm-type axlebox and its gasket is damaged, replace it separately - buy it in a store (costs pennies) or cut it yourself from rubber of a suitable thickness. The axle box with ceramic discs is replaced entirely.
- Reassemble the faucet in reverse order.
General scheme of mixer repair work
Everything is as simple as possible and slightly reminiscent of a construction set. But a leaking faucet is not the only problem you may encounter while using it in the kitchen.
Half-turn
The evolution of the two-valve design ended with the modernization of the shut-off and control mechanism. Instead of a valve with a rubber gasket, a half-turn ceramic disc valve was installed in the axle box. A modern shower distributor is made with a similar head.
The process of disassembling a half-turn valve is as follows:
- We unscrew the cap (some are plastic, with latches) on the lamb with your hand or pliers.
Remove the decorative plug. - Unscrew the screw securing the handle to the rod.
Unscrew the screw securing the wing. - We tighten the handle.
We tighten the handle. - Unscrew the decorative cap.
Unscrew the decorative cap. - Unscrew the head using the appropriate key.
We unscrew the head. - We remove the crane axle box.
We remove the crane axle box.
Video instruction:
Other faucet breakdowns and fault prevention
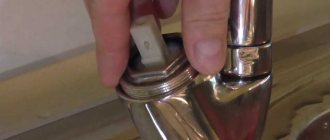
The quality of water in many cities leaves much to be desired, so over time the aerator in the tap can become dirty. On the inside, hard deposits “grow” on it. When there are too many of them, the pressure and quality of the water deteriorate significantly. The solution to the problem is to replace the aerator. Ideally, it can be easily unscrewed with an adjustable wrench, but for stuck parts you will need WD40 or tapping with a hammer.
The faucet is leaking, and during the inspection you found a crack in it? Then it's time to go for a new product. For a short time, silicone sealant can be an assistant.
You can extend the life of the faucet if you install a water filter and use the device carefully, without tightening the valves too tightly or moving the lever suddenly and all the way.
Conclusion
As a result, I would like to note that the range of these products on the market is quite wide and some manufacturers introduce their own design innovations. We talked about the most common system. But don't be alarmed if your faucet has an extra seal or another gasket, the basics usually remain the same.
Assortment of different mixers.
Did you like the article? Subscribe to our Yandex.Zen channel
Design features of the main types of kitchen faucets
Such delights as thermostatic and touchless faucets are good for bathrooms. In the kitchen, more practical models - traditional two-valve and single-lever - are fighting for a place in the sun. The common elements for them are: body, spout (spout), aerator, sealing gaskets. Otherwise they differ significantly.
Installation of two-valve taps
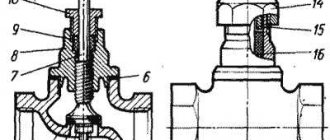
Faucets with two valves that are familiar to the eye are designed quite simply. Under the flywheel, which you turn when operating the structure, there is a crane-axlebox - its locking element. Below is the design of such a kitchen faucet in pictures.
Axleboxes in a two-valve mixer (sectional view)
In products where several revolutions of the flywheel are required to supply or shut off water, worm axle boxes are installed. Their work is based on rotational-translational movements. The more you unscrew the valve, the further the axle box gasket will move away from the so-called “saddle”. The consequence of this is the flow of water into the internal cavity of the mixer, and then into its spout (spout).
Worm worm valve axle box for mixer
In models where it is enough to make only half a revolution to supply water, axle boxes with ceramic plates are installed. When you open the tap, the holes in them coincide and water flows into the spout.
Crane axle boxes with ceramic plates
The cost of faucet axle boxes is low, they are always available in plumbing stores, and their replacement is extremely simple.
Design and types of single-lever mixers
More modern and practical are models of faucets with one handle (lever) that regulates pressure and temperature. Mixing water in them is carried out in a hollow ball with three holes or in a special cartridge.
The mixing element in ball models has three openings, two of which are inlets - designed to supply hot and cold water to this miniature container, and one outlet - for supplying water at a given temperature to the sink.
Ball mixer device
The ball itself is located on two rubber “saddles”. Its displacement relative to them, carried out when the lever moves, allows you to regulate the pressure and temperature of the water being poured out. The ball is secured at the top with a sealing collar and a lock nut.
Schematic structure of a ball model of a kitchen faucet
The operating principle of a mixer with a cartridge that replaces a ball is similar. At the same time, their internal structure is fundamentally different. There are still the same three functional holes, but inside the cartridge there is not a cavity, but special metal-ceramic disks. Due to their displacement relative to each other and the degree of overlap of the supply holes, when turning the lever, the water supply is adjusted.
Replaceable ceramic cartridges
How to disassemble a water aerator
The aerator is a prefabricated structure. It consists of a plastic and metal body with mesh inserted inside.
Any plumbing store has special plastic keys for unscrewing the aerator. If you don’t have such a tool at home, an adjustable wrench will do the job.
- Using an open-end or adjustable wrench, you need to grab the aerator and rotate it clockwise when looking at the faucet from above. To avoid damaging the body, place thin material, leather, between the instrument and the aerator.
- Several grids stacked on top of each other in a certain sequence - the design of the aerator. To remove the contents of the case, press your finger on the mesh from which water flows out. A small cylinder will appear.
- To remove the grids, insert a flat-head screwdriver into the side hole of the cylinder. This will create a double mesh. Use the tip of a knife to pry up the mesh and separate it from the coarse filter.
- Remove the thin spherical meshes from the housing.
You can start cleaning the components. After washing, reassemble everything in reverse order. As a result, the water flowing from the tap will be saturated with oxygen.
Ball valve is the most popular option
The most common mixer design today can be safely called a ball valve. It is a mechanism with one rotary handle. When moving the handle up and down, the water pressure is regulated, and to the right and left - its temperature. The popularity of such a device is explained not only by the simplicity and ease of its operation, but also by its increased reliability.
Single lever mixer device
In order to answer the question “how to repair a ball mixer”, you need to understand how the system works. This is what a ball valve looks like in cross-section.
This is done according to the following algorithm:
- Shut off and drain the water;
- We dismantle the mixer;
- Use a knife or screwdriver to pry up the decorative plug and remove it;
- Unscrew the screw;
- Remove the lever;
- We take out the cartridge and install a new one in its place;
- We do the assembly.
That's all. Now your faucet will definitely work like new.
There is a blockage in the aerator
When the water in the bathroom flows in a thin stream, but in the kitchen it flows in a powerful stream, there is no need to talk about the fault of the water utility. So, how to fix a bathroom faucet if the water pressure has dropped? The most common and easily resolved cause of this problem is a clogged aerator.
It's very easy to check if this is your case. Unscrew the aerator and open the tap. If the water pressure returns to normal, the culprit has been found. It is better to replace a very rusty aerator, but simply rinse a clogged one by directing a stream of water to its outer surface. Now we install the part in place and everything is ready.
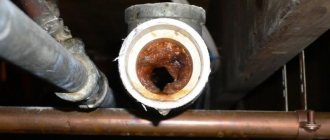
Clogged water pipe or hose
If simple manipulations with the aerator have no effect, most likely the pipe or hose is clogged. Quite often, in houses with old metal pipes, rust that has fallen off their inner surface blocks the cross-section, which leads to a drop in pressure in the mixer. Cleaning the pipes will help solve the problem, but it is better to replace them with plastic ones. The inner surface of modern polymer pipes is very smooth and not subject to corrosion, which means it does not “overgrow”.
If it is not yet possible to replace the pipeline, arm yourself with a thin “snake” cable, disconnect the pipe on both sides and start cleaning.
Problems with the shower-tub switch
Now let's move on to the answer to the question of how to repair a faucet in the bathroom if the water supply to the shower stops by itself. The switch lever lowers spontaneously, and water flows only through the tap.
The cause of such a malfunction may be wear of the spool gaskets. If only the top gasket is damaged, you will not have to remove the faucet. Since it is impossible to determine this “by eye”, first you should replace it, and only then draw conclusions:
- Unscrew the union nut of the hose and remove it;
- Use a thin hook or awl to pry up the gasket;
- We wet the new gasket with water and install it in place;
- Assembling the mixer.
If the damage cannot be eliminated in this way, you will have to change the bottom gasket:
- Turn off the water;
- Remove the flexible hose by unscrewing the union nut;
- Remove the spout and adapter;
- Remove the switch and remove the eccentric;
- We take out the spool;
Using a thin screwdriver or hook, remove the bottom gasket (we have already replaced the top one);
If the upper spool gasket has already been replaced, there is no need to do it again.
- We put on a new gasket, moisten it with water and install the spool back;
- Assembling the mixer.
In the kitchen, the faucet is used much more actively than in the bathroom, so it breaks down much more often. In rare cases, the only solution to the problem that has arisen is to buy a new device and invite a plumber; in other cases, you can handle it yourself. By deciding to repair a kitchen faucet yourself, you will save on the services of a specialist and gain important experience. You just need to arm yourself with theory and tools.
- Leakage from under the nut at the water outlet, from under the handle (lever) or mixer valves in working condition.
- The correct movement of the lever or valves is disrupted (they stick, turn, do not lock in the desired position, etc.).
- At normal water pressure in the system, the jet is not powerful enough.
- Water drips from a closed tap.
The problem that raises the most questions is a leaking faucet. And here you need to know the “enemy” not only by sight, but also from the inside. We are talking about the design of mixers.
Device
To understand how to disassemble a ball valve, you should study its design. In Fig. 1 and 2 show a diagram of the design of a single lever ball valve.
Figure 2. Ball valve assembly diagram.
Ball mixers are distinguished by their reliability and durability thanks to the non-separable cartridge included in their design. All parts of the mixer are adjusted very precisely relative to each other. However, such mixers still sometimes fail. Knowing the design of such cranes and understanding the principle of their operation will help you easily cope with their disassembly and repair. In Fig. Figure 3 shows a diagram of the operating principle of a ball mixer.
The design of such faucets is based on a hollow ball with holes and a pin for attaching it to the handle. Cold and hot water is supplied to this ball through two water pipes, after which, mixed in it, it flows into the spout.
When you turn the lever to the left or right, the supply of hot or cold water is adjusted by blocking the holes in the ball. Similarly, by raising and lowering the lever, you can adjust the water pressure.
When analysis is necessary
Faucets are disassembled for preventative maintenance and repair. The time that passes before the device fails depends on several circumstances:
- the type and quality of the material from which the tap is made;
- degree of water purification;
- with what intensity is it used?
If preventive maintenance is not carried out, the service life will be shortened. The smallest solid particle stuck under the seal leads to leakage over time. Therefore, every 2 years the mixer is disassembled, cleaned, and gaskets are changed.
Often replacing the gasket will correct the problem.
Most often, the cause of the malfunction lies in the rubber gaskets . The more intensively water distribution fittings are used, the faster they wear out and leaks appear.
In case of some breakdowns, the product cannot be restored; a new one must be installed.
Replacement of units or parts after disassembly is possible in the following cases:
- the cartridge leaked;
- insufficient pressure from the ball mixer, fully open;
- water flows simultaneously from the gander and the shower head;
- The push-button switch for the shower outlet is broken.
Minimal disassembly is required when the filter is clogged, which appears from poorly purified water.
Problems with the operation of the ball mixer
What problems are most common when using a ball type mixer?
Apart from those cases where the cause of the breakdown is mechanical damage, that is, a crack in the body or there is a problem with the water supply, for example, water with rust constantly flows, then the most common problems are the following problems.
The most common problems:
- weakened pressure, provided that the pressure in the water supply system has not decreased;
- water leak;
- Difficult temperature adjustment (impossible to set warm water).
The most common problem is faucet leakage. Its cause is clogging of the space between the ball and the seats in the cartridge. Even a microscopic speck can break the seal of the faucet and subsequently deform the seat.
The pressure is not difficult to regulate by changing the position of the rod connecting the lever and the ball to each other. By changing the position of the rod, you can adjust the position of the pipes to ensure the required pressure in the tap.
Problems may also arise due to a clogged valve. This problem is easily solved by removing the aerator, cleaning it and returning it to its original position. To avoid blockages in the future, it is necessary to install water filters that can capture solid elements that clog the faucet.
Shower switches
The outdated ball design is being replaced by piston (spool) switches: eccentric and push-button. The first ones are located in the central bore of the housing or in a separately attached diverter. The latter are typical for single-lever options and are located on the spout.
The plunger is removed from the central bore as follows:
- We disconnect the gander and remove the handle in the same way as a ball switch.
- Unscrew the rod fitting. We take it out together with the eccentric rod.
- Using a small hexagon, we remove the piston down.
Let's look at disassembling the push-button option using Grohe as an example:
Sequence of operations:
- Disconnect the shower hose.
- Use a screwdriver to keep the valve from rotating.
- Unscrew the button cap.
- Use a hexagon to unscrew the assembled mechanism.
KOHLER diverter replacement process: