Even the most reliable taps eventually begin to leak water - leaking or dripping. To fix a faucet, you don't always need to call a plumber. Most breakdowns can be fixed on your own. But, before you repair a dripping faucet, you need to understand its design and work procedure.
Repairing a faucet with your own hands is a task of average difficulty
What are bathroom shower faucets made of?
Not only the appearance, but also the durability and cost of a bathtub shower faucet depend on the material of manufacture.
Mixers are made of silumin alloy. They can be recognized by their light weight. Such mixers are very fragile and last no more than 1-2 years.
Well-known manufacturers offer brass faucets. This is a universal material, it is valued for its strength, anti-corrosion properties and wear resistance. Manufacturers also use stainless steel.
Be sure to check the quality of the device so that the “stainless” faucet does not end up covered with rusty spots within six months. To give a plumbing fixture an attractive appearance, chrome, nickel, enamel, bronze and ceramic coatings are often used.
- The shiny chrome surface looks good in any interior; this material is durable and unpretentious.
- It is better to avoid a nickel-plated faucet if someone in the family has allergies.
- The good thing about an enamel surface is that you can use it to create a unique design; moreover, no traces of water remain on it, but do not forget that this is a fragile material.
- Bronze and ceramics are quite expensive and require special care.
Selection and operation of a kitchen faucet
Breakdowns in the plumbing system occur with enviable regularity, and the reason for this may be the lack of proper regular maintenance. And above all, monitoring the operation of the water supply system is important.
The system operates stably only at stable pressure; sudden changes destroy it, and the sealing gaskets and threaded connections of locking devices are the first to suffer.
which faucet mixer to choose for the kitchen
The initial quality of the tap is of great importance. First of all - the material of manufacture. A good faucet or mixer is made of heavy alloys - brass or bronze, they are easy and simple to fix. Materials such as silumin are absolutely unsuitable for plumbing, although they are often used by unscrupulous manufacturers.
Single-lever devices are convenient to use and can be operated with one hand. You should avoid purchasing products from manufacturers in China and Turkey - they traditionally do not differ in quality and durability and begin to leak immediately after installation.
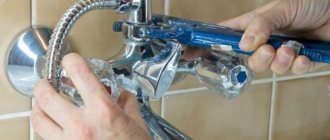
How can I install a faucet in the bathroom?
In the bathroom you can most often see mortise and wall-mounted appliances:
Bath faucets with shower on board
Recessed installation involves installing the faucet directly on the body of the bathtub or sink (their design usually already has holes).
Wall Mounted Bath Shower Faucets
Wall-mounted is a classic installation method in which the faucet is mounted on a wall panel, while the water supply pipes can be routed outside or hidden behind a wall, tiles or panels. The second option is more aesthetically pleasing, but more difficult to implement.
Floor standing bath and shower mixers
Owners of spacious bathrooms will appreciate faucets designed for floor installation; these are spectacular stand-mounted models.
Device
First of all, it is necessary to consider the design of the device, which is determined by its type. There are faucets with valves and with a cartridge. The former are characterized by the presence of two valves for supplying cold and hot water, respectively. The latter are equipped with a cartridge, which is controlled by one handle. Depending on the position of the latter, the temperature regime of the supplied water changes.
The bathroom device has a more complex design, since it involves connecting a shower hose and having a separate handle or button for supplying water through it. There are wall-mounted units that can be installed on the sink or the edge of the bathtub.
Despite the significant external differences between the mixers, their internal structure is not so diverse. Typical elements can have different sizes, which does not change the essence of their work. In the following, the most common problems with faucets will be discussed.
Valve mixers
In this case, the mixer device is very simple and it will be easier to repair it. Therefore, you can deal with this yourself.
The valve mixer device includes such elements.
- Frame.
- Spout.
- Valves.
- Crane axle boxes.
The valves are designed for manual control of the mixer, and the faucet axleboxes perform the function of supplying water. Older models are equipped with rubber gaskets to prevent faucet leakage, while more modern models are equipped with ceramic plates.
Weak stream when tap is open
One possible reason for this problem is clogged water pipes. This picture is more often observed in old houses.
You can check the condition of the pipeline in the following way. First, the cold and hot water supply valves are closed. Next, the mixer is dismantled. After which both valves are gradually opened in turn. If the water supply is poor, then the problem lies in the pipes. Otherwise, we are talking about a malfunction of the water supply device.
Read here: Modern apartment renovation, home and office: modern ideas and do-it-yourself design options
The next step is to disassemble the mixer for repair. The first step is to remove the aerator, which is a metal or plastic mesh located at the very exit from the gander.
Poor condition of pipes and hard water lead to the fact that this element quickly becomes clogged and begins to pass water poorly. After removal, it can be cleaned or completely removed from the water supply system.
Secondly, pay attention to the condition of the rubber gasket on the axle box. Use a sharp thin object to pry up the decorative cap on the tap, after which the fastening screw is unscrewed with a screwdriver. The axle box is unscrewed from the body using a wrench of the appropriate diameter.
The condition of the gasket will allow you to understand whether it is the cause of the channel blockage. The damaged part is replaced with a new one, and the mixer is assembled. The procedure is repeated for the second axle box.
Another reason could be dirt getting into the device. To correct the situation, it should be disassembled and washed.
Lever mixers
The design of such faucets includes a body, a spout (gander), a ceramic or ball cartridge, a control handle, and a nut that secures the cartridge in the body.
The ceramic cartridge performs the function of mixing water, and the control handle makes it possible to regulate the water pressure and its temperature. If there is a breakdown in the cartridge, you will have to replace it; it is not intended to be disassembled.
Our range:
6102 Shower mixer WasserKRAFT 6919 RUR
6301 Bath mixer with short spout WasserKRAFT 4789 RUR
7801 Bath mixer with short spout WasserKRAFT RUB 13,123
AGATHA External shower mixer, with hand shower, bronze RUB 5,023
How to fix a faucet with a cartridge?
Products of this type are much more convenient and reliable than their valve counterparts. The design of the faucet makes it possible to adjust the pressure and temperature of the water by moving the lever in the vertical and horizontal directions. The cartridges located in the mixer body are distinguished by their high cost, reliability and long service life.
But even such perfect products become unusable over time. They begin to leak, the pressure ceases to be regulated, the lever gets stuck in one position. To repair water taps quickly and efficiently, you should replace the faulty cartridge. You need to disassemble the mixer and remove the damaged part from it.
This is done like this:
- the decorative plug is disconnected;
- the lever moves up and is removed;
- the liner is removed from the grooves.
Advice! When heading to a hardware store, it is advisable to take the faulty cartridge with you. Thanks to this, the seller will be able to select a completely identical part. There will be no possibility of error. Before installing a new liner, you should thoroughly clean the faucet from dirt and treat it with silicone grease.
Required Tools
Before you repair the faucet in the bathroom, you need to prepare, for which you purchase the necessary tools and certain materials for the job, these include:
- aerator;
- rubber or plastic rings of suitable size;
- control handle;
- attractive looking plug;
- ceramic head, as well as a casing for it;
- adjustable and hex keys;
- knife, screwdriver and pliers;
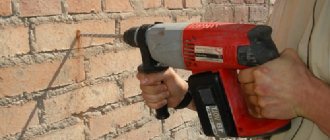
- drill and hammer.
Even a person with experience in repairing faucets or plumbing fixtures has these tools. Even without experience, you can handle repairs yourself to fix your item, but it is important to carefully study the instructions and purchase the tools necessary for this process.
What is needed for repair
Before you start repairing a kitchen faucet with your own hands, you need to prepare all the tools and necessary faucet components.
You will need:
- Hex wrench;
- Adjustment key;
- Cutter knife;
- Screwdriver and hammer.
Repairs also require additional materials - dry rags, lubricant. And if the faucet leaks, you will have to buy additional spare parts: a new cartridge or its parts (for a single-lever mixer), sealing rings, a faucet axle (for a two-valve design).
How to seal plumbing products
This question worries many novice craftsmen. There are several types of seals available; errors not only cause leaks, but can also completely damage the equipment.
What types of sealants are there and what do professional plumbers recommend?
Flax with sealing paste
The photo shows a strand of flax and a tube of paste
A traditional seal, but rarely used lately. Previously, oil paint was used instead of sealing paste. Remember that sealing paste has almost no effect on the quality of sealing, it only prevents the flax from rotting. This means that connections must be tightened with considerable force, and most modern plumbing equipment is made of silumin, a very weak alloy.
It is necessary to wind a flax flagellum onto the thread, recessing it into the turns of the thread, trying to ensure that the flax fibers are smeared in the paste
Result of thread sealing
Conclusion - such connections can only be used on durable steel fittings, because tightness is ensured not by lubrication, but by tightening force.
Another disadvantage of flax is that it cannot be completely covered with threads, and this worsens the appearance of the water fittings. And the last problem is that after using the sealing paste you must constantly dry your hands, otherwise unsightly stains will remain on the surface of the plastic pipes. For professionals, this is a significant loss of working time.
Paste is visible at the junction
FUM tape
A universal seal, used in most cases for internal installation of water supply and plumbing. To seal, there is no need to exert increased effort, which minimizes the risk of cracks forming on weak elements.
FUM tape
When purchasing, check the quality of the FUM tape; it should stretch a little and not tear.
FUM tape is available in convenient packaging, making it easy to use
The tape has two disadvantages - relatively high cost and the inability to adjust the position of the connection. If it becomes necessary to adjust the position of the connected elements by unscrewing, then you will have to completely disassemble them and make a new seal, taking into account the mistakes made.
How to wind ribbon correctly
Even a slight unscrewing back causes leaks. But for home use, this is the optimal sealant with an unlimited shelf life. To connect several fittings you will need a couple of meters of tape, and a skein has ten meters. One skein will last for several years.
Sealing thread
Sealing thread
In terms of its properties, there are many similarities with FUM tape. But it has one important advantage - manufacturers guarantee that when unscrewed back 180°, the threaded connection does not lose its original tightness. Although professional plumbers do not recommend unscrewing more than 90°, this ability makes using threads very convenient. Especially for those craftsmen who find it difficult to determine the correct position of the fittings by eye the first time. The cost of threads largely depends on the manufacturers, but it is always higher than that of tape.
The process of winding the seal does not require special skills
Anaerobic sealant
The most modern material, completely unknown to many non-professionals. Anaerobic sealants can be dismantled or difficult to dismantle. The former do not create much inconvenience during repair work. The latter must be heated before dismantling, and this can be quite difficult. Recommended for use in hard-to-reach places that make it difficult to tighten threaded connections with wrenches.
Anaerobic gel sealants
Advantages - the ability to adjust the position of the fittings; when unscrewing, the tightness is completely preserved. There are two disadvantages: high cost and the thread must be perfectly clean. Due to these features, anaerobic sealants are most often used during the installation of new plumbing systems and during the connection of new plumbing equipment. The high price pays off due to the significant acceleration of installation work.
Application of anaerobic sealant
All seals, when used correctly, provide 100% sealing. Find out the types of bathtubs and their sizes by following the link.
Pros and cons of suspended structures
As you have already seen, from a design point of view, hanging models are not inferior to floor-standing ones.
However, most of the benefits are on the technical side. Among the main advantages of a bidet with installation are the following:
- Comfortable location of the device relative to the toilet, sink or bathtub. To install the installation, you need a small area near the wall, and in some cases, in free space in any part of the bathroom. This makes it possible to embody the most unusual design ideas.
- Space optimization. Ergonomic and compact bidets, mounted at a certain height above the floor, occupy a minimum of usable space, that is, they are suitable for furnishing the interior of even small bathrooms or toilets.
- Possibility of easy maintenance of plumbing fixtures. The hanging units are accessible from all sides, making them very easy to clean. In addition, the floor under the devices screwed to the installation is free, which makes tidying up the room as easy as possible.
- Security for users. The metal frame, which is the main element of the installation, is designed for heavy loads. Modern designs can withstand weight in the range of 350-400 kg.
- Reliability. If installed correctly, neither the bidet bowl, nor the installation, nor the decorative screen are in any danger - the frame material and durable fasteners provide the necessary strength and functionality.
Another advantage will appeal to those who like to do home improvement with their own hands.
Thanks to detailed instructions with drawings and diagrams, which manufacturers always include with the design, you can install the hanging bidet yourself.
There are also disadvantages, and for some they are decisive when refusing to install a suspended model. For example, not all bathrooms have enough space to install a masking panel.
The second drawback is related to the complexity of repair work - sometimes it is necessary to dismantle the protective screen. But the main disadvantage is the prohibitive price of kits with installations for some categories of citizens, so they have to make do with economical floor-standing models.
Types of switches
The faucet switches to the shower using mechanisms that can be:
1.cork,
2. push-button,
3. cartridge,
4. spool valves.
The cartridge type of switch is considered the simplest and most widely used. Basically, the device breaks due to wear of the rubber seal in the form of a ring, which is located between the mixer lever and its body. The seal is affected by moisture and mechanical stress, so it wears out. Bad gaskets should be replaced with new ones by disassembling the device.
Some tips for prevention
Being able to repair your kitchen faucet yourself is a great way to save money. However, repairs cannot always completely restore the efficiency of the faucet, and it is often easier to simply replace the faucet in the kitchen.
Keep in mind that:
- The most durable structures are considered to be those made of heavy metals (brass);
- The lowest quality are Chinese or Turkish silumin products;
- The convenience of the single-lever device is obvious - it can be opened with one free hand. It is also easier to repair, since the design contains fewer spare parts.
- Faucet repairs can be prevented. Most often, the main cause of malfunctions is contaminants coming from the water main. Therefore, installing special coarse water filters will help you keep your faucet intact longer.
Support the project - share the material with your friends on social networks:
Mixer repair depending on the malfunction
Repairing a ball mixer or any other begins with determining the features and causes of failure. Based on the information received, a decision is made regarding what actions must be performed for repairs. It can break for the following reasons:
- low quality of the device, since certain manufacturers sell products made from low-quality and unsuitable materials, therefore repair of a ball mixer or other type of plumbing fixture is often required, therefore it is recommended not to initially save on such a purchase, so that there is no problem in constantly investing money and effort in troubleshooting;
- the use of short-lived and low-quality consumable items, for example, gaskets or other parts, since hard water or other exposure factors quickly lead to their destruction, which certainly requires DIY repair of the mixer, which consists of replacing the damaged element;
- improper installation will lead to leaks or other malfunctions of the plumbing fixture, so either the work is entrusted to specialists or done independently with strict adherence to the basic requirements and conditions for proper installation.
Bathroom ball faucets require repair most often, as they are considered popular and common.
Types of device:
- single lever mixer;
- two-valve;
- contactless.
Each type is mounted with its own characteristics, so a broken element will be repaired using a special method. Repairing a faucet spout differs from repairing the body or cartridge.
Crack in the body
Repair of a shower faucet or sink is often required due to the appearance of a crack on it. This is especially true for products made of brass; this material is not highly durable, like steel, for example. The mixer may leak due to the appearance of a crack located on the body. Repair work consisting of eliminating a crack is considered simple, but ineffective, since the leak can be dealt with quickly and easily, but for a short period of time. The crack is sealed with a special sealant, but the problem will only be solved temporarily, so the destruction of the case usually requires purchasing a new item soon.
Even a small crack on the mixer body can lead to replacement of the device
A sealant is used to repair the crack.
Gasket wear
When a leak occurs, the housing must first be inspected to ensure its integrity. If no cracks or other similar problems were found, then it is possible to determine what kind of repair the single-lever mixer needs, only after disassembling it.
How to change the gasket in a faucet? To do this, follow simple and consistent steps:
- initially the valves on the water supply pipes are closed;
- the tap drains completely;
- the inlets are unscrewed and water is poured into the bucket;
- the fixing nut is unscrewed, and if you have to work with a mixer installed in the kitchen, then the nut is usually located under the sink;
- it is important to carefully examine the gasket in the faucet in the bathroom or kitchen, as this will allow you to determine whether it is worn out or has cracks and deformations, since if it has any defects, it will certainly be replaced with a new gasket;
- After replacing the element, the crane is assembled.
Gaskets are inexpensive and accessible elements, however, when selecting them, the optimal diameter is taken into account, since the gasket must come out with force into the groove in the product, so it is advisable to have an old worn-out element with you during the selection process.
Cartridge clogged
Often, even after the gasket in the bathroom faucet is replaced with your own hands, the problem with leakage remains. Most often, the faucet cartridge needs repair. During the operation of a plumbing fixture, situations often arise when small objects get into the cartridge, leading to its failure. The only solution to the problem is to completely replace the element, so repairing a single-lever mixer is carried out using the following steps:
- water is blocked;
- the remaining water is drained from the system;
- the mixer is removed correctly;
- the plug is removed, and to do this it is enough to carefully pry it off with a screwdriver or knife;
- the screw is unscrewed and the lever is removed;
- the old cartridge that has failed is dismantled;
- a new element is installed in its place;
- the structure is being reassembled.
Thus, if you figure out how to repair bathroom faucets and their cartridge, then this work is done simply and quickly.
Weak water pressure
If the water pressure through the mixer has noticeably weakened, but the neighbors have remained the same, you should suspect, first of all, that the aerator filter located at the tip of the gander is clogged. You should unscrew it by hand or with pliers, and then check the pressure. If the pressure increased without an aerator, then the problem lay in its contamination. You need to carefully rinse it under running water, and then screw it back into place.
Tip: Often it is not the aerator itself that gets dirty, but the cleaning filter located at the entrance to the room. Therefore, if cleaning the aerator did not give anything, then unscrew the filter and check the cleanliness of its mesh.
We found out how to repair a bathroom faucet with a shower with your own hands. When using higher quality consumables, such problems will occur much less frequently.
Clogged water pipe or hose
If you cannot get rid of the problem even after cleaning the aerator, then there may be a blockage in the hose or pipe. This requires high-quality repair of the shower hose.
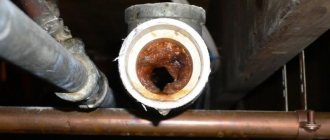
The problem most often occurs where metal pipes are installed. Rust deposits quite often occur on their inner walls, so it is necessary to clean the pipes. If you have the financial means, it is advisable to replace metal pipes with plastic ones, since they are of high quality and resistant to various negative factors.
Repairing a shower hose is also done by cleaning it, but if different methods do not help eliminate deposits, then the element has to be replaced.
Problems with the shower/tub switch
Often, bathrooms use a special design for switching between the faucet and the shower hose. To do this, you can lower the lever or perform other actions. Most often, water stops flowing to the shower when the switch lever drops spontaneously. At the same time, water is supplied exclusively to the tap, which reduces the comfort of using plumbing fixtures.
The cause of such a breakdown is usually the wear of the gasket used in the spool, so this element is initially inspected. If only the top gasket is worn out, then repairs do not require dismantling the mixer, but it is quite difficult to find out the reason. To do this, follow these steps:
- the hose is removed, for which you need to unscrew the union nut, since it is this that attaches the hose;
- Using a hook or awl, carefully pull out the gasket;
- the new element is moistened with water and installed in the desired place;
- The mechanism is being assembled.
If after this the problem still remains, then replace the lower gasket:
- the water supply to the system is shut off;
- the flexible hose is removed, for which you need to unscrew the union nut;
- the spout and adapter are removed;
- the switch is eliminated;
- the eccentric is pulled out;
- gets the spool;
- the bottom gasket is pulled out, for which a thin hook is used;
- a new pre-wetted element is installed in its place;
- the structure is assembled.
The faucet being repaired must certainly be equipped with suitable gaskets, and you can make them yourself using hard rubber, the width of which is 4 mm.
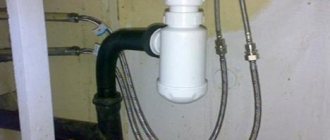
Leakage from gander clamp nut
If a leak is detected in the clamping nut, then the repair is considered simple:
- the main valve is closed;
- the clamping nut is unscrewed using a wrench or pliers;
- the gander and the gasket under it are removed;
- a new gasket is installed;
- the mechanism is assembled.
Basic faults
Before repairing a water faucet, you should take the time to analyze the situation. This way we can understand exactly what actions should be taken, thereby saving a lot of time.
Leakage is the most common problem
The list of breakdowns includes the following items:
| Breaking | Description |
| When the valve is closed, drops of water flow out of the tap | The locking mechanism becomes unusable. To fix the problem, it is necessary to either replace the element responsible for blocking the pipe clearance, or install new sealing gaskets. |
| Water drips at the connection point of the spout, hose or valve | The tightness of the connection is broken. It can be restored either by replacing the gasket or by installing a plumbing tap on the thread. |
| The flywheel turns | The flywheel housing has come off the rod or the rod has failed. In the first case, it is enough to install the part in place, in the second, you will have to replace the locking element. |
| The faucet makes a humming sound when operating | The gasket has worn out and its edges begin to vibrate under water pressure. Usually, to eliminate extraneous sounds, it is enough to replace the gasket. |
| Leak on body or spout | The integrity of the product has been compromised. It can be temporarily sealed using “cold welding”, but it is worth replacing the faucet as soon as possible. |
| Splashes fly from the aerator, water flow is obstructed. | The aerator grille is clogged and requires cleaning. |
In principle, this table describes the main faults. Other situations that may arise during the operation of the crane are derivatives of those already analyzed, and therefore they need to be repaired using a similar algorithm.
But such cracks cannot be repaired
Also, before starting work, you should carefully familiarize yourself with the design features of the model you have installed. As a rule, the assembly drawing of the water tap comes complete with the product itself, so when installing a new mixer, this document should be kept.
Note! If you can’t find a diagram, then you should enter the query “assembly drawing method for indicating a water tap” into a search engine and select your model. Most manufacturers post technical documentation online, so the chance of finding what you need is very high.
Now we will try to figure out what to do in each specific case. And let's start with the most common situation, namely, eliminating the causes of leakage of the shut-off element.
Drawing of a water tap body and a schematic representation of shut-off elements
Disassembling the mixer
It is recommended to call a specialist. You should only troubleshoot problems yourself if you have experience in performing repair work. You can repair the plumbing in the bathroom with your own hands if there are leaks under the gib, lever, valve, fastening nut, or at the junction of the hose with the shower. You must first prepare spare parts to replace faulty elements with new ones. If the breakdown occurs inside the cartridge, it will not be possible to repair individual parts. The entire part will have to be replaced. If there is a malfunction in the lever area, the device is disassembled, starting with removing the plug. It is marked with red and blue colors. Then you need to unscrew the mounting bolt and remove the lever. Afterwards, remove the cartridge and place a new one in its place. Assembly is carried out in reverse order.
If the breakdown occurs due to wear of the gasket, you will have to unscrew the clamping nut using an adjustable wrench. Then they remove the gander, remove the damaged part, and install a new one in its place. It is recommended to install FMU tape on the thread. Then the assembly is carried out. You will have to act carefully so as not to break the thread. The process takes no more than 30 minutes. Before disassembling, be sure to shut off the access to liquid. Otherwise, you can flood the bathroom and flood your neighbors. Carefully study the instructions for use and the device diagram before starting repair work, so that during assembly each element is installed in the correct place.
Ball and cartridge models
Dismantling the crane
The design of the water tap and mixer, which is controlled by one lever, differs from the axle-box design.
Accordingly, the dismantling of such a product for repair must be performed according to a different scheme:
Unscrew the screw
- First, lift up the red and blue trim on the front panel.
- Under the cover there is usually a screw for a Phillips screwdriver or hexagon - unscrew it.
- Next, remove the handle, carefully disconnecting it from the rod of the ball or cartridge locking mechanism.
- The next stage is to provide access to the fittings themselves. To do this, you need to unscrew one or two nuts.
Note! Very often, manufacturers make an internal locking nut with grooves for a special tool. You can either purchase a similar wrench, or try to unscrew the part yourself, using improvised tools.
Unscrewing the nut with a special tool
By removing the nut, we gain access to either the cartridge or the ball valve. They are dismantled quite simply, and replacement will not cause difficulties.
Replacing locking and sealing elements
Repair kit for ball mixer
To restore the functionality of a single-lever mixer, most often you need to completely change the functional element.
The instructions recommend doing this:
- We remove the cartridge from the socket by pulling it vertically up along the guides. If a part is skewed, you can correct its position with a slight side impact.
- We clean the cavity under the cartridge from rust and debris, which may cause seal failure.
- We install a new cartridge, secure it with one nut and check how well it shuts off the water. If there are no leaks and the adjustment works properly, we assemble the mixer.
Cartridge removed from slot
Ball valves have their own characteristics. Their main advantage is that the ball itself breaks extremely rarely, so repairs usually involve replacing the gaskets. We proceed like this:
- Holding the rod, remove the ball from the socket.
- Using tweezers or small pliers, remove the spring-loaded gaskets that press the ball to the body.
Removing the sealing elements
- We replace the gaskets, and then install the ball in place.
- We place a new sealing ring on top and clamp the valve with a union nut for the mixer.
- As in previous cases, it is better to check the tightness of the structure before complete assembly.
The basic operating principle of the touch faucet
Undoubtedly, the price for sensor faucets, which is set by manufacturers, may seem overpriced. But such a purchase can be compared to an investment in your own comfort, and you must also remember that such investments pay off thanks to the economical consumption of energy resources spent on ensuring household comfort.
In appearance, the crane may not differ from a regular one, but at the same time it is equipped with sensors of different sensitivity and range of action.
To configure the operating ranges of the sensor, automatic operating modes are used, or you can enter the following parameters manually:
- sensitivity radius and distance from the object to the sensor;
- temporary pause between data reading and water supply.
When a hand or toothbrush enters the sensor's working area, it turns on the water supply, allowing you to wash your hands or wash your face.
The ability to fine-tune operational parameters is provided in fairly expensive models of this unique device.
Types of bathroom faucets
As a rule, models of three categories are used in bathrooms:
- traditional two-valve taps;
- common single-lever devices;
- innovative sensor faucets.
For many decades, homes have been equipped with two-handle faucets. Such devices are equipped with two handwheel handles, one of which is intended for hot water, and the second for cold water.
As a locking mechanism, older models used a system of a seat and a valve on a stem equipped with a rubber gasket. When the valve was tightened, the valve closed off the seat, which provided a path for the water to flow.
The stem with the valve had to be screwed in, then unscrewed - this was time-consuming and inconvenient. Instead, they now use a metal valve axle box or a device made of a pair of ceramic disks.
Although two-valve models with a ceramic block are more expensive than devices with rubber gaskets, they have a number of important advantages. They are easier to operate, more durable and reliable
Single-lever options have now become very popular. Lever or joystick mixers have one shut-off and control mechanism that controls mixing, supply, and pressure of hot/cold water.
Based on the locking unit, the range of such mixers can be divided into two categories:
- with ball block;
- with disk cartridge.
The second option looks preferable due to its lower cost and maintainability. Its locking mechanism, similar to valve devices, includes two ceramic discs with holes for mixing and shutting off water flows. If it fails, replacing the cartridge is quite simple.
Single-lever ball faucets are more expensive, and they cannot be repaired due to the difficulty of finding the locking mechanism. Plumbing stores rarely offer it.
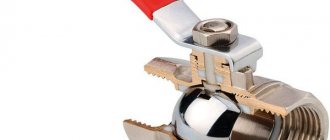
But ball valves, installed on hot water and cold water pipes in front of plumbing to shut off the flow in case of repairs, have almost completely replaced obsolete valves.
It is almost impossible to distinguish a ball mixer from a cartridge mixer by appearance
In order not to make a mistake when purchasing, it is important to pay attention to the internal structure of the model indicated in the technical data sheet, or ask the seller. The control element of a touch-sensitive faucet for a kitchen or bath with shower is a photocell, which turns on a stream of water when you bring your hands to the tap and turns it off when you remove them. Repairing such plumbing requires experience and knowledge not only in the field of plumbing
Repairing such plumbing requires experience and knowledge not only in the field of plumbing
The control element of a touch-sensitive faucet for a kitchen or bath with shower is a photocell, which turns on a stream of water when you bring your hands to the tap and turns it off when you remove them. Repairing such plumbing requires experience and knowledge not only in the field of plumbing.
An exception to the rule is a clogged aerator, which manifests itself in a weakening of water flow. This problem, which we will discuss in detail below, can be easily fixed by yourself.
Causes of malfunctions of touchless faucets
There is only one reason for this, because this type is considered the most reliable: there are no components subject to mechanical stress. Manufacturers provide warranties for these devices for at least five years.
Repairing touchless faucets is never an easy task. Breakdowns in them most often occur due to the failure of the sensors responsible for the flow of water. It is difficult to fix on your own; it would be wiser to delegate this work to a specialist.
There is a high probability that the cause of faucet failure may be too hard water, which contains an excessive amount of iron salts.
The most common breakdowns:
- The water jet is very thin. The simplest fault that can be easily fixed. Most often, this occurs when the aerator fails. The aerator is usually made of metal or plastic;
- Switching between water supply modes is difficult. In this case, the switching mechanism is repaired.
How to fix damage yourself
To repair an improperly functioning ball valve you will need:
- adjustable wrench;
- hexagon;
- pliers;
- flat screwdriver.
Additionally, it is recommended to purchase rubber gaskets in advance. These components wear out quickly, causing the main problems with ball mixers. Before starting work, you must turn off the water supply and drain the remainder from the tap. When carrying out repairs, you need to pay attention to how the components of the ball mixer are installed. Often, after completing the procedure, the cartridge begins to work incorrectly. This happens because the rubber gasket located at the bottom interferes with the normal flow of water.
Do not use force when tightening nuts and bolts. If the parts are pinched, the handle will have difficulty moving. And in extreme cases, this accelerates the wear of internal components and causes cracks to appear in the metal casing.
Leak
Leaking is the most common problem with faucets. This failure occurs due to abrasion of the rubber gaskets. This happens for natural reasons or due to small particles getting into the turning mechanism. In the latter case, damage to the ball is possible, which leads to similar consequences.
To repair a ball valve, you will first need to determine the cause of the leak. Before disassembling the mixer, it is recommended to tighten the structure along the threads with an adjustable wrench. If this procedure does not bring the desired result, you will have to disassemble the tap.
After performing this procedure, you need to clean the parts from plaque and small particles. If the ball fails or the gaskets wear out, these parts must be replaced with new ones. The faucet is assembled in the reverse order.
Crack
If a crack appears, the part will have to be replaced. But if the defect is small, then cold welding can correct the situation. This product must be applied to a previously degreased surface (the material is treated with acetone or alcohol). Cold welding gives a temporary effect. Therefore, you will have to purchase a new faucet later.
Valve problems
Problems with the valve arise due to component failures or clogging. To repair the handle, the handle must be removed following the above algorithm and the internal parts cleaned. After this, you must either replace the faulty components or tighten the valve with an adjustable wrench.
Reduced water pressure
This problem occurs for two reasons: low pressure in the water supply or clogged pipes. Before disassembling the mixer, you must open the taps in other rooms. If the pressure is weak there, then you can correct the situation by calling the housing and communal services. Otherwise, you will have to disassemble the mixer and clean the parts through which water flows. You also need to unscrew and pour a solution into the hoses that dissolves blockages.
Inability to adjust temperature
If the temperature of the stream changes chaotically, then the cause of the malfunction should be sought in the lower part of the mixer. This problem occurs due to the appearance of a gap between the ball and the rubber seats. It is impossible to eliminate such a malfunction using improvised means (sealant or other). In this case, you will have to replace the ball cartridge and rubber gaskets.
A sharp change in water temperature is due to low quality water, which contains many impurities or is characterized by increased hardness. Therefore, before purchasing a mixer, you need to study the mixer data sheet. Manufacturers usually indicate the recommended water hardness. Also, to avoid early breakdowns of faucets, a filter should be installed.
Noise during operation
The noise that occurs immediately after opening the valve is typical of old taps. The causes of this problem lie in worn gaskets. Over time, the rubber begins to move away from the stock under the influence of air currents and water. As a result, noise occurs due to vibration of the gaskets.
Replacing the valve flywheel
It should be remembered that the crane flywheel
can only be replaced with a similar one.
Its inner surface is shaped in such a way as to prevent the lock washer
.
READ ALSO: How and what to cut threads on a metal pipe
Sometimes screw
, securing
the flywheel
, does not turn.
Then you should hit the end of the screwdriver with the blade in the screw slot 3-4 times. If the screw does not budge in this case, unscrew the head
and break
the flywheel
if it is earthenware, or cut it with a hacksaw if it is plastic.
Now the faceted end of the rod
You can place the edge on the hammer head and hit the opposite edge with another hammer.
After this, you should unscrew the screw
with pliers.
If it breaks off, you can grind off the protruding part of the screw with a file, tap the end of the screw, drill and cut a new thread
.
Replacing the valve stem
Please remember that the head housing
is also not eternal, but the thread along which
the rod thread
wears out more slowly.
Therefore, the body can withstand two or three rod
.
When changing the rod
, perform the following steps:
- first of all, you should turn off the water;
- then open the tap to check whether water is flowing or not;
- if there is no water, turn out the tap head with a wrench or an adjustable wrench;
- the flywheel on the rod can be dismountable;
- The cap must be removed from the stem, otherwise the jaws of the key will not be able to cover the edges of the head.
Slitting valves
have some tricks in repair:
- first you need to shut off the flow of water to the head with a valve; it can be located here, under the washbasin;
- after this, you should unscrew the valve head, first turning the stem out a little;
- the flywheel must then be removed;
- after separating the valve head from the body, push out the lock washer;
- then you need to press the tetrahedral end of the rod on which the flywheel is fixed;
- the rod and spindle should come out of the head housing.
Sometimes, in order to disassemble the valve head, you have to hit the end of the stem on a wooden board.
ATTENTION! Under no circumstances should you strike with the end of the rod.
on any steel object, because
the edges and first threads
will become clogged .
After disassembly into the annular grooves of the rod
you should put on new
oil seals
, removing the old worn ones.
The rod and spindle
will fit into the body more easily if you lightly lubricate the protruding parts of the new
seals
. If they are missing, you can wind a few threads under the existing ones, preferably linen.
READ ALSO: What is an axial fan
Another option is possible - rings
and install them instead of
the old seals
.
One of the troubles is worn out rod threads
.
In this case, the flywheel
begins to rotate.
The best solution is to install a new rod
. To do this you need:
- disassemble (unscrew) the head and push out the faulty rod;
- after this, a new rod should be inserted;
- screw in the head.
Rod with spindle
They will fit into the housing more easily if you lightly
lubricate
the protruding parts of the oil seal.
rod at hand
, then you can get by with temporary measures.
For example, attach a flywheel
to the faucet body with wire.
True, it will no longer be possible to use it, but at least until the stem
with a new one
the tap
will not leak.
There are other ways to temporarily get rid of a leak. Let's say on the stock
There's still a little bit of the whole carving left.
Then you can install a gasket
on the valve stem and
the valve
will protrude more from
the stem
. You can also use wire or washers for this purpose.
Useful advice - if the valve stem
It is better not to repair it, but simply replace it with a new one.
Faucet care: how to extend its service life
A little about how to postpone faucet repair for a long time. One of the simple solutions is to monitor the quality of water supplied to the mixer using modern mechanical filters. Solid particles of sand and pebbles will not spoil the parts, and they will work much longer.
It is recommended to install coarse filters at the beginning of a fork in the residential water supply. Today, a self-cleaning filter is available to consumers. All filtered sediments from it are sent directly to the sewer.
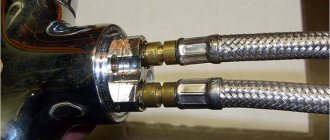
It is not always possible to install a large filter. Where it is not available, the mixer itself is connected to connecting taps, where cleaning filters are already built-in.
There are filters that help reduce water hardness. This is important for ceramic faucets, since they suffer more than others due to the presence of salt deposits in the water.
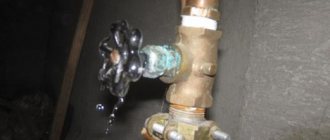
And finally, advice from experienced plumbers. If the pipes hum when you turn on the mixer, you need to check how well they are fixed and, if necessary, secure them with clamps.
In some cases, the humming is caused by high pressure in the pipes, then it will be necessary to install a special reducer to reduce the pressure. Often this noise is caused by worn valve gaskets; after replacement it disappears.
On our website there is a whole article devoted to the problem of humming pipes, we recommend you read it.
Leaks and their varieties
If water leaks from under the valve, then damage or wear of the o-ring is the main cause of this problem. It can be eliminated by replacing the ring, for which you need to unscrew the axle box from the seat with a key.
In the case where a leak is detected near the place where the gib is attached to the mixer body, the reason is the same - wear of the o-ring. To correct the situation, you will need to unscrew the gib and replace the old ring, and then return the element to its place.
If there is a crack in the case, then there are two scenarios. The first involves disassembling the device and replacing the cracked element if it is available for sale. The second option involves a complete replacement of the device.
Ceiling repair: selection of materials and current methods of ceiling design. 95 photos of modern ideas- Beige curtains: popular options for curtain shades, photos of new designs and combinations
Plastic window repair: do-it-yourself window adjustment and restoration. Features and basic rules of repair
How to fix a leaking faucet
Let’s say right away that in most cases there are no difficulties in replacing a leaking faucet, but beginners still often encounter some problems. However, preliminary preparation and strict adherence to step-by-step instructions will help cope with leaks and significantly increase the service life of the mixer.
In principle, repairing a faucet yourself is not such a difficult task.
Seal or replace the seal in the valve
As soon as you discover that the valve has begun to leak
, it is necessary to tighten
the union nut
in order to
seal the oil seal
.
However, by tightening the nut over and over again, you will eventually tighten the nut all the way, but the flow will continue; you should not try to tighten the nut even more. You can simply rip off the nut along with the valve
. You can also clamp the stem.
This problem can be solved by ADDING PACKING (seal) to the oil seal.
. To do this, you do not need to shut off the water in the pipe in front of the valve. Certain safety measures must be taken:
- screw the valve handwheel until it stops;
- open any tap on this pipe located after the valve;
- fully open the union nut that clamps the oil seal, holding the valve handwheel in place;
- remove the flywheel, making sure that the rod remains motionless.
ATTENTION! must not be disassembled in the open position.
, otherwise the water will easily
squeeze out the seal
and cause you a small flood.
If everything is fine, proceed further:
- remove the union nut and remove the oil seal bushing;
- then place the seal into the resulting gap, carefully wrapping it around the rod;
- compact the sealant after each turn;
- it is necessary to leave space in the gap for the bushing;
- Insert the sleeve so that there is room left to tighten the union nut.
READ ALSO: How to strengthen a toilet to a tile, concrete, or wood floor
It should be taken into account that with less contact you can break
first or second
thread of thread
.
This is not so bad for the valve. You just have to clear the gap from the seal
so that the remaining part of the thread can be used.
But for further tightening of the union nut, during operation of the valve, there will be no thread left.
Sometimes on the valve stem
located at the entrance to the apartment, drops appear.
The rod
is completely unscrewed and, together with the valve (shutter),
is stuck
to the housing head.
Applying too much force to the flywheel may cause the rod to break.
.
To eliminate leaks
You will have to either completely tighten
the union nut
, or, holding the flywheel firmly with the palm of your hand, completely unscrew the union nut and screw
the seal
, concentrating it around
the rod
.
ATTENTION! It should be remembered that the bushing cannot be removed
, because the water pressure in the valve
can squeeze out the seal, and water will hit through the gap
.
Water may also ooze from under the oil seal bushing.
in valves with a rotary-forward movement of the rod.
TWIST the bushing slightly past the edge
with an adjustable wrench or wrench.
ATTENTION! Don't use pliers here - you'll cut off the edges
.
If the bushing is tightened to the limit, and water continues to ooze from the closed tap, then REFILL the seal.
, i.e.
replace the oil seal. The main part in the valve is the seal
.
It depends on it whether the valve will leak or not. The valve is open almost constantly, because We use water all the time. Therefore, the seal
must be tightly packed.
Grinding in shut-off valves without removing them:
- remove the oil seal and the old packing and unscrew the nuts;
- clean the oil seal from the old packing;
- prepare new gaskets similar to the old gaskets or take ready-made new gaskets and fill the oil seal;
- put the oil seal in place and tighten the nuts;
- If necessary, grind in the plug valve and the valve at the valve.
Flywheel
The valve together with
the stem
must occupy the extreme position permissible when turned out. If this is not done, water will begin to ooze from under the union nut.
But sometimes cases arise when the valve must be partially closed, for example, in front of the cistern on the first floors of high-rise buildings.
Partial opening of the valve is possible if the stuffing box is sufficiently stuffed. In this case, it is necessary to periodically inspect the valves
.
Water supply with the tap closed
If problems arise with the valve mixer, you should remove the axle boxes and replace the rubber gaskets. Sometimes spare gaskets and seals are included. It is advisable to keep them to avoid unnecessary expenses on buying new ones.
If we are talking about a cartridge, then the entire part requires replacement. When purchasing, you should take into account the fact that the cartridges have different sizes, so it is advisable to take the entire mixer to the store.